2013 CHEVROLET MALIBU tow
[x] Cancel search: towPage 268 of 436

Black plate (2,1)Chevrolet Malibu Owner Manual - 2013 - CRC - 6/6/12
10-2 Vehicle Care
Tire Pressure MonitorSystem . . . . . . . . . . . . . . . . . . . 10-54
Tire Pressure Monitor Operation . . . . . . . . . . . . . . . . . 10-55
Tire Inspection . . . . . . . . . . . . . . 10-58
Tire Rotation . . . . . . . . . . . . . . . 10-59
When It Is Time for New
Tires . . . . . . . . . . . . . . . . . . . . . . 10-60
Buying New Tires . . . . . . . . . . . 10-61
Different Size Tires and Wheels . . . . . . . . . . . . . . . . . . . 10-62
Uniform Tire Quality Grading . . . . . . . . . . . . . . . . . . . 10-63
Wheel Alignment and Tire Balance . . . . . . . . . . . . . . . . . . . 10-65
Wheel Replacement . . . . . . . . 10-65
Tire Chains . . . . . . . . . . . . . . . . . 10-66
If a Tire Goes Flat . . . . . . . . . . 10-66
Tire Sealant and Compressor Kit (With Pressure Relief
Button) . . . . . . . . . . . . . . . . . . . . 10-68
Tire Sealant and Compressor Kit (With Pressure Deflation
Button) . . . . . . . . . . . . . . . . . . . . 10-75
Storing the Tire Sealant and Compressor Kit . . . . . . . . . . . 10-83
Tire Changing . . . . . . . . . . . . . . 10-84
Compact Spare Tire . . . . . . . . 10-89Jump Starting
Jump Starting (On-board with eAssist Only) . . . . . . . . . 10-90
Jump Starting (with or without eAssist) . . . . . . . . . . . 10-92
Towing
Towing the Vehicle . . . . . . . . . 10-95
Recreational VehicleTowing . . . . . . . . . . . . . . . . . . . . 10-95
Appearance Care
Exterior Care . . . . . . . . . . . . . . . 10-97
Interior Care . . . . . . . . . . . . . . . 10-100
Floor Mats . . . . . . . . . . . . . . . . 10-103
General Information
For service and parts needs, visit
your dealer. You will receive
genuine GM parts and GM-trained
and supported service people.
Genuine GM parts have one of
these marks:
Page 271 of 436
Black plate (5,1)Chevrolet Malibu Owner Manual - 2013 - CRC - 6/6/12
Vehicle Care 10-5
Hood
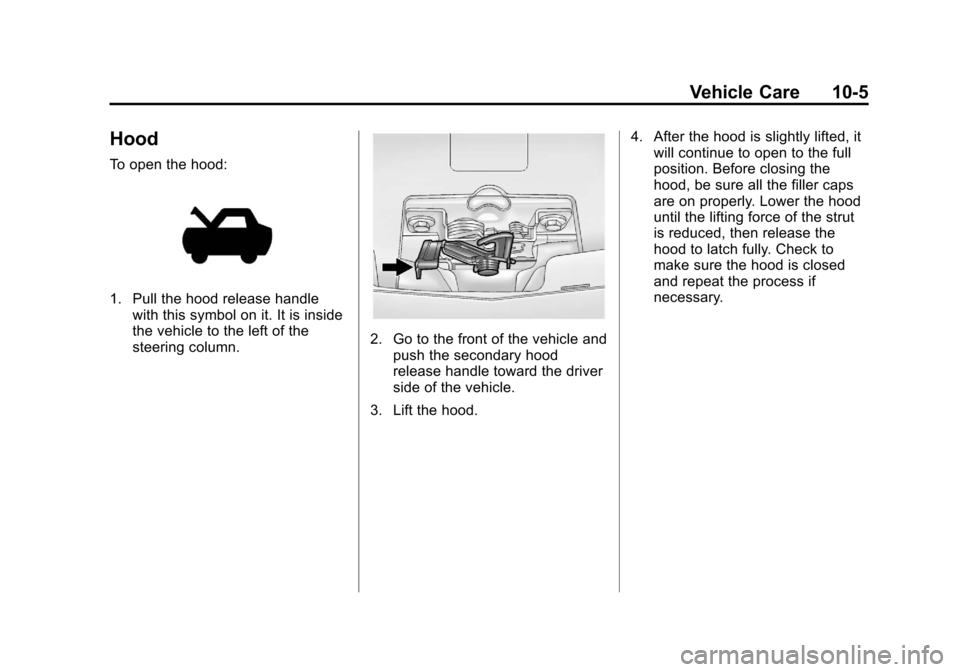
To open the hood:
1. Pull the hood release handlewith this symbol on it. It is inside
the vehicle to the left of the
steering column.
2. Go to the front of the vehicle andpush the secondary hood
release handle toward the driver
side of the vehicle.
3. Lift the hood. 4. After the hood is slightly lifted, it
will continue to open to the full
position. Before closing the
hood, be sure all the filler caps
are on properly. Lower the hood
until the lifting force of the strut
is reduced, then release the
hood to latch fully. Check to
make sure the hood is closed
and repeat the process if
necessary.
Page 277 of 436
Black plate (11,1)Chevrolet Malibu Owner Manual - 2013 - CRC - 6/6/12
Vehicle Care 10-11
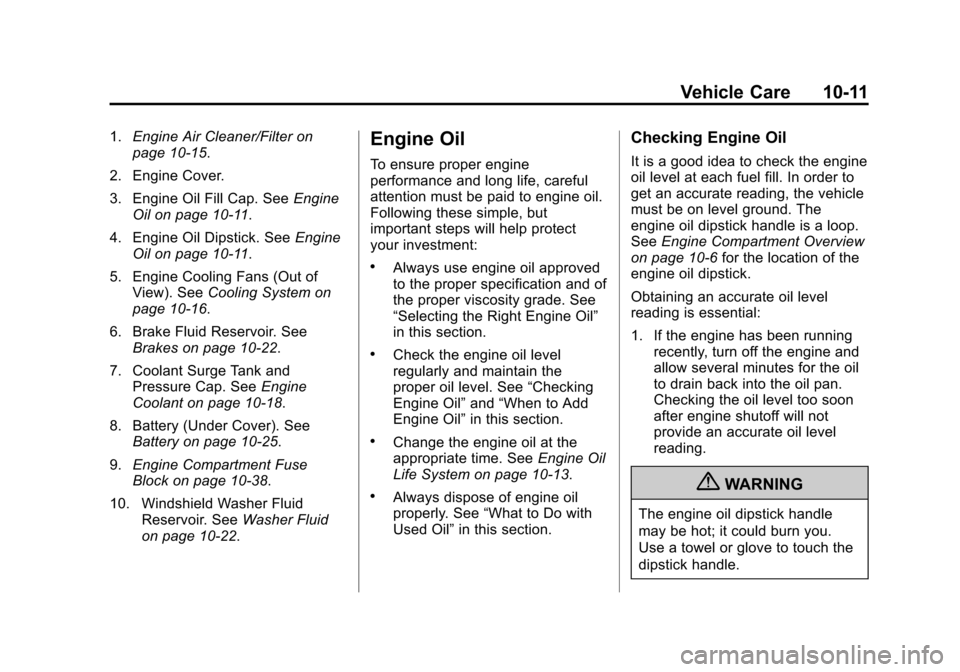
1.Engine Air Cleaner/Filter on
page 10‑15.
2. Engine Cover.
3. Engine Oil Fill Cap. See Engine
Oil on page 10‑11.
4. Engine Oil Dipstick. See Engine
Oil on page 10‑11.
5. Engine Cooling Fans (Out of View). See Cooling System on
page 10‑16.
6. Brake Fluid Reservoir. See Brakes on page 10‑22.
7. Coolant Surge Tank and Pressure Cap. See Engine
Coolant on page 10‑18.
8. Battery (Under Cover). See Battery on page 10‑25.
9. Engine Compartment Fuse
Block on page 10‑38.
10. Windshield Washer Fluid Reservoir. See Washer Fluid
on page 10‑22.Engine Oil
To ensure proper engine
performance and long life, careful
attention must be paid to engine oil.
Following these simple, but
important steps will help protect
your investment:
.Always use engine oil approved
to the proper specification and of
the proper viscosity grade. See
“Selecting the Right Engine Oil”
in this section.
.Check the engine oil level
regularly and maintain the
proper oil level. See “Checking
Engine Oil” and“When to Add
Engine Oil” in this section.
.Change the engine oil at the
appropriate time. See Engine Oil
Life System on page 10‑13.
.Always dispose of engine oil
properly. See “What to Do with
Used Oil” in this section.
Checking Engine Oil
It is a good idea to check the engine
oil level at each fuel fill. In order to
get an accurate reading, the vehicle
must be on level ground. The
engine oil dipstick handle is a loop.
SeeEngine Compartment Overview
on page 10‑6 for the location of the
engine oil dipstick.
Obtaining an accurate oil level
reading is essential:
1. If the engine has been running recently, turn off the engine and
allow several minutes for the oil
to drain back into the oil pan.
Checking the oil level too soon
after engine shutoff will not
provide an accurate oil level
reading.
{WARNING
The engine oil dipstick handle
may be hot; it could burn you.
Use a towel or glove to touch the
dipstick handle.
Page 278 of 436

Black plate (12,1)Chevrolet Malibu Owner Manual - 2013 - CRC - 6/6/12
10-12 Vehicle Care
2. Pull out the dipstick and clean itwith a paper towel or cloth, then
push it back in all the way.
Remove it again, keeping the tip
down, and check the level.
When to Add Engine Oil
If the oil is below the MIN
(minimum) mark, add 1 L (1 qt) of
the recommended oil and then
recheck the level. See “Selecting
the Right Engine Oil” in this section
for an explanation of what kind of oil
to use. For engine oil crankcase
capacity, see Capacities and
Specifications on page 12‑2.
Notice: Do not add too much oil.
Oil levels above or below the
acceptable operating range
shown on the dipstick are harmful
to the engine. If you find that you have an oil level above the
operating range, i.e., the engine
has so much oil that the oil level
gets above the upper mark that
shows the proper operating
range, the engine could be
damaged. You should drain out
the excess oil or limit driving of
the vehicle and seek a service
professional to remove the
excess amount of oil.
See
Engine Compartment Overview
on page 10‑6 for the location of the
engine oil fill cap.
Add enough oil to put the level
somewhere in the proper operating
range. Push the dipstick all the way
back in when through.
Selecting the Right Engine Oil
Selecting the right engine oil
depends on both the proper oil
specification and viscosity grade.
See Recommended Fluids and
Lubricants on page 11‑12. Specification
Use and ask for licensed engine
oils with the dexos1® approved
certification mark. Engine oils
meeting the requirements for the
vehicle should have the dexos1
approved certification mark. This
certification mark indicates that the
oil has been approved to the dexos1
specification.
Notice:
Failure to use the
recommended engine oil or
equivalent can result in engine
damage not covered by the
vehicle warranty. Check with your
dealer or service provider on
whether the oil is approved to the
dexos1 specification.
Page 281 of 436
Black plate (15,1)Chevrolet Malibu Owner Manual - 2013 - CRC - 6/6/12
Vehicle Care 10-15
Engine Air Cleaner/Filter
The engine air cleaner/filter is in the
engine compartment on the
passenger side of the vehicle. See
Engine Compartment Overview on
page 10‑6for more information on
location.
When to Inspect the Engine Air
Cleaner/Filter
Inspect the air cleaner/filter at the
scheduled maintenance intervals
and replace it at the first oil change
after each 80 000 km (50,000 mi)
interval. See Maintenance Schedule
on page 11‑2. If you are driving in
dusty/dirty conditions, inspect the
filter at each engine oil change.
How to Inspect the Engine Air
Cleaner/Filter
To inspect the air cleaner/filter,
remove the filter from the vehicle
and lightly shake the filter to release
loose dust and dirt. If the filter
remains covered with dirt, a new
filter is required. To inspect or replace the engine air
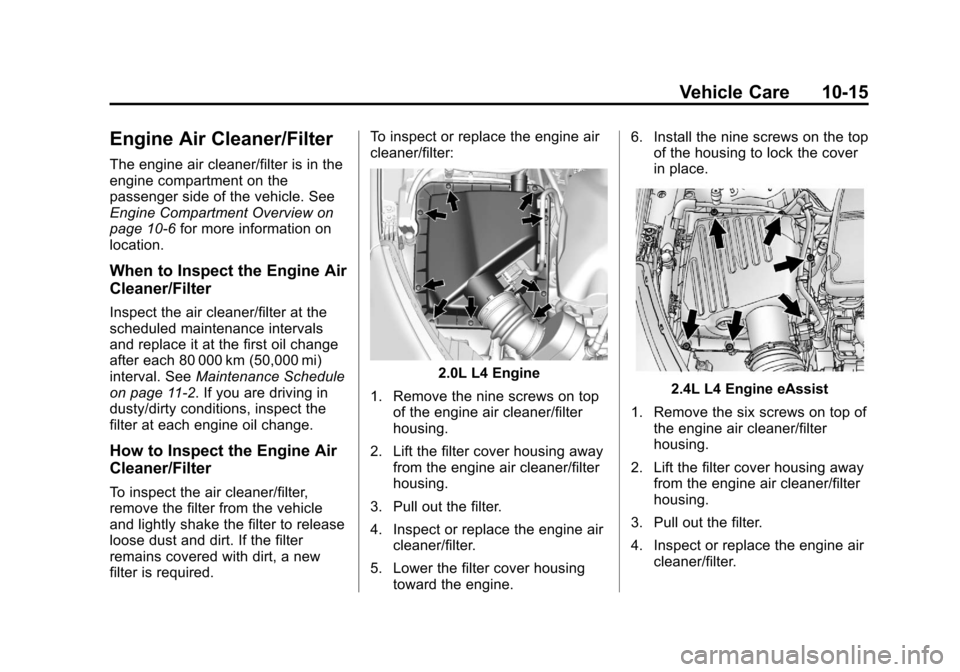
cleaner/filter:
2.0L L4 Engine
1. Remove the nine screws on top of the engine air cleaner/filter
housing.
2. Lift the filter cover housing away from the engine air cleaner/filter
housing.
3. Pull out the filter.
4. Inspect or replace the engine air cleaner/filter.
5. Lower the filter cover housing toward the engine. 6. Install the nine screws on the top
of the housing to lock the cover
in place.2.4L L4 Engine eAssist
1. Remove the six screws on top of the engine air cleaner/filter
housing.
2. Lift the filter cover housing away from the engine air cleaner/filter
housing.
3. Pull out the filter.
4. Inspect or replace the engine air cleaner/filter.
Page 282 of 436

Black plate (16,1)Chevrolet Malibu Owner Manual - 2013 - CRC - 6/6/12
10-16 Vehicle Care
5. Lower the filter cover housingtoward the engine.
6. Install the six screws on the top of the housing to lock the cover
in place.
2.5L L4 Engine
1. Remove the five screws on top of the engine air cleaner/filter
housing.
2. Lift the filter cover housing away from the engine air cleaner/filter
housing.
3. Pull out the filter. 4. Inspect or replace the engine air
cleaner/filter.
5. Lower the filter cover housing toward the engine.
6. Install the five screws on the top of the housing to lock the cover
in place.
{WARNING
Operating the engine with the air
cleaner/filter off can cause you or
others to be burned. The air
cleaner not only cleans the air; it
helps to stop flames if the engine
backfires. Use caution when
working on the engine and do not
drive with the air cleaner/filter off.
Notice: If the air cleaner/filter is
off, dirt can easily get into the
engine, which could damage it.
Always have the air cleaner/filter
in place when you are driving.
Cooling System
The cooling system allows the
engine to maintain the correct
working temperature.
2.0L L4 Engine
1. Engine Cooling Fans (Out of View)
2. Coolant Surge Tank and Pressure Cap
Page 294 of 436
Black plate (28,1)Chevrolet Malibu Owner Manual - 2013 - CRC - 6/6/12
10-28 Vehicle Care
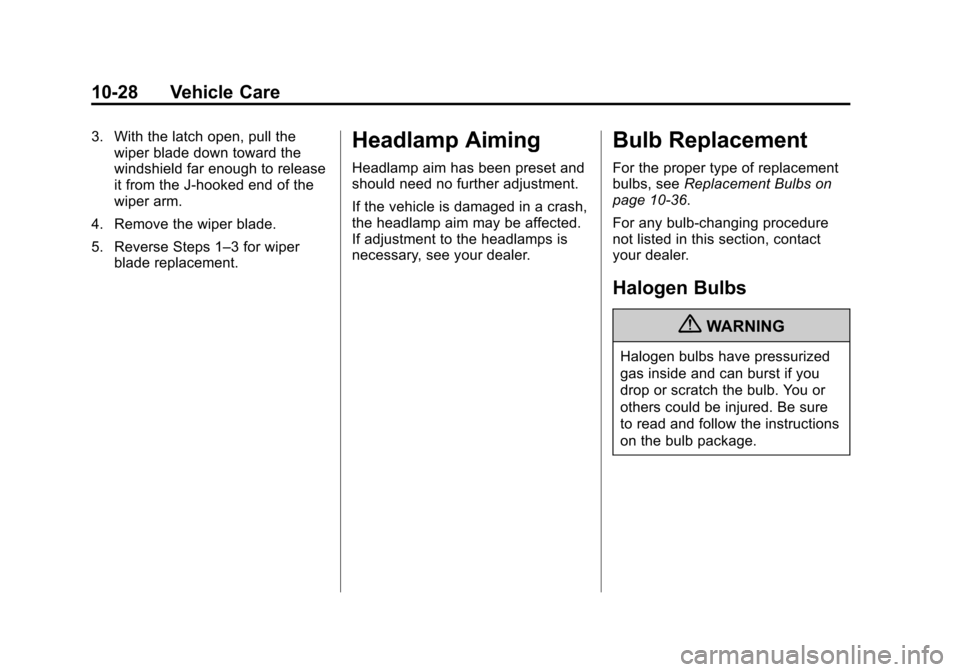
3. With the latch open, pull thewiper blade down toward the
windshield far enough to release
it from the J-hooked end of the
wiper arm.
4. Remove the wiper blade.
5. Reverse Steps 1–3 for wiper blade replacement.Headlamp Aiming
Headlamp aim has been preset and
should need no further adjustment.
If the vehicle is damaged in a crash,
the headlamp aim may be affected.
If adjustment to the headlamps is
necessary, see your dealer.
Bulb Replacement
For the proper type of replacement
bulbs, see Replacement Bulbs on
page 10‑36.
For any bulb‐changing procedure
not listed in this section, contact
your dealer.
Halogen Bulbs
{WARNING
Halogen bulbs have pressurized
gas inside and can burst if you
drop or scratch the bulb. You or
others could be injured. Be sure
to read and follow the instructions
on the bulb package.
Page 301 of 436
Black plate (35,1)Chevrolet Malibu Owner Manual - 2013 - CRC - 6/6/12
Vehicle Care 10-35
Notice:Improper lamp assembly
removal and installation can
cause leaks and water intrusion
which may cause damage to the
taillamp. Do not remove the
taillamp assembly to replace a
bulb. Use the trunk opening to
access the bulb.
The stoplamp/taillamp is an LED. To
replace the stoplamp/taillamp see
your dealer.
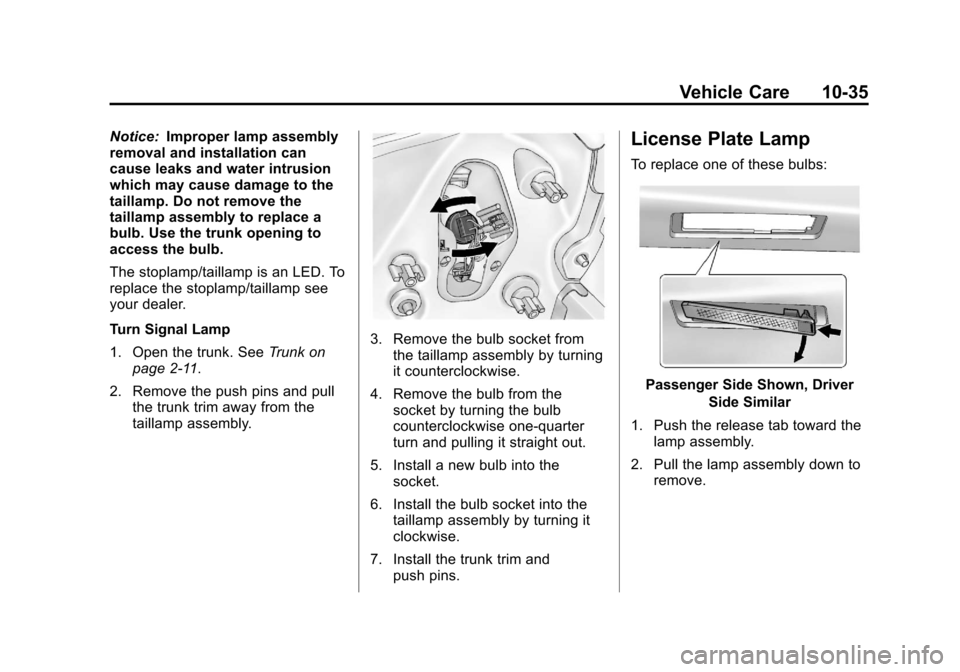
Turn Signal Lamp
1. Open the trunk. See Trunk on
page 2‑11.
2. Remove the push pins and pull the trunk trim away from the
taillamp assembly.
3. Remove the bulb socket fromthe taillamp assembly by turning
it counterclockwise.
4. Remove the bulb from the socket by turning the bulb
counterclockwise one-quarter
turn and pulling it straight out.
5. Install a new bulb into the socket.
6. Install the bulb socket into the taillamp assembly by turning it
clockwise.
7. Install the trunk trim and push pins.
License Plate Lamp
To replace one of these bulbs:
Passenger Side Shown, Driver
Side Similar
1. Push the release tab toward the lamp assembly.
2. Pull the lamp assembly down to remove.