2013 CHEVROLET EXPRESS PASSANGER light
[x] Cancel search: lightPage 97 of 402

Black plate (53,1)Chevrolet Express Owner Manual - 2013 - 1stPrintReady - 6/19/12
Seats and Restraints 3-53
Child Restraint”underPassenger
Sensing System on page 3‑26 for
more information.
To remove the child restraint,
unbuckle the vehicle safety belt and
let it return to the stowed position.
If the top tether is attached to a top
tether anchor, disconnect it.
Securing Child Restraints
(Front Seat-Airbag On/Off
Switch)
This vehicle has airbags. A rear
seat is a safer place to secure a
forward-facing child restraint. See
Where to Put the Restraint on
page 3‑39.
On vehicles with an airbag on/off
switch, you can use this feature to
turn off the right front passenger
frontal airbag. The switch is located
on the instrument panel. See Airbag
On-Off Switch on page 3‑23 for
more information, including
important safety information. A label on the sun visor says,
“Never put a rear-facing child seat in
the front.”
This is because the risk to
the rear-facing child is so great,
if the airbag deploys.
{WARNING
A child in a rear-facing child
restraint can be seriously injured
or killed if the right front
passenger airbag inflates. This is
because the back of the
rear-facing child restraint would
be very close to the inflating
airbag. A child in a forward-facing
child restraint can be seriously
injured or killed if the right front
passenger airbag inflates and the
passenger seat is in a forward
position.
Even if the airbag switch has
turned off the right front
passenger frontal airbag, no
system is fail-safe. No one can
guarantee that an airbag will not
(Continued)
WARNING (CONTINUED)
deploy under some unusual
circumstance, even though it is
turned off.
Secure rear-facing child restraints
in a rear seat, even if the airbag
is off. If you secure a
forward-facing child restraint in
the right front seat, always move
the front passenger seat as far
back as it will go. It is better to
secure the child restraint in a
rear seat.
{WARNING
If the airbag readiness light ever
comes on and stays on, it means
that something may be wrong
with the airbag system. For
example, the right front(Continued)
Page 98 of 402

Black plate (54,1)Chevrolet Express Owner Manual - 2013 - 1stPrintReady - 6/19/12
3-54 Seats and Restraints
WARNING (CONTINUED)
passenger airbag could inflate
even though the airbag on-off
switch is turned off.
To help avoid injury to yourself or
others, have the vehicle serviced
right away. SeeAirbag Readiness
Light on page 5‑14 for more
information, including important
safety information.
If the vehicle does not have a rear
seat that will accommodate a
rear-facing child restraint, a
rear-facing child restraint should not
be installed in the vehicle, even if
the airbag is off.
If the child restraint has the LATCH
system, see Lower Anchors and
Tethers for Children (LATCH
System) on page 3‑41 for how and
where to install the child restraint
using LATCH. If a child restraint is
secured using a safety belt and it
uses a top tether, see LowerAnchors and Tethers for Children
(LATCH System) on page 3‑41
for
top tether anchor locations.
Do not secure a child seat in a
position without a top tether anchor
if a national or local law requires
that the top tether be anchored, or if
the instructions that come with the
child restraint say that the top strap
must be anchored.
In Canada, the law requires that
forward-facing child restraints have
a top tether, and that the tether be
attached.
You will be using the lap-shoulder
belt to secure the child restraint in
this position. Follow the instructions
that came with the child restraint.
1. Move the seat as far back as it will go before securing the
forward-facing child restraint. If you have no other choice but
to install a rear-facing child
restraint in this seat, make sure
the airbag is off once the child
restraint has been installed.
When the airbag off switch has
turned off the right front
passenger frontal airbag, the off
indicator in the airbag off light
should light and stay lit when the
vehicle is started. See
Airbag
On-Off Light on page 5‑15.
2. Put the child restraint on the seat.
3. Pick up the latch plate, and run the lap and shoulder portions of
the vehicle safety belt through or
around the restraint. The child
restraint instructions will show
you how.
Page 103 of 402

Black plate (1,1)Chevrolet Express Owner Manual - 2013 - 1stPrintReady - 6/19/12
Instruments and Controls 5-1
Instruments and
Controls
Controls
Steering Wheel Adjustment . . . 5-2
Steering Wheel Controls . . . . . . 5-2
Horn . . . . . . . . . . . . . . . . . . . . . . . . . . 5-3
Windshield Wiper/Washer . . . . . 5-3
Compass . . . . . . . . . . . . . . . . . . . . . 5-4
Clock . . . . . . . . . . . . . . . . . . . . . . . . . 5-6
Power Outlets . . . . . . . . . . . . . . . . . 5-7
Cigarette Lighter . . . . . . . . . . . . . . 5-7
Ashtrays . . . . . . . . . . . . . . . . . . . . . . 5-8
Warning Lights, Gauges, and
Indicators
Warning Lights, Gauges, andIndicators . . . . . . . . . . . . . . . . . . . . 5-8
Instrument Cluster . . . . . . . . . . . . 5-9
Speedometer . . . . . . . . . . . . . . . . 5-10
Odometer . . . . . . . . . . . . . . . . . . . . 5-10
Trip Odometer . . . . . . . . . . . . . . . 5-10
Fuel Gauge . . . . . . . . . . . . . . . . . . 5-10
Engine Oil Pressure Gauge . . . . . . . . . . . . . . . . . . . . . . 5-11
Engine Coolant Temperature Gauge . . . . . . . . . . . . . . . . . . . . . . 5-12 Voltmeter Gauge . . . . . . . . . . . . . 5-13
Safety Belt Reminders . . . . . . . 5-14
Airbag Readiness Light . . . . . . 5-14
Airbag On-Off Light . . . . . . . . . . 5-15
Passenger Airbag Status
Indicator . . . . . . . . . . . . . . . . . . . . 5-16
Charging System Light . . . . . . 5-17
Malfunction Indicator Lamp . . . . . . . . . . . . . 5-17
Brake System Warning Light . . . . . . . . . . . . . . . . . . . . . . . 5-20
Antilock Brake System (ABS) Warning Light . . . . . . . . . . . . . . 5-21
Tow/Haul Mode Light . . . . . . . . 5-21
StabiliTrak
®OFF Light . . . . . . . 5-21
Traction Control System (TCS)/StabiliTrak
®Light . . . . 5-22
Tire Pressure Light . . . . . . . . . . 5-22
Engine Oil Pressure Light . . . . 5-23
Low Fuel Warning Light . . . . . . 5-23
Security Light . . . . . . . . . . . . . . . . 5-23
High-Beam On Light . . . . . . . . . 5-24
Cruise Control Light . . . . . . . . . 5-24
Information Displays
Driver Information Center (DIC) . . . . . . . . . . . . . . . 5-24
Vehicle Messages
Vehicle Messages . . . . . . . . . . . 5-29
Battery Voltage and ChargingMessages . . . . . . . . . . . . . . . . . . 5-30
Brake System Messages . . . . 5-30
Compass Messages . . . . . . . . . 5-30
Door Ajar Messages . . . . . . . . . 5-30
Engine Cooling System Messages . . . . . . . . . . . . . . . . . . 5-31
Engine Oil Messages . . . . . . . . 5-32
Engine Power Messages . . . . 5-32
Fuel System Messages . . . . . . 5-33
Key and Lock Messages . . . . . 5-33
Lamp Messages . . . . . . . . . . . . . 5-33
Object Detection System Messages . . . . . . . . . . . . . . . . . . 5-33
Ride Control System Messages . . . . . . . . . . . . . . . . . . 5-34
Airbag System Messages . . . . 5-35
Security Messages . . . . . . . . . . 5-35
Service Vehicle Messages . . . 5-36
Tire Messages . . . . . . . . . . . . . . . 5-36
Transmission Messages . . . . . 5-37
Vehicle Reminder Messages . . . . . . . . . . . . . . . . . . 5-38
Vehicle Personalization
Vehicle Personalization . . . . . . 5-38
Page 105 of 402

Black plate (3,1)Chevrolet Express Owner Manual - 2013 - 1stPrintReady - 6/19/12
Instruments and Controls 5-3
2. Press and releaseworc/x
to scroll up or down the list, then
press and hold
w, or press¨to
play the highlighted track.
Navigating Folders on an iPod or
USB Device
1. Press and hold
worc/x
while listening to a song until the
contents of the current folder
display on the radio display.
2. Press and hold
c/xto go
back to the previous folder list.
3. Press and release
worc/x
to scroll up or down the list.
.To select a folder, press
and hold
w, or press¨
when the folder is
highlighted.
.To go back further in the
folder list, press and hold
c/x.
b/g(Push to Talk): Press to
silence the vehicle speakers only.
Press again to turn the sound on.
For vehicles with Bluetooth or
OnStar
®systems, press and hold
for longer than two seconds to
interact with those systems. See
Bluetooth on page 7‑21 andOnStar
Overview on page 14‑1 for more
information.
SRCE (Source/Voice
Recognition): Press to switch
between the radio and CD, and for
equipped vehicles, the front
auxiliary.
¨(Seek): Press to go to the next
radio station while in AM, FM,
or SiriusXM
®.
For vehicles with a CD Player or
USB port:
Press
¨to go to the next track or
chapter while sourced to the CD.
Press
¨to select a track or a folder
when navigating folders on an iPod
or USB device. While listening to a CD, press and
hold
¨to quickly move forward
through the tracks. Release to stop
on the desired track.
+
e: Press to increase volume.
−
e: Press to decrease volume.
Horn
Press the horn symbol in the middle
of the steering wheel to sound
the horn.
Windshield Wiper/Washer
The windshield wiper control is
located on the multifunction lever on
the left side of the steering wheel.
Turn the band with
Non it to select
the wiper speed.
Page 107 of 402

Black plate (5,1)Chevrolet Express Owner Manual - 2013 - 1stPrintReady - 6/19/12
Instruments and Controls 5-5
To adjust for compass variance, use
the following procedure:
Compass Variance (Zone)
Procedure
1. Do not set the compass zonewhen the vehicle is moving. Only
set it when the vehicle is in
P (Park).
Press
Tuntil PRESSVTO
CHANGE COMPASS ZONE
displays.
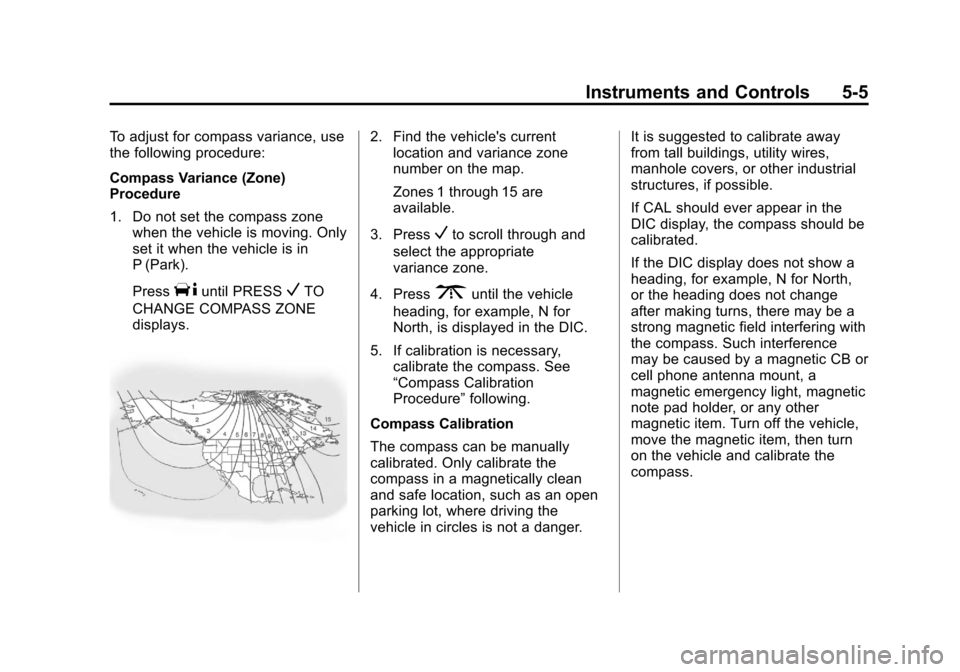
2. Find the vehicle's current location and variance zone
number on the map.
Zones 1 through 15 are
available.
3. Press
Vto scroll through and
select the appropriate
variance zone.
4. Press
3until the vehicle
heading, for example, N for
North, is displayed in the DIC.
5. If calibration is necessary, calibrate the compass. See
“Compass Calibration
Procedure” following.
Compass Calibration
The compass can be manually
calibrated. Only calibrate the
compass in a magnetically clean
and safe location, such as an open
parking lot, where driving the
vehicle in circles is not a danger. It is suggested to calibrate away
from tall buildings, utility wires,
manhole covers, or other industrial
structures, if possible.
If CAL should ever appear in the
DIC display, the compass should be
calibrated.
If the DIC display does not show a
heading, for example, N for North,
or the heading does not change
after making turns, there may be a
strong magnetic field interfering with
the compass. Such interference
may be caused by a magnetic CB or
cell phone antenna mount, a
magnetic emergency light, magnetic
note pad holder, or any other
magnetic item. Turn off the vehicle,
move the magnetic item, then turn
on the vehicle and calibrate the
compass.
Page 109 of 402

Black plate (7,1)Chevrolet Express Owner Manual - 2013 - 1stPrintReady - 6/19/12
Instruments and Controls 5-7
Another way to increase the time
or date, is to press
¨SEEK or
\FWD (forward).
3. To decrease, press
©SEEK or
sREV. Turn thefknob, on
the upper right side of the radio,
to adjust the selected setting.
Changing the Time and Date
Default Settings
To change the time or date default
settings:
1. Press
Hand then the softkey
under the forward arrow that is
currently displayed on the radio
screen until the time 12H (hour)
and 24H (hour), and the date
MM/DD (month and day) and
DD/MM (day and month) are
displayed.
2. Press the softkey under the desired option.
3. Press
Hagain to apply the
selected default, or let the
screen time out.
Power Outlets
The accessory power outlets can be
used to plug in electrical equipment,
such as a cell phone or an MP3
player.
The vehicle may have two
accessory power outlets on the
instrument panel.
Remove the cover to access and
replace when not in use.
Certain power accessory plugs may
not be compatible to the accessory
power outlet and could overload
vehicle or adapter fuses. If a
problem is experienced, see your
dealer.
{WARNING
Power is always supplied to the
outlets. Do not leave electrical
equipment plugged in when the
vehicle is not in use because the
vehicle could catch fire and cause
injury or death. Notice:
Leaving electrical
equipment plugged in for an
extended period of time while the
vehicle is off will drain the
battery. Always unplug electrical
equipment when not in use and
do not plug in equipment that
exceeds the maximum 20 ampere
rating.
When adding electrical equipment,
be sure to follow the proper
installation instructions included with
the equipment. See Add-On
Electrical Equipment on page 9‑57.
Notice: Hanging heavy
equipment from the power outlet
can cause damage not covered
by the vehicle warranty. The
power outlets are designed for
accessory power plugs only, such
as cell phone charge cords.
Cigarette Lighter
To use the cigarette lighter, if the
vehicle has one, push it in all the
way, and let go. When it is ready for
use, it will pop back out by itself.
Page 110 of 402

Black plate (8,1)Chevrolet Express Owner Manual - 2013 - 1stPrintReady - 6/19/12
5-8 Instruments and Controls
Do not use the lighter to plug in
accessory devices. Use the power
outlets provided.
Notice:Holding a cigarette lighter
in while it is heating does not let
the lighter back away from the
heating element when it is hot.
Damage from overheating can
occur to the lighter or heating
element, or a fuse could be
blown. Do not hold a cigarette
lighter in while it is heating.
Ashtrays
The vehicle may have a removable
ashtray. The ashtray can be placed
into the front floor console
cupholder. Open cover to use.
Notice: If papers, pins, or other
flammable items are put in the
ashtray, hot cigarettes or other
smoking materials could ignite
them and possibly damage the
vehicle. Never put flammable
items in the ashtray.
Warning Lights,
Gauges, and
Indicators
Warning lights and gauges can
signal that something is wrong
before it becomes serious enough
to cause an expensive repair or
replacement. Paying attention to the
warning lights and gauges could
prevent injury.
Warning lights come on when there
could be a problem with a vehicle
function. Some warning lights come
on briefly when the engine is started
to indicate they are working. Gauges can indicate when there
could be a problem with a vehicle
function. Often gauges and warning
lights work together to indicate a
problem with the vehicle.
When one of the warning lights
comes on and stays on while
driving, or when one of the gauges
shows there may be a problem,
check the section that explains what
to do. Follow this manual's advice.
Waiting to do repairs can be costly
and even dangerous.
Page 116 of 402

Black plate (14,1)Chevrolet Express Owner Manual - 2013 - 1stPrintReady - 6/19/12
5-14 Instruments and Controls
Safety Belt Reminders
Driver Safety Belt Reminder
Light
There is a driver safety belt
reminder light on the instrument
cluster.
When the vehicle is started this light
flashes and a chime may come on
to remind the driver to fasten their
safety belt. Then the light stays on
solid until the belt is buckled. This
cycle may continue several times if
the driver remains or becomes
unbuckled while the vehicle is
moving.
If the driver safety belt is buckled,
neither the light nor the chime
comes on.
Passenger Safety Belt
Reminder Light
There may be a passenger safety
belt reminder light near the
passenger airbag status indicator.
SeePassenger Sensing System on
page 3‑26.
For vehicles equipped with the
passenger safety belt warning light,
when the vehicle is started this light
flashes and a chime may come on
to remind passengers to fasten their
safety belt. Then the light stays on
solid until the belt is buckled. This
cycle continues several times if the
passenger remains or becomes
unbuckled while the vehicle is
moving. If the passenger safety belt is
buckled, neither the chime nor the
light comes on.
The front passenger safety belt
warning light and chime may turn on
if an object is put on the seat such
as a briefcase, handbag, grocery
bag, laptop, or other electronic
device. To turn off the warning light
and/or chime, remove the object
from the seat or buckle the
safety belt.
Airbag Readiness Light
This light shows if there is an
electrical problem with the airbag
system. The system check includes
the airbag sensor(s), passenger
sensing system (if equipped), the
pretensioners (if equipped), the
airbag modules, the wiring, and the
crash sensing and diagnostic
module. For more information on the
airbag system, see
Airbag System
on page 3‑16.