2013 CHEVROLET EXPRESS PASSANGER inflation pressure
[x] Cancel search: inflation pressurePage 304 of 402

Black plate (56,1)Chevrolet Express Owner Manual - 2013 - 1stPrintReady - 6/19/12
10-56 Vehicle Care
A Tire and Loading Information label
shows the size of the original
equipment tires and the correct
inflation pressure for the tires when
they are cold. SeeVehicle Load
Limits on page 9‑10, for an example
of the Tire and Loading Information
label and its location. Also see Tire
Pressure on page 10‑53.
The TPMS can warn about a low
tire pressure condition but it does
not replace normal tire
maintenance. See Tire Inspection
on page 10‑58, Tire Rotation on
page 10‑58 andTires on
page 10‑44.
Notice: Tire sealant materials are
not all the same. A non-approved
tire sealant could damage the
TPMS sensors. TPMS sensor
damage caused by using an
incorrect tire sealant is not
covered by the vehicle warranty.
Always use only the
GM-approved tire sealant
available through your dealer or
included in the vehicle.TPMS Malfunction Light and
Message
The TPMS will not function properly
if one or more of the TPMS sensors
are missing or inoperable. When the
system detects a malfunction, the
low tire pressure warning light
flashes for about one minute and
then stays on for the remainder of
the ignition cycle. A DIC warning
message also displays. The
malfunction light and DIC warning
message come on at each ignition
cycle until the problem is corrected.
Some of the conditions that can
cause these to come on are:
.One of the road tires has been
replaced with the spare tire. The
spare tire does not have a
TPMS sensor. The malfunction
light and the DIC message
should go off after the road tire
is replaced and the sensor
matching process is performed
successfully. See "TPMS Sensor
Matching Process" later in this
section.
.The TPMS sensor matching
process was not done or not
completed successfully after
rotating the tires. The
malfunction light and the DIC
message should go off after
successfully completing the
sensor matching process. See
"TPMS Sensor Matching
Process" later in this section.
.One or more TPMS sensors are
missing or damaged. The
malfunction light and the DIC
message should go off when the
TPMS sensors are installed and
the sensor matching process is
performed successfully. See
your dealer for service.
.Replacement tires or wheels do
not match the original equipment
tires or wheels. Tires and wheels
other than those recommended
could prevent the TPMS from
functioning properly. See Buying
New Tires on page 10‑61.
Page 307 of 402

Black plate (59,1)Chevrolet Express Owner Manual - 2013 - 1stPrintReady - 6/19/12
Vehicle Care 10-59
Use this rotation pattern when
rotating the tires.
If the vehicle has a compact
spare tire, do not include it in the
tire rotation.
Adjust the front and rear tires to
the recommended inflation
pressure on the Tire and
Loading Information label after
the tires have been rotated. See
Tire Pressure on page 10‑53
andVehicle Load Limits on
page 9‑10. Reset the Tire Pressure Monitor
System. See
Tire Pressure
Monitor Operation on
page 10‑55.
Check that all wheel nuts are
properly tightened. See “Wheel
Nut Torque” underCapacities
and Specifications on
page 12‑2.
{WARNING
Rust or dirt on a wheel, or on the
parts to which it is fastened, can
make wheel nuts become loose
after time. The wheel could come
off and cause an accident. When
changing a wheel, remove any
rust or dirt from places where the
wheel attaches to the vehicle. In
an emergency, a cloth or a paper
towel can be used; however, use
a scraper or wire brush later to
remove all rust or dirt.
Lightly coat the center of the
wheel hub with wheel bearing
grease after a wheel change or
tire rotation to prevent corrosion
or rust build-up. Do not get
grease on the flat wheel
mounting surface or on the
wheel nuts or bolts.
Dual Tire Rotation
When the vehicle is new,
or whenever a wheel, wheel bolt,
or wheel nut is replaced, check
the wheel nut torque after 160,
1 600, and 10 000 km (100,
1,000, and 6,000 mi) of driving.
For proper wheel nut tightening
information, see “Removing the Flat
Tire and Installing the Spare Tire”
under Tire Changing on page 10‑68.
Also see “Wheel Nut Torque” under
Capacities and Specifications on
page 12‑2.
The outer tire on a dual wheel setup
generally wears faster than the
inner tire. Tires last longer and wear
more evenly if they are rotated. See
Page 308 of 402

Black plate (60,1)Chevrolet Express Owner Manual - 2013 - 1stPrintReady - 6/19/12
10-60 Vehicle Care
Tire Inspection on page 11‑3and
Tire Rotation on page 10‑58. Also
see Maintenance Schedule on
page 11‑3.
{WARNING
If the vehicle is operated with a
tire that is underinflated, the tire
can overheat. An overheated tire
can lose air suddenly or catch
fire. You or others could be
injured. Properly inflate all tires,
including the spare.
See Tires on page 10‑44 andTire
Pressure on page 10‑53 for more
information on proper tire inflation.
When It Is Time for New
Tires
Factors such as maintenance,
temperatures, driving speeds,
vehicle loading, and road conditions
affect the wear rate of the tires.
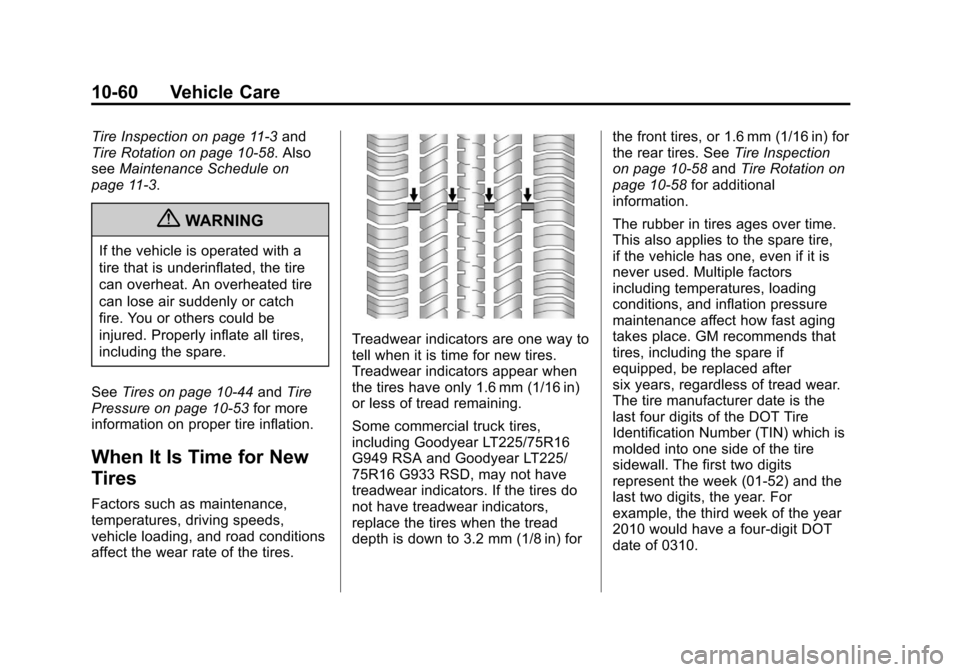
Treadwear indicators are one way to
tell when it is time for new tires.
Treadwear indicators appear when
the tires have only 1.6 mm (1/16 in)
or less of tread remaining.
Some commercial truck tires,
including Goodyear LT225/75R16
G949 RSA and Goodyear LT225/
75R16 G933 RSD, may not have
treadwear indicators. If the tires do
not have treadwear indicators,
replace the tires when the tread
depth is down to 3.2 mm (1/8 in) for the front tires, or 1.6 mm (1/16 in) for
the rear tires. See
Tire Inspection
on page 10‑58 andTire Rotation on
page 10‑58 for additional
information.
The rubber in tires ages over time.
This also applies to the spare tire,
if the vehicle has one, even if it is
never used. Multiple factors
including temperatures, loading
conditions, and inflation pressure
maintenance affect how fast aging
takes place. GM recommends that
tires, including the spare if
equipped, be replaced after
six years, regardless of tread wear.
The tire manufacturer date is the
last four digits of the DOT Tire
Identification Number (TIN) which is
molded into one side of the tire
sidewall. The first two digits
represent the week (01-52) and the
last two digits, the year. For
example, the third week of the year
2010 would have a four-digit DOT
date of 0310.
Page 325 of 402

Black plate (77,1)Chevrolet Express Owner Manual - 2013 - 1stPrintReady - 6/19/12
Vehicle Care 10-77
8. Tilt the retainer at the end of thecable and pull it through the
wheel opening. Pull the tire out
from under the vehicle.
Notice: If you drive away before
the spare tire or secondary
latch system cable has been
reinstalled, you could damage the
vehicle. Always reinstall this
cable before driving the vehicle.
9. If the cable is hanging under the
vehicle, turn the wheel wrench in
the hoist shaft hole in the
bumper clockwise to raise the
cable back up.
Have the hoist assembly inspected
as soon as you can. You will not be
able to store a spare or flat tire
using the hoist assembly until it has
been repaired or replaced. To continue changing the flat tire,
return to Step 4 of
“Storing a Flat or
Spare Tire and Tools” underTire
Changing on page 10‑68.
Full-Size Spare Tire
If this vehicle came with a full-size
spare tire, it was fully inflated when
new, however, it can lose air over
time. Check the inflation pressure
regularly. See Tire Pressure on
page 10‑53 andVehicle Load Limits
on page 9‑10. For instructions on
how to remove, install, or store a
spare tire, see Tire Changing on
page 10‑68. After installing the spare tire on the
vehicle, stop as soon as possible
and check that the spare is correctly
inflated. The spare tire is made to
perform well at speeds up to
112 km/h (70 mph) at the
recommended inflation pressure, so
you can finish your trip.
Have the damaged or flat road tire
repaired or replaced back onto the
vehicle, as soon as possible, so the
spare tire will be available in case it
is needed again.
Do not mix tires and wheels of
different sizes, because they will not
fit. Keep the spare tire and its wheel
together.
Page 341 of 402

Black plate (3,1)Chevrolet Express Owner Manual - 2013 - 1stPrintReady - 6/19/12
Service and Maintenance 11-3
Maintenance
Schedule
Owner Checks and Services
At Each Fuel Stop
.Check the engine oil level. See
Engine Oil on page 10‑7.
Once a Month
.Check the tire inflation
pressures. See Tire Pressure on
page 10‑53.
.Inspect the tires for wear. See
Tire Inspection on page 10‑58.
.Check the windshield washer
fluid level. See Washer Fluid on
page 10‑23.
Engine Oil Change
When the CHANGE ENGINE OIL
SOON message displays, have the
engine oil and filter changed within
the next 1 000 km/600 mi. If driven
under the best conditions, the
engine oil life system might not
indicate the need for vehicle service for more than a year. The engine oil
and filter must be changed at least
once a year and the oil life system
must be reset. Your trained dealer
technician can perform this work.
If the engine oil life system is reset
accidentally, service the vehicle
within 5 000 km/3,000 mi since the
last service. Reset the oil life
system when the oil is changed.
See
Engine Oil Life System on
page 10‑9.
Tire Rotation and Required
Services Every 12 000 km/
7,500 mi
Rotate the tires, if recommended for
the vehicle, and perform the
following services. See Tire
Rotation on page 10‑58.
.Check engine oil level and oil
life percentage. If needed,
change engine oil and filter, and
reset oil life system. See Engine
Oil on page 10‑7 andEngine Oil
Life System on page 10‑9.
.Check engine coolant level. See
Engine Coolant on page 10‑17.
.Check windshield washer fluid
level. See Washer Fluid on
page 10‑23.
.Visually inspect windshield wiper
blades for wear, cracking,
or contamination. See Exterior
Care on page 10‑84. Replace
worn or damaged wiper blades.
See Wiper Blade Replacement
on page 10‑31.
.Check tire inflation pressures.
See Tire Pressure on
page 10‑53.
.Inspect tire wear. See Tire
Inspection on page 10‑58.
.Visually check for fluid leaks.
.Inspect engine air cleaner filter.
See Engine Air Cleaner/Filter on
page 10‑15.
.Inspect brake system.
.Visually inspect steering,
suspension, and chassis
components for damaged, loose,
Page 400 of 402

Black plate (10,1)Chevrolet Express Owner Manual - 2013 - 1stPrintReady - 6/19/12
i-10 INDEX
Service (cont'd)Publications Ordering
Information . . . . . . . . . . . . . . . . 13-16
Scheduling Appointments . . . 13-12
Vehicle Messages . . . . . . . . . . . . 5-36
Servicing the Airbag . . . . . . . . . . . 3-31
Shift Lock Control Function Check, Automatic
Transmission . . . . . . . . . . . . . . . . 10-30
Shifting Into Park . . . . . . . . . . . . . . . . . . . . . . 9-19
Out of Park . . . . . . . . . . . . . . . . . . . 9-20
Side Door . . . . . . . . . . . . . . . . . . . . . . 2-9
Sidemarker Bulb Replacement . . . . . . . . . . 10-34
Signals, Turn and Lane-Change . . . . . . . . . . . . . . . . . 6-4
Sliding Door . . . . . . . . . . . . . . . . . . . 2-10
Specifications and
Capacities . . . . . . . . . . . . . . . . . . . . 12-2
Speedometer . . . . . . . . . . . . . . . . . . 5-10
StabiliTrak OFF Light . . . . . . . . . . . . . . . . . . . . . 5-21
System . . . . . . . . . . . . . . . . . . . . . . . 9-32
Start Vehicle, Remote . . . . . . . . . . 2-4
Starter Switch Check . . . . . . . . . 10-30
Starting the Engine . . . . . . . . . . . . 9-16 Steering . . . . . . . . . . . . . . . . . . . . . . . . 9-4
Fluid, Power . . . . . . . . . . . . . . . . 10-23
Wheel Adjustment . . . . . . . . . . . . . 5-2
Wheel Controls . . . . . . . . . . . . . . . . 5-2
Storage Areas Front . . . . . . . . . . . . . . . . . . . . . . . . . . 4-1
Stuck Vehicle . . . . . . . . . . . . . . . . . . . 9-9
Sun Visors . . . . . . . . . . . . . . . . . . . . . 2-18
Swing-out Windows . . . . . . . . . . . . 2-16
Switches Airbag On-Off . . . . . . . . . . . . . . . . . 3-23
Symbols . . . . . . . . . . . . . . . . . . . . . . . . . . iv
System Infotainment . . . . . . . . . . . . . . . . . . . 7-1
Noise Control . . . . . . . . . . . . . . . 10-29
T
Taillamps . . . . . . . . . . . . . . . . . . . . . 10-35
Text Telephone (TTY) Users . . . 13-6
Theft-Deterrent Systems . . . . . . . 2-11Immobilizer . . . . . . . . . . . . . . . . . . . 2-11
Time . . . . . . . . . . . . . . . . . . . . . . . . . . . . 5-6
Tires Buying New Tires . . . . . . . . . . . 10-61
Chains . . . . . . . . . . . . . . . . . . . . . . 10-65
Changing . . . . . . . . . . . . . . . . . . . 10-68 Tires (cont'd)
Designations . . . . . . . . . . . . . . . 10-48
Different Size . . . . . . . . . . . . . . . 10-62
Dual Rotation . . . . . . . . . . . . . . . 10-59
Full-Size Spare . . . . . . . . . . . . . 10-77
If a Tire Goes Flat . . . . . . . . . . 10-66
Inflation Monitor System . . . . 10-55
Inspection . . . . . . . . . . . . . . . . . . 10-58
Messages . . . . . . . . . . . . . . . . . . . . 5-36
Pressure Light . . . . . . . . . . . . . . . . 5-22
Pressure Monitor System . . . 10-54
Rotation . . . . . . . . . . . . . . . . . . . . 10-58
Secondary Latch System . . . 10-75
Sidewall Labeling . . . . . . . . . . . 10-46
Terminology and
Definitions . . . . . . . . . . . . . . . . . 10-50
Uniform Tire Quality Grading . . . . . . . . . . . . . . . . . . . 10-63
Wheel Alignment and Tire Balance . . . . . . . . . . . . . . . . . . . 10-64
Wheel Replacement . . . . . . . . 10-65
When It Is Time for New Tires . . . . . . . . . . . . . . . . . . . . . . 10-60
Winter . . . . . . . . . . . . . . . . . . . . . . 10-45
Tow/Haul Mode . . . . . . . . . . . . . . . . 9-29
Tow/Haul Mode Light . . . . . . . . . . 5-21