2013 CHEVROLET EXPRESS PASSANGER warning
[x] Cancel search: warningPage 322 of 402
Black plate (74,1)Chevrolet Express Owner Manual - 2013 - 1stPrintReady - 6/19/12
10-74 Vehicle Care
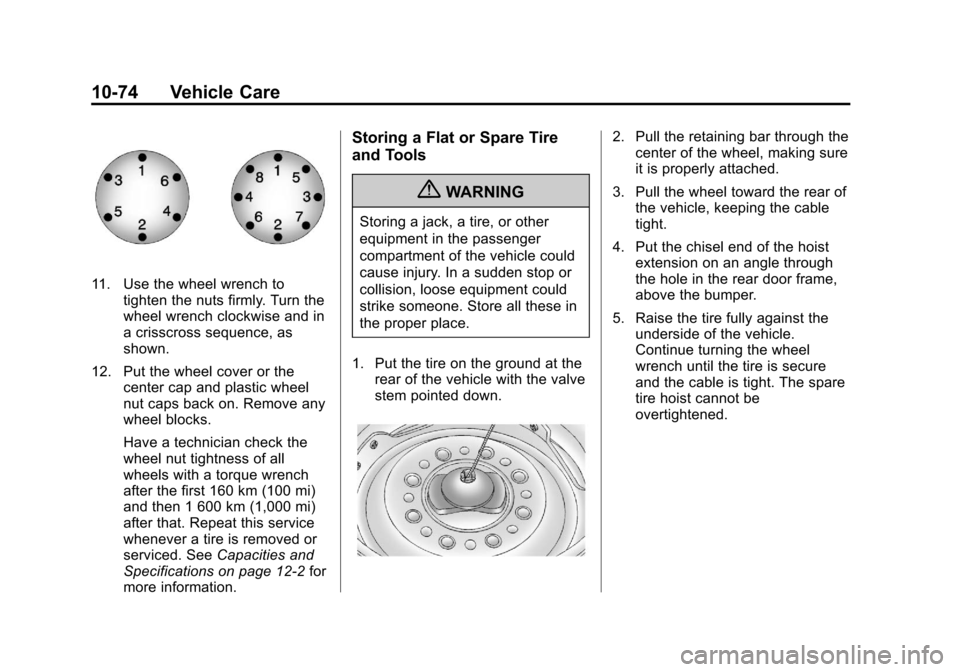
11. Use the wheel wrench totighten the nuts firmly. Turn the
wheel wrench clockwise and in
a crisscross sequence, as
shown.
12. Put the wheel cover or the center cap and plastic wheel
nut caps back on. Remove any
wheel blocks.
Have a technician check the
wheel nut tightness of all
wheels with a torque wrench
after the first 160 km (100 mi)
and then 1 600 km (1,000 mi)
after that. Repeat this service
whenever a tire is removed or
serviced. See Capacities and
Specifications on page 12‑2 for
more information.
Storing a Flat or Spare Tire
and Tools
{WARNING
Storing a jack, a tire, or other
equipment in the passenger
compartment of the vehicle could
cause injury. In a sudden stop or
collision, loose equipment could
strike someone. Store all these in
the proper place.
1. Put the tire on the ground at the rear of the vehicle with the valve
stem pointed down.
2. Pull the retaining bar through thecenter of the wheel, making sure
it is properly attached.
3. Pull the wheel toward the rear of the vehicle, keeping the cable
tight.
4. Put the chisel end of the hoist extension on an angle through
the hole in the rear door frame,
above the bumper.
5. Raise the tire fully against the underside of the vehicle.
Continue turning the wheel
wrench until the tire is secure
and the cable is tight. The spare
tire hoist cannot be
overtightened.
Page 323 of 402
Black plate (75,1)Chevrolet Express Owner Manual - 2013 - 1stPrintReady - 6/19/12
Vehicle Care 10-75
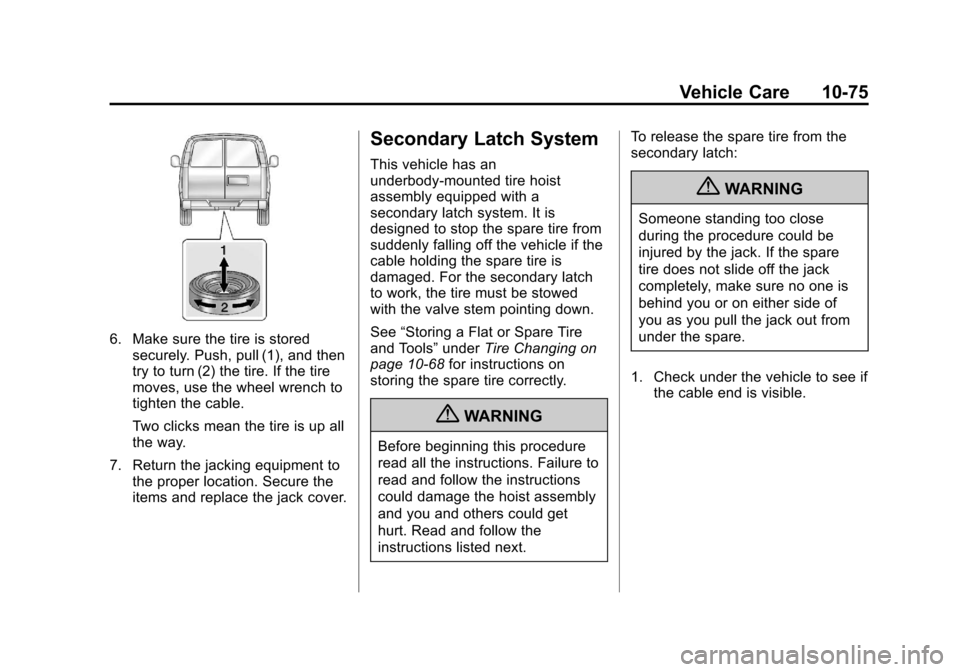
6. Make sure the tire is storedsecurely. Push, pull (1), and then
try to turn (2) the tire. If the tire
moves, use the wheel wrench to
tighten the cable.
Two clicks mean the tire is up all
the way.
7. Return the jacking equipment to the proper location. Secure the
items and replace the jack cover.
Secondary Latch System
This vehicle has an
underbody-mounted tire hoist
assembly equipped with a
secondary latch system. It is
designed to stop the spare tire from
suddenly falling off the vehicle if the
cable holding the spare tire is
damaged. For the secondary latch
to work, the tire must be stowed
with the valve stem pointing down.
See “Storing a Flat or Spare Tire
and Tools” underTire Changing on
page 10‑68 for instructions on
storing the spare tire correctly.
{WARNING
Before beginning this procedure
read all the instructions. Failure to
read and follow the instructions
could damage the hoist assembly
and you and others could get
hurt. Read and follow the
instructions listed next. To release the spare tire from the
secondary latch:
{WARNING
Someone standing too close
during the procedure could be
injured by the jack. If the spare
tire does not slide off the jack
completely, make sure no one is
behind you or on either side of
you as you pull the jack out from
under the spare.
1. Check under the vehicle to see if the cable end is visible.
Page 326 of 402
Black plate (78,1)Chevrolet Express Owner Manual - 2013 - 1stPrintReady - 6/19/12
10-78 Vehicle Care
Jump Starting
For more information about the
vehicle battery, seeBattery on
page 10‑27.
If the vehicle battery has run down,
you may want to use another
vehicle and some jumper cables to
start your vehicle. Be sure to use
the following steps to do it safely.
{WARNING
Batteries can hurt you. They can
be dangerous because:
.They contain acid that can
burn you.
.They contain gas that can
explode or ignite.
.They contain enough
electricity to burn you.
If you do not follow these steps
exactly, some or all of these
things can hurt you. Notice:
Ignoring these steps
could result in costly damage to
the vehicle that would not be
covered by the warranty.
Trying to start the vehicle by
pushing or pulling it will not
work, and it could damage the
vehicle.
1. Check the other vehicle. It must
have a 12-volt battery with a
negative ground system.
Notice: Only use a vehicle that
has a 12-volt system with a
negative ground for jump
starting. If the other vehicle does
not have a 12-volt system with a
negative ground, both vehicles
can be damaged. 2. Get the vehicles close enough
so the jumper cables can reach,
but be sure the vehicles are not
touching each other. If they are,
it could cause a ground
connection you do not want. You
would not be able to start your
vehicle, and the bad grounding
could damage the electrical
systems.
To avoid the possibility of the
vehicles rolling, set the parking
brake firmly on both vehicles
involved in the jump start
procedure. Put an automatic
transmission in P (Park) or a
manual transmission in Neutral
before setting the parking brake.
Notice: If any accessories are left
on or plugged in during the jump
starting procedure, they could be
damaged. The repairs would not
be covered by the vehicle
warranty. Whenever possible,
turn off or unplug all accessories
on either vehicle when jump
starting the vehicle.
Page 327 of 402

Black plate (79,1)Chevrolet Express Owner Manual - 2013 - 1stPrintReady - 6/19/12
Vehicle Care 10-79
3. Turn off the ignition on bothvehicles. Unplug unnecessary
accessories plugged into the
cigarette lighter or the accessory
power outlet. Turn off the radio
and all lamps that are not
needed. This will avoid sparks
and help save both batteries.
And it could save the radio!
4. Open the hoods and locate the positive (+) and negative (−)
terminal locations of the other
vehicle.
On your van, use the unpainted
radio antenna bracket as a
remote negative (−) terminal.
{WARNING
Using an open flame near a
battery can cause battery gas to
explode. People have been hurt
doing this, and some have been
blinded. Use a flashlight if you
need more light.
(Continued)
WARNING (CONTINUED)
Be sure the battery has enough
water. You do not need to add
water to the battery installed in
your new vehicle. But if a battery
has filler caps, be sure the right
amount of fluid is there. If it is low,
add water to take care of that
first. If you do not, explosive gas
could be present.
Battery fluid contains acid that
can burn you. Do not get it on
you. If you accidentally get it in
your eyes or on your skin, flush
the place with water and get
medical help immediately.
{WARNING
Fans or other moving engine
parts can injure you badly. Keep
your hands away from moving
parts once the engine is running. 5. Check that the jumper cables do
not have loose or missing
insulation. If they do, you could
get a shock. The vehicles could
be damaged too.
Before you connect the cables,
here are some basic things you
should know. Positive (+) will go
to positive (+) or to a remote
positive (+) terminal if the vehicle
has one. Negative (−) will go to
an unpainted metal part or to a
remote negative (−) terminal if
the vehicle has one. On your
van, use the unpainted radio
antenna bracket as a remote
negative (−) terminal.
Do not connect positive (+) to
negative (−) or you will get a
short that would damage the
battery and maybe other parts
too. And do not connect the
negative (−) cable to the
negative (−) terminal on the dead
battery because this can cause
sparks.
Page 338 of 402
Black plate (90,1)Chevrolet Express Owner Manual - 2013 - 1stPrintReady - 6/19/12
10-90 Vehicle Care
Care of Safety Belts
Keep belts clean and dry.
{WARNING
Do not bleach or dye safety belts.
It may severely weaken them. In
a crash, they might not be able to
provide adequate protection.
Clean safety belts only with mild
soap and lukewarm water.
Floor Mats
{WARNING
If a floor mat is the wrong size or
is not properly installed, it can
interfere with the pedals.
Interference with the pedals can
cause unintended acceleration
and/or increased stopping
distance which can cause a crash
and injury. Make sure the floor
mat does not interfere with the
pedals.Use the following guidelines for
proper floor mat usage.
.The original equipment floor
mats were designed for the
vehicle. If the floor mats need
replacing, it is recommended
that GM certified floor mats be
purchased. Non-GM floor mats
may not fit properly and may
interfere with the pedals. Always
check that the floor mats do not
interfere with the pedals.
.Use the floor mat with the
correct side up. Do not turn
it over.
.Do not place anything on top of
the driver side floor mat.
.Use only a single floor mat on
the driver side.
.Do not place one floor mat on
top of another.
Page 340 of 402
Black plate (2,1)Chevrolet Express Owner Manual - 2013 - 1stPrintReady - 6/19/12
11-2 Service and Maintenance
Proper vehicle maintenance helps to
keep the vehicle in good working
condition, improves fuel economy,
and reduces vehicle emissions.
Because of the way people use
vehicles, maintenance needs vary.
There may need to be more
frequent checks and services.
The Additional Required
Services - Normal are for
vehicles that:
.Carry passengers and cargo
within recommended limits on
the Tire and Loading Information
label. SeeVehicle Load Limits
on page 9‑10.
.Are driven on reasonable road
surfaces within legal driving
limits.
.Use the recommended fuel. See
Recommended Fuel on
page 9‑42. Refer to the information in the
Maintenance Schedule Additional
Required Services - Normal chart.
The Additional Required
Services - Severe are for vehicles
that are:
.Mainly driven in heavy city traffic
in hot weather.
.Mainly driven in hilly or
mountainous terrain.
.Frequently towing a trailer.
.Used for high speed or
competitive driving.
.Used for taxi, police, or delivery
service.
Refer to the information in the
Maintenance Schedule Additional
Required Services - Severe chart.
{WARNING
Performing maintenance work can
be dangerous and can cause
serious injury. Perform
maintenance work only if the
required information, proper tools,
and equipment are available.
If they are not, see your dealer to
have a trained technician do the
work. See
Doing Your Own
Service Work on page 10‑4.
Page 391 of 402

Black plate (1,1)Chevrolet Express Owner Manual - 2013 - 1stPrintReady - 6/19/12
INDEX i-1
A
Accessories andModifications . . . . . . . . . . . . . . . . . 10-3
Accessory Power . . . . . . . . . . . . . . 9-19
Add-On Electrical Equipment . . . . . . . . . . . . . . . . . . . 9-57
Additional Information
OnStar
®. . . . . . . . . . . . . . . . . . . . . . 14-5
Air Cleaner/Filter, Engine . . . . . 10-15
Air Vents . . . . . . . . . . . . . . . . . . . . . . . 8-7
Airbag System Check . . . . . . . . . . . . . . . . . . . . . . . . 3-32
How Does an AirbagRestrain? . . . . . . . . . . . . . . . . . . . 3-21
Passenger Sensing System . . . . . . . . . . . . . . . . . . . . . . 3-26
What Makes an Airbag Inflate? . . . . . . . . . . . . . . . . . . . . . . 3-21
What Will You See after an Airbag Inflates? . . . . . . . . . . . . . 3-22
When Should an Airbag Inflate? . . . . . . . . . . . . . . . . . . . . . . 3-20
Where Are the Airbags? . . . . . . 3-18 Airbags
Adding Equipment to the
Vehicle . . . . . . . . . . . . . . . . . . . . . . 3-31
Light On-Off . . . . . . . . . . . . . . . . . . 5-15
On-Off Light . . . . . . . . . . . . . . . . . . 5-15
On-Off Switch . . . . . . . . . . . . . . . . 3-23
Passenger Status Indicator . . . 5-16
Readiness Light . . . . . . . . . . . . . . 5-14
Servicing Airbag-Equipped Vehicles . . . . . . . . . . . . . . . . . . . . . 3-31
System Check . . . . . . . . . . . . . . . . 3-16
All-Wheel Drive . . . . . . . . . 10-27, 9-30
AM-FM Radio . . . . . . . . . . . . . . . . . . . 7-7
Antilock Brake System (ABS) . . . . . . . . . . . . . . . . 9-30
Warning Light . . . . . . . . . . . . . . . . . 5-21
Appearance Care Exterior . . . . . . . . . . . . . . . . . . . . . 10-84
Interior . . . . . . . . . . . . . . . . . . . . . . 10-87
Ashtrays . . . . . . . . . . . . . . . . . . . . . . . . 5-8 Assistance Program,
Roadside . . . . . . . . . . . . . . 13-7, 13-11
Audio Players . . . . . . . . . . . . . . . . . 7-12 CD . . . . . . . . . . . . . . . . . . . . . . . . . . . 7-12
Audio System Fixed Mast Antenna . . . . . . . . . . 7-11
Radio Reception . . . . . . . . . . . . . . 7-10
Theft-Deterrent Feature . . . . . . . . 7-2
Automatic Door Locks . . . . . . . . . . . . . . . . . . . . 2-8
Headlamp System . . . . . . . . . . . . . 6-3
Transmission . . . . . . . . . . . 9-22, 9-26
TransmissionFluid . . . . . . . . . . . . . . . 10-10, 10-12
Automatic Transmission Manual Mode . . . . . . . . . . . . . . . . . 9-28
Shift Lock Control
Function Check . . . . . . . . . . . 10-30
Auxiliary Devices . . . . . . . . . . . . . . . . . . . . . . . 7-17
Axle, Front . . . . . . . . . . . . . . . . . . . . 10-28
Axle, Rear . . . . . . . . . . . . . . . . . . . . 10-28
Page 392 of 402

Black plate (2,1)Chevrolet Express Owner Manual - 2013 - 1stPrintReady - 6/19/12
i-2 INDEX
B
Battery . . . . . . . . . . . . . . . . . . . . . . . 10-27Jump Starting . . . . . . . . . . . . . . . 10-78
Load Management . . . . . . . . . . . . . 6-6
Power Protection . . . . . . . . . . . . . . 6-7
Voltage and ChargingMessages . . . . . . . . . . . . . . . . . . . 5-30
Blade Replacement, Wiper . . . 10-31
Bluetooth . . . . . . . . . . . . . . . . . . . . . . 7-21
Brake System Warning Light . . . . . . . . 5-20
Brakes . . . . . . . . . . . . . . . . . . . . . . . . 10-24 Antilock . . . . . . . . . . . . . . . . . . . . . . . 9-30
Fluid . . . . . . . . . . . . . . . . . . . . . . . . 10-25
Parking . . . . . . . . . . . . . . . . . . . . . . . 9-31
System Messages . . . . . . . . . . . . 5-30
Braking . . . . . . . . . . . . . . . . . . . . . . . . . 9-3
Break-In, New Vehicle . . . . . . . . . 9-14
Bulb Replacement . . . . . . . . . . . . 10-37 Center High-Mounted
Stoplamp (CHMSL) . . . . . . . 10-36
Front Turn Signal, Sidemarker, and
Parking Lamps . . . . . . . . . . . . 10-34
Halogen Bulbs . . . . . . . . . . . . . . 10-32
Headlamp Aiming . . . . . . . . . . . 10-32 Bulb Replacement (cont'd)
Headlamps . . . . . . . . . . 10-32, 10-33
License Plate Lamps . . . . . . . 10-37
Taillamps . . . . . . . . . . . . . . . . . . . 10-35
Buying New Tires . . . . . . . . . . . . . 10-61
C
Calibration . . . . . . . . . . . . . . . . . . . . . . 5-4
California Fuel Requirements . . . . . . . . . . . 9-42
Perchlorate MaterialsRequirements . . . . . . . . . . . . . . . 10-3
Warning . . . . . . . . . . . . . . . . . . . . . . 10-3
Camera, Rear Vision . . . . . . . . . . 9-38
Canadian Vehicle Owners . . . . . . . . iii
Capacities and Specifications . . . . . . . . . . . . . . . . 12-2
Carbon Monoxide Engine Exhaust . . . . . . . . . . . . . . . 9-21
Winter Driving . . . . . . . . . . . . . . . . . 9-7
Cargo Door Relocking . . . . . . . . . . 2-7
Cautions, Danger, and Warnings . . . . . . . . . . . . . . . . . . . . . . . . iv
CD Player . . . . . . . . . . . . . . . . . . . . . 7-12
Center High-Mounted Stoplamp (CHMSL) . . . . . . . . . 10-36 Chains, Tire . . . . . . . . . . . . . . . . . . 10-65
Charging System Light . . . . . . . . 5-17
Check
Engine Light . . . . . . . . . . . . . . . . . . 5-17
IgnitionTransmission Lock . . . . . . . . 10-31
Child Restraints
Infants and YoungChildren . . . . . . . . . . . . . . . . . . . . . 3-35
Lower Anchors and Tethers for Children . . . . . . . . . 3-41
Older Children . . . . . . . . . . . . . . . . 3-33
Securing . . . . . . . . . . 3-48, 3-50, 3-53
Systems . . . . . . . . . . . . . . . . . . . . . . 3-38
Cigarette Lighter . . . . . . . . . . . . . . . . 5-7
Circuit Breakers . . . . . . . . . . . . . . 10-38
Cleaning Exterior Care . . . . . . . . . . . . . . . 10-84
Interior Care . . . . . . . . . . . . . . . . 10-87
Climate Control Systems . . . . . . . 8-1 Air Conditioning . . . . . . . . . . . . . . . 8-1
Heating . . . . . . . . . . . . . . . . . . . . . . . . 8-1
Rear . . . . . . . . . . . . . . . . . . . . . . . . . . . 8-5
Rear Heating System . . . . . . . . . . 8-4
Clock . . . . . . . . . . . . . . . . . . . . . . . . . . . 5-6