2013 CHEVROLET EXPRESS PASSANGER light
[x] Cancel search: lightPage 229 of 402
Black plate (39,1)Chevrolet Express Owner Manual - 2013 - 1stPrintReady - 6/19/12
Driving and Operating 9-39
shifted into R (Reverse), the video
image appears on the navigation
screen. After a delay, the navigation
screen displays the last screen after
the vehicle is shifted out of
R (Reverse).
Turning the RVC System On or Off
To turn the RVC system on or off:
1. Shift into P (Park).
2. Press MENU to enter theconfigure menu options. Turn
the Multifunction knob until the
Display feature is highlighted
and press the Multifunction
knob. Or press the Display
screen button
3. Select the Rear Camera Options screen button. The Rear Camera
Options screen displays.
4. Select the Video screen button. When the Video screen button is
highlighted the RVC
system is on. The delay that is received after
shifting out of R (Reverse) is
approximately 10 seconds. The
delay can be canceled by
performing one of the following:
.Pressing a hard key on the
navigation system.
.Shifting into P (Park).
.Reach a vehicle speed of
8 km/h (5 mph).
Symbols
The navigation system may have a
feature that allows for viewing
parking assist symbols on the
navigation screen while using the
RVC. The Ultrasonic Rear Park
Assist (URPA) system must not be
disabled to use the caution symbols.
If URPA has been disabled and the
symbols have been turned on, the
Rear Parking Assist Symbols
Unavailable error message may
display. See Ultrasonic Parking
Assist on page 9‑37. The symbols appear near objects
detected by the URPA system. The
symbol may cover the object when
viewing the navigation screen.
To turn the symbols on or off:
1. Make sure that URPA has not
been disabled.
2. Shift into P (Park).
3. Press MENU to enter the configure menu options. Turn
the Multifunction knob until the
Display feature is highlighted
and press the Multifunction
knob. Or press the Display
screen button
4. Select the Rear Camera Options screen button. The Rear Camera
Options screen displays.
5. Touch the Symbols screen button. The screen button will be
highlighted when on.
Page 230 of 402
Black plate (40,1)Chevrolet Express Owner Manual - 2013 - 1stPrintReady - 6/19/12
9-40 Driving and Operating
Guidelines
The RVC system may have a
guideline overlay that can help the
driver align the vehicle when
backing into a parking spot.
To turn the guidelines on or off:
1. Make sure that URPA has notbeen disabled.
2. Shift into P (Park).
3. Press MENU to enter the configure menu options. Turn
the Multifunction knob until the
Display feature is highlighted
and press the Multifunction
knob. Or press the Display
screen button
4. Select the Rear Camera Options screen button. The Rear Camera
Options screen displays.
5. Touch the Guidelines screen button. The screen button will be
highlighted when on.RVC Location
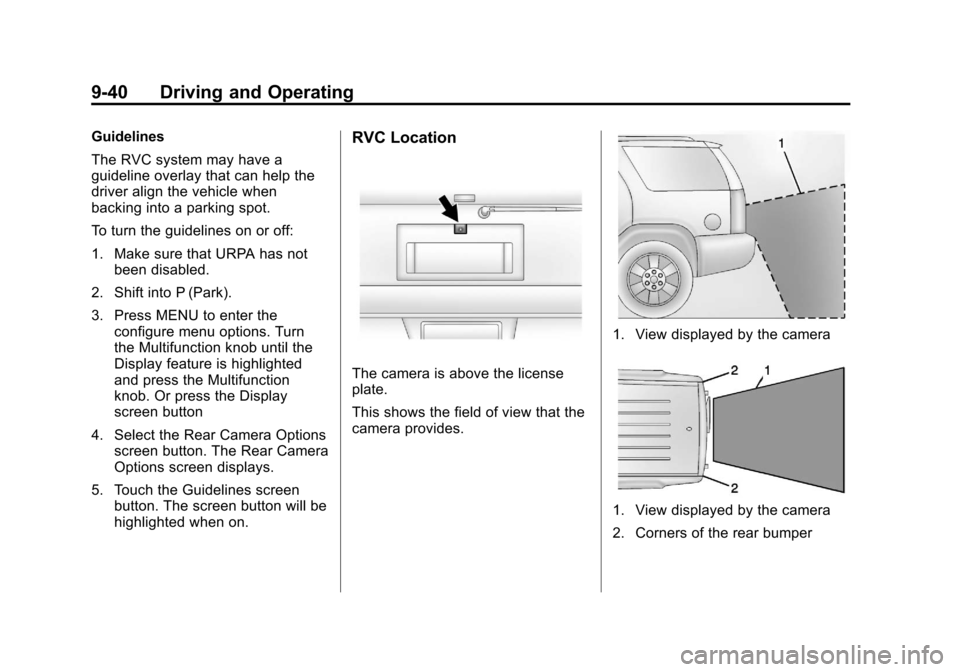
The camera is above the license
plate.
This shows the field of view that the
camera provides.
1. View displayed by the camera
1. View displayed by the camera
2. Corners of the rear bumper
Page 231 of 402

Black plate (41,1)Chevrolet Express Owner Manual - 2013 - 1stPrintReady - 6/19/12
Driving and Operating 9-41
Displayed images may be further or
closer than they appear. The area
displayed is limited and objects
which are close to either corner of
the bumper or under the bumper do
not display.
When the System Does Not
Seem To Work Properly
The RVC system might not work
properly or display a clear image if:
.The RVC is turned off. See
“Turning the RVC System On or
Off”earlier in this section.
.It is dark.
.The sun or the beam of
headlamps is shining directly
into the camera lens.
.Ice, snow, mud, or anything else
builds up on the camera lens.
Clean the lens, rinse it with
water, and wipe it with a soft
cloth.
.The back of the vehicle is in an
accident, the position and
mounting angle of the camera
can change or the camera can
be affected. Be sure to have the
camera and its position and
mounting angle checked at your
dealer.
The RVC system display in the
rearview mirror may turn off or not
appear as expected due to one of
the following conditions. If this
occurs the left indicator light on the
mirror will flash.
.A slow flash may indicate a loss
of video signal, or no video
signal present during the reverse
cycle.
.A fast flash may indicate that the
display has been on for the
maximum allowable time during
a reverse cycle, or the display
has reached an Over
Temperature limit. The fast flash conditions are
used to protect the video device
from high temperature
conditions. Once conditions
return to normal the device will
reset and the green indicator will
stop flashing.
During any of these fault conditions,
the display will be blank and the
indicator will flash while the vehicle
is in R (Reverse) or until the
conditions return to normal.
Page 236 of 402
Black plate (46,1)Chevrolet Express Owner Manual - 2013 - 1stPrintReady - 6/19/12
9-46 Driving and Operating
Be careful not to spill fuel. Do not
top off or overfill the tank and wait a
few seconds after you have finished
pumping before removing the
nozzle. Clean fuel from painted
surfaces as soon as possible. See
Exterior Care on page 10‑84.
When replacing the fuel cap, turn it
clockwise until it clicks. Make sure
the cap is fully installed. The
diagnostic system can determine if
the fuel cap has been left off or
improperly installed. This would
allow fuel to evaporate into the
atmosphere. SeeMalfunction
Indicator Lamp on page 5‑17.
{WARNING
If a fire starts while you are
refueling, do not remove the
nozzle. Shut off the flow of fuel by
shutting off the pump or by
notifying the station attendant.
Leave the area immediately. Notice:
If you need a new fuel
cap, be sure to get the right type.
Your dealer can get one for you.
If you get the wrong type, it may
not fit properly. This may cause
the malfunction indicator lamp to
light and may damage the fuel
tank and emissions system. See
Malfunction Indicator Lamp on
page 5‑17.
Filling a Portable Fuel
Container
{WARNING
Filling a portable fuel container
while it is in the vehicle can cause
fuel vapors that can ignite either
by static electricity or other
means. You or others could be
badly burned and the vehicle
could be damaged. Always:
.Use approved fuel
containers.
(Continued)
WARNING (CONTINUED)
.Remove container from
vehicle, trunk, or pickup bed
before filling.
.Place container on the
ground.
.Place the nozzle inside the fill
opening of the container
before dispensing fuel, and
keep it in contact with the fill
opening until filling is
complete.
.Do not smoke while
pumping fuel.
Page 245 of 402
Black plate (55,1)Chevrolet Express Owner Manual - 2013 - 1stPrintReady - 6/19/12
Driving and Operating 9-55
not sealed, deadly carbon monoxide
(CO) from the engine's exhaust can
get into the vehicle as well as dirt
and water. See“Carbon Monoxide”
under Engine Exhaust on
page 9‑21.
Safety Chains
Always attach chains between the
vehicle and the trailer. Cross the
safety chains under the tongue of
the trailer to help prevent the tongue
from contacting the road if it
becomes separated from the hitch.
Always leave just enough slack so
the rig can turn. Never allow safety
chains to drag on the ground.
Trailer Brakes
A loaded trailer that weighs more
than 680 kg (1,500 lbs) needs to
have its own brake system that is
adequate for the weight of the
trailer. Be sure to read and follow
the instructions for the trailer brakes
so they are installed, adjusted and
maintained properly.
Trailer Wiring Harness
The optional heavy-duty trailer
wiring package includes a wiring
harness, with a seven-pin connector
at the rear of the vehicle and a
four-wire harness assembly under
the driver side of the instrument
panel. The four-wire harness
assembly comes without a
connector.
If the vehicle does not have a trailer
hitch, the seven-wire harness
assembly with connector is taped
together and located in a frame
pocket at the driver side rear left
corner of the frame.
If the vehicle has a trailer hitch, the
seven-wire harness assembly with
connector is attached to a bracket
on the hitch platform. In both cases,
the seven-wire harness has a
connector and includes a 30-amp
feed wire. The seven-wire harness connector
contains the following trailer circuits:.Light Green: Back-up Lamps
(10A fuse)**
.White: Ground
.Dark Blue: Trailer Brake Signal
.Dark Green: Right Rear Stop
and Turn Signal*
.Red/Black Stripe: Battery Feed
(30A Fuse)
.Brown: Trailer Park Lamp
Supply Voltage (15A fuse)**
.Yellow: Left Rear Stop and Turn
Signal *
The four-wire harness (without
connector) contains the following
circuits:
.Black: Ground
.Red/White: Battery Feed
.Dark Blue: Trailer Brake Signal
.Light Blue: CHMSL/Stoplamp
Supply Voltage
Page 246 of 402
Black plate (56,1)Chevrolet Express Owner Manual - 2013 - 1stPrintReady - 6/19/12
9-56 Driving and Operating
* If the vehicle is a cutaway with
trailer provisions, a 15 amp fuse will
be shared for both left/stop trailer
turn and right/stop trailer turn
signals. However, the cutaway
lighting connector will have a
10 amp fuse for each signal.
** If the vehicle is a cutaway with
trailer provisions, a 15 amp fuse will
be shared for trailer park lamps and
cutaway rear lighting connector park
lamps. Also, a 10 amp fuse will be
shared for trailer back-up lamps and
cutaway rear lighting connector
back-up lamps.
Tow/Haul Mode
This button is on the instrument
panel, to the right of the steering
wheel.
Pressing this button turns on and off
the Tow/Haul Mode.
This indicator light on the instrument
cluster comes on when the Tow/
Haul Mode is on.
Tow/Haul is a feature that assists
when pulling a heavy trailer or a
large or heavy load. SeeTow/Haul
Mode on page 9‑29.
Tow/Haul is designed to be most
effective when the vehicle and
trailer combined weight is at least
75 percent of the vehicle Gross
Combined Weight Rating (GCWR).
See “Weight of the Trailer” inTrailer
Towing on page 9‑49. Tow/Haul is
most useful under the following
driving conditions:
.When pulling a heavy trailer or a
large or heavy load through
rolling terrain.
.When pulling a heavy trailer or a
large or heavy load in stop and
go traffic.
.When pulling a heavy trailer or a
large or heavy load in busy
parking lots where improved low
speed control of the vehicle is
desired.
Operating the vehicle in Tow/Haul
when lightly loaded or with no trailer
at all will not cause damage.
However, there is no benefit to the
selection of Tow/Haul when the
vehicle is unloaded. Such a
selection when unloaded may result
in unpleasant engine and
transmission driving characteristics
and reduced fuel economy. Tow/
Haul is recommended only when
pulling a heavy trailer or a large or
heavy load.
Page 261 of 402

Black plate (13,1)Chevrolet Express Owner Manual - 2013 - 1stPrintReady - 6/19/12
Vehicle Care 10-13
vehicle towed to a dealer and have
it repaired before driving the vehicle
further.
Change the fluid and filter at the
intervals listed inMaintenance
Schedule on page 11‑3, and be sure
to use the transmission fluid listed in
Recommended Fluids and
Lubricants on page 11‑12.
How to Check Automatic
Transmission Fluid
Because this operation can be
difficult, it is recommended to have
this check done at your dealer,
which can monitor the transmission
temperature. The transmission fluid
level increases with temperature. To
obtain a highly accurate fluid level
check, the transmission temperature
must be measured.
If it is decided to check the fluid
level, be sure to follow all the
instructions here, or a false reading
on the dipstick may occur. Notice:
Too much or too little
fluid can damage the
transmission. Too much can
mean that some of the fluid could
come out and fall on hot engine
parts or exhaust system parts,
starting a fire. Too little fluid
could cause the transmission to
overheat. Be sure to get an
accurate reading if checking the
transmission fluid.
Wait at least 30 minutes with the
engine off, before checking the
transmission fluid level if the vehicle
has been driven:
.In hot weather, when outside
temperatures are above 32°C
(90°F).
.The vehicle is heavily loaded.
.At high speed for quite a while in
hot weather.
.In heavy traffic and hot weather.
.While pulling a trailer. After driving under these conditions,
a hot check can be performed. The
fluid should be hot, which is 71°C to
93°C (160°F to 200°F).
A cold fluid level check can be
performed after the vehicle has
been sitting for eight hours or more
with the engine off, but this is used
only as a reference. Let the engine
run at idle for five minutes if the
outside temperature is between
15°C to 32°C (60°F to 90°F). Should
the fluid level be low during this cold
check, the fluid must be checked
warm or hot before adding fluid.
If the outside temperature is colder
than 15°C (60°F) or hotter than
32°C (90°F), a cold check cannot be
performed.
A warm fluid level check can be
performed by driving the vehicle
under lightly loaded conditions and
outside temperatures between 10°C
to 27°C (50°F to 80°F). The vehicle
should be driven for at least 24 km
(15 mi) before performing a warm
check. Checking the fluid warm or
Page 262 of 402

Black plate (14,1)Chevrolet Express Owner Manual - 2013 - 1stPrintReady - 6/19/12
10-14 Vehicle Care
hot will give a more accurate
reading of the fluid level than a cold
check.
Because the vehicle is equipped
with a high-efficiency air-to-oil
cooler, the transmission fluid
temperature may not reach the
required hot fluid level checking
temperature under normal lightly
loaded driving vehicle conditions.
Checking the Fluid Level
Prepare the vehicle:
1. Park the vehicle on a levelplace. Keep the engine running.
2. With the parking brake applied, place the shift lever in P (Park).
3. With a foot on the brake pedal, move the shift lever through
each gear range, pausing for
about three seconds in each
range. When M is reached,
move the selector from M1
through M3. Then, position the
shift lever in P (Park). 4. Let the engine run at idle for
two minutes or more.
Then, without shutting off the
engine, use the steps that follow.
The transmission dipstick is near
the center of the engine
compartment and will be labeled
with the graphic shown.
See Engine Compartment Overview
on page 10‑6 for more information
on location.
1. COLD Range
2. WARM Range 3. HOT Range
1. Flip the handle up, pull out the
dipstick, and wipe it with a clean
rag or paper towel.
2. Push it back in all the way, wait three seconds, and pull it back
out again.
3. Check both sides of the dipstick, and read the lower level. The
fluid level must be in the
COLD (1) range for a cold
check, transmission temperature
27°C to 32°C (80°F to 90°F);
between the COLD (1) and
HOT (3) range for a WARM (2)
check, 50°C to 60°C (122°F to
140°F); or in the HOT (3)
cross-hatched range for a hot
check, 71°C to 93°C (160°F to
200°F). Be sure to keep the
dipstick pointed down to get an
accurate reading.
4. If the fluid level is in the acceptable range, push the
dipstick back in all the way; then
flip the handle down to lock the
dipstick in place.