2013 CHEVROLET EXPRESS CARGO VAN ignition
[x] Cancel search: ignitionPage 226 of 402
Black plate (36,1)Chevrolet Express Owner Manual - 2013 - 1stPrintReady - 6/19/12
9-36 Driving and Operating
.To slow down in small amounts,
press the SET–button on the
steering wheel briefly. Each time
this is done, the vehicle goes
about 1.6 km/h (1 mph) slower.
Passing Another Vehicle While
Using Cruise Control
Use the accelerator pedal to
increase the vehicle speed. When
you take your foot off the pedal, the
vehicle will slow down to the
previous set cruise speed.
Using Cruise Control on Hills
How well the cruise control works
on hills depends on the vehicle
speed, the load, and the steepness
of the hills. When going up steep
hills, pressing the accelerator pedal
may be necessary to maintain
vehicle speed. While going downhill:
.Vehicles with a four speed
automatic transmission may
need to have the brakes applied
or the transmission shifted to a
lower gear to help maintain
driver selected speed.
.Vehicles with a six speed
automatic transmission have
Cruise Grade Braking to help
maintain driver selected speed.
Cruise Grade Braking is enabled
when the vehicle is started and
Cruise Control is active. It is not
enabled in Range Selection Mode.
It assists in maintaining driver
selected speed when driving on
downhill grades by using the engine
and transmission to slow the
vehicle. To disable and enable Cruise Grade
Braking for the current ignition key
cycle, press and hold the Tow/Haul
button for three seconds. A DIC
message displays. See
Transmission Messages on
page 5‑37.
When the brakes are manually
applied the cruise control is
disengaged.
Ending Cruise Control
There are three ways to end cruise
control:
.To disengage cruise control,
step lightly on the brake pedal.
.Press the[on the steering
wheel.
.To turn off the cruise control,
press
Ion the steering wheel.
Erasing Speed Memory
The cruise control set speed is
erased from memory if
Iis
pressed or if the vehicle is
turned off.
Page 249 of 402
Black plate (1,1)Chevrolet Express Owner Manual - 2013 - 1stPrintReady - 6/19/12
Vehicle Care 10-1
Vehicle Care
General Information
General Information . . . . . . . . . . 10-2
California Proposition65 Warning . . . . . . . . . . . . . . . . . 10-3
California Perchlorate Materials Requirements . . . . 10-3
Accessories and Modifications . . . . . . . . . . . . . . . 10-3
Vehicle Checks
Doing Your OwnService Work . . . . . . . . . . . . . . . 10-4
Hood . . . . . . . . . . . . . . . . . . . . . . . . 10-4
Engine Compartment Overview . . . . . . . . . . . . . . . . . . . 10-6
Engine Oil . . . . . . . . . . . . . . . . . . . 10-7
Engine Oil Life System . . . . . . 10-9
Automatic Transmission Fluid (4-Speed
Transmission) . . . . . . . . . . . . . 10-10
Automatic Transmission Fluid (6-Speed
Transmission) . . . . . . . . . . . . . 10-12
Engine Air Cleaner/Filter . . . . 10-15
Cooling System . . . . . . . . . . . . 10-16 Engine Coolant . . . . . . . . . . . . . 10-17
Engine Overheating . . . . . . . . 10-21
Engine Fan . . . . . . . . . . . . . . . . . 10-22
Power Steering Fluid . . . . . . . 10-23
Washer Fluid . . . . . . . . . . . . . . . 10-23
Brakes . . . . . . . . . . . . . . . . . . . . . 10-24
Brake Fluid . . . . . . . . . . . . . . . . . 10-25
Battery . . . . . . . . . . . . . . . . . . . . . 10-27
All-Wheel Drive . . . . . . . . . . . . . 10-27
Front Axle . . . . . . . . . . . . . . . . . . 10-28
Rear Axle . . . . . . . . . . . . . . . . . . 10-28
Noise Control System . . . . . . 10-29
Starter Switch Check . . . . . . . 10-30
Automatic Transmission Shift
Lock Control Function
Check . . . . . . . . . . . . . . . . . . . . . 10-30
Ignition Transmission Lock Check . . . . . . . . . . . . . . . . . . . . . 10-31
Park Brake and P (Park) Mechanism Check . . . . . . . . 10-31
Wiper Blade Replacement . . . . . . . . . . . . . . 10-31
Headlamp Aiming
Headlamp Aiming . . . . . . . . . . 10-32
Bulb Replacement
Bulb Replacement . . . . . . . . . . 10-32
Halogen Bulbs . . . . . . . . . . . . . . 10-32
Headlamps . . . . . . . . . . . . . . . . . 10-33
Front Turn Signal,Sidemarker, and Parking
Lamps . . . . . . . . . . . . . . . . . . . . 10-34
Taillamps . . . . . . . . . . . . . . . . . . . 10-35
Center High-Mounted Stoplamp (CHMSL) . . . . . . . 10-36
License Plate Lamp . . . . . . . . 10-37
Replacement Bulbs . . . . . . . . . 10-37
Electrical System
Electrical System Overload . . . . . . . . . . . . . . . . . . 10-38
Fuses and Circuit Breakers . . . . . . . . . . . . . . . . . . 10-38
Engine Compartment Fuse Block . . . . . . . . . . . . . . . . . . . . . 10-38
Floor Console Fuse Block . . . . . . . . . . . . . . . . . . . . . 10-41
Page 258 of 402
Black plate (10,1)Chevrolet Express Owner Manual - 2013 - 1stPrintReady - 6/19/12
10-10 Vehicle Care
When the system has calculated
that oil life has been diminished, it
indicates that an oil change is
necessary. A CHANGE ENGINE
OIL SOON message comes on. See
Engine Oil Messages on page 5‑32.
Change the oil as soon as possible
within the next 1 000 km (600 mi).
It is possible that, if driving under
the best conditions, the oil life
system might indicate that an oil
change is not necessary for up to a
year. The engine oil and filter must
be changed at least once a year
and, at this time, the system must
be reset. Your dealer has trained
service people who will perform this
work and reset the system. It is also
important to check the oil regularly
over the course of an oil drain
interval and keep it at the proper
level.
If the system is ever reset
accidentally, the oil must be
changed at 5 000 km (3,000 mi)
since the last oil change.
Remember to reset the oil life
system whenever the oil is changed.How to Reset the Engine Oil
Life System
Reset the system whenever the
engine oil is changed so that the
system can calculate the next
engine oil change. To reset the
system:
1. Turn the ignition key to ON/RUNwith the engine off.
2. Fully press and release the accelerator pedal slowly three
times within five seconds.
3. Turn the key to LOCK/OFF.
If the CHANGE ENGINE OIL SOON
message comes back on when the
vehicle is started, the engine oil life
system has not reset. Repeat the
procedure.
Automatic Transmission
Fluid (4-Speed
Transmission)
If the vehicle has a diesel engine,
see the Duramax diesel supplement
for more information.
When to Check and Change
Automatic Transmission Fluid
A good time to check the automatic
transmission fluid level is when the
engine oil is changed.
Change the fluid and filter at the
intervals listed in Maintenance
Schedule on page 11‑3 and be sure
to use the transmission fluid listed in
Recommended Fluids and
Lubricants on page 11‑12.
How to Check Automatic
Transmission Fluid
Because this operation can be a
little difficult, it may be decided to
have this done at the dealer.
If not taken to the dealer, be sure to
follow all the instructions here or a
false reading on the dipstick could
result.
Notice: Too much or too little
fluid can damage the
transmission. Too much can
mean that some of the fluid could
come out and fall on hot engine
Page 279 of 402
Black plate (31,1)Chevrolet Express Owner Manual - 2013 - 1stPrintReady - 6/19/12
Vehicle Care 10-31
2. Firmly apply the parking brake.See Parking Brake on
page 9‑31.
Be ready to apply the regular
brake immediately if the vehicle
begins to move.
3. With the engine off, turn the ignition on, but do not start the
engine. Without applying the
regular brake, try to move the
shift lever out of P (Park) with
normal effort. If the shift lever
moves out of P (Park), contact
your dealer for service.
Ignition Transmission
Lock Check
While parked, and with the parking
brake set, try to turn the ignition to
LOCK/OFF in each shift lever
position.
.The ignition should turn to
LOCK/OFF only when the shift
lever is in P (Park).
.The ignition key should come
out only in LOCK/OFF. Contact your dealer if service is
required.
Park Brake and P (Park)
Mechanism Check
{WARNING
When you are doing this check,
the vehicle could begin to move.
You or others could be injured
and property could be damaged.
Make sure there is room in front
of the vehicle in case it begins to
roll. Be ready to apply the regular
brake at once should the vehicle
begin to move.
Park on a fairly steep hill, with the
vehicle facing downhill. Keeping
your foot on the regular brake, set
the parking brake.
.To check the parking brake's
holding ability: With the engine
running and the transmission in
N (Neutral), slowly remove foot pressure from the regular brake
pedal. Do this until the vehicle is
held by the parking brake only.
.To check the P (Park)
mechanism's holding ability:
With the engine running, shift to
P (Park). Then release the
parking brake followed by the
regular brake.
Contact your dealer if service is
required.
Wiper Blade Replacement
Windshield wiper blades should be
inspected for wear and cracking.
See Maintenance Schedule on
page 11‑3.
Replacement blades come in
different types and are removed in
different ways. For proper type and
length, see Maintenance
Replacement Parts on page 11‑14.
Page 287 of 402
Black plate (39,1)Chevrolet Express Owner Manual - 2013 - 1stPrintReady - 6/19/12
Vehicle Care 10-39
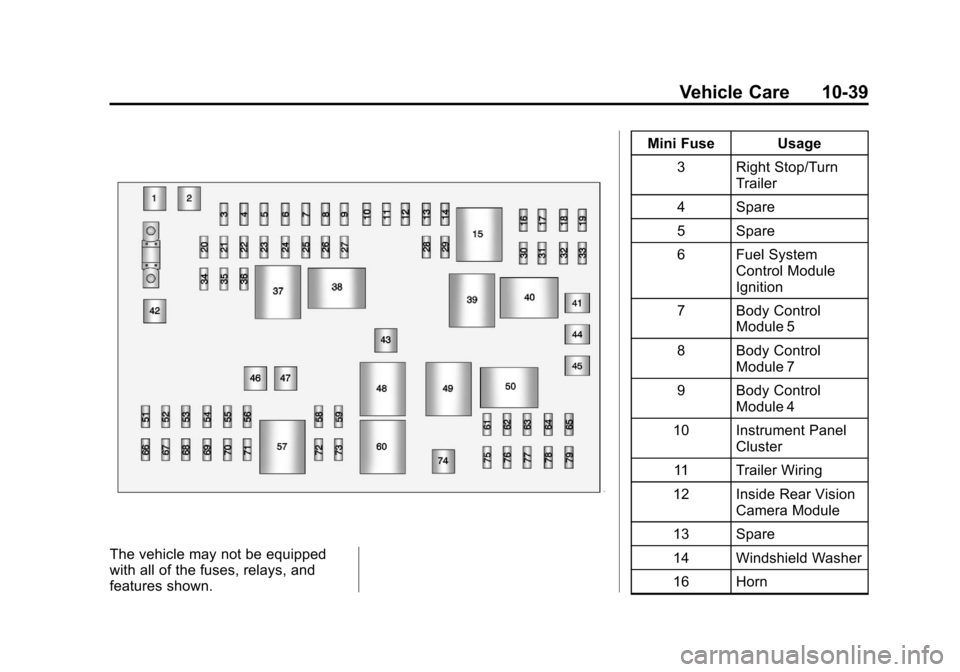
The vehicle may not be equipped
with all of the fuses, relays, and
features shown.Mini Fuse Usage
3 Right Stop/Turn Trailer
4 Spare
5 Spare
6 Fuel System Control Module
Ignition
7 Body Control Module 5
8 Body Control Module 7
9 Body Control Module 4
10 Instrument Panel Cluster
11 Trailer Wiring
12 Inside Rear Vision Camera Module
13 Spare
14 Windshield Washer
16 Horn
Page 288 of 402
Black plate (40,1)Chevrolet Express Owner Manual - 2013 - 1stPrintReady - 6/19/12
10-40 Vehicle Care
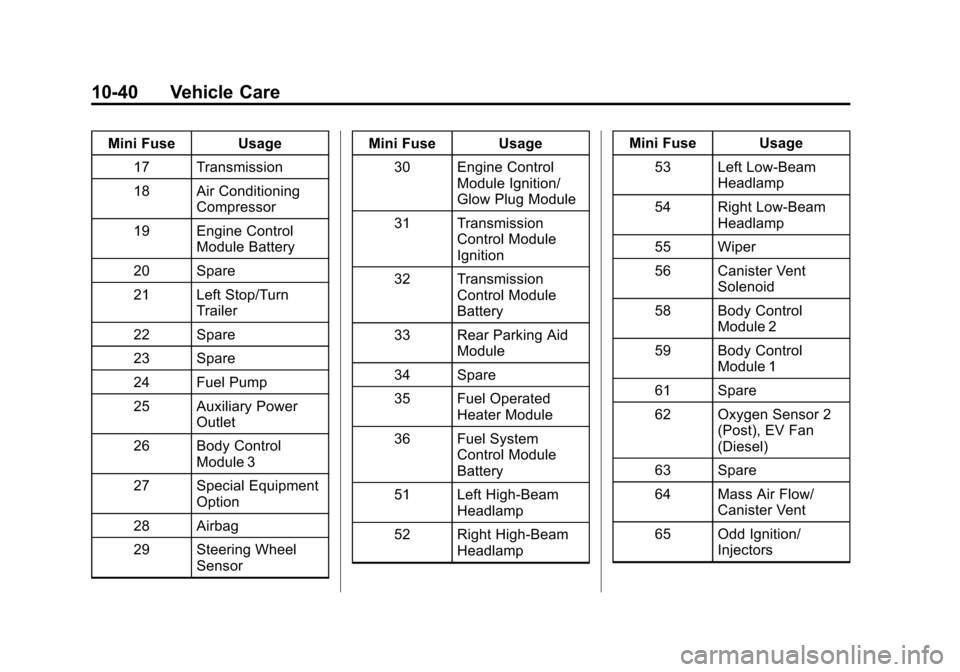
Mini Fuse Usage17 Transmission
18 Air Conditioning Compressor
19 Engine Control Module Battery
20 Spare
21 Left Stop/Turn Trailer
22 Spare
23 Spare
24 Fuel Pump
25 Auxiliary Power Outlet
26 Body Control Module 3
27 Special Equipment Option
28 Airbag
29 Steering Wheel Sensor Mini Fuse Usage
30 Engine Control Module Ignition/
Glow Plug Module
31 Transmission Control Module
Ignition
32 Transmission Control Module
Battery
33 Rear Parking Aid Module
34 Spare
35 Fuel Operated Heater Module
36 Fuel System Control Module
Battery
51 Left High-Beam Headlamp
52 Right High-Beam Headlamp Mini Fuse Usage
53 Left Low-Beam Headlamp
54 Right Low-Beam Headlamp
55 Wiper
56 Canister Vent Solenoid
58 Body Control Module 2
59 Body Control Module 1
61 Spare
62 Oxygen Sensor 2 (Post), EV Fan
(Diesel)
63 Spare
64 Mass Air Flow/ Canister Vent
65 Odd Ignition/ Injectors
Page 289 of 402
Black plate (41,1)Chevrolet Express Owner Manual - 2013 - 1stPrintReady - 6/19/12
Vehicle Care 10-41
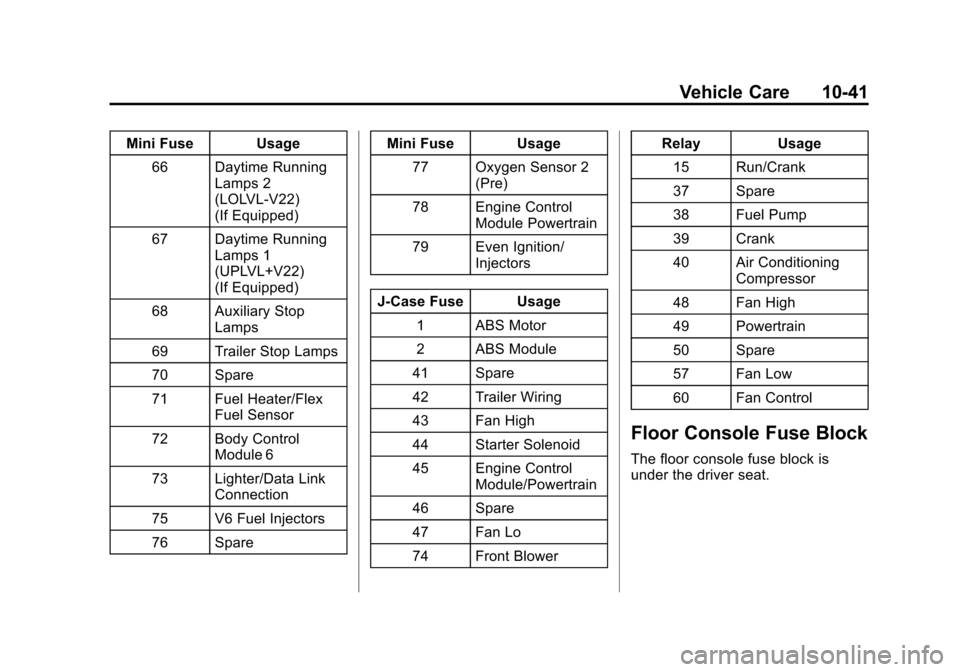
Mini Fuse Usage66 Daytime Running Lamps 2
(LOLVL-V22)
(If Equipped)
67 Daytime Running Lamps 1
(UPLVL+V22)
(If Equipped)
68 Auxiliary Stop Lamps
69 Trailer Stop Lamps
70 Spare
71 Fuel Heater/Flex Fuel Sensor
72 Body Control Module 6
73 Lighter/Data Link Connection
75 V6 Fuel Injectors
76 Spare Mini Fuse Usage
77 Oxygen Sensor 2 (Pre)
78 Engine Control Module Powertrain
79 Even Ignition/ Injectors
J-Case Fuse Usage 1 ABS Motor
2 ABS Module
41 Spare
42 Trailer Wiring
43 Fan High
44 Starter Solenoid
45 Engine Control Module/Powertrain
46 Spare
47 Fan Lo
74 Front Blower Relay Usage
15 Run/Crank
37 Spare
38 Fuel Pump
39 Crank
40 Air Conditioning Compressor
48 Fan High
49 Powertrain
50 Spare
57 Fan Low
60 Fan Control
Floor Console Fuse Block
The floor console fuse block is
under the driver seat.
Page 291 of 402
Black plate (43,1)Chevrolet Express Owner Manual - 2013 - 1stPrintReady - 6/19/12
Vehicle Care 10-43
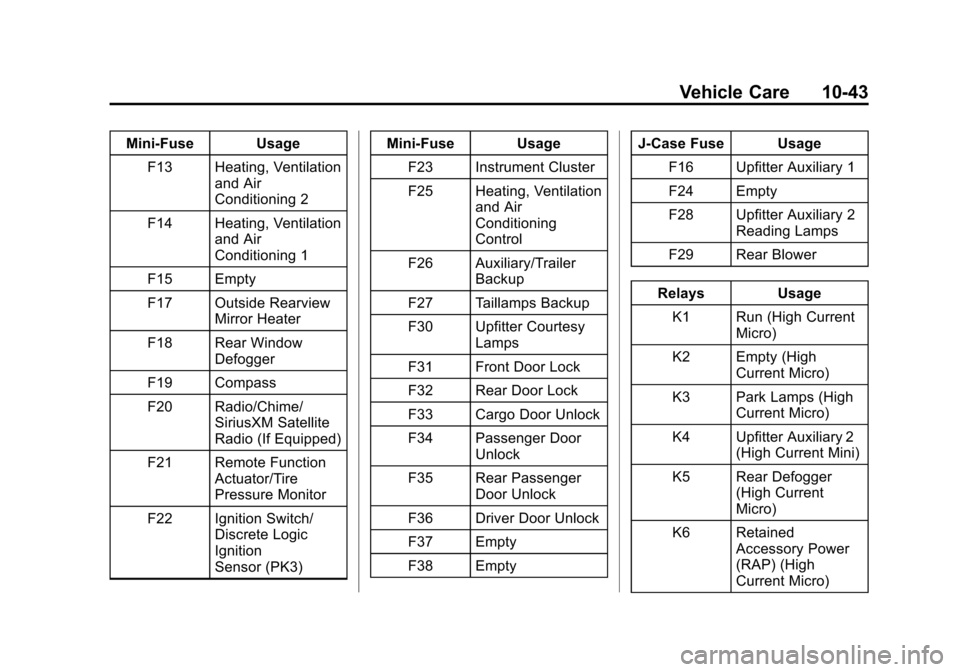
Mini-Fuse UsageF13 Heating, Ventilation and Air
Conditioning 2
F14 Heating, Ventilation and Air
Conditioning 1
F15 Empty
F17 Outside Rearview Mirror Heater
F18 Rear Window Defogger
F19 Compass
F20 Radio/Chime/ SiriusXM Satellite
Radio (If Equipped)
F21 Remote Function Actuator/Tire
Pressure Monitor
F22 Ignition Switch/ Discrete Logic
Ignition
Sensor (PK3) Mini-Fuse Usage
F23 Instrument Cluster
F25 Heating, Ventilation and Air
Conditioning
Control
F26 Auxiliary/Trailer Backup
F27 Taillamps Backup
F30 Upfitter Courtesy Lamps
F31 Front Door Lock
F32 Rear Door Lock
F33 Cargo Door Unlock
F34 Passenger Door Unlock
F35 Rear Passenger Door Unlock
F36 Driver Door Unlock
F37 Empty
F38 Empty J-Case Fuse Usage
F16 Upfitter Auxiliary 1
F24 Empty
F28 Upfitter Auxiliary 2 Reading Lamps
F29 Rear Blower
Relays Usage K1 Run (High Current Micro)
K2 Empty (High Current Micro)
K3 Park Lamps (High Current Micro)
K4 Upfitter Auxiliary 2 (High Current Mini)
K5 Rear Defogger (High Current
Micro)
K6 Retained Accessory Power
(RAP) (High
Current Micro)