2013 CHEVROLET EQUINOX battery
[x] Cancel search: batteryPage 32 of 388
Black plate (2,1)Chevrolet Equinox Owner Manual - 2013 - CRC - 5/21/12
2-2 Keys, Doors, and Windows
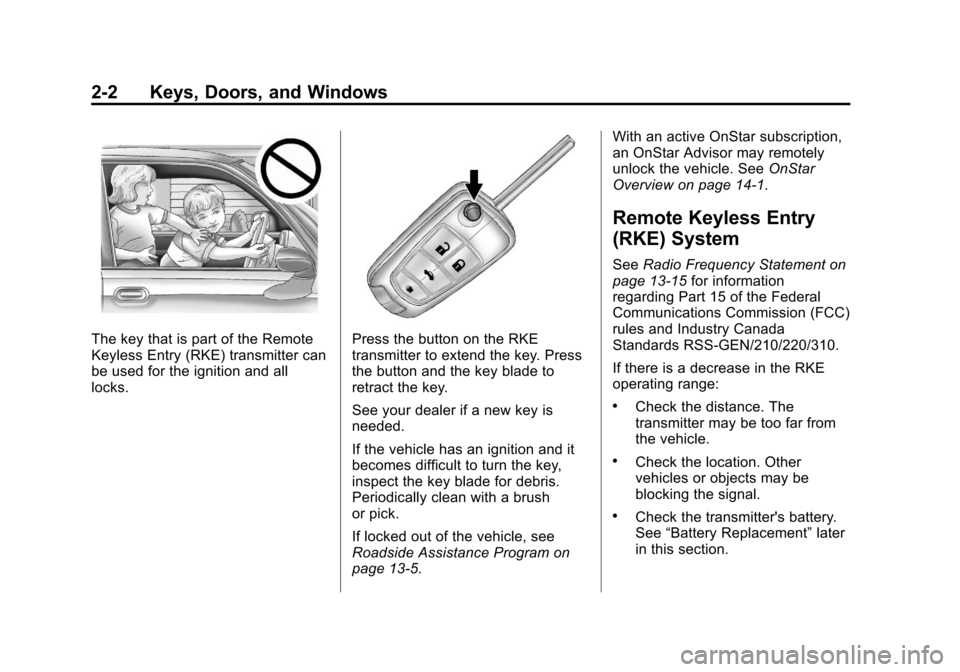
The key that is part of the Remote
Keyless Entry (RKE) transmitter can
be used for the ignition and all
locks.Press the button on the RKE
transmitter to extend the key. Press
the button and the key blade to
retract the key.
See your dealer if a new key is
needed.
If the vehicle has an ignition and it
becomes difficult to turn the key,
inspect the key blade for debris.
Periodically clean with a brush
or pick.
If locked out of the vehicle, see
Roadside Assistance Program on
page 13‑5.With an active OnStar subscription,
an OnStar Advisor may remotely
unlock the vehicle. See
OnStar
Overview on page 14‑1.
Remote Keyless Entry
(RKE) System
See Radio Frequency Statement on
page 13‑15 for information
regarding Part 15 of the Federal
Communications Commission (FCC)
rules and Industry Canada
Standards RSS-GEN/210/220/310.
If there is a decrease in the RKE
operating range:
.Check the distance. The
transmitter may be too far from
the vehicle.
.Check the location. Other
vehicles or objects may be
blocking the signal.
.Check the transmitter's battery.
See “Battery Replacement” later
in this section.
Page 34 of 388
Black plate (4,1)Chevrolet Equinox Owner Manual - 2013 - CRC - 5/21/12
2-4 Keys, Doors, and Windows
7(Vehicle Locator/Panic
Alarm): Press and release one
time to initiate vehicle locator. The
exterior lamps flash and the horn
chirps three times. Press and hold
7for at least three seconds to
sound the panic alarm. The horn
sounds and the turn signals flash
until
7is pressed again or the key
is placed in the ignition and turned
to ON/RUN.
/(Remote Vehicle Start): For
vehicles with this feature, first press
Qthen press and hold/to start
the engine from outside the vehicle
using the RKE transmitter. See
Remote Vehicle Start on page 2‑4
for additional information.
The buttons on the keys are
disabled when there is a key in the
ignition.
Programming Transmitters to
the Vehicle
Only RKE transmitters programmed
to this vehicle will work. If a
transmitter is lost or stolen, a replacement can be purchased and
programmed through your dealer.
When the replacement transmitter is
programmed to this vehicle, all
remaining transmitters must also be
reprogrammed. Any lost or stolen
transmitters will no longer work
once the new transmitter is
programmed.
Battery Replacement
Replace the battery if the REPLACE
BATTERY IN REMOTE KEY
message displays in the DIC. See
“Replace Battery in Remote Key”
under
Key and Lock Messages on
page 5‑28.
The battery is not rechargeable. To
replace the battery:
1. Push the button on the transmitter to extend the key.
2. Remove the battery cover by prying with a finger.
3. Remove the battery by pushing on the battery and sliding it
toward the key blade. 4. Insert the new battery, positive
side facing up. Push the battery
down until it is held in place.
Replace with a CR2032 or
equivalent battery.
5. Snap the battery cover back on to the transmitter.
Remote Vehicle Start
The vehicle may have this feature
that allows you to start the engine
from outside the vehicle.
/(Remote Vehicle Start): This
button will be on the RKE
transmitter if the vehicle has remote
start.
The climate control system will use
the previous settings during a
remote start. The rear defog may
come on during remote start based
on cold ambient conditions. The
rear defog indicator light does not
come on during remote start.
Page 41 of 388
Black plate (11,1)Chevrolet Equinox Owner Manual - 2013 - CRC - 5/21/12
Keys, Doors, and Windows 2-11
Do not force the liftgate open or
closed during a power cycle.
The power liftgate may be
temporarily disabled under extreme
temperatures or low battery
conditions. If this occurs, the liftgate
can still be operated manually.
If the vehicle is shifted out of
P (Park) while the power function is
in progress, the liftgate power
function will continue to completion.
If the vehicle is shifted out of
P (Park) and accelerated before the
power liftgate latch is closed, the
liftgate may reverse to the open
position. Cargo could fall out of the
vehicle. Always make sure the
power liftgate is closed and latched
before driving away.
If the liftgate is power opened and
the liftgate support struts have lost
pressure, the turn signals flash and
a chime will sound. The liftgate
stays open temporarily, and then
slowly closes. See a dealer for
service before using the liftgate.Obstacle Detection Features
If the liftgate encounters an obstacle
during a power open or close cycle,
a warning chime will sound and the
liftgate will automatically reverse
direction to the full closed or open
position. After removing the
obstruction, the power liftgate
operation can be used again. If the
liftgate encounters multiple
obstacles on the same power cycle,
the power function will deactivate
and a message will display in the
Driver Information Center (DIC), see
Object Detection System Messages
on page 5‑29. After removing the
obstructions, the liftgate will resume
normal power operation.
Pinch sensors are located on the
side edges of the liftgate. If an
object is caught between the liftgate
and the vehicle and presses against
this sensor, the liftgate will reverse
direction and open fully. The liftgate
will remain open until it is activated
again or closed manually.
Power Liftgate 3/4 Mode
To program the liftgate opening
height:
1. Turn the liftgate switch to eitherthe MAX, or the 3/4 mode
position and power open the
liftgate.
2. Stop the liftgate movement at the desired height by pressing
any liftgate switch. Manually
adjust the liftgate position if
required.
3. Press and hold the button on the liftgate adjacent to the latch until
the turn signals flash and a beep
sounds to indicate that the new
setting is recorded.
When power opened with the 3/4
mode selected, the liftgate stops at
the new set position.
Page 42 of 388
Black plate (12,1)Chevrolet Equinox Owner Manual - 2013 - CRC - 5/21/12
2-12 Keys, Doors, and Windows
If there is no audible and visual
feedback when setting the
intermediate stop position, the
liftgate height is being set below the
3/4 open height minimum
(approximately 1.5 m or 5 ft). The
liftgate cannot be set below that
minimum and the new setting will
not be recorded.
Manual Operation of Power
Liftgate
To change the liftgate to manual
operation, turn the mode switch to
the OFF position.
With the power liftgate disabled and
all of the doors unlocked, the liftgate
can be manually opened and
closed. Manual operation of a
liftgate that also has power
operation requires more effort than
a standard manual liftgate.To open the liftgate, press the touch
pad on the handle on the outside of
the liftgate, and lift the gate open. To
close the liftgate, use the pull cup to
lower the liftgate and close. With the
power liftgate disabled, the liftgate
electric latch will still power latch
once contact is made with the
striker. Always close the liftgate
before driving.
If
Von the RKE transmitter is
pressed while power operation is
disabled, the turn signals flash and
the liftgate will not move.
The liftgate has an electric latch.
If the battery is disconnected or has
low voltage, the liftgate will not
open. The liftgate will resume
operation when the battery is
reconnected and charged.
Vehicle Security
This vehicle has theft-deterrent
features; however, they do not make
the vehicle impossible to steal.
Vehicle Alarm System
This vehicle has an anti-theft alarm
system.
Arming the System
To arm the system, do one of the
following:
.PressQon the RKE transmitter.
.Lock the vehicle using the key in
the driver door.
The alarm automatically arms after
about 30 seconds. The security
light, located on the instrument
panel, flashes.
Press
Von the RKE transmitter to
open the liftgate without setting off
the alarm. The system rearms when
the liftgate is closed.
Page 80 of 388
Black plate (30,1)Chevrolet Equinox Owner Manual - 2013 - CRC - 5/21/12
3-30 Seats and Restraints
The on indicator may be lit if an
object, such as a briefcase,
handbag, grocery bag, laptop or
other electronic device, is put on an
unoccupied seat. If this is not
desired remove the object from
the seat.
{WARNING
Stowing of articles under the
passenger seat or between the
passenger seat cushion and
seatback may interfere with the
proper operation of the passenger
sensing system.
Servicing the
Airbag-Equipped Vehicle
Airbags affect how the vehicle
should be serviced. There are parts
of the airbag system in several
places around the vehicle. Your
dealer and the service manual have
information about servicing the
vehicle and the airbag system. Topurchase a service manual, see
Service Publications Ordering
Information on page 13‑11.
{WARNING
For up to 10 seconds after the
vehicle is turned off and the
battery is disconnected, an airbag
can still inflate during improper
service. You can be injured if you
are close to an airbag when it
inflates. Avoid yellow connectors.
They are probably part of the
airbag system. Be sure to follow
proper service procedures, and
make sure the person performing
work for you is qualified to do so.
Adding Equipment to the
Airbag-Equipped Vehicle
Q: Is there anything I might add
to or change about the vehicle
that could keep the airbags
from working properly?
A: Yes. If you add things that
change the vehicle's frame,
bumper system, height, front end
or side sheet metal, they may
keep the airbag system from
working properly. Changing or
moving any parts of the front
seats, safety belts, the airbag
sensing and diagnostic module,
steering wheel, instrument
panel, roof-rail airbag modules,
ceiling headliner or pillar garnish
trim, overhead console, front
sensors, side impact sensors,
rollover sensor module, or airbag
wiring can affect the operation of
the airbag system.
In addition, the vehicle has a
passenger sensing system for
the right front passenger
position, which includes sensors
Page 107 of 388
Black plate (1,1)Chevrolet Equinox Owner Manual - 2013 - CRC - 5/21/12
Instruments and Controls 5-1
Instruments and
Controls
Controls
Steering Wheel Adjustment . . . 5-2
Steering Wheel Controls . . . . . . 5-2
Horn . . . . . . . . . . . . . . . . . . . . . . . . . . 5-3
Windshield Wiper/Washer . . . . . 5-3
Rear Window Wiper/Washer . . . . . . . . . . . . . . . . . . . . . . 5-4
Compass . . . . . . . . . . . . . . . . . . . . . 5-4
Clock . . . . . . . . . . . . . . . . . . . . . . . . . 5-5
Power Outlets . . . . . . . . . . . . . . . . . 5-6
Warning Lights, Gauges, and
Indicators
Warning Lights, Gauges, and Indicators . . . . . . . . . . . . . . . . . . . . 5-7
Instrument Cluster . . . . . . . . . . . . 5-8
Speedometer . . . . . . . . . . . . . . . . . 5-9
Odometer . . . . . . . . . . . . . . . . . . . . . 5-9
Tachometer . . . . . . . . . . . . . . . . . . . 5-9
Fuel Gauge . . . . . . . . . . . . . . . . . . . 5-9
Engine Coolant Temperature Gauge . . . . . . . . . . . . . . . . . . . . . . 5-10
Safety Belt Reminders . . . . . . . 5-11
Airbag Readiness Light . . . . . . 5-11 Passenger Airbag Status
Indicator . . . . . . . . . . . . . . . . . . . . 5-12
Charging System Light . . . . . . 5-13
Malfunction Indicator Lamp . . . . . . . . . . . . . 5-13
Brake System Warning Light . . . . . . . . . . . . . . . . . . . . . . . 5-15
Antilock Brake System (ABS) Warning Light . . . . . . . . . . . . . . 5-16
Lane Departure Warning (LDW) Light . . . . . . . . . . . . . . . . 5-17
Forward Collision Alert (FCA) Warning Light . . . . . . . . . . . . . . 5-17
Traction Off Light . . . . . . . . . . . . 5-17
StabiliTrak
®OFF Light . . . . . . . 5-18
Traction Control System (TCS)/StabiliTrak
®Light . . . . 5-18
Tire Pressure Light . . . . . . . . . . 5-19
Engine Oil Pressure Light . . . . 5-19
Fuel Economy Light . . . . . . . . . 5-20
Low Fuel Warning Light . . . . . . 5-20
Security Light . . . . . . . . . . . . . . . . 5-20
High-Beam On Light . . . . . . . . . 5-21
Front Fog Lamp Light . . . . . . . . 5-21
Lamps On Reminder . . . . . . . . . 5-21
Cruise Control Light . . . . . . . . . 5-21
Information Displays
Driver Information Center (DIC) . . . . . . . . . . . . . . . 5-22
Vehicle Messages
Vehicle Messages . . . . . . . . . . . 5-25
Battery Voltage and ChargingMessages . . . . . . . . . . . . . . . . . . 5-25
Brake System Messages . . . . 5-26
Compass Messages . . . . . . . . . 5-26
Cruise Control Messages . . . . 5-26
Door Ajar Messages . . . . . . . . . 5-26
Engine Cooling System Messages . . . . . . . . . . . . . . . . . . 5-26
Engine Oil Messages . . . . . . . . 5-27
Engine Power Messages . . . . 5-28
Fuel System Messages . . . . . . 5-28
Key and Lock Messages . . . . . 5-28
Object Detection System Messages . . . . . . . . . . . . . . . . . . 5-28
Ride Control System Messages . . . . . . . . . . . . . . . . . . 5-29
Airbag System Messages . . . . 5-30
Security Messages . . . . . . . . . . 5-30
Service Vehicle Messages . . . 5-30
Tire Messages . . . . . . . . . . . . . . . 5-30
Transmission Messages . . . . . 5-31
Vehicle Reminder Messages . . . . . . . . . . . . . . . . . . 5-31
Page 112 of 388
Black plate (6,1)Chevrolet Equinox Owner Manual - 2013 - CRC - 5/21/12
5-6 Instruments and Controls
6. To save the time and return tothe Time Settings menu, press
the
EBACK button at any
time or press the MENU/SEL
knob after adjusting the minutes.
To set the 12/24 hour format:
1. Turn the infotainment system on.
2. Press the CONFIG button and select Time Settings, or press
the
Hbutton.
3. Highlight 12/24 Hour Format.
4. Press the MENU/SEL knob to select the 12 hour or 24 hour
display format.
Setting the Clock (Radio with
CD and Touchscreen)
To set the time:
1. Press the CONFIG button toenter the menu options. Turn the
TUNE/MENU knob to scroll
through the available setup
features. Press the TUNE/MENU knob or press the Time screen
button to display other options
within that feature.
2. Press + or −to decrease or
increase the Hours and Minutes
displayed on the clock.
12/24 HR Format: Press the 12 HR
screen button for standard time;
press the 24 HR screen button for
military time.
Day + or Day −:Press the Day +
or Day −display buttons to increase
or decrease the day.
Display: Press Display to turn the
display of the time on the screen on
or off.
Power Outlets
The accessory power outlets can be
used to connect electrical
equipment, such as a cell phone or
MP3 player. There are four accessory power
outlets in the following locations:
below the CD slot, inside the center
console storage, on the rear of the
center console storage, and in the
rear cargo compartment.
To use the outlets, remove the cover
and close when not in use.
Notice:
Leaving electrical
equipment plugged in for an
extended period of time while the
vehicle is off will drain the
battery. Always unplug electrical
equipment when not in use and
do not plug in equipment that
exceeds the maximum 20 ampere
rating.
Certain accessory plugs may not be
compatible with the accessory
power outlets and could overload
vehicle and adapter fuses. If a
problem is experienced, see your
dealer.
Page 119 of 388
Black plate (13,1)Chevrolet Equinox Owner Manual - 2013 - CRC - 5/21/12
Instruments and Controls 5-13
{WARNING
If the airbag readiness light ever
comes on and stays on, it means
that something may be wrong
with the airbag system. To help
avoid injury to yourself or others,
have the vehicle serviced right
away. SeeAirbag Readiness
Light on page 5‑11 for more
information, including important
safety information.
Charging System Light
The charging system light comes on
briefly when the ignition is turned
on, but the engine is not running, as
a check to show the light is working. The light turns off when the engine
is started. If it does not, have the
vehicle serviced by your dealer.
If the light stays on, or comes on
while driving, there may be a
problem with the electrical charging
system. Have it checked by your
dealer. Driving while this light is on
could drain the battery.
When this light comes on, the Driver
Information Center (DIC) also
displays a message.
See
Battery Voltage and Charging
Messages on page 5‑25.
If a short distance must be driven
with the light on, be sure to turn off
all accessories, such as the radio
and air conditioner.
Malfunction
Indicator Lamp
A computer system called OBD II
(On-Board Diagnostics-Second
Generation) monitors the operation
of the vehicle to ensure emissions
are at acceptable levels, helping to maintain a clean environment. The
malfunction indicator lamp comes
on when the vehicle is placed in
ON/RUN, as a check to show it is
working. If it does not, have the
vehicle serviced by your dealer. See
Ignition Positions on page 9‑19.
If the malfunction indicator lamp
comes on while the engine is
running, this indicates that the OBD
II system has detected a problem
and diagnosis and service might be
required.
Malfunctions often are indicated by
the system before any problem is
apparent. Being aware of the light
can prevent more serious damage
to the vehicle. This system also
assists the service technician in
correctly diagnosing any
malfunction.