2013 CHEVROLET CRUZE change wheel
[x] Cancel search: change wheelPage 5 of 394

Black plate (5,1)Chevrolet Cruze Owner Manual - 2013 - crc - 10/16/12
Introduction v
Vehicle Symbol Chart
Here are some additional symbols
that may be found on the vehicle
and what they mean. For more
information on the symbol, refer to
the Index.
9:Airbag Readiness Light
#:Air Conditioning
!:Antilock Brake System (ABS)
%:Audio Steering Wheel Controls
or OnStar®
$: Brake System Warning Light
":Charging System
I:Cruise Control
B: Engine Coolant Temperature
O:Exterior Lamps
#:Fog Lamps
.: Fuel Gauge
+:Fuses
3: Headlamp High/Low-Beam
Changer
j: LATCH System Child
Restraints
*: Malfunction Indicator Lamp
::Oil Pressure
}:Power
/:Remote Vehicle Start
>:Safety Belt Reminders
7:Tire Pressure Monitor
d:Traction Control/StabiliTrak®
M:Windshield Washer Fluid
Page 9 of 394

Black plate (3,1)Chevrolet Cruze Owner Manual - 2013 - crc - 10/16/12
In Brief 1-3
1.Exterior Lamp Controls on
page 6‑1.
Front Fog Lamps on page 6‑4 (If
Equipped).
Instrument Panel Illumination
Control on page 6‑5.
2. Air Vents on page 8‑6.
3. Headlamp High/Low-Beam
Changer on page 6‑2.
Turn Signal Lever. See Turn and
Lane-Change Signals on
page 6‑4.
Driver Information Center (DIC)
Buttons. See Driver Information
Center (DIC) on page 5‑22.
4. Instrument Cluster on page 5‑8.
5. Driver Information Center (DIC)
on page 5‑22.
6. Steering Wheel Controls on
page 5‑2.
7. Windshield Wiper/Washer on
page 5‑3. 8.
Infotainment on page 7‑1.
Satellite Radio on page 7‑10 (If
Equipped).
9. Infotainment Display Screen.
10. Instrument Panel Storage on
page 4‑1.
11. Light Sensor. See Automatic
Headlamp System on
page 6‑3.
12. Passenger Airbag. See Where
Are the Airbags? on page 3‑19.
13. Hood Release. See Hood on
page 10‑4.
14. Data Link Connector (DLC) (Out of View). See Malfunction
Indicator Lamp on page 5‑13.
15. Instrument Panel Fuse Block
on page 10‑37.
16. Cruise Control on page 9‑36.
17. Steering Wheel Adjustment on
page 5‑2. 18.
Horn on page 5‑3.
Driver Airbag. See Where Are
the Airbags? on page 3‑19.
19. Ignition Switch or Keyless Ignition Button (If Equipped).
SeeIgnition Positions (Key
Access) on page 9‑15 or
Ignition Positions (Keyless
Access) on page 9‑17.
20. Driver Knee Airbag. See Where
Are the Airbags? on page 3‑19.
21. Power Door Locks on
page 2‑11.
22. Hazard Warning Flashers on
page 6‑4.
23. Power Outlets on page 5‑6.
24. Parking Brake on page 9‑33.
25. Shift Lever. See Automatic
Transmission on page 9‑26 or
Manual Transmission on
page 9‑30.
Page 22 of 394

Black plate (16,1)Chevrolet Cruze Owner Manual - 2013 - crc - 10/16/12
1-16 In Brief
Portable Audio Devices
Some vehicles have a 3.5 mm
(1/8 in) auxiliary input and a USB
port in the center console bin.
External devices such as iPods
®,
laptop computers, MP3 players, CD
changers, and USB drives may be
connected, depending on the audio
system.
See Auxiliary Devices on page 7‑16.
Bluetooth®
The Bluetooth®system allows users
with a Bluetooth-enabled mobile
phone to make and receive
hands-free calls using the vehicle
audio system and controls.
The Bluetooth-enabled mobile
phone must be paired with the
in-vehicle Bluetooth system before it
can be used in the vehicle. Not all
phones will support all functions. See
Bluetooth (Overview) on
page 7‑18 orBluetooth
(Infotainment Controls) on
page 7‑20 orBluetooth (Voice
Recognition) on page 7‑23.
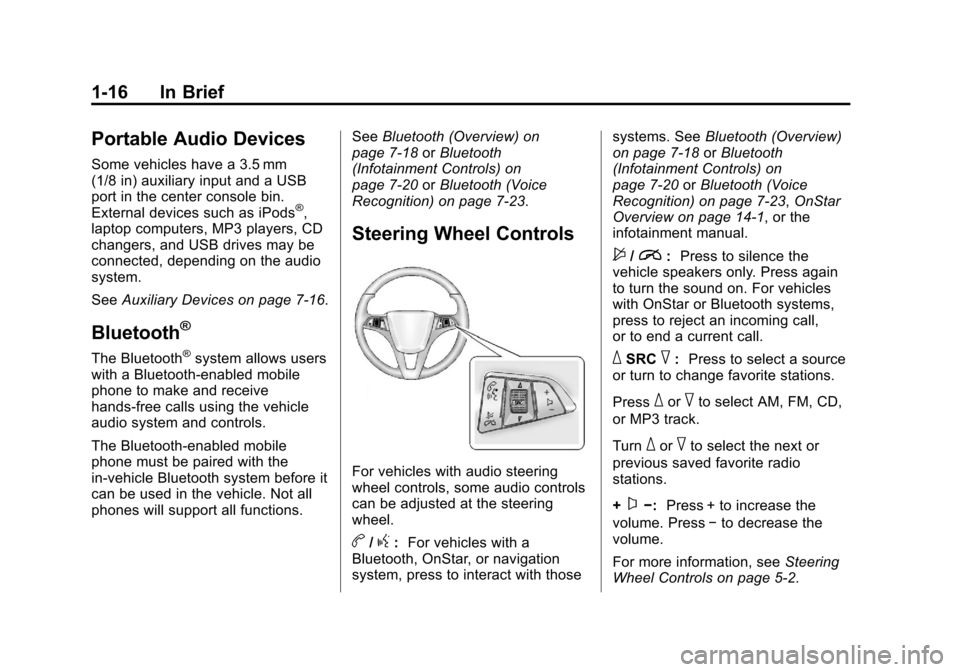
Steering Wheel Controls
For vehicles with audio steering
wheel controls, some audio controls
can be adjusted at the steering
wheel.
b/g: For vehicles with a
Bluetooth, OnStar, or navigation
system, press to interact with those systems. See
Bluetooth (Overview)
on page 7‑18 orBluetooth
(Infotainment Controls) on
page 7‑20 orBluetooth (Voice
Recognition) on page 7‑23, OnStar
Overview on page 14‑1, or the
infotainment manual.
$/i: Press to silence the
vehicle speakers only. Press again
to turn the sound on. For vehicles
with OnStar or Bluetooth systems,
press to reject an incoming call,
or to end a current call.
_SRC^: Press to select a source
or turn to change favorite stations.
Press
_or^to select AM, FM, CD,
or MP3 track.
Turn
_or^to select the next or
previous saved favorite radio
stations.
+
x−: Press + to increase the
volume. Press −to decrease the
volume.
For more information, see Steering
Wheel Controls on page 5‑2.
Page 26 of 394

Black plate (20,1)Chevrolet Cruze Owner Manual - 2013 - crc - 10/16/12
1-20 In Brief
Engine Oil Life System
The engine oil life system calculates
engine oil life based on vehicle use
and displays the CHANGE ENGINE
OIL SOON DIC message or Code
82 DIC message when it is
necessary to change the engine oil
and filter.
Remember, the Oil Life display must
be reset after each oil change. It will
not reset itself. Also, be careful not
to reset the Oil Life display
accidentally at any time other than
when the oil has just been changed.
It cannot be reset accurately until
the next oil change. To reset the
engine oil life system press the SET
button while the Oil Life display is
active.Resetting the Oil Life System
1. Using the DIC MENU button and
thumbwheel, scroll until you
reach REMAINING OIL LIFE on
the DIC (
:% for Canada).
2. Press the SET button to reset the oil life at 100%. When
prompted, use the thumbwheel
to highlight YES or NO. Press
the SET/CLEAR button to
confirm.
Be careful not to reset the oil life
display accidentally at any time
other than after the oil is changed.
It cannot be reset accurately.
See Engine Oil Life System on
page 10‑11.
Driving for Better Fuel
Economy
Driving habits can affect fuel
mileage. Here are some driving tips
to get the best fuel economy
possible.
.Avoid fast starts and accelerate
smoothly.
.Brake gradually and avoid
abrupt stops.
.Avoid idling the engine for long
periods of time.
.When road and weather
conditions are appropriate, use
cruise control.
.Always follow posted speed
limits or drive more slowly when
conditions require.
.Keep vehicle tires properly
inflated.
.Combine several trips into a
single trip.
Page 79 of 394

Black plate (29,1)Chevrolet Cruze Owner Manual - 2013 - crc - 10/16/12
Seats and Restraints 3-29
{WARNING
For up to 10 seconds after the
vehicle is turned off and the
battery is disconnected, an airbag
can still inflate during improper
service. You can be injured if you
are close to an airbag when it
inflates. Avoid yellow connectors.
They are probably part of the
airbag system. Be sure to follow
proper service procedures, and
make sure the person performing
work for you is qualified to do so.
Adding Equipment to the
Airbag-Equipped Vehicle
Adding accessories that change the
vehicle's frame, bumper system,
height, front end, or side sheet
metal, may keep the airbag system
from working properly. The
operation of the airbag system can
also be affected by changing or
moving any parts of the front seats,
safety belts, the airbag sensing anddiagnostic module, steering wheel,
instrument panel, roof-rail airbag
modules, ceiling headliner or pillar
garnish trim, front sensors, side
impact sensors, or airbag wiring.
Your dealer and the service manual
have information about the location
of the airbag sensors, sensing and
diagnostic module, and airbag
wiring.
In addition, the vehicle has a
passenger sensing system for the
front outboard passenger position,
which includes sensors that are part
of the passenger seat. The
passenger sensing system may not
operate properly if the original seat
trim is replaced with non-GM
covers, upholstery, or trim; or with
GM covers, upholstery, or trim
designed for a different vehicle. Any
object, such as an aftermarket seat
heater or a comfort-enhancing pad
or device, installed under or on top
of the seat fabric, could also
interfere with the operation of the
passenger sensing system. This
could either prevent properdeployment of the passenger
airbag(s) or prevent the passenger
sensing system from properly
turning off the passenger airbag(s).
See
Passenger Sensing System on
page 3‑24.
If the vehicle has rollover roof-rail
airbags, see Different Size Tires
and Wheels on page 10‑56 for
additional important information.
If you have to modify your vehicle
because you have a disability and
you have questions about whether
the modifications will affect the
vehicle's airbag system, or if you
have questions about whether the
airbag system will be affected if the
vehicle is modified for any other
reason, call Customer Assistance.
See Customer Assistance Offices
on page 13‑3.
Page 105 of 394

Black plate (3,1)Chevrolet Cruze Owner Manual - 2013 - crc - 10/16/12
Instruments and Controls 5-3
b/g(Push to Talk):For vehicles
with a Bluetooth, OnStar,
or navigation system, press to
interact with those systems. See
Bluetooth (Overview) on page 7‑18
or Bluetooth (Infotainment Controls)
on page 7‑20 orBluetooth (Voice
Recognition) on page 7‑23, OnStar
Overview on page 14‑1, or the
infotainment manual.
$/i(Mute/End Call): Press to
silence the vehicle speakers only.
Press again to turn the sound on.
For vehicles with OnStar or
Bluetooth systems, press to reject
an incoming call, or end a
current call.
_SRC^(Source/Favorite): Press
to select a source or turn to change
favorite stations.
Press
_or^to select AM, FM, CD,
or MP3 track.
Turn
_or^to select the next or
previous saved favorite radio
stations. +
x−
(Volume): Press + to
increase the volume. Press −to
decrease the volume.
Horn
Pressaon the steering wheel pad
to sound the horn.
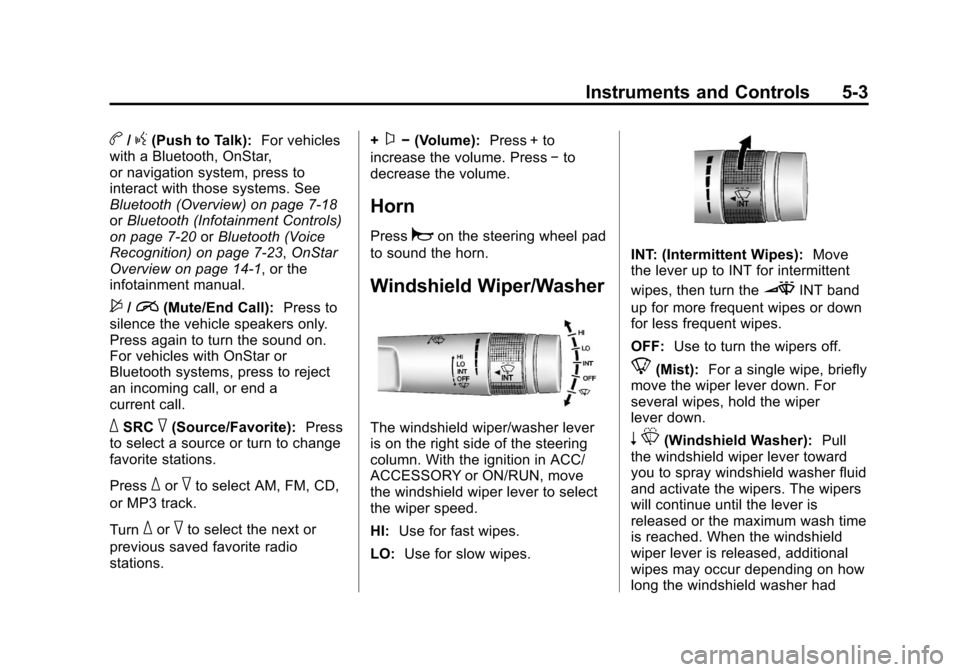
Windshield Wiper/Washer
The windshield wiper/washer lever
is on the right side of the steering
column. With the ignition in ACC/
ACCESSORY or ON/RUN, move
the windshield wiper lever to select
the wiper speed.
HI: Use for fast wipes.
LO: Use for slow wipes.
INT: (Intermittent Wipes): Move
the lever up to INT for intermittent
wipes, then turn the
3INT band
up for more frequent wipes or down
for less frequent wipes.
OFF: Use to turn the wipers off.
8(Mist): For a single wipe, briefly
move the wiper lever down. For
several wipes, hold the wiper
lever down.
n L(Windshield Washer): Pull
the windshield wiper lever toward
you to spray windshield washer fluid
and activate the wipers. The wipers
will continue until the lever is
released or the maximum wash time
is reached. When the windshield
wiper lever is released, additional
wipes may occur depending on how
long the windshield washer had
Page 117 of 394

Black plate (15,1)Chevrolet Cruze Owner Manual - 2013 - crc - 10/16/12
Instruments and Controls 5-15
If one or more of these conditions
occurs, change the fuel brand used.
It may require at least one full tank
of the proper fuel to turn the light off.
SeeRecommended Fuel on
page 9‑46.
If none of the above have made the
light turn off, your dealer can check
the vehicle. The dealer has the
proper test equipment and
diagnostic tools to fix any
mechanical or electrical problems
that might have developed.
Emissions Inspection and
Maintenance Programs
Depending on where you live, your
vehicle may be required to
participate in an emission control
system inspection and maintenance
program. For the inspection, the
emission system test equipment will
likely connect to the vehicle's Data
Link Connector (DLC).
The DLC is under the instrument
panel next to the steering wheel.
See your dealer if assistance is
needed.
The vehicle may not pass
inspection if:
.The malfunction indicator lamp is
on while the vehicle is running.
The vehicle is in ON/RUN for
keyed access, or service only
mode for keyless access and the
malfunction indicator lamp does
not come on. See your dealer for
assistance in verifying proper
operation of the malfunction
indicator lamp.
.The OBD II (On-Board
Diagnostics) system determines
that critical emission control
systems have not been
completely diagnosed. The
vehicle would be considered not
ready for inspection. This can
happen if the 12-volt battery has
recently been replaced or run
down. The diagnostic system is
designed to evaluate critical
emission control systems during
normal driving. This can take
several days of routine driving.
If this has been done and the
vehicle still does not pass the
inspection for lack of OBD II
system readiness, your dealer
can prepare the vehicle for
inspection.
Page 152 of 394

Black plate (4,1)Chevrolet Cruze Owner Manual - 2013 - crc - 10/16/12
7-4 Infotainment System
9. AS
.Radio: Opens the autostore
stations list.
10. BAND
.Changes the band while
listening to the radio.
.Selects the radio when
listening to a different
audio source.
11. CD/AUX
.Selects the CD player or
an external audio source.
12. CD Slot
.Insert a CD.
13. CONFIG
.Opens the settings menu.
14.
5\>
.Opens the phone
main menu.
.Mutes the audio system. 15. FAV
.Radio: Opens the
favorites list.
16. BACK
.Menu: Moves one
level back.
.Character Input: Deletes
the last character.
17. MENU/SEL
.Turn to open menus,
highlight menu items,
or set numeric values
while in a menu.
.Press to select menu
items.
.Radio: Manually selects
radio stations.
.CD: Selects tracks.
18.
Y
.Removes a disc from the
CD slot.
Operation
Controls
The infotainment system is operated
by using the pushbuttons,
multifunction knobs, menus shown
on the display, and steering wheel
controls, if equipped.
Turning the System On or Off
O(Volume/Power): Press to turn
the system on and off.
Automatic Switch-Off
If the infotainment system has been
turned on after the ignition is turned
off, the system will turn off
automatically after 10 minutes.
Volume Control
O(Volume/Power): Turn to adjust
the volume.
5/>(Phone/Mute): Press5/>to mute the infotainment system.
Press
5/>again, or turn theO
knob to cancel mute.