2013 CHEVROLET CORVETTE open hood
[x] Cancel search: open hoodPage 258 of 414
Black plate (46,1)Chevrolet Corvette Owner Manual - 2013 - crc2 - 11/8/12
9-46 Driving and Operating
as wide open throttle applications.
You might also hear audible spark
knock during acceleration. Refill the
tank with premium fuel as soon as
possible to avoid damaging the
engine. If heavy knocking is heard
when using gasoline rated at
91 octane or higher, the engine
needs service.
Gasoline Specifications
At a minimum, gasoline should meet
ASTM specification D 4814. Some
gasolines contain an
octane-enhancing additive called
methylcyclopentadienyl manganese
tricarbonyl (MMT). We recommend
against the use of gasolines
containing MMT. SeeFuel Additives
on page 9‑46.
California Fuel
Requirements
If the vehicle is certified to meet
California Emissions Standards, it is
designed to operate on fuels that
meet California specifications. See the underhood emission control
label. If this fuel is not available in
states adopting California Emissions
Standards, the vehicle will operate
satisfactorily on fuels meeting
federal specifications, but emission
control system performance might
be affected. The malfunction
indicator lamp could turn on and the
vehicle might fail a smog‐check test.
See
Malfunction Indicator Lamp on
page 5‑18. If this occurs, return to
your authorized dealer for diagnosis.
If it is determined that the condition
is caused by the type of fuel used,
repairs might not be covered by the
vehicle warranty.
Fuels in Foreign
Countries
If planning to drive in countries
outside the U.S. or Canada, the
proper fuel might be hard to find.
Check regional auto club or fuel
retail brand websites for availability
in the country where driving. Never
use leaded gasoline, fuel containing
methanol, or any other fuel not recommended. Costly repairs
caused by use of improper fuel
would not be covered by the vehicle
warranty.
Fuel Additives
To provide cleaner air, all gasolines
in the United States are now
required to contain additives that
help prevent engine and fuel system
deposits from forming, allowing the
emission control system to work
properly. In most cases, nothing
should have to be added to the fuel.
However, some gasolines contain
only the minimum amount of
additive required to meet U.S.
Environmental Protection Agency
regulations. To help keep fuel
injectors and intake valves clean
and avoid problems due to dirty
injectors or valves, look for gasoline
that is advertised as TOP TIER
Detergent Gasoline. Look for the
TOP TIER label on the fuel pump to
ensure gasoline meets enhanced
detergency standards developed by
the auto companies. A list of
Page 269 of 414
Black plate (7,1)Chevrolet Corvette Owner Manual - 2013 - crc2 - 11/8/12
Vehicle Care 10-7
This vehicle has an airbag system.
Before attempting to do your own
service work, seeServicing the
Airbag-Equipped Vehicle on
page 3‑24.
Keep a record with all parts receipts
and list the mileage and the date of
any service work performed. See
Maintenance Records on
page 11‑15.
Notice: Even small amounts of
contamination can cause damage
to vehicle systems. Do not allow
contaminants to contact the
fluids, reservoir caps,
or dipsticks.Hood
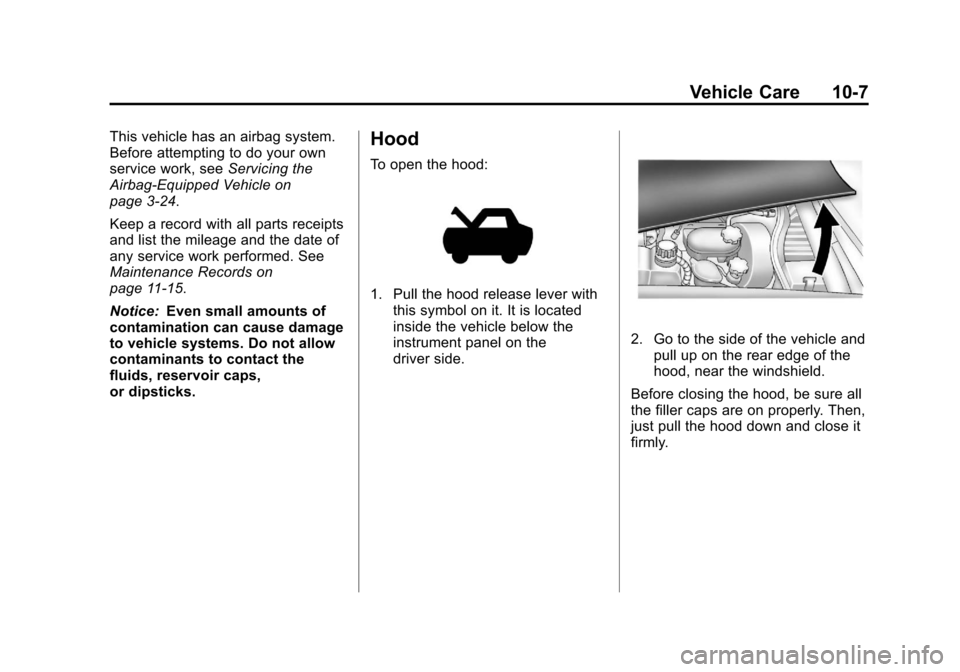
To open the hood:
1. Pull the hood release lever with this symbol on it. It is located
inside the vehicle below the
instrument panel on the
driver side.
2. Go to the side of the vehicle andpull up on the rear edge of the
hood, near the windshield.
Before closing the hood, be sure all
the filler caps are on properly. Then,
just pull the hood down and close it
firmly.
Page 283 of 414
Black plate (21,1)Chevrolet Corvette Owner Manual - 2013 - crc2 - 11/8/12
Vehicle Care 10-21
Manual Transmission
Fluid
It is not necessary to check the
manual transmission fluid level.
A transmission fluid leak is the only
reason for fluid loss. If a leak
occurs, take the vehicle to the
dealer and have it repaired as soon
as possible. SeeRecommended
Fluids and Lubricants on page 11‑12
for the proper fluid to use.
Hydraulic Clutch
It is not necessary to regularly
check clutch fluid unless you
suspect there is a leak in the
system. Adding fluid will not correct
a leak. A fluid loss in this system
could indicate a problem. Have the
system inspected and repaired.
When to Check and What
to Use
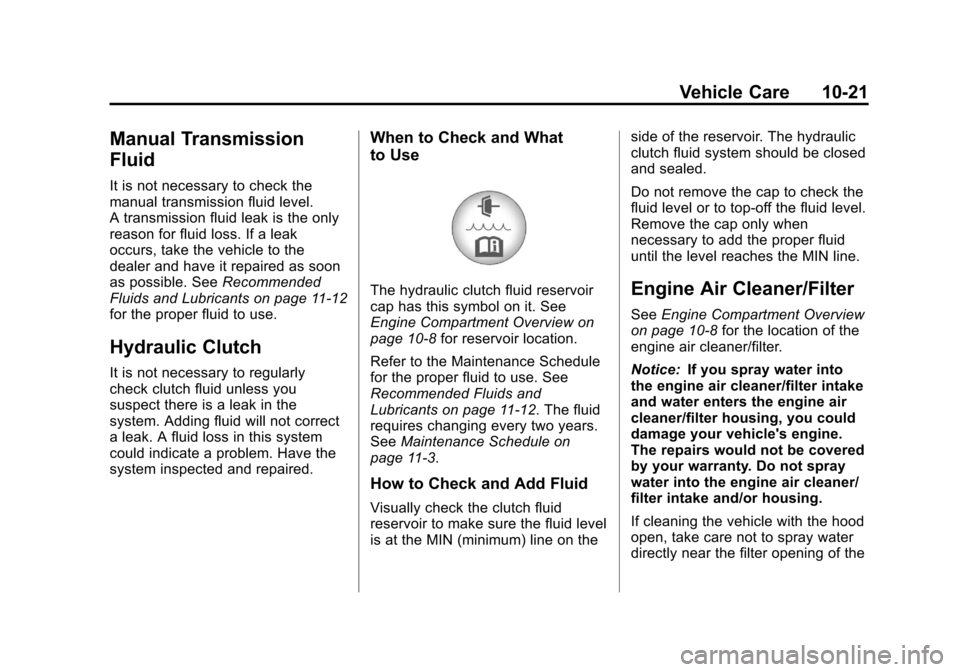
The hydraulic clutch fluid reservoir
cap has this symbol on it. See
Engine Compartment Overview on
page 10‑8 for reservoir location.
Refer to the Maintenance Schedule
for the proper fluid to use. See
Recommended Fluids and
Lubricants on page 11‑12. The fluid
requires changing every two years.
See Maintenance Schedule on
page 11‑3.
How to Check and Add Fluid
Visually check the clutch fluid
reservoir to make sure the fluid level
is at the MIN (minimum) line on the side of the reservoir. The hydraulic
clutch fluid system should be closed
and sealed.
Do not remove the cap to check the
fluid level or to top‐off the fluid level.
Remove the cap only when
necessary to add the proper fluid
until the level reaches the MIN line.
Engine Air Cleaner/Filter
See
Engine Compartment Overview
on page 10‑8 for the location of the
engine air cleaner/filter.
Notice: If you spray water into
the engine air cleaner/filter intake
and water enters the engine air
cleaner/filter housing, you could
damage your vehicle's engine.
The repairs would not be covered
by your warranty. Do not spray
water into the engine air cleaner/
filter intake and/or housing.
If cleaning the vehicle with the hood
open, take care not to spray water
directly near the filter opening of the
Page 284 of 414
Black plate (22,1)Chevrolet Corvette Owner Manual - 2013 - crc2 - 11/8/12
10-22 Vehicle Care
air cleaner, as shown in the
illustration, as this could damage
the vehicle's engine.
When to Inspect the Engine Air
Cleaner/Filter
Inspect the air cleaner/filter at the
scheduled maintenance intervals
and replace them at the first oil
change after each 80 000 km
(50,000 mi) interval. See
Maintenance Schedule on
page 11‑3. If driving in dusty/dirty
conditions, inspect the filter at each
engine oil change.
How to Inspect the Engine Air
Cleaner/Filter
To inspect the air cleaner/filter,
remove the filter from the vehicle
and lightly shake the filter to release
loose dust and dirt. If the filter
remains covered with dirt, a new
filter is required.
To inspect or replace the engine air
cleaner/filter:
1. Open the hood. SeeHood on
page 10‑7.
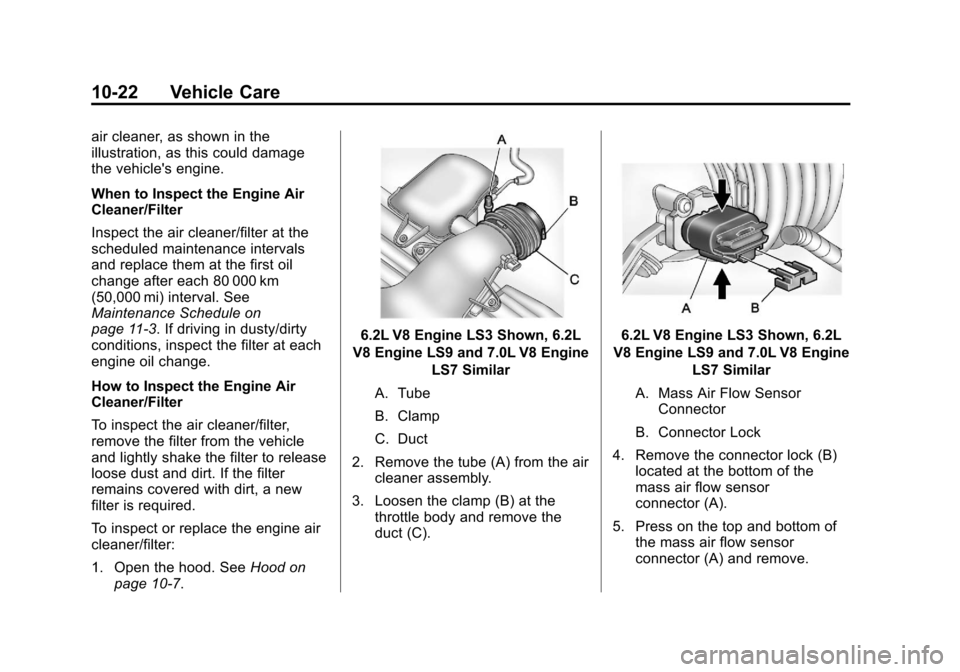
6.2L V8 Engine LS3 Shown, 6.2L
V8 Engine LS9 and 7.0L V8 Engine LS7 Similar
A. Tube
B. Clamp
C. Duct
2. Remove the tube (A) from the air cleaner assembly.
3. Loosen the clamp (B) at the throttle body and remove the
duct (C).6.2L V8 Engine LS3 Shown, 6.2L
V8 Engine LS9 and 7.0L V8 Engine LS7 Similar
A. Mass Air Flow Sensor Connector
B. Connector Lock
4. Remove the connector lock (B) located at the bottom of the
mass air flow sensor
connector (A).
5. Press on the top and bottom of the mass air flow sensor
connector (A) and remove.
Page 291 of 414
Black plate (29,1)Chevrolet Corvette Owner Manual - 2013 - crc2 - 11/8/12
Vehicle Care 10-29
5. Replace the pressure cap tightly.Check the level in the surge tank
when the system has cooled
down. If the coolant is not at the
proper level, repeat Steps 1−4,
then reinstall the pressure cap.
If the coolant is not at the proper
level when the system cools
down again, see the dealer.
Notice: If the pressure cap is not
tightly installed, coolant loss and
possible engine damage may
occur. Be sure the cap is properly
and tightly secured.
Engine Overheating
The vehicle has several indicators
to warn of engine overheating.
There is an engine coolant
temperature gauge on the
instrument panel cluster. See
Engine Coolant Temperature Gauge
on page 5‑15. The vehicle may also
display a COOLANT OVER
TEMPERATURE message on the Driver Information Center (DIC). See
Engine Cooling System Messages
on page 5‑38.
If the decision is made not to lift the
hood but to get service help right
away. See
Roadside Assistance
Program (Mexico) on page 13‑7 or
Roadside Assistance Program (U.S.
and Canada) on page 13‑10.
If the decision is made to lift the
hood, make sure the vehicle is
parked on a level surface.
Then check to see if the engine
cooling fan is running. If the engine
is overheating, the fan should be
running. If it is not, do not continue
to run the engine and have the
vehicle serviced.
Notice: Running the engine
without coolant may cause
damage or a fire. Vehicle damage
would not be covered by the
warranty. See Overheated Engine
Protection Operating Mode on
page 10‑30 for information on
driving to a safe place in an
emergency.
If Steam is Coming from the
Engine
{WARNING
Steam from an overheated engine
can burn you badly, even if you
just open the hood. Stay away
from the engine if you see or hear
steam coming from it. Turn it off
and get everyone away from the
vehicle until it cools down. Wait
until there is no sign of steam or
coolant before you open
the hood.
If you keep driving when the
vehicles engine is overheated,
the liquids in it can catch fire. You
or others could be badly burned.
Stop the engine if it overheats,
and get out of the vehicle until the
engine is cool.
(Continued)
Page 338 of 414
Black plate (76,1)Chevrolet Corvette Owner Manual - 2013 - crc2 - 11/8/12
10-76 Vehicle Care
Notice:If any accessories are left
on or plugged in during the jump
starting procedure, they could be
damaged. The repairs would not
be covered by the vehicle
warranty. Whenever possible,
turn off or unplug all accessories
on either vehicle when jump
starting the vehicle.
3. Turn off the ignition on both
vehicles. Unplug unnecessary
accessories plugged into the
cigarette lighter or the accessory
power outlet. Turn off the radio
and all lamps that are not
needed. This will avoid sparks
and help save both batteries.
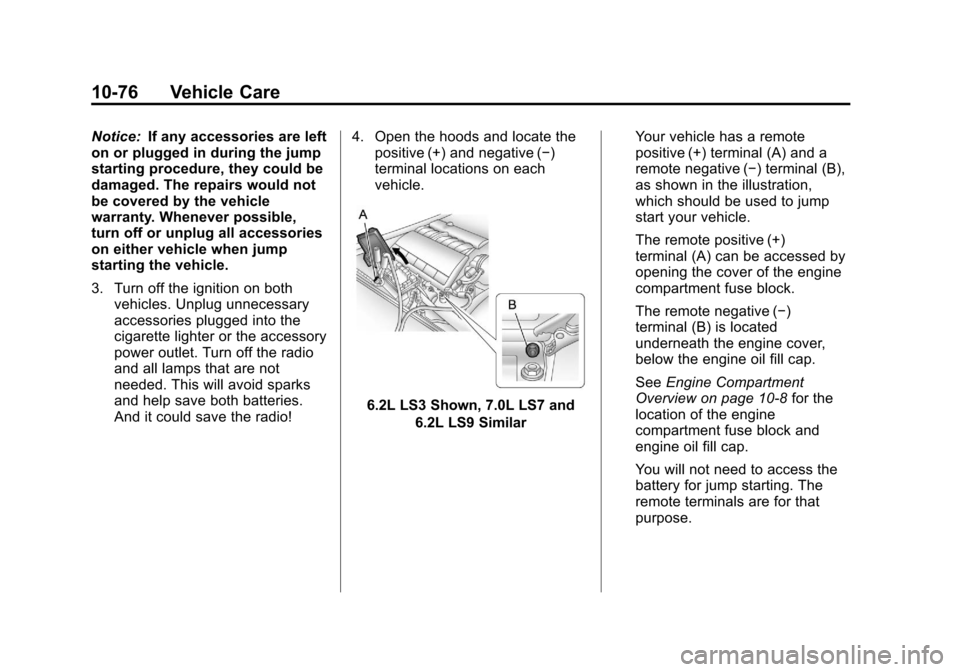
And it could save the radio! 4. Open the hoods and locate the
positive (+) and negative (−)
terminal locations on each
vehicle.
6.2L LS3 Shown, 7.0L LS7 and
6.2L LS9 Similar Your vehicle has a remote
positive (+) terminal (A) and a
remote negative (−) terminal (B),
as shown in the illustration,
which should be used to jump
start your vehicle.
The remote positive (+)
terminal (A) can be accessed by
opening the cover of the engine
compartment fuse block.
The remote negative (−)
terminal (B) is located
underneath the engine cover,
below the engine oil fill cap.
See
Engine Compartment
Overview on page 10‑8 for the
location of the engine
compartment fuse block and
engine oil fill cap.
You will not need to access the
battery for jump starting. The
remote terminals are for that
purpose.
Page 339 of 414
Black plate (77,1)Chevrolet Corvette Owner Manual - 2013 - crc2 - 11/8/12
Vehicle Care 10-77
{WARNING
An electric fan can start up even
when the engine is not running
and can injure you. Keep hands,
clothing and tools away from any
underhood electric fan.
{WARNING
Using an open flame near a
battery can cause battery gas to
explode. People have been hurt
doing this, and some have been
blinded. Use a flashlight if you
need more light.
Be sure the battery has enough
water. You do not need to add
water to the battery installed in
your new vehicle. But if a battery
has filler caps, be sure the right
amount of fluid is there. If it is low,(Continued)
WARNING (Continued)
add water to take care of that
first. If you do not, explosive gas
could be present.
Battery fluid contains acid that
can burn you. Do not get it on
you. If you accidentally get it in
your eyes or on your skin, flush
the place with water and get
medical help immediately.
{WARNING
Fans or other moving engine
parts can injure you badly. Keep
your hands away from moving
parts once the engine is running. 5. Check that the jumper cables do
not have loose or missing
insulation. If they do, you could
get a shock. The vehicles could
be damaged too.
Before you connect the cables,
here are some basic things you
should know. Positive (+) will go
to positive (+) or to a remote
positive (+) terminal if the vehicle
has one. Negative (−) will go to a
heavy, unpainted metal engine
part or to a remote negative (−)
terminal if the vehicle has one.
Do not connect positive (+) to
negative (−) or you will get a
short that would damage the
battery and maybe other parts
too. And do not connect the
negative (−) cable to the
negative (−) terminal on the dead
battery because this can cause
sparks.
Page 407 of 414

Black plate (5,1)Chevrolet Corvette Owner Manual - 2013 - crc2 - 11/8/12
INDEX i-5
FusesEngine Compartment
Fuse Block . . . . . . . . . . . . . . . . 10-45
Fuses and Circuit Breakers . . . . . . . . . . . . . . . . . . 10-45
Instrument Panel Fuse Block . . . . . . . . . . . . . . . . . . . . . . 10-48
G
Garage Door Opener . . . . . . . . . . 5-60
Programming . . . . . . . . . . . . . . . . . 5-60
Gasoline Specifications . . . . . . . . . . . . . . . . . 9-46
Gauges Boost . . . . . . . . . . . . . . . . . . . . . . . . . 5-13
Engine CoolantTemperature . . . . . . . . . . . . . . . . 5-15
Engine Oil Pressure . . . . . . . . . . 5-14
Fuel . . . . . . . . . . . . . . . . . . . . . . . . . . 5-12
Odometer . . . . . . . . . . . . . . . . . . . . . 5-12
Speedometer . . . . . . . . . . . . . . . . . 5-12
Tachometer . . . . . . . . . . . . . . . . . . . 5-12
Voltmeter . . . . . . . . . . . . . . . . . . . . . 5-16
Warning Lights and
Indicators . . . . . . . . . . . . . . . . . . . . 5-8 General Information
Service and Maintenance . . . . . 11-1
Towing . . . . . . . . . . . . . . . . . . . . . . . . 9-50
Vehicle Care . . . . . . . . . . . . . . . . . . 10-2
Glove Box . . . . . . . . . . . . . . . . . . . . . . 4-1
GM Mobility Reimbursement Program . . . . . . . . . . . . . . . . . . . . . . 13-7
H
Halogen Bulbs . . . . . . . . . . . . . . . . 10-41
Hatch . . . . . . . . . . . . . . . . . . . . . . . . . . 2-10
Hazard Warning Flashers . . . . . . . 6-4
Head Restraints . . . . . . . . . . . . . . . . 3-2
Head-up Display . . . . . . . . . . . . . . . 5-30
Headlamps
Aiming . . . . . . . . . . . . . . . . . . . . . . 10-41
Bulb Replacement . . . . . . . . . . 10-41
Daytime RunningLamps (DRL) . . . . . . . . . . . . . . . . . 6-2
Flash-to-Pass . . . . . . . . . . . . . . . . . . 6-2
High Intensity Discharge (HID) Lighting . . . . . . . . . . . . . 10-42
High-Beam On Light . . . . . . . . . . 5-24
High/Low Beam Changer . . . . . . 6-2
Lamps On Reminder . . . . . . . . . 5-25
Twilight Sentinel . . . . . . . . . . . . . . . 6-3 Heated Front Seats . . . . . . . . . . . . . 3-7
Heated Mirrors . . . . . . . . . . . . . . . . . 2-15
High-Beam On Light . . . . . . . . . . . 5-24
High-Speed Operation . . . . . . . . 10-62
Highway Hypnosis . . . . . . . . . . . . . . 9-9
Hill and Mountain Roads . . . . . . . . 9-9
Hood . . . . . . . . . . . . . . . . . . . . . . . . . . 10-7
Horn . . . . . . . . . . . . . . . . . . . . . . . . . . . . 5-4
How to Wear Safety Belts
Properly . . . . . . . . . . . . . . . . . . . . . . . 3-9
Hydraulic Clutch . . . . . . . . . . . . . . 10-21
I
Ignition Positions . . . . . . . . . . . . . . 9-18
Immobilizer . . . . . . . . . . . . . . . . . . . . 2-13
Infants and Young Children,
Restraints . . . . . . . . . . . . . . . . . . . . 3-28
Infotainment . . . . . . . . . . . . . . . . . . . . 7-1
Instrument Cluster . . . . . . . . . . . . . . 5-9
Introduction . . . . . . . . . . . . . . . . . . . . . . . iii