2013 CHEVROLET CORVETTE remote control
[x] Cancel search: remote controlPage 165 of 414
Black plate (61,1)Chevrolet Corvette Owner Manual - 2013 - crc2 - 11/8/12
Instruments and Controls 5-61
Read the instructions completely
before attempting to program the
transmitter. Because of the steps
involved, it may be helpful to have
another person assist with
programming the transmitter.
Be sure to keep the original remote
control transmitter for use in other
vehicles, as well as for future
programming. Only the original
remote control transmitter is needed
for Fixed Code programming. The
programmed buttons should be
erased when the vehicle is sold or
the lease ends. See“Erasing
Universal Home Remote Buttons” in
this section.
Park the vehicle outside of the
garage when programming a garage
door. Be sure that people and
objects are clear of the garage door
or gate being programmed.Programming Universal Home
Remote —Rolling Code
For questions or help programming
the Universal Home Remote
System, call 1-866-572-2728 or go
to www.learcar2u.com.
Most garage door openers sold
after 1996 are Rolling Code units.
Programming a garage door opener
involves time-sensitive actions, so
read the entire procedure before
starting. Otherwise, the device will
time out and the procedure will have
to be repeated.
To program up to three devices:
1. Press START or put the vehicle
in accessory mode. See Ignition
Positions on page 9‑18 for
additional information.
Programming can only occur
when the vehicle is running or in
accessory mode.
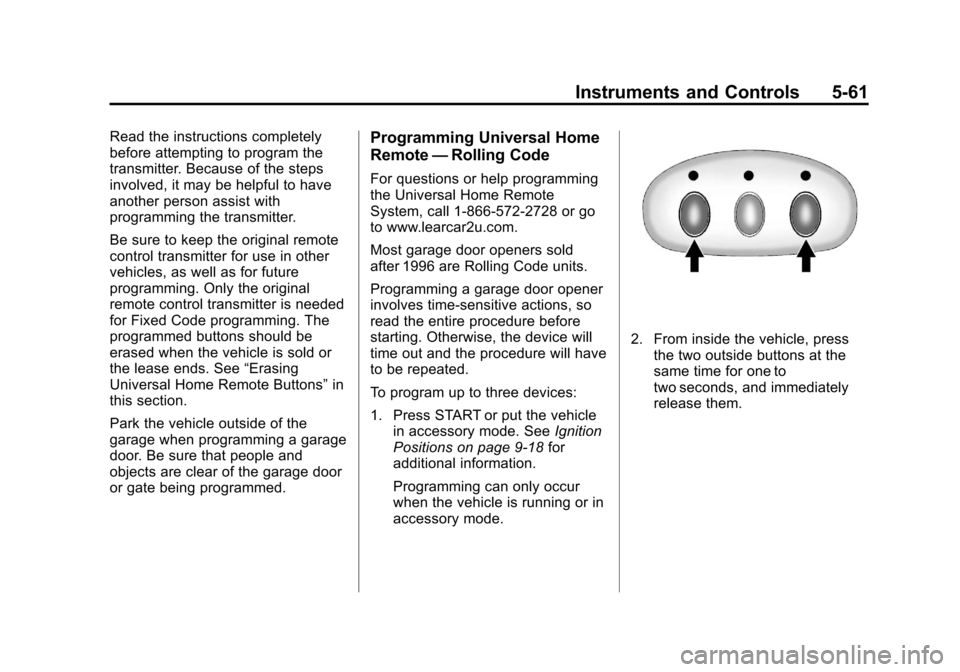
2. From inside the vehicle, press the two outside buttons at the
same time for one to
two seconds, and immediately
release them.
Page 166 of 414
Black plate (62,1)Chevrolet Corvette Owner Manual - 2013 - crc2 - 11/8/12
5-62 Instruments and Controls
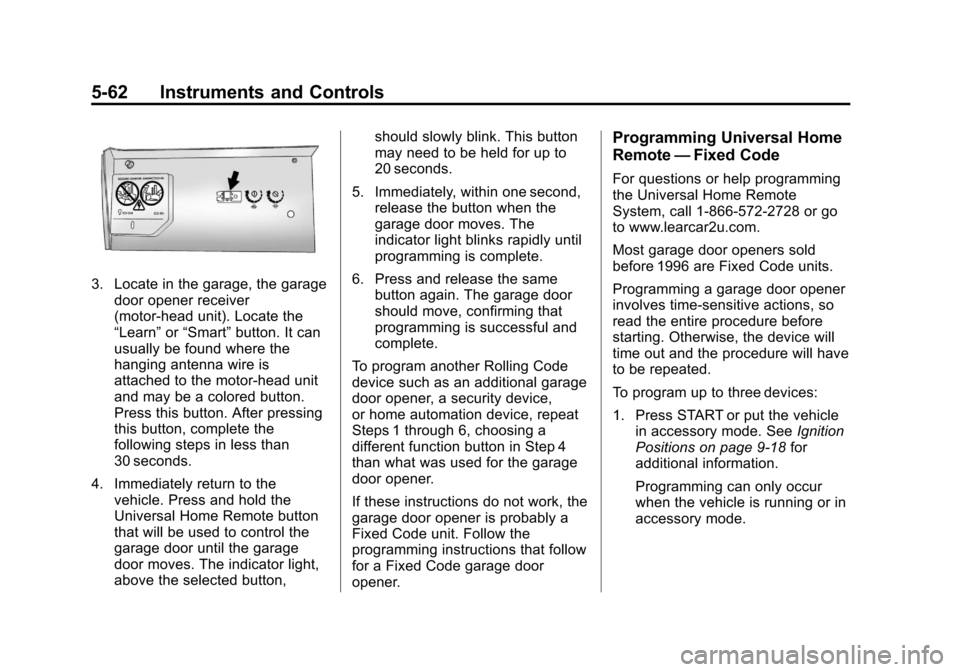
3. Locate in the garage, the garagedoor opener receiver
(motor-head unit). Locate the
“Learn” or“Smart” button. It can
usually be found where the
hanging antenna wire is
attached to the motor-head unit
and may be a colored button.
Press this button. After pressing
this button, complete the
following steps in less than
30 seconds.
4. Immediately return to the vehicle. Press and hold the
Universal Home Remote button
that will be used to control the
garage door until the garage
door moves. The indicator light,
above the selected button, should slowly blink. This button
may need to be held for up to
20 seconds.
5. Immediately, within one second, release the button when the
garage door moves. The
indicator light blinks rapidly until
programming is complete.
6. Press and release the same button again. The garage door
should move, confirming that
programming is successful and
complete.
To program another Rolling Code
device such as an additional garage
door opener, a security device,
or home automation device, repeat
Steps 1 through 6, choosing a
different function button in Step 4
than what was used for the garage
door opener.
If these instructions do not work, the
garage door opener is probably a
Fixed Code unit. Follow the
programming instructions that follow
for a Fixed Code garage door
opener.
Programming Universal Home
Remote —Fixed Code
For questions or help programming
the Universal Home Remote
System, call 1-866-572-2728 or go
to www.learcar2u.com.
Most garage door openers sold
before 1996 are Fixed Code units.
Programming a garage door opener
involves time-sensitive actions, so
read the entire procedure before
starting. Otherwise, the device will
time out and the procedure will have
to be repeated.
To program up to three devices:
1. Press START or put the vehicle
in accessory mode. See Ignition
Positions on page 9‑18 for
additional information.
Programming can only occur
when the vehicle is running or in
accessory mode.
Page 167 of 414

Black plate (63,1)Chevrolet Corvette Owner Manual - 2013 - crc2 - 11/8/12
Instruments and Controls 5-63
2. To verify that the garage dooropener is a Fixed Code unit,
remove the battery cover on the
hand-held transmitter supplied
by the manufacturer of the
garage door opener motor.
If there is a row of dip switches
similar to the graphic above, the
garage door opener is a Fixed
Code unit. If you do not see a
row of dip switches, return to the
previous section, “Programming
Universal Home
Remote –Rolling Code.” The hand-held transmitter can
have between eight and
12 dip switches depending on
the brand of transmitter.
The garage door opener receiver
(motor head unit) could also
have a row of dip switches that
can be used when programming
the Universal Home Remote.
If the total number of switches
on the motor head and
hand-held transmitter is different,
or if the dip switch settings are
different, use the dip switch
settings on the motor head unit
to program the Universal Home
Remote. The motor head dip
switch settings can also be used
when the original hand-held
transmitter is not available.
Example of Eight Dip Switches
with Two Positions
Example of Eight Dip Switcheswith Three Positions
The panel of switches might not
appear exactly as they do in the
examples above, but they
should be similar.
The switch positions on the
hand-held transmitter could be
labeled as follows:
.A switch in the up position
could be labeled as “Up,”
“+,” or“On.”
Page 168 of 414
Black plate (64,1)Chevrolet Corvette Owner Manual - 2013 - crc2 - 11/8/12
5-64 Instruments and Controls
.A switch in the down
position could be labeled as
“Down,” “−,”or“Off.”
.A switch in the middle
position could be labeled as
“Middle,” “0,” or“Neutral.”
3. Write down the eight to 12 switch settings from left to right as
follows:
.When a switch is in the up
position, write “Left.”
.When a switch is in the
down position, write “Right.”
.If a switch is set between
the up and down position,
write“Middle.”
The switch settings written
down in Step 3 now
become the button strokes
to be entered into the
Universal Home Remote in
Step 5. Be sure to enter the
switch settings written down
in Step 3, in order from left to right, into the Universal
Home Remote, when
completing Step 5.
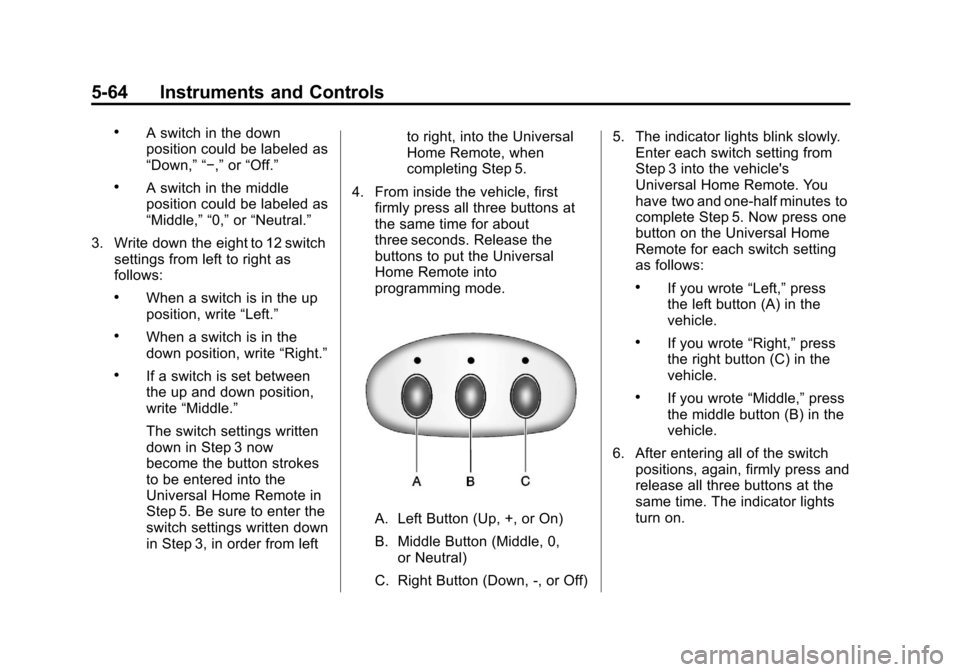
4. From inside the vehicle, first firmly press all three buttons at
the same time for about
three seconds. Release the
buttons to put the Universal
Home Remote into
programming mode.
A. Left Button (Up, +, or On)
B. Middle Button (Middle, 0,or Neutral)
C. Right Button (Down, -, or Off) 5. The indicator lights blink slowly.
Enter each switch setting from
Step 3 into the vehicle's
Universal Home Remote. You
have two and one-half minutes to
complete Step 5. Now press one
button on the Universal Home
Remote for each switch setting
as follows:
.If you wrote “Left,”press
the left button (A) in the
vehicle.
.If you wrote “Right,”press
the right button (C) in the
vehicle.
.If you wrote “Middle,”press
the middle button (B) in the
vehicle.
6. After entering all of the switch positions, again, firmly press and
release all three buttons at the
same time. The indicator lights
turn on.
Page 169 of 414
Black plate (65,1)Chevrolet Corvette Owner Manual - 2013 - crc2 - 11/8/12
Instruments and Controls 5-65
7. Press and hold the button thatwill be used to control the
garage door until the garage
door moves. The indicator light
above the selected button
should slowly blink. This button
may need to be held for up to
55 seconds.
8. Immediately release the button when the garage door moves.
The indicator light blinks rapidly
until programming is complete.
9. Press and release the same button again. The garage door
should move, confirming that
programming is successful and
complete.
To program another Fixed Code
device such as an additional garage
door opener, a security device,
or home automation device, repeat
Steps 1 through 9, choosing a
different button in Step 7 than what
was used for the garage door
opener.Universal Remote System
Operation
Press and hold the appropriate
button for at least one-half second.
The indicator light comes on while
the signal is being transmitted.
Operation can occur:
.If the vehicle is in
accessory mode.
.If the vehicle is running.
.If the vehicle is in Retained
Accessory Mode (RAP). See
Retained Accessory Power
(RAP) on page 9‑21 for more
information.
.Up to an additional 10 minutes
after RAP finishes.
.Up to 10 minutes after any door
is opened.
Reprogramming Universal
Home Remote Buttons
Any of the three buttons can be
reprogrammed by repeating the
instructions.
Erasing Universal Home
Remote Buttons
The programmed buttons should be
erased when the vehicle is sold or
the lease ends.
To erase either Rolling Code or
Fixed Code on the Universal Home
Remote device:
1. Press and hold the two outside buttons at the same time for
approximately 20 seconds, until
the indicator lights, located
directly above the buttons, begin
to blink rapidly.
2. Once the indicator lights begin to blink, release both buttons. The
codes from all buttons are
erased.
For help or information on the
Universal Home Remote System,
call the customer assistance phone
number under Customer Assistance
Offices (U.S. and Canada) on
page 13‑5 orCustomer Assistance
Offices (Mexico) on page 13‑5.
Page 265 of 414
Black plate (3,1)Chevrolet Corvette Owner Manual - 2013 - crc2 - 11/8/12
Vehicle Care 10-3
cause cancer and birth defects or
other reproductive harm. Engine
exhaust, many parts and systems,
many fluids, and some component
wear by-products contain and/or
emit these chemicals.
California Perchlorate
Materials Requirements
Certain types of automotive
applications, such as airbag
initiators, safety belt pretensioners,
and lithium batteries contained in
Remote Keyless Entry transmitters,
may contain perchlorate materials.
Special handling may be necessary.
For additional information, see
www.dtsc.ca.gov/hazardouswaste/
perchlorate.
Accessories and
Modifications
Adding non‐dealer accessories or
making modifications to the vehicle
can affect vehicle performance and
safety, including such things as
airbags, braking, stability, ride andhandling, emissions systems,
aerodynamics, durability, and
electronic systems like antilock
brakes, traction control, and stability
control. These accessories or
modifications could even cause
malfunction or damage not covered
by the vehicle warranty.
Damage to vehicle components
resulting from modifications or the
installation or use of non‐GM
certified parts, including control
module or software modifications, is
not covered under the terms of the
vehicle warranty and may affect
remaining warranty coverage for
affected parts.
GM Accessories are designed to
complement and function with other
systems on the vehicle. See your
dealer to accessorize the vehicle
using genuine GM Accessories
installed by a dealer technician.
Also, see
Adding Equipment to the
Airbag-Equipped Vehicle on
page 3‑25.
Lifting the Vehicle
{WARNING
Lifting a vehicle can cause an
injury. The vehicle can slip off the
jack and roll over you or other
people. You and they could be
badly injured. Find a level place
to lift your vehicle. To help
prevent the vehicle from moving:
1. Set the parking brake firmly.
2. Put an automatic transmission shift lever in
P (Park), or shift a manual
transmission to 1 (First) or
R (Reverse).
3. Turn off the engine.
To be even more certain the
vehicle won't move, put blocks in
front of and behind the wheels.
Page 398 of 414
Black plate (4,1)Chevrolet Corvette Owner Manual - 2013 - crc2 - 11/8/12
14-4 OnStar
Connections
OnStar Hands-Free Calling allows
calls to be made and received from
the vehicle. The vehicle can also be
controlled from a cell phone through
the OnStar RemoteLink mobile app.
For coverage maps, see
www.onstar.com (U.S.),
www.onstar.ca (Canada).
Hands-Free Calling
1. Press=. System responds:
“OnStar ready.”
2. Say “Call.”System responds:
“Please say the name or number
to call.”
3. Say the entire number without pausing, including a “1”and the
area code. System responds:
“OK calling.”
Calling 911 Emergency
1. Press=. The system responds
“OnStar Ready,” followed by
a tone. 2. Say
“Call.”The system responds
“Please say the name or number
to call.”
3. Say “911”without pausing. The
system responds “911.”
4. Say “Call.”The system responds
“OK, dialing 911.”
Retrieve My Number
1. Press=. System responds:
“OnStar ready.”
2. Say “My number.” System
responds: “Your OnStar
Hands-Free Calling number is.”
End a Call
Press=. System responds: “Call
ended.”
Store a Name Tag for Speed
Dialing
1. Press=. System responds:
“OnStar ready.”
2. Say “Store.” System responds:
“Please say the number you
would like to store.” 3. Say the entire number without
pausing. System responds:
“Please say the name tag.”
4. Pick a name tag. System responds: “About to store
5. Say “Yes”or say “No”to try
again. System responds: “OK,
storing
Place a Call Using a Stored
Number
1. Press=. System responds:
“OnStar ready.”
2. Say “Call
responds: “OK, calling
Verify Minutes and Expiration
Press=and say “Minutes” then
“Verify” to check how many minutes
remain and their expiration date.
Page 408 of 414

Black plate (6,1)Chevrolet Corvette Owner Manual - 2013 - crc2 - 11/8/12
i-6 INDEX
J
Jump Starting . . . . . . . . . . . . . . . . . 10-75
K
Key and Lock Messages . . . . . . . 5-40
Keyless EntryRemote (RKE) System . . . . . . . . 2-3
Keys . . . . . . . . . . . . . . . . . . . . . . . . . . . . 2-1
L
Labeling, Tire Sidewall . . . . . . . . 10-55
Lamps Courtesy . . . . . . . . . . . . . . . . . . . . . . . 6-6
Daytime Running (DRL) . . . . . . . 6-2
Exterior Controls . . . . . . . . . . . . . . . 6-1
Exterior Lamps OffReminder . . . . . . . . . . . . . . . . . . . . 6-2
Exterior Lighting Battery Saver . . . . . . . . . . . . . . . . . . . . . . . . 6-7
Headlamps, Front Turn
Signal, and Parking
Lamps . . . . . . . . . . . . . . . . . . . . 10-42
License Plate . . . . . . . . . . . . . . . 10-44
Malfunction Indicator . . . . . . . . . 5-18 Lamps (cont'd)
Messages . . . . . . . . . . . . . . . . . . . . 5-42
On Reminder . . . . . . . . . . . . . . . . . 5-25
Reading . . . . . . . . . . . . . . . . . . . . . . . 6-6
Lap-Shoulder Belt . . . . . . . . . . . . . 3-10
LATCH System Replacing Parts after aCrash . . . . . . . . . . . . . . . . . . . . . . . 3-37
LATCH, Lower Anchors and
Tethers for Children . . . . . . . . . . 3-33
Latches, Seatback . . . . . . . . . . . . . . 3-6
Lifting the Vehicle, Tires . . . . . . . 10-3
Lighter, Cigarette . . . . . . . . . . . . . . . 5-7
Lighting Entry/Exit . . . . . . . . . . . . . . . . . . . . . . 6-6
Illumination Control . . . . . . . . . . . . 6-6
Lights Active Handling System . . . . . . 5-23
Airbag Readiness . . . . . . . . . . . . . 5-16
Antilock Brake System
(ABS) Warning . . . . . . . . . . . . . . 5-21
Brake System Warning . . . . . . . 5-20
Flash-to-Pass . . . . . . . . . . . . . . . . . . 6-2
Front Fog Lamp . . . . . . . . . . . . . . 5-24 Lights (cont'd)
High-Beam On . . . . . . . . . . . . . . . . 5-24
High/Low Beam Changer . . . . . . 6-2
One-to-Four Shift . . . . . . . . . . . . . 5-21
Safety Belt Reminders . . . . . . . . 5-16
Security . . . . . . . . . . . . . . . . . . . . . . 5-24
StabiliTrak
®OFF . . . . . . . . . . . . . 5-22
Tire Pressure . . . . . . . . . . . . . . . . . 5-23
Traction Off . . . . . . . . . . . . . . . . . . . 5-22
Limited-Slip Rear Axle . . . . . . . . . 9-40
Locks Automatic Door . . . . . . . . . . . . . . . . 2-9
Door . . . . . . . . . . . . . . . . . . . . . . . . . . . 2-7
Lockout Protection . . . . . . . . . . . . . 2-9
Power Door . . . . . . . . . . . . . . . . . . . . 2-8
Loss of Control . . . . . . . . . . . . . . . . . 9-5
Low-Profile Tires . . . . . . . . . . . . . . 10-54
Lower Anchors and Tethers for Children (LATCH
System) . . . . . . . . . . . . . . . . . . . . . . 3-33
Lumbar Adjustment . . . . . . . . . . . . . 3-3 Front Seats . . . . . . . . . . . . . . . . . . . . 3-3