2013 CHEVROLET CORVETTE high beam
[x] Cancel search: high beamPage 175 of 414

Black plate (5,1)Chevrolet Corvette Owner Manual - 2013 - crc2 - 11/8/12
Lighting 6-5
turn signal automatically flashes
three times. If more flashes are
desired, continue to hold the lever.
The lever returns to its starting
position when it is released.
If after signaling a turn or lane
change the arrows flash rapidly or
do not come on, a signal bulb may
be burned out.
Have any burned out bulbs
replaced. If a bulb is not burned out,
check the fuse. SeeFuses and
Circuit Breakers on page 10‑45.
Turn Signal on Chime
A chime sounds if the turn signal
has been on for more than 1.2 km
(0.75 miles) of driving.
If you need to leave the turn signal
on for more than 1.2 km
(0.75 miles), turn off the signal and
then turn it back on.Fog Lamps
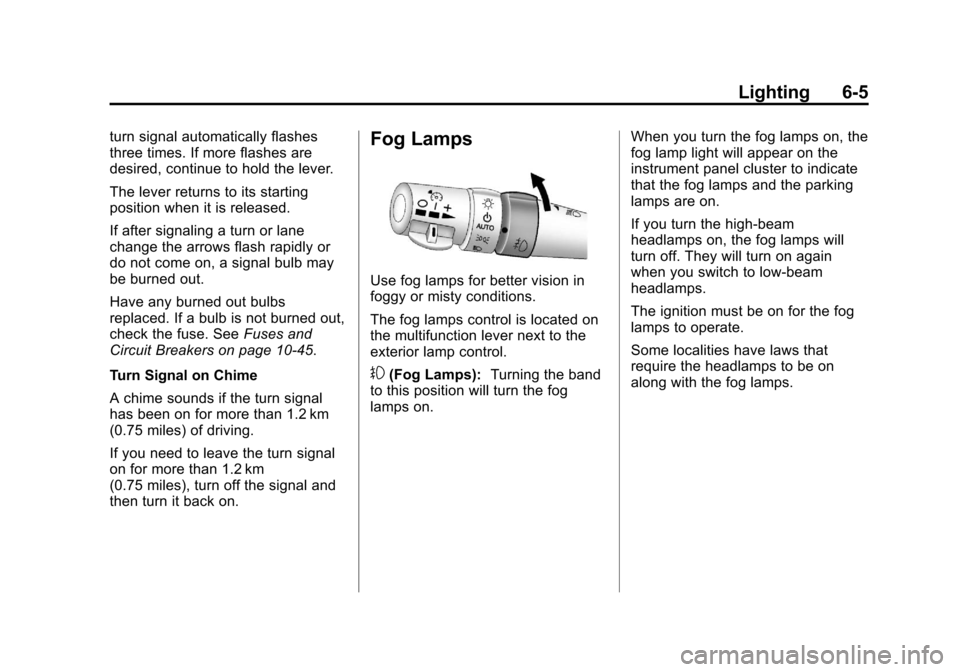
Use fog lamps for better vision in
foggy or misty conditions.
The fog lamps control is located on
the multifunction lever next to the
exterior lamp control.
#(Fog Lamps): Turning the band
to this position will turn the fog
lamps on. When you turn the fog lamps on, the
fog lamp light will appear on the
instrument panel cluster to indicate
that the fog lamps and the parking
lamps are on.
If you turn the high-beam
headlamps on, the fog lamps will
turn off. They will turn on again
when you switch to low-beam
headlamps.
The ignition must be on for the fog
lamps to operate.
Some localities have laws that
require the headlamps to be on
along with the fog lamps.
Page 304 of 414

Black plate (42,1)Chevrolet Corvette Owner Manual - 2013 - crc2 - 11/8/12
10-42 Vehicle Care
High Intensity Discharge
(HID) Lighting
{WARNING
The high intensity discharge
lighting system operates at a very
high voltage. If you try to service
any of the system components,
you could be seriously injured.
Have your dealer or a qualified
technician service them.
The vehicle may have HID
headlamps. After an HID headlamp
bulb has been replaced, you may
notice that the beam is a slightly
different shade than it was originally.
This is normal.
Headlamps, Front Turn
Signal and Parking
Lamps
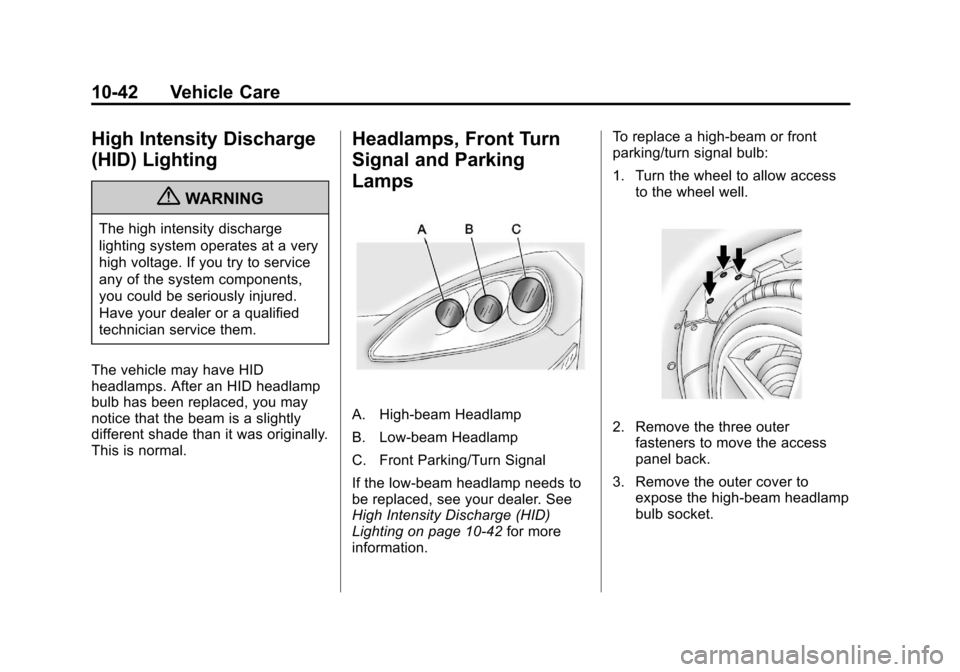
A. High-beam Headlamp
B. Low-beam Headlamp
C. Front Parking/Turn Signal
If the low-beam headlamp needs to
be replaced, see your dealer. See
High Intensity Discharge (HID)
Lighting on page 10‑42 for more
information. To replace a high-beam or front
parking/turn signal bulb:
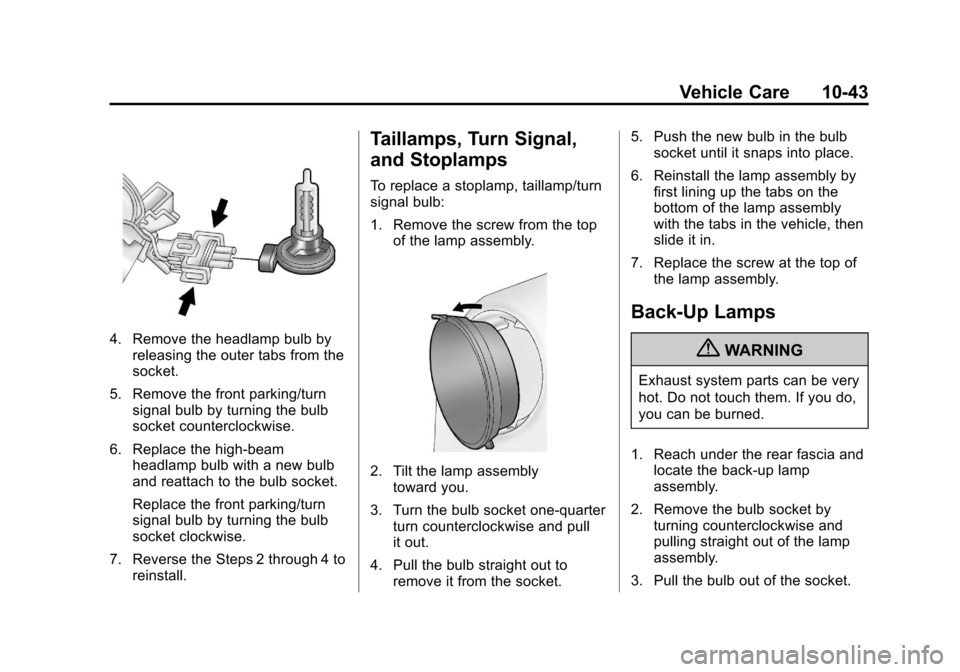
1. Turn the wheel to allow access
to the wheel well.2. Remove the three outerfasteners to move the access
panel back.
3. Remove the outer cover to expose the high-beam headlamp
bulb socket.
Page 305 of 414

Black plate (43,1)Chevrolet Corvette Owner Manual - 2013 - crc2 - 11/8/12
Vehicle Care 10-43
4. Remove the headlamp bulb byreleasing the outer tabs from the
socket.
5. Remove the front parking/turn signal bulb by turning the bulb
socket counterclockwise.
6. Replace the high-beam headlamp bulb with a new bulb
and reattach to the bulb socket.
Replace the front parking/turn
signal bulb by turning the bulb
socket clockwise.
7. Reverse the Steps 2 through 4 to reinstall.
Taillamps, Turn Signal,
and Stoplamps
To replace a stoplamp, taillamp/turn
signal bulb:
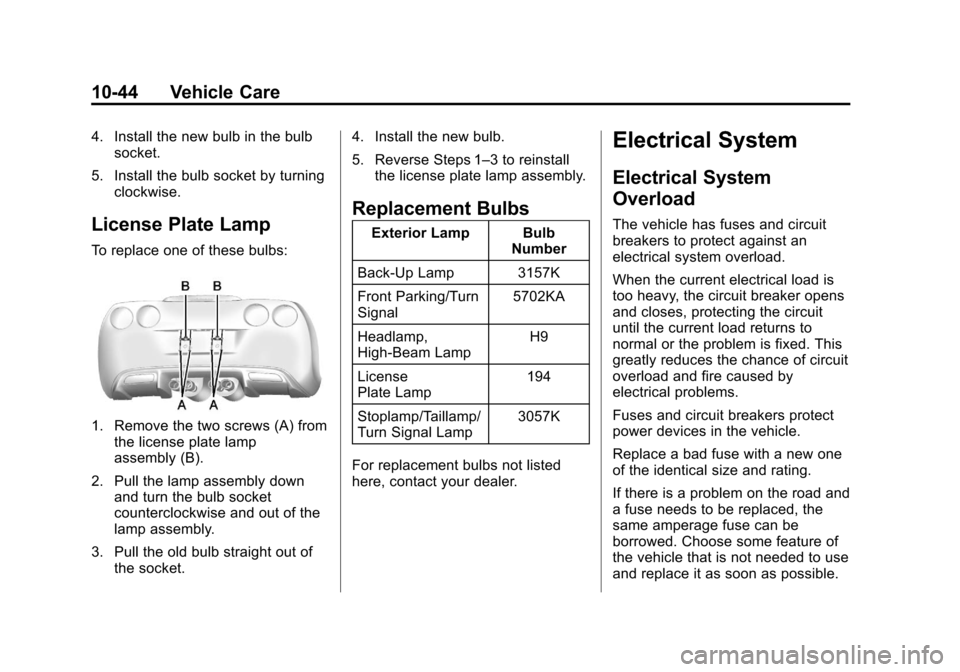
1. Remove the screw from the top
of the lamp assembly.
2. Tilt the lamp assemblytoward you.
3. Turn the bulb socket one-quarter turn counterclockwise and pull
it out.
4. Pull the bulb straight out to remove it from the socket. 5. Push the new bulb in the bulb
socket until it snaps into place.
6. Reinstall the lamp assembly by first lining up the tabs on the
bottom of the lamp assembly
with the tabs in the vehicle, then
slide it in.
7. Replace the screw at the top of the lamp assembly.
Back-Up Lamps
{WARNING
Exhaust system parts can be very
hot. Do not touch them. If you do,
you can be burned.
1. Reach under the rear fascia and locate the back-up lamp
assembly.
2. Remove the bulb socket by turning counterclockwise and
pulling straight out of the lamp
assembly.
3. Pull the bulb out of the socket.
Page 306 of 414

Black plate (44,1)Chevrolet Corvette Owner Manual - 2013 - crc2 - 11/8/12
10-44 Vehicle Care
4. Install the new bulb in the bulbsocket.
5. Install the bulb socket by turning clockwise.
License Plate Lamp
To replace one of these bulbs:
1. Remove the two screws (A) fromthe license plate lamp
assembly (B).
2. Pull the lamp assembly down and turn the bulb socket
counterclockwise and out of the
lamp assembly.
3. Pull the old bulb straight out of the socket. 4. Install the new bulb.
5. Reverse Steps 1–3 to reinstall
the license plate lamp assembly.
Replacement Bulbs
Exterior Lamp Bulb Number
Back-Up Lamp 3157K
Front Parking/Turn
Signal 5702KA
Headlamp,
High-Beam Lamp H9
License
Plate Lamp 194
Stoplamp/Taillamp/
Turn Signal Lamp 3057K
For replacement bulbs not listed
here, contact your dealer.
Electrical System
Electrical System
Overload
The vehicle has fuses and circuit
breakers to protect against an
electrical system overload.
When the current electrical load is
too heavy, the circuit breaker opens
and closes, protecting the circuit
until the current load returns to
normal or the problem is fixed. This
greatly reduces the chance of circuit
overload and fire caused by
electrical problems.
Fuses and circuit breakers protect
power devices in the vehicle.
Replace a bad fuse with a new one
of the identical size and rating.
If there is a problem on the road and
a fuse needs to be replaced, the
same amperage fuse can be
borrowed. Choose some feature of
the vehicle that is not needed to use
and replace it as soon as possible.
Page 309 of 414

Black plate (47,1)Chevrolet Corvette Owner Manual - 2013 - crc2 - 11/8/12
Vehicle Care 10-47
FuseUsage
14 Canister Purge Solenoid, Mass Air
Flow Sensor
15 Air Conditioner Compressor
16 Even Numbered Fuel Injectors
17 Windshield Washer
18 Headlamp Washer
19 Passenger Side Low-Beam
Headlamp
20 Fuel Pump (except ZR1)
21 Driver Side Low-Beam
Headlamp
22 Front Fog Lamp
23 Passenger Side High-Beam
Headlamp Fuse
Usage
24 Driver Side High-Beam
Headlamp
56 Engine Control Module (ECM)/
Transmission
Control
Module (TCM)/
Easy Key Module
J-Style Fuses Usage
25 Cooling Fan
26 Battery Main 3
27 Antilock Brake System
28 Heating/Ventilation/ Air Conditioning
Blower
29 Battery Main 2
30 Starter
31 Audio Amplifier J-Style
Fuses Usage
32 Intercooler Pump
33 Battery Main 1
Micro-Relays Usage 34 Horn
35 Air Conditioning
Compressor
36 Windshield Washer
37 Parking Lamps, Fog
Lamps
38 Front Fog Lamp
39 High-Beam Headlamp
46 Headlamp Washer
55 Fuel Pump (except ZR1)
Page 310 of 414

Black plate (48,1)Chevrolet Corvette Owner Manual - 2013 - crc2 - 11/8/12
10-48 Vehicle Care
Mini-Relays Usage40 Rear Defog
41 Windshield Wiper High/Low
42 Windshield Wiper Run/Accessory
43 Crank
44 Powertrain Ignition 1
45 Windshield Wiper On/Off
47 Low-Beam Headlamp Spare Fuses Usage
48 Spare
49 Spare
50 Spare
51 Spare
52 Spare
53 Spare
54 Fuse Puller
Diodes Usage § Diode 1
§ Wiper
§ Diode 2Instrument Panel Fuse
Block
The instrument panel fuse block is
located on the passenger side of the
vehicle, under the instrument panel
and under the toe-board.
Remove the carpet and toe-board
covering to access the fuse block by
pulling at the top of each corner of
the panel. Open the fuse block
cover to access the fuses.
You can remove fuses using the
fuse puller.
Page 407 of 414

Black plate (5,1)Chevrolet Corvette Owner Manual - 2013 - crc2 - 11/8/12
INDEX i-5
FusesEngine Compartment
Fuse Block . . . . . . . . . . . . . . . . 10-45
Fuses and Circuit Breakers . . . . . . . . . . . . . . . . . . 10-45
Instrument Panel Fuse Block . . . . . . . . . . . . . . . . . . . . . . 10-48
G
Garage Door Opener . . . . . . . . . . 5-60
Programming . . . . . . . . . . . . . . . . . 5-60
Gasoline Specifications . . . . . . . . . . . . . . . . . 9-46
Gauges Boost . . . . . . . . . . . . . . . . . . . . . . . . . 5-13
Engine CoolantTemperature . . . . . . . . . . . . . . . . 5-15
Engine Oil Pressure . . . . . . . . . . 5-14
Fuel . . . . . . . . . . . . . . . . . . . . . . . . . . 5-12
Odometer . . . . . . . . . . . . . . . . . . . . . 5-12
Speedometer . . . . . . . . . . . . . . . . . 5-12
Tachometer . . . . . . . . . . . . . . . . . . . 5-12
Voltmeter . . . . . . . . . . . . . . . . . . . . . 5-16
Warning Lights and
Indicators . . . . . . . . . . . . . . . . . . . . 5-8 General Information
Service and Maintenance . . . . . 11-1
Towing . . . . . . . . . . . . . . . . . . . . . . . . 9-50
Vehicle Care . . . . . . . . . . . . . . . . . . 10-2
Glove Box . . . . . . . . . . . . . . . . . . . . . . 4-1
GM Mobility Reimbursement Program . . . . . . . . . . . . . . . . . . . . . . 13-7
H
Halogen Bulbs . . . . . . . . . . . . . . . . 10-41
Hatch . . . . . . . . . . . . . . . . . . . . . . . . . . 2-10
Hazard Warning Flashers . . . . . . . 6-4
Head Restraints . . . . . . . . . . . . . . . . 3-2
Head-up Display . . . . . . . . . . . . . . . 5-30
Headlamps
Aiming . . . . . . . . . . . . . . . . . . . . . . 10-41
Bulb Replacement . . . . . . . . . . 10-41
Daytime RunningLamps (DRL) . . . . . . . . . . . . . . . . . 6-2
Flash-to-Pass . . . . . . . . . . . . . . . . . . 6-2
High Intensity Discharge (HID) Lighting . . . . . . . . . . . . . 10-42
High-Beam On Light . . . . . . . . . . 5-24
High/Low Beam Changer . . . . . . 6-2
Lamps On Reminder . . . . . . . . . 5-25
Twilight Sentinel . . . . . . . . . . . . . . . 6-3 Heated Front Seats . . . . . . . . . . . . . 3-7
Heated Mirrors . . . . . . . . . . . . . . . . . 2-15
High-Beam On Light . . . . . . . . . . . 5-24
High-Speed Operation . . . . . . . . 10-62
Highway Hypnosis . . . . . . . . . . . . . . 9-9
Hill and Mountain Roads . . . . . . . . 9-9
Hood . . . . . . . . . . . . . . . . . . . . . . . . . . 10-7
Horn . . . . . . . . . . . . . . . . . . . . . . . . . . . . 5-4
How to Wear Safety Belts
Properly . . . . . . . . . . . . . . . . . . . . . . . 3-9
Hydraulic Clutch . . . . . . . . . . . . . . 10-21
I
Ignition Positions . . . . . . . . . . . . . . 9-18
Immobilizer . . . . . . . . . . . . . . . . . . . . 2-13
Infants and Young Children,
Restraints . . . . . . . . . . . . . . . . . . . . 3-28
Infotainment . . . . . . . . . . . . . . . . . . . . 7-1
Instrument Cluster . . . . . . . . . . . . . . 5-9
Introduction . . . . . . . . . . . . . . . . . . . . . . . iii
Page 408 of 414

Black plate (6,1)Chevrolet Corvette Owner Manual - 2013 - crc2 - 11/8/12
i-6 INDEX
J
Jump Starting . . . . . . . . . . . . . . . . . 10-75
K
Key and Lock Messages . . . . . . . 5-40
Keyless EntryRemote (RKE) System . . . . . . . . 2-3
Keys . . . . . . . . . . . . . . . . . . . . . . . . . . . . 2-1
L
Labeling, Tire Sidewall . . . . . . . . 10-55
Lamps Courtesy . . . . . . . . . . . . . . . . . . . . . . . 6-6
Daytime Running (DRL) . . . . . . . 6-2
Exterior Controls . . . . . . . . . . . . . . . 6-1
Exterior Lamps OffReminder . . . . . . . . . . . . . . . . . . . . 6-2
Exterior Lighting Battery Saver . . . . . . . . . . . . . . . . . . . . . . . . 6-7
Headlamps, Front Turn
Signal, and Parking
Lamps . . . . . . . . . . . . . . . . . . . . 10-42
License Plate . . . . . . . . . . . . . . . 10-44
Malfunction Indicator . . . . . . . . . 5-18 Lamps (cont'd)
Messages . . . . . . . . . . . . . . . . . . . . 5-42
On Reminder . . . . . . . . . . . . . . . . . 5-25
Reading . . . . . . . . . . . . . . . . . . . . . . . 6-6
Lap-Shoulder Belt . . . . . . . . . . . . . 3-10
LATCH System Replacing Parts after aCrash . . . . . . . . . . . . . . . . . . . . . . . 3-37
LATCH, Lower Anchors and
Tethers for Children . . . . . . . . . . 3-33
Latches, Seatback . . . . . . . . . . . . . . 3-6
Lifting the Vehicle, Tires . . . . . . . 10-3
Lighter, Cigarette . . . . . . . . . . . . . . . 5-7
Lighting Entry/Exit . . . . . . . . . . . . . . . . . . . . . . 6-6
Illumination Control . . . . . . . . . . . . 6-6
Lights Active Handling System . . . . . . 5-23
Airbag Readiness . . . . . . . . . . . . . 5-16
Antilock Brake System
(ABS) Warning . . . . . . . . . . . . . . 5-21
Brake System Warning . . . . . . . 5-20
Flash-to-Pass . . . . . . . . . . . . . . . . . . 6-2
Front Fog Lamp . . . . . . . . . . . . . . 5-24 Lights (cont'd)
High-Beam On . . . . . . . . . . . . . . . . 5-24
High/Low Beam Changer . . . . . . 6-2
One-to-Four Shift . . . . . . . . . . . . . 5-21
Safety Belt Reminders . . . . . . . . 5-16
Security . . . . . . . . . . . . . . . . . . . . . . 5-24
StabiliTrak
®OFF . . . . . . . . . . . . . 5-22
Tire Pressure . . . . . . . . . . . . . . . . . 5-23
Traction Off . . . . . . . . . . . . . . . . . . . 5-22
Limited-Slip Rear Axle . . . . . . . . . 9-40
Locks Automatic Door . . . . . . . . . . . . . . . . 2-9
Door . . . . . . . . . . . . . . . . . . . . . . . . . . . 2-7
Lockout Protection . . . . . . . . . . . . . 2-9
Power Door . . . . . . . . . . . . . . . . . . . . 2-8
Loss of Control . . . . . . . . . . . . . . . . . 9-5
Low-Profile Tires . . . . . . . . . . . . . . 10-54
Lower Anchors and Tethers for Children (LATCH
System) . . . . . . . . . . . . . . . . . . . . . . 3-33
Lumbar Adjustment . . . . . . . . . . . . . 3-3 Front Seats . . . . . . . . . . . . . . . . . . . . 3-3