2013 CHEVROLET CORVETTE light
[x] Cancel search: lightPage 250 of 414
Black plate (38,1)Chevrolet Corvette Owner Manual - 2013 - crc2 - 11/8/12
9-38 Driving and Operating
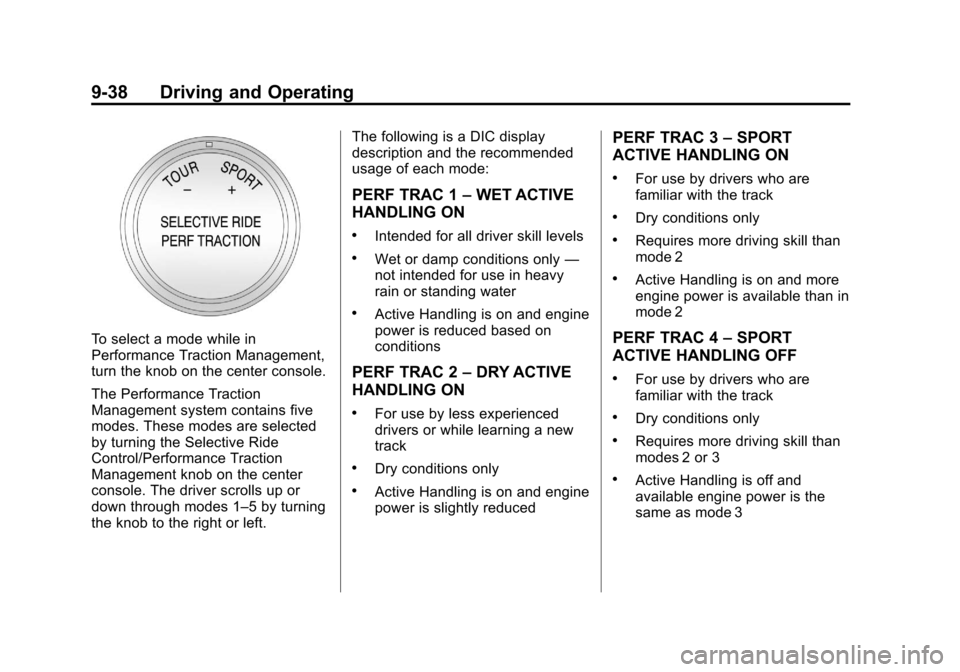
To select a mode while in
Performance Traction Management,
turn the knob on the center console.
The Performance Traction
Management system contains five
modes. These modes are selected
by turning the Selective Ride
Control/Performance Traction
Management knob on the center
console. The driver scrolls up or
down through modes 1–5 by turning
the knob to the right or left.The following is a DIC display
description and the recommended
usage of each mode:
PERF TRAC 1
–WET ACTIVE
HANDLING ON
.Intended for all driver skill levels
.Wet or damp conditions only —
not intended for use in heavy
rain or standing water
.Active Handling is on and engine
power is reduced based on
conditions
PERF TRAC 2 –DRY ACTIVE
HANDLING ON
.For use by less experienced
drivers or while learning a new
track
.Dry conditions only
.Active Handling is on and engine
power is slightly reduced
PERF TRAC 3 –SPORT
ACTIVE HANDLING ON
.For use by drivers who are
familiar with the track
.Dry conditions only
.Requires more driving skill than
mode 2
.Active Handling is on and more
engine power is available than in
mode 2
PERF TRAC 4 –SPORT
ACTIVE HANDLING OFF
.For use by drivers who are
familiar with the track
.Dry conditions only
.Requires more driving skill than
modes 2 or 3
.Active Handling is off and
available engine power is the
same as mode 3
Page 251 of 414
Black plate (39,1)Chevrolet Corvette Owner Manual - 2013 - crc2 - 11/8/12
Driving and Operating 9-39
PERF TRAC 5–RACE ACTIVE
HANDLING OFF
.For use by experienced drivers
who are familiar with the track
.Dry conditions only
.Requires more driving skill than
in other modes
.Active Handling is off and engine
power is available for maximum
cornering speed
Press and release the Active
Handling button to turn off
Performance Traction Management
and return to the Active Handling
and Traction Control Systems. The
TRACTION SYSTEM AND ACTIVE
HANDLING-ON message displays
briefly in the DIC and a chime is
heard.
Launch Control
A Launch Control feature is
available, within Competitive Driving
Mode (except Z06 with magnetic
Selective Ride Control or ZR1) or
Performance Traction Management (Z06 with magnetic Selective Ride
Control or ZR1), on vehicles with a
manual transmission to allow the
driver to achieve high levels of
vehicle acceleration in a straight
line. Launch Control is a form of
traction control that manages tire
spin while launching the vehicle.
This feature is intended for use
during closed course race events
where consistent zero to sixty
and quarter mile times are
desirable.
Launch Control is only available
when the following criteria are met:
.Competitive Driving Mode is
selected (except Z06 with
magnetic Selective Ride Control
or ZR1) or any of the
Performance Traction
Management modes are
selected (Z06 with magnetic
Selective Ride Control or ZR1).
The TCS light comes on the
instrument panel and the
appropriate DIC message
displays.
.The vehicle is not moving.
.The steering wheel is pointing
straight.
.The clutch is pressed and the
vehicle is in first gear.
.The accelerator pedal is rapidly
applied to wide open throttle.
The Launch Control feature will
initially limit engine speed as the
driver rapidly applies the accelerator
pedal to wide open throttle.
A smooth, quick release of the
clutch, while maintaining the fully
pressed accelerator pedal, will
manage wheel slip. Complete shifts
as described in Manual
Transmission on page 9‑29.
After the vehicle is launched, the
system continues in Competitive
Mode (except Z06 with magnetic
Selective Ride Control or ZR1) or
Performance Traction Management
(Z06 with magnetic Selective Ride
Control or ZR1).
Page 256 of 414
Black plate (44,1)Chevrolet Corvette Owner Manual - 2013 - crc2 - 11/8/12
9-44 Driving and Operating
Cruise Control in Sport and
Manual Paddle Shift Gear
Selection
When the vehicle is in S (Sport) and
the manual paddle shift controls are
not being used, cruise control
operates in the same manner as
D (Drive).
When the vehicle is in S (Sport) and
the manual paddle shift controls are
being used, cruise control operates
as follows:
.If cruise control is active and a
gear is selected with the manual
paddle shift controls, the vehicle
speed is maintained in the driver
selected gear and will not
automatically up-shift or
down-shift the transmission
while the driver’s gear selection
is active.
.If driving in hilly terrain, cruise
control may not be able to
maintain vehicle speed if an
up-shift or down-shift is not
selected by the driver. While
driving on hilly terrain and cruise
control is active with a manual
paddle shift gear selection, the
driver must select the proper
gear for the terrain or select
D (Drive) on the gear range
selector for full automatic
transmission operation.
Ending Cruise Control
.To disengage cruise control,
step lightly on the brake pedal.
If the vehicle has a manual
transmission, lightly tap the
clutch to end the cruise control
session.
.To turn off the cruise control
system, move the cruise control
switch to
9. When cruise control is disengaged,
the CRUISE DISENGAGED
message displays on the Driver
Information Center (DIC). See
Cruise Control Messages on
page 5‑37.
Erasing Speed Memory
The cruise control set speed is
erased from memory by moving the
switch to
9or if the ignition is
turned off.
Page 257 of 414
Black plate (45,1)Chevrolet Corvette Owner Manual - 2013 - crc2 - 11/8/12
Driving and Operating 9-45
Fuel
Use of the recommended fuel is an
important part of the proper
maintenance of this vehicle. To help
keep the engine clean and maintain
optimum vehicle performance, we
recommend the use of gasoline
advertised as TOP TIER Detergent
Gasoline.
Look for the TOP TIER label on the
fuel pump to ensure gasoline meets
enhanced detergency standards
developed by auto companies. A list
of marketers providing TOP TIER
Detergent Gasoline can be found at
www.toptiergas.com. TOP TIER
gasoline is only available in the U.S.
and Canada.
The eighth digit of the Vehicle
Identification Number (VIN) shows
the code letter or number that
identifies the vehicle's engine. The
VIN is at the top left of the
instrument panel. SeeVehicle
Identification Number (VIN) on
page 12‑1.
Recommended Fuel
If the vehicle has the 6.2L V8 engine
(VIN Code W), use premium
unleaded gasoline with a posted
octane rating of 91 or higher. You
can also use regular unleaded gasoline rated at 87 octane or
higher, but the vehicle's acceleration
could be slightly reduced, and a
slight audible knocking noise,
commonly referred to as spark
knock, might be heard. If the octane
is less than 87, a heavy knocking
noise might be heard when driving.
If this occurs, use a gasoline rated
at 87 octane or higher as soon as
possible. Otherwise, you could
damage the engine. If heavy
knocking is heard when using
gasoline rated at 87 octane or
higher, the engine needs service.
If the vehicle has the 6.2L V8 engine
(VIN Code T) or the 7.0L V8 engine
(VIN Code E), use premium
unleaded gasoline with a posted
octane rating of 91 or higher. For
best performance, use premium
unleaded gasoline with a posted
octane rating of 93. In an
emergency, you can use regular
unleaded gasoline with an octane
rating of 87 or higher. If 87 octane
fuel is used, do not perform any
aggressive driving maneuvers such
Page 261 of 414
Black plate (49,1)Chevrolet Corvette Owner Manual - 2013 - crc2 - 11/8/12
Driving and Operating 9-49
nozzle. Clean fuel from painted
surfaces as soon as possible. See
Exterior Care on page 10‑79.
When replacing the fuel cap, turn it
clockwise until it clicks. Make sure
the cap is fully installed. The
diagnostic system can determine if
the fuel cap has been left off or
improperly installed. This would
allow fuel to evaporate into the
atmosphere. SeeMalfunction
Indicator Lamp on page 5‑18.
The CHECK GAS CAP message
displays on the Driver Information
Center (DIC) if the fuel cap is not
properly installed. See Fuel System
Messages on page 5‑40 for more
information.
{WARNING
If a fire starts while you are
refueling, do not remove the
nozzle. Shut off the flow of fuel by
shutting off the pump or by
notifying the station attendant.
Leave the area immediately. Notice:
If you need a new fuel
cap, be sure to get the right type.
Your dealer can get one for you.
If you get the wrong type, it may
not fit properly. This may cause
the malfunction indicator lamp to
light and may damage the fuel
tank and emissions system. See
Malfunction Indicator Lamp on
page 5‑18.
Filling a Portable Fuel
Container
{WARNING
Filling a portable fuel container
while it is in the vehicle can cause
fuel vapors that can ignite either
by static electricity or other
means. You or others could be
badly burned and the vehicle
could be damaged. Always:
.Use approved fuel
containers.
(Continued)
WARNING (Continued)
.Remove the container from
the vehicle, trunk, or pickup
bed before filling.
.Place the container on the
ground.
.Place the nozzle inside the fill
opening of the container
before dispensing fuel, and
keep it in contact with the fill
opening until filling is
complete.
.Fill the container no more
than 95% full to allow for
expansion.
.Do not smoke, light matches,
or use lighters while
pumping fuel.
.Avoid using cell phones or
other electronic devices.
Page 263 of 414

Black plate (1,1)Chevrolet Corvette Owner Manual - 2013 - crc2 - 11/8/12
Vehicle Care 10-1
Vehicle Care
General Information
General Information . . . . . . . . . . 10-2
California Proposition65 Warning . . . . . . . . . . . . . . . . . 10-2
California Perchlorate Materials Requirements . . . . 10-3
Accessories and Modifications . . . . . . . . . . . . . . . 10-3
Lifting the Vehicle . . . . . . . . . . . . 10-3
Vehicle Checks
Doing Your Own Service Work . . . . . . . . . . . . . . . 10-6
Hood . . . . . . . . . . . . . . . . . . . . . . . . 10-7
Engine Compartment Overview . . . . . . . . . . . . . . . . . . . 10-8
Engine Oil . . . . . . . . . . . . . . . . . . 10-13
Engine Oil Life System . . . . . 10-19
Automatic Transmission Fluid . . . . . . . . . . . . . . . . . . . . . . 10-20
Manual Transmission Fluid . . . . . . . . . . . . . . . . . . . . . . 10-21
Hydraulic Clutch . . . . . . . . . . . . 10-21
Engine Air Cleaner/Filter . . . . 10-21
Cooling System (Engine) . . . 10-24 Cooling System
(Intercooler) . . . . . . . . . . . . . . . 10-25
Engine Coolant . . . . . . . . . . . . . 10-26
Engine Overheating . . . . . . . . 10-29
Overheated Engine Protection
Operating Mode . . . . . . . . . . . 10-30
Power Steering Fluid . . . . . . . 10-31
Washer Fluid . . . . . . . . . . . . . . . 10-32
Brakes . . . . . . . . . . . . . . . . . . . . . 10-32
Brake Fluid . . . . . . . . . . . . . . . . . 10-36
Battery . . . . . . . . . . . . . . . . . . . . . 10-37
Rear Axle . . . . . . . . . . . . . . . . . . 10-38
Starter Switch Check . . . . . . . 10-38
Automatic Transmission Shift Lock Control Function
Check . . . . . . . . . . . . . . . . . . . . . 10-39
Park Brake and P (Park) Mechanism Check . . . . . . . . 10-39
Wiper Blade Replacement . . . . . . . . . . . . . . 10-40
Windshield Replacement . . . 10-41
Headlamp Aiming
Headlamp Aiming . . . . . . . . . . 10-41
Bulb Replacement
Bulb Replacement . . . . . . . . . . 10-41
Halogen Bulbs . . . . . . . . . . . . . . 10-41 High Intensity Discharge
(HID) Lighting . . . . . . . . . . . . . 10-42
Headlamps, Front Turn Signal and Parking
Lamps . . . . . . . . . . . . . . . . . . . . 10-42
Taillamps, Turn Signal, and Stoplamps . . . . . . . . . . . . . . . . 10-43
Back-Up Lamps . . . . . . . . . . . . 10-43
License Plate Lamp . . . . . . . . 10-44
Replacement Bulbs . . . . . . . . . 10-44
Electrical System
Electrical System Overload . . . . . . . . . . . . . . . . . . 10-44
Fuses and Circuit Breakers . . . . . . . . . . . . . . . . . . 10-45
Engine Compartment Fuse
Block . . . . . . . . . . . . . . . . . . . . . 10-45
Instrument Panel Fuse Block . . . . . . . . . . . . . . . . . . . . . 10-48
Wheels and Tires
Tires . . . . . . . . . . . . . . . . . . . . . . . . 10-52
Winter Tires . . . . . . . . . . . . . . . . 10-53
Run-Flat Tires . . . . . . . . . . . . . . 10-53
Low-Profile Tires . . . . . . . . . . . 10-54
Sport Cup Tires . . . . . . . . . . . . 10-55
Summer Tires . . . . . . . . . . . . . . 10-55
Tire Sidewall Labeling . . . . . . 10-55
Page 284 of 414
Black plate (22,1)Chevrolet Corvette Owner Manual - 2013 - crc2 - 11/8/12
10-22 Vehicle Care
air cleaner, as shown in the
illustration, as this could damage
the vehicle's engine.
When to Inspect the Engine Air
Cleaner/Filter
Inspect the air cleaner/filter at the
scheduled maintenance intervals
and replace them at the first oil
change after each 80 000 km
(50,000 mi) interval. See
Maintenance Schedule on
page 11‑3. If driving in dusty/dirty
conditions, inspect the filter at each
engine oil change.
How to Inspect the Engine Air
Cleaner/Filter
To inspect the air cleaner/filter,
remove the filter from the vehicle
and lightly shake the filter to release
loose dust and dirt. If the filter
remains covered with dirt, a new
filter is required.
To inspect or replace the engine air
cleaner/filter:
1. Open the hood. SeeHood on
page 10‑7.
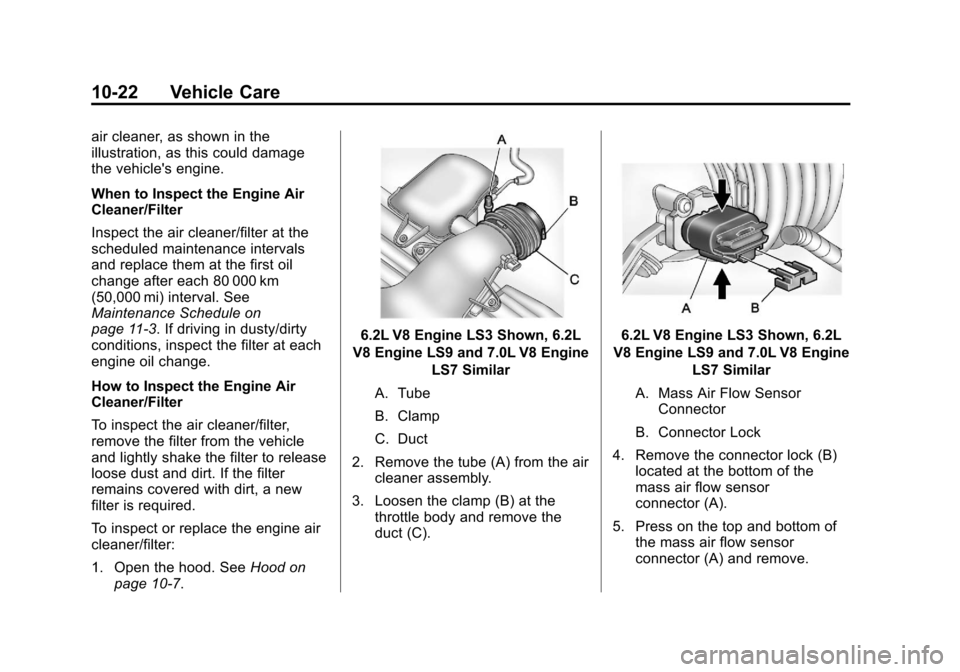
6.2L V8 Engine LS3 Shown, 6.2L
V8 Engine LS9 and 7.0L V8 Engine LS7 Similar
A. Tube
B. Clamp
C. Duct
2. Remove the tube (A) from the air cleaner assembly.
3. Loosen the clamp (B) at the throttle body and remove the
duct (C).6.2L V8 Engine LS3 Shown, 6.2L
V8 Engine LS9 and 7.0L V8 Engine LS7 Similar
A. Mass Air Flow Sensor Connector
B. Connector Lock
4. Remove the connector lock (B) located at the bottom of the
mass air flow sensor
connector (A).
5. Press on the top and bottom of the mass air flow sensor
connector (A) and remove.
Page 292 of 414
Black plate (30,1)Chevrolet Corvette Owner Manual - 2013 - crc2 - 11/8/12
10-30 Vehicle Care
WARNING (Continued)
SeeOverheated Engine
Protection Operating Mode on
page 10‑30 for information on
driving to a safe place in an
emergency.
If No Steam is Coming from
the Engine
If an engine overheat warning is
displayed but no steam can be seen
or heard, the problem may not be
too serious. Sometimes the engine
can get a little too hot when the
vehicle:
.Climbs a long hill on a hot day
.Stops after high-speed driving
.Idles for long periods in traffic
If the overheat warning is displayed
with no sign of steam:
1. Turn the air conditioning off. 2. Turn the heater on to the highest
temperature and to the highest
fan speed. Open the windows as
necessary.
3. If in a traffic jam, shift to N (Neutral) while stopped. If it is
safe to do so, pull off the road,
shift to P (Park) or N (Neutral)
and let the engine idle.
If the temperature overheat gauge is
no longer in the overheat zone or an
overheat warning no longer
displays, the vehicle can be driven.
Continue to drive the vehicle slowly
for about 10 minutes. Keep a safe
vehicle distance from the vehicle in
front. If the warning does not come
back on, continue to drive normally.
If the warning continues, pull over,
stop, and park the vehicle
right away.
If there is no sign of steam, idle the
engine for three minutes while
parked. If the warning is still
displayed, turn off the engine until it cools down. Also, see
“Overheated
Engine Protection Operating Mode”
next in this section.
Overheated Engine
Protection
Operating Mode
This emergency operating mode lets
the vehicle be driven to a safe
place, up to 80 km (50 mi), in an
emergency situation. If an
overheated engine condition exists
and the messages COOLANT
OVER TEMPERATURE and
REDUCED ENGINE POWER are
displayed, along with the check
engine light, an overheat protection
mode which alternates firing groups
of cylinders helps prevent engine
damage. In this mode, there is a
significant loss in power and engine
performance.
Driving extended distances in the
overheat protection mode should be
avoided.