2013 CHEVROLET AVALANCHE ECU
[x] Cancel search: ECUPage 1 of 494

Black plate (1,1)Chevrolet Avalanche Owner Manual - 2013 - CRC - 8/27/12
2013 Chevrolet Avalanche Owner ManualM
In Brief. . . . . . . . . . . . . . . . . . . . . . . . 1-1
Instrument Panel . . . . . . . . . . . . . . 1-2
Initial Drive Information . . . . . . . . 1-4
Vehicle Features . . . . . . . . . . . . . 1-19
Performance and Maintenance . . . . . . . . . . . . . . . . 1-26
Keys, Doors, and Windows . . . . . . . . . . . . . . . . . . . . 2-1
Keys and Locks . . . . . . . . . . . . . . . 2-1
Doors . . . . . . . . . . . . . . . . . . . . . . . . . . 2-8
Vehicle Security . . . . . . . . . . . . . . 2-16
Exterior Mirrors . . . . . . . . . . . . . . . 2-19
Interior Mirrors . . . . . . . . . . . . . . . . 2-22
Windows . . . . . . . . . . . . . . . . . . . . . 2-23
Roof . . . . . . . . . . . . . . . . . . . . . . . . . . 2-25
Seats and Restraints . . . . . . . . . 3-1
Head Restraints . . . . . . . . . . . . . . . 3-2
Front Seats . . . . . . . . . . . . . . . . . . . . 3-3
Rear Seats . . . . . . . . . . . . . . . . . . . 3-10
Safety Belts . . . . . . . . . . . . . . . . . . 3-11
Airbag System . . . . . . . . . . . . . . . . 3-20
Child Restraints . . . . . . . . . . . . . . 3-35 Storage
. . . . . . . . . . . . . . . . . . . . . . . 4-1
Storage Compartments . . . . . . . . 4-1
Luggage/Load Locations . . . . . . . 4-2
Additional Storage Features . . . 4-5
Roof Rack System . . . . . . . . . . . . 4-11
Instruments and Controls . . . . 5-1
Controls . . . . . . . . . . . . . . . . . . . . . . . 5-2
Warning Lights, Gauges, and Indicators . . . . . . . . . . . . . . . . . . . . 5-9
Information Displays . . . . . . . . . . 5-25
Vehicle Messages . . . . . . . . . . . . 5-34
Vehicle Personalization . . . . . . . 5-44
Universal Remote System . . . . 5-52
Lighting . . . . . . . . . . . . . . . . . . . . . . . 6-1
Exterior Lighting . . . . . . . . . . . . . . . 6-1
Interior Lighting . . . . . . . . . . . . . . . . 6-7
Lighting Features . . . . . . . . . . . . . . 6-8
Infotainment System . . . . . . . . . 7-1
Introduction . . . . . . . . . . . . . . . . . . . . 7-1
Radio . . . . . . . . . . . . . . . . . . . . . . . . . 7-10
Audio Players . . . . . . . . . . . . . . . . 7-15 Rear Seat Infotainment . . . . . . . 7-36
Phone . . . . . . . . . . . . . . . . . . . . . . . . 7-48
Trademarks and License
Agreements . . . . . . . . . . . . . . . . . 7-55
Climate Controls . . . . . . . . . . . . . 8-1
Climate Control Systems . . . . . . 8-1
Air Vents . . . . . . . . . . . . . . . . . . . . . . . 8-9
Driving and Operating . . . . . . . . 9-1
Driving Information . . . . . . . . . . . . . 9-2
Starting and Operating . . . . . . . 9-20
Engine Exhaust . . . . . . . . . . . . . . 9-28
Automatic Transmission . . . . . . 9-29
Drive Systems . . . . . . . . . . . . . . . . 9-34
Brakes . . . . . . . . . . . . . . . . . . . . . . . 9-41
Ride Control Systems . . . . . . . . 9-43
Cruise Control . . . . . . . . . . . . . . . . 9-47
Object Detection Systems . . . . 9-49
Fuel . . . . . . . . . . . . . . . . . . . . . . . . . . 9-55
Towing . . . . . . . . . . . . . . . . . . . . . . . 9-60
Conversions and Add-Ons . . . 9-76
Page 12 of 494

Black plate (6,1)Chevrolet Avalanche Owner Manual - 2013 - CRC - 8/27/12
1-6 In Brief
Tailgate
Use the Remote Keyless
Entry (RKE) transmitter or power
door lock switch to lock and unlock
the tailgate.
Open the tailgate by lifting up on its
handle while pulling the tailgate
toward you.
To close the tailgate, push it firmly
upward until it latches. Push and
pull on the tailgate to be sure it is
latched securely.
Tailgate Removal
The tailgate is not to be removed.
Removing the tailgate may cause
damage to the electrical connector
resulting in a loss of lock/unlock and
rear vision camera function.
SeeTailgate on page 2‑14.
Windows
Power Folding Mirrors Shown,
Other Models Similar
The driver door has switches that
control all windows. Each
passenger door switch only controls
that window. The power windows
work when the ignition is in ON/
RUN or ACC/ACCESSORY, or in
Retained Accessory Power (RAP).
See Retained Accessory Power
(RAP) on page 9‑25. Press the switch to lower the
window. Pull the switch up to raise
it. See
Windows on page 2‑23 and
Power Windows on page 2‑23.
Seat Adjustment
Manual Seats
To adjust the seat:
1. Lift the bar to unlock the seat.
2. Slide the seat to the desired position and release the bar.
Page 31 of 494

Black plate (25,1)Chevrolet Avalanche Owner Manual - 2013 - CRC - 8/27/12
In Brief 1-25
Universal Remote System
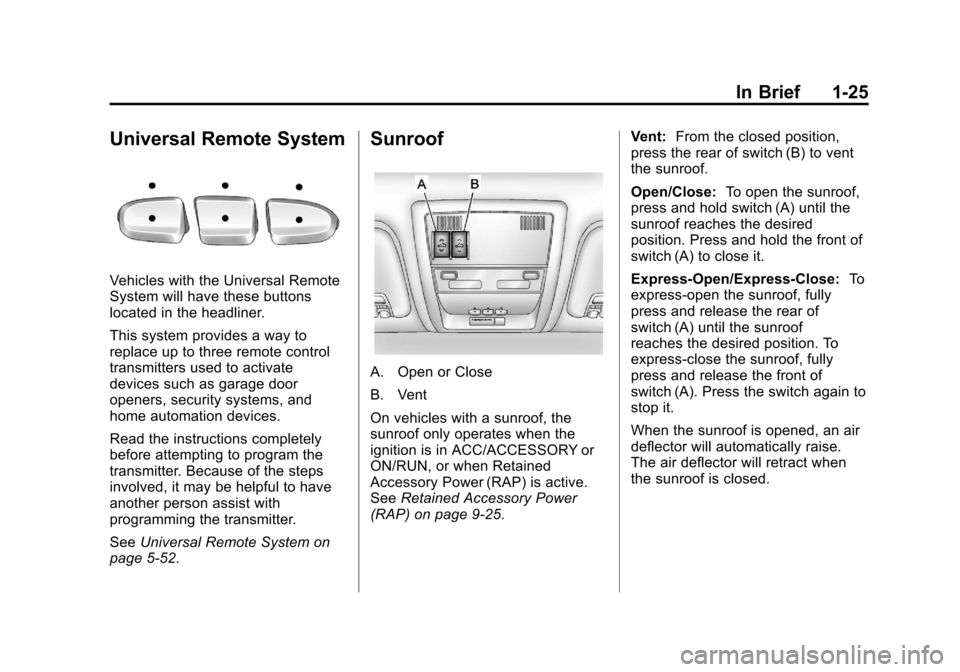
Vehicles with the Universal Remote
System will have these buttons
located in the headliner.
This system provides a way to
replace up to three remote control
transmitters used to activate
devices such as garage door
openers, security systems, and
home automation devices.
Read the instructions completely
before attempting to program the
transmitter. Because of the steps
involved, it may be helpful to have
another person assist with
programming the transmitter.
SeeUniversal Remote System on
page 5‑52.
Sunroof
A. Open or Close
B. Vent
On vehicles with a sunroof, the
sunroof only operates when the
ignition is in ACC/ACCESSORY or
ON/RUN, or when Retained
Accessory Power (RAP) is active.
See Retained Accessory Power
(RAP) on page 9‑25. Vent:
From the closed position,
press the rear of switch (B) to vent
the sunroof.
Open/Close: To open the sunroof,
press and hold switch (A) until the
sunroof reaches the desired
position. Press and hold the front of
switch (A) to close it.
Express-Open/Express-Close: To
express-open the sunroof, fully
press and release the rear of
switch (A) until the sunroof
reaches the desired position. To
express-close the sunroof, fully
press and release the front of
switch (A). Press the switch again to
stop it.
When the sunroof is opened, an air
deflector will automatically raise.
The air deflector will retract when
the sunroof is closed.
Page 34 of 494

Black plate (28,1)Chevrolet Avalanche Owner Manual - 2013 - CRC - 8/27/12
1-28 In Brief
.When road and weather
conditions are appropriate, use
cruise control.
.Always follow posted speed
limits or drive more slowly when
conditions require.
.Keep vehicle tires properly
inflated.
.Combine several trips into a
single trip.
.Replace the vehicle's tires with
the same TPC Spec number
molded into the tire's sidewall
near the size.
.Follow recommended scheduled
maintenance.
Roadside Assistance
Program
U.S.: 1-800-243-8872
TTY Users (U.S. Only):
1-888-889-2438
Canada: 1-800-268-6800
Mexico: 01-800-466-0800
As the owner of a new Chevrolet,
you are automatically enrolled in the
Roadside Assistance program.
SeeRoadside Assistance Program
(Mexico) on page 13‑7 orRoadside
Assistance Program (U.S. and
Canada) on page 13‑11. Roadside Assistance and OnStar
(U.S. and Canada)
If the vehicle has an active OnStar
subscription, contact OnStar and the
vehicle’s current GPS location will
be sent to an OnStar advisor to
assess the situation, contact
Roadside Assistance, and relay the
exact location to send help.
OnStar®
If equipped, this vehicle has a
comprehensive, in-vehicle system
that can connect to a live Advisor
for Emergency, Security, Navigation,
Connection, and Diagnostic
Services. See
OnStar Overview on
page 14‑1.
Page 35 of 494

Black plate (1,1)Chevrolet Avalanche Owner Manual - 2013 - CRC - 8/27/12
Keys, Doors, and Windows 2-1
Keys, Doors, and
Windows
Keys and Locks
Keys . . . . . . . . . . . . . . . . . . . . . . . . . . 2-1
Remote Keyless Entry (RKE)System . . . . . . . . . . . . . . . . . . . . . . 2-2
Remote Keyless Entry (RKE) System Operation . . . . . . . . . . . 2-2
Remote Vehicle Start . . . . . . . . . 2-4
Door Locks . . . . . . . . . . . . . . . . . . . 2-6
Power Door Locks . . . . . . . . . . . . 2-7
Delayed Locking . . . . . . . . . . . . . . 2-7
Automatic Door Locks . . . . . . . . . 2-7
Lockout Protection . . . . . . . . . . . . 2-8
Safety Locks . . . . . . . . . . . . . . . . . . 2-8
Doors
Midgate®. . . . . . . . . . . . . . . . . . . . . . 2-8
Tailgate . . . . . . . . . . . . . . . . . . . . . . 2-14
Power Assist Steps . . . . . . . . . . 2-15
Vehicle Security
Vehicle Security . . . . . . . . . . . . . . 2-16
Vehicle Alarm System . . . . . . . 2-16
Immobilizer . . . . . . . . . . . . . . . . . . 2-17
Immobilizer Operation . . . . . . . 2-17
Exterior Mirrors
Convex Mirrors . . . . . . . . . . . . . . 2-19
Power Mirrors . . . . . . . . . . . . . . . . 2-19
Folding Mirrors . . . . . . . . . . . . . . . 2-20
Heated Mirrors . . . . . . . . . . . . . . . 2-21
Automatic Dimming Mirror . . . 2-21
Park Tilt Mirrors . . . . . . . . . . . . . . 2-21
Interior Mirrors
Manual Rearview Mirror . . . . . . 2-22
Automatic Dimming Rearview Mirror . . . . . . . . . . . . . . . . . . . . . . . 2-22
Windows
Windows . . . . . . . . . . . . . . . . . . . . . 2-23
Power Windows . . . . . . . . . . . . . 2-23
Sun Visors . . . . . . . . . . . . . . . . . . . 2-24
Roof
Sunroof . . . . . . . . . . . . . . . . . . . . . . 2-25
Keys and Locks
Keys
{WARNING
Leaving children in a vehicle with
the ignition key is dangerous and
children or others could be
seriously injured or killed. They
could operate the power windows
or other controls or make the
vehicle move. The windows will
function with the keys in the
ignition, and children or others
could be caught in the path of a
closing window. Do not leave
children in a vehicle with the
ignition key.
Page 42 of 494

Black plate (8,1)Chevrolet Avalanche Owner Manual - 2013 - CRC - 8/27/12
2-8 Keys, Doors, and Windows
Lockout Protection
If the driver side power door lock
switch is pressed when the driver
door is open and the key is in the
ignition, all of the doors will lock and
then the driver door will unlock.
If the passenger side power door
lock switch is pressed when the
front passenger door is open and
the key is in the ignition, all of the
doors will lock and then the front
passenger door will unlock.
Safety Locks
The vehicle has rear door security
locks to prevent passengers from
opening the rear doors from the
inside.
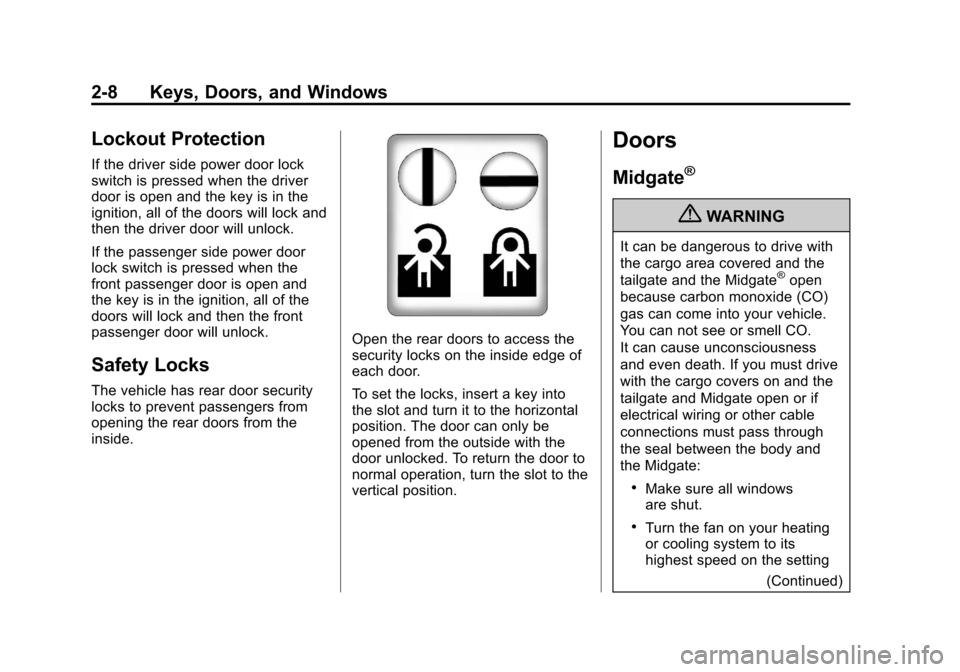
Open the rear doors to access the
security locks on the inside edge of
each door.
To set the locks, insert a key into
the slot and turn it to the horizontal
position. The door can only be
opened from the outside with the
door unlocked. To return the door to
normal operation, turn the slot to the
vertical position.
Doors
Midgate®
{WARNING
It can be dangerous to drive with
the cargo area covered and the
tailgate and the Midgate
®open
because carbon monoxide (CO)
gas can come into your vehicle.
You can not see or smell CO.
It can cause unconsciousness
and even death. If you must drive
with the cargo covers on and the
tailgate and Midgate open or if
electrical wiring or other cable
connections must pass through
the seal between the body and
the Midgate:
.Make sure all windows
are shut.
.Turn the fan on your heating
or cooling system to its
highest speed on the setting
(Continued)
Page 43 of 494

Black plate (9,1)Chevrolet Avalanche Owner Manual - 2013 - CRC - 8/27/12
Keys, Doors, and Windows 2-9
WARNING (Continued)
that brings in outside air. This
will force outside air into your
vehicle. SeeDual Automatic
Climate Control System on
page 8‑4.
.If you have air outlets on or
under the instrument panel,
open them all the way. See
Engine Exhaust on
page 9‑28.
Midgate Operation
This vehicle is equipped with a
Midgate and a removable rear glass
panel. The Midgate allows you to
extend the length of the vehicle's
cargo area.
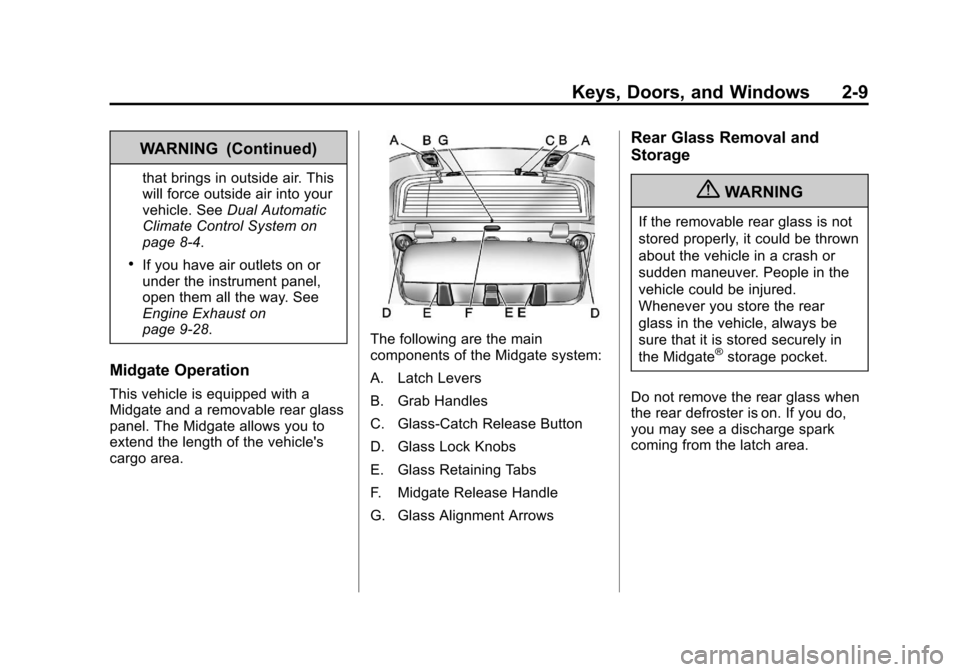
The following are the main
components of the Midgate system:
A. Latch Levers
B. Grab Handles
C. Glass-Catch Release Button
D. Glass Lock Knobs
E. Glass Retaining Tabs
F. Midgate Release Handle
G. Glass Alignment Arrows
Rear Glass Removal and
Storage
{WARNING
If the removable rear glass is not
stored properly, it could be thrown
about the vehicle in a crash or
sudden maneuver. People in the
vehicle could be injured.
Whenever you store the rear
glass in the vehicle, always be
sure that it is stored securely in
the Midgate
®storage pocket.
Do not remove the rear glass when
the rear defroster is on. If you do,
you may see a discharge spark
coming from the latch area.
Page 45 of 494

Black plate (11,1)Chevrolet Avalanche Owner Manual - 2013 - CRC - 8/27/12
Keys, Doors, and Windows 2-11
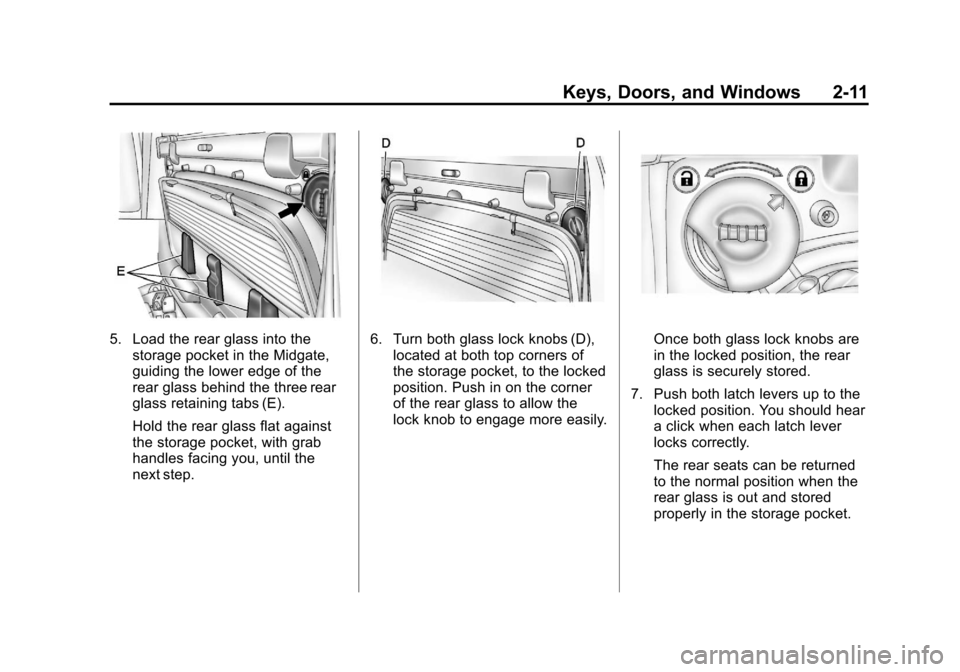
5. Load the rear glass into thestorage pocket in the Midgate,
guiding the lower edge of the
rear glass behind the three rear
glass retaining tabs (E).
Hold the rear glass flat against
the storage pocket, with grab
handles facing you, until the
next step.6. Turn both glass lock knobs (D),located at both top corners of
the storage pocket, to the locked
position. Push in on the corner
of the rear glass to allow the
lock knob to engage more easily.Once both glass lock knobs are
in the locked position, the rear
glass is securely stored.
7. Push both latch levers up to the locked position. You should hear
a click when each latch lever
locks correctly.
The rear seats can be returned
to the normal position when the
rear glass is out and stored
properly in the storage pocket.