2013 CHEVROLET AVALANCHE ECU
[x] Cancel search: ECUPage 119 of 494
Black plate (5,1)Chevrolet Avalanche Owner Manual - 2013 - CRC - 8/27/12
Storage 4-5
Cargo Area Floor Drains
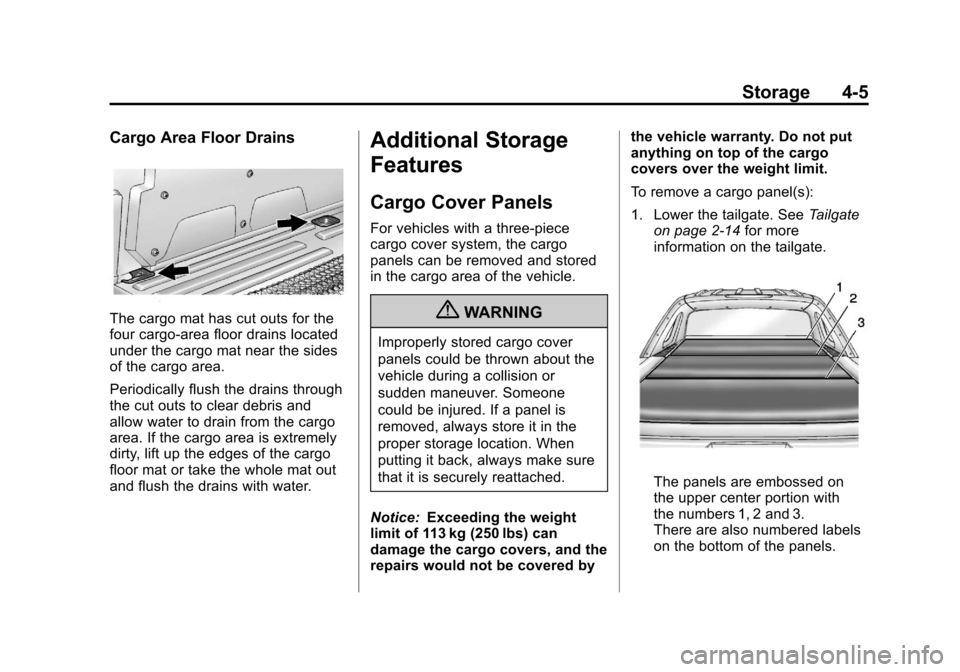
The cargo mat has cut outs for the
four cargo-area floor drains located
under the cargo mat near the sides
of the cargo area.
Periodically flush the drains through
the cut outs to clear debris and
allow water to drain from the cargo
area. If the cargo area is extremely
dirty, lift up the edges of the cargo
floor mat or take the whole mat out
and flush the drains with water.
Additional Storage
Features
Cargo Cover Panels
For vehicles with a three-piece
cargo cover system, the cargo
panels can be removed and stored
in the cargo area of the vehicle.
{WARNING
Improperly stored cargo cover
panels could be thrown about the
vehicle during a collision or
sudden maneuver. Someone
could be injured. If a panel is
removed, always store it in the
proper storage location. When
putting it back, always make sure
that it is securely reattached.
Notice: Exceeding the weight
limit of 113 kg (250 lbs) can
damage the cargo covers, and the
repairs would not be covered by the vehicle warranty. Do not put
anything on top of the cargo
covers over the weight limit.
To remove a cargo panel(s):
1. Lower the tailgate. See
Tailgate
on page 2‑14 for more
information on the tailgate.
The panels are embossed on
the upper center portion with
the numbers 1, 2 and 3.
There are also numbered labels
on the bottom of the panels.
Page 120 of 494
Black plate (6,1)Chevrolet Avalanche Owner Manual - 2013 - CRC - 8/27/12
4-6 Storage
The numbers on the top and
bottom of the panels will be used
as reference when removing,
storing and reinstalling the
panels.
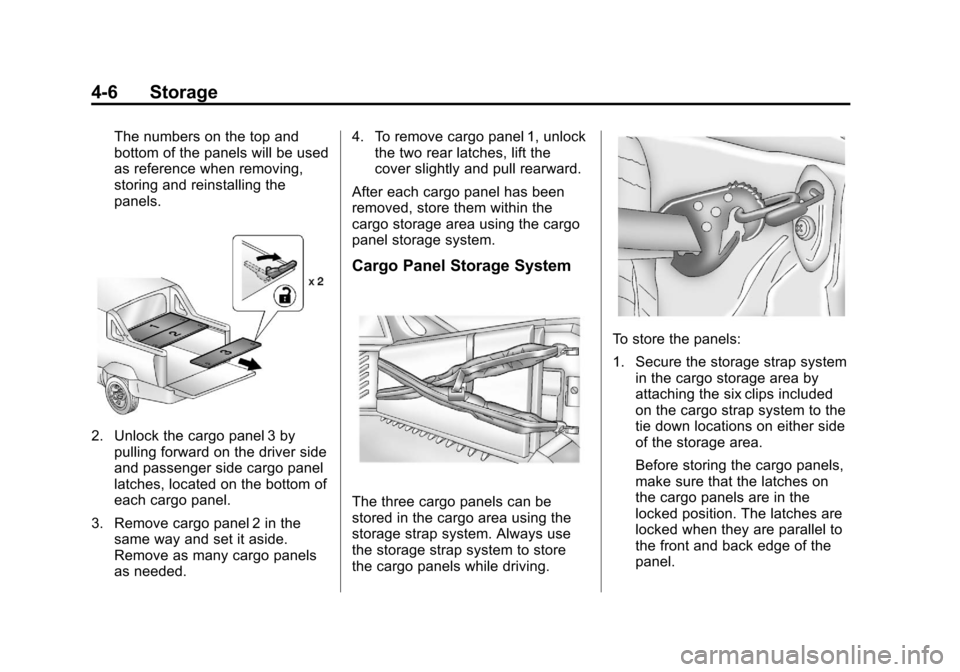
2. Unlock the cargo panel 3 bypulling forward on the driver side
and passenger side cargo panel
latches, located on the bottom of
each cargo panel.
3. Remove cargo panel 2 in the same way and set it aside.
Remove as many cargo panels
as needed. 4. To remove cargo panel 1, unlock
the two rear latches, lift the
cover slightly and pull rearward.
After each cargo panel has been
removed, store them within the
cargo storage area using the cargo
panel storage system.
Cargo Panel Storage System
The three cargo panels can be
stored in the cargo area using the
storage strap system. Always use
the storage strap system to store
the cargo panels while driving.
To store the panels:
1. Secure the storage strap system in the cargo storage area by
attaching the six clips included
on the cargo strap system to the
tie down locations on either side
of the storage area.
Before storing the cargo panels,
make sure that the latches on
the cargo panels are in the
locked position. The latches are
locked when they are parallel to
the front and back edge of the
panel.
Page 121 of 494
Black plate (7,1)Chevrolet Avalanche Owner Manual - 2013 - CRC - 8/27/12
Storage 4-7
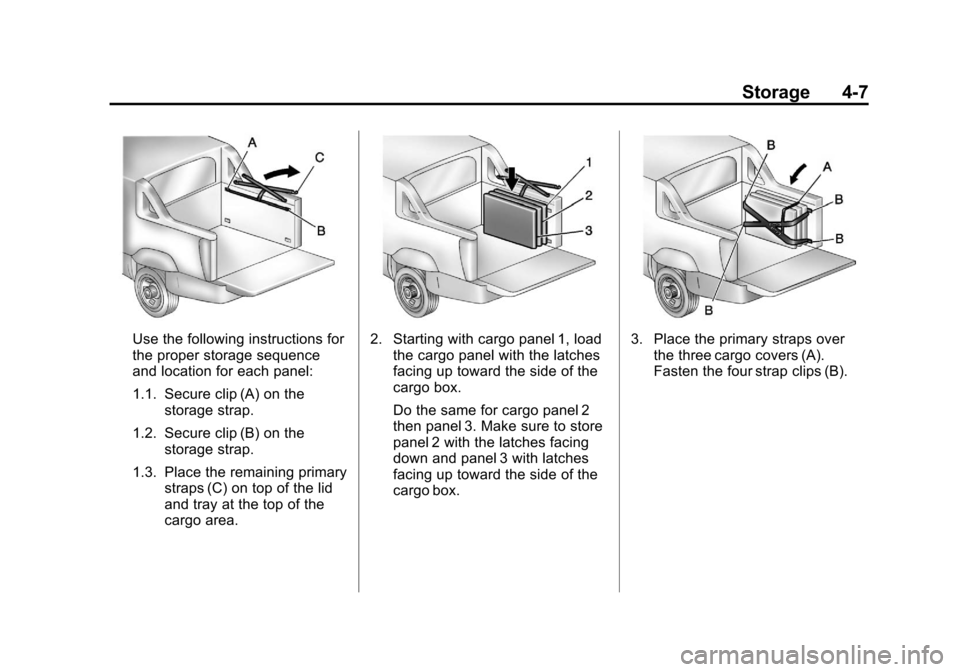
Use the following instructions for
the proper storage sequence
and location for each panel:
1.1. Secure clip (A) on thestorage strap.
1.2. Secure clip (B) on the storage strap.
1.3. Place the remaining primary straps (C) on top of the lid
and tray at the top of the
cargo area.2. Starting with cargo panel 1, loadthe cargo panel with the latches
facing up toward the side of the
cargo box.
Do the same for cargo panel 2
then panel 3. Make sure to store
panel 2 with the latches facing
down and panel 3 with latches
facing up toward the side of the
cargo box.3. Place the primary straps overthe three cargo covers (A).
Fasten the four strap clips (B).
Page 122 of 494
Black plate (8,1)Chevrolet Avalanche Owner Manual - 2013 - CRC - 8/27/12
4-8 Storage
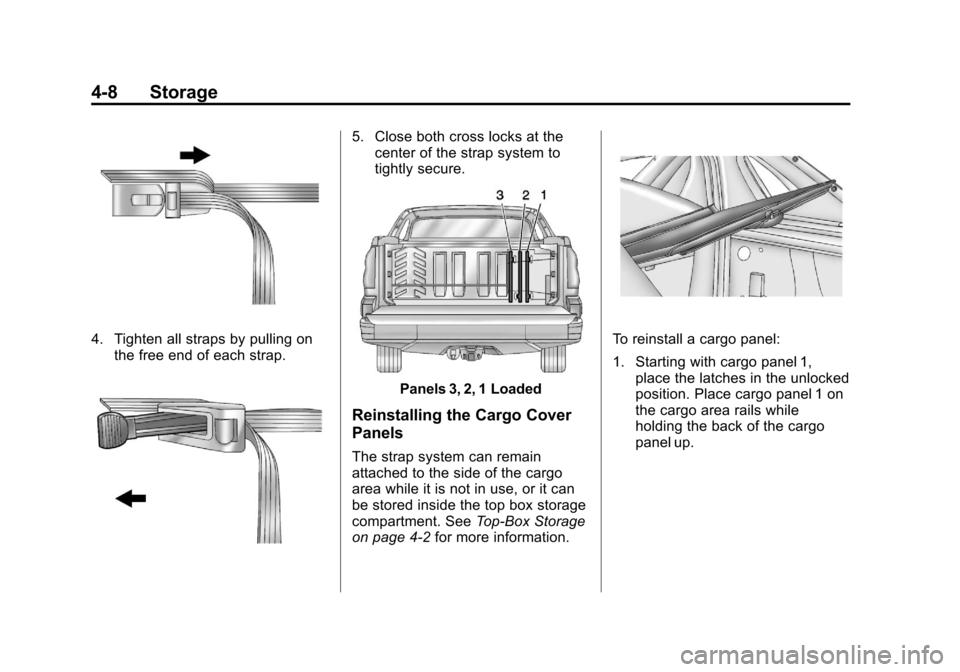
4. Tighten all straps by pulling onthe free end of each strap.
5. Close both cross locks at thecenter of the strap system to
tightly secure.
Panels 3, 2, 1 Loaded
Reinstalling the Cargo Cover
Panels
The strap system can remain
attached to the side of the cargo
area while it is not in use, or it can
be stored inside the top box storage
compartment. See Top-Box Storage
on page 4‑2 for more information.
To reinstall a cargo panel:
1. Starting with cargo panel 1,
place the latches in the unlocked
position. Place cargo panel 1 on
the cargo area rails while
holding the back of the cargo
panel up.
Page 125 of 494

Black plate (11,1)Chevrolet Avalanche Owner Manual - 2013 - CRC - 8/27/12
Storage 4-11
Cargo Tie-Downs
The vehicle has cargo tie downs,
located in the rear cargo area.
These can be used to secure cargo.
The tie downs can also be used to
secure the cargo cover panel strap
system, if the vehicle has one. For
more information seeCargo Cover
Panels on page 4‑5.
Roof Rack System
{WARNING
If something is carried on top of
the vehicle that is longer or wider
than the roof rack —like paneling,
plywood, or a mattress —the
wind can catch it while the vehicle
is being driven. The item being
carried could be violently torn off,
and this could cause a collision
and damage the vehicle. Never
carry something longer or wider
than the roof rack on top of the
vehicle unless using a GM
certified accessory carrier.
For vehicles with a roof rack, the
rack can be used to load items. For
roof racks that do not have
crossrails included, GM Certified
crossrails can be purchased as an
accessory. See your dealer for
additional information. Notice:
Loading cargo on the
roof rack that weighs more than
91 kg (200 lbs) or hangs over the
rear or sides of the vehicle may
damage the vehicle. Load cargo
so that it rests evenly between
the crossrails, making sure to
fasten cargo securely.
To prevent damage or loss of cargo
when driving, check to make sure
crossrails and cargo are securely
fastened. Loading cargo on the roof
rack will make the vehicle’ s center
of gravity higher. Avoid high speeds,
sudden starts, sharp turns, sudden
braking or abrupt maneuvers,
otherwise it may result in loss of
control. If driving for a long distance,
on rough roads, or at high speeds,
occasionally stop the vehicle to
make sure the cargo remains in its
place.
Page 126 of 494
Black plate (12,1)Chevrolet Avalanche Owner Manual - 2013 - CRC - 8/27/12
4-12 Storage
Do not exceed the maximum vehicle
capacity when loading the vehicle.
For more information on vehicle
capacity and loading, seeVehicle
Load Limits on page 9‑15.
.If small heavy objects are placed
on the roof, cut a piece of 9 mm
or 3/8 inch plywood to fit inside
the crossrails and siderails to
spread the load. Tie the plywood
to the siderail supports.
.Tie the load and secure it to
the crossrails or the siderail
supports. Use the crossrails only
to keep the load from sliding. To
move a crossrail, lift the release
lever up, on both sides of the
rail. Then slide the crossrail to
the desired position balancing
the force side to side. Press the
release lever down on both
sides of the rail, down to tighten
it. Try to slide the crossrail back
and forth slightly to make sure it
is tight.
.To carry long items, move the
crossrails as far apart as
possible. Tie the load to the
crossrails and the siderails or
siderail supports. Also tie the
load to the bumpers, but do not
tie the load so tightly that the
crossrails or siderails are
damaged.
.After moving a crossrail, be sure
it is securely locked into the
siderail.
A Center High-Mounted Stoplamp
(CHMSL) is located above the rear
window glass.
Make sure items loaded on the roof
of the vehicle do not block or
damage the CHMSL.
Page 127 of 494

Black plate (1,1)Chevrolet Avalanche Owner Manual - 2013 - CRC - 8/27/12
Instruments and Controls 5-1
Instruments and
Controls
Controls
Steering Wheel Adjustment . . . 5-2
Steering Wheel Controls . . . . . . 5-2
Horn . . . . . . . . . . . . . . . . . . . . . . . . . . 5-4
Windshield Wiper/Washer . . . . . 5-4
Compass . . . . . . . . . . . . . . . . . . . . . 5-5
Clock . . . . . . . . . . . . . . . . . . . . . . . . . 5-7
Power Outlets . . . . . . . . . . . . . . . . . 5-8
Warning Lights, Gauges, and
Indicators
Warning Lights, Gauges, andIndicators . . . . . . . . . . . . . . . . . . . . 5-9
Instrument Cluster . . . . . . . . . . . 5-10
Speedometer . . . . . . . . . . . . . . . . 5-11
Odometer . . . . . . . . . . . . . . . . . . . . 5-11
Trip Odometer . . . . . . . . . . . . . . . 5-11
Tachometer . . . . . . . . . . . . . . . . . . 5-11
Fuel Gauge . . . . . . . . . . . . . . . . . . 5-11
Engine Oil Pressure Gauge . . . . . . . . . . . . . . . . . . . . . . 5-12 Engine Coolant Temperature
Gauge . . . . . . . . . . . . . . . . . . . . . . 5-13
Voltmeter Gauge . . . . . . . . . . . . . 5-14
Safety Belt Reminders . . . . . . . 5-14
Airbag Readiness Light . . . . . . 5-15
Passenger Airbag Status Indicator . . . . . . . . . . . . . . . . . . . . 5-16
Charging System Light . . . . . . 5-17
Malfunction Indicator Lamp . . . . . . . . . . . . . 5-17
Brake System Warning Light . . . . . . . . . . . . . . . . . . . . . . . 5-20
Antilock Brake System (ABS) Warning Light . . . . . . . . . . . . . . 5-21
Tow/Haul Mode Light . . . . . . . . 5-21
StabiliTrak
®OFF Light . . . . . . . 5-21
Traction Control System (TCS)/StabiliTrak
®Light . . . . 5-22
Tire Pressure Light . . . . . . . . . . 5-22
Engine Oil Pressure Light . . . . 5-23
Low Fuel Warning Light . . . . . . 5-23
Security Light . . . . . . . . . . . . . . . . 5-23
High-Beam On Light . . . . . . . . . 5-24
Front Fog Lamp Light . . . . . . . . 5-24
Cruise Control Light . . . . . . . . . 5-24
Information Displays
Driver Information Center (DIC) . . . . . . . . . . . . . . . 5-25
Vehicle Messages
Vehicle Messages . . . . . . . . . . . 5-34
Battery Voltage and ChargingMessages . . . . . . . . . . . . . . . . . . 5-34
Brake System Messages . . . . 5-35
Door Ajar Messages . . . . . . . . . 5-35
Engine Cooling System Messages . . . . . . . . . . . . . . . . . . 5-36
Engine Oil Messages . . . . . . . . 5-37
Engine Power Messages . . . . 5-38
Fuel System Messages . . . . . . 5-38
Key and Lock Messages . . . . . 5-38
Lamp Messages . . . . . . . . . . . . . 5-38
Object Detection System Messages . . . . . . . . . . . . . . . . . . 5-39
Ride Control System Messages . . . . . . . . . . . . . . . . . . 5-39
Airbag System Messages . . . . 5-40
Security Messages . . . . . . . . . . 5-41
Tire Messages . . . . . . . . . . . . . . . 5-41
Transmission Messages . . . . . 5-42
Vehicle Reminder Messages . . . . . . . . . . . . . . . . . . 5-43
Washer Fluid Messages . . . . . 5-43
Page 149 of 494

Black plate (23,1)Chevrolet Avalanche Owner Manual - 2013 - CRC - 8/27/12
Instruments and Controls 5-23
Engine Oil Pressure Light
Notice:Lack of proper engine oil
maintenance can damage the
engine. Driving with the engine
oil low can also damage the
engine. The repairs would not be
covered by the vehicle warranty.
Check the oil level as soon as
possible. Add oil if required, but
if the oil level is within the
operating range and the oil
pressure is still low, have the
vehicle serviced. Always follow
the maintenance schedule for
changing engine oil.
This light comes on briefly while
starting the engine. If it does not,
have the vehicle serviced by your
dealer. If the system is working
normally, the indicator light then
goes off. If the light comes on and stays on, it
means that oil is not flowing through
the engine properly. The vehicle
could be low on oil and it might
have some other system problem.
Low Fuel Warning Light
This light, under the fuel gauge,
comes on briefly while the engine is
being started.
This light and a chime come on
when the fuel tank is low on fuel.
The Driver Information Center also
displays a FUEL LEVEL LOW
message. See
Fuel System
Messages on page 5‑38 for more
information. When fuel is added this
light and message should go off.
If they do not, have the vehicle
serviced by your dealer.
Security Light
The security light should come on
briefly as the engine is started. If the
system is working normally, the
indicator light turns off. If it does not
come on, have the vehicle serviced
by your dealer.
If the light stays on and the engine
does not start, there could be a
problem with the theft-deterrent
system.
This light is also used to indicate the
status of the anti-theft alarm system
when the ignition is turned off. The
light will flash rapidly if the alarm
system is arming and one or more
of the monitored entry points is not
closed. The light will stay on if the
alarm is arming and all entry points
are closed.