2013 CHEVROLET AVALANCHE spare wheel
[x] Cancel search: spare wheelPage 409 of 494
Black plate (75,1)Chevrolet Avalanche Owner Manual - 2013 - CRC - 8/27/12
Vehicle Care 10-75
To store the tools:
1. Return the tools to the tool bagand place it back in the top‐box
storage unit.
2. Assemble the wheel blocks and jack together with the wing nut
by reversing Step 2 under
“Removing the Spare Tire and
Tools.”
3. Replace the jack cover and tighten the jack-cover wing nuts.Secondary Latch System
This vehicle has an
underbody-mounted tire hoist
assembly equipped with a
secondary latch system. It is
designed to stop the spare tire from
suddenly falling off your vehicle. For
the secondary latch to work, the
spare must be installed with the
valve stem pointing down. See
“Storing a Flat or Spare Tire and
Tools” underTire Changing on
page 10‑66.
{WARNING
Before beginning this procedure
read all the instructions. Failure to
read and follow the instructions
could damage the hoist assembly
and you and others could get
hurt. Read and follow the
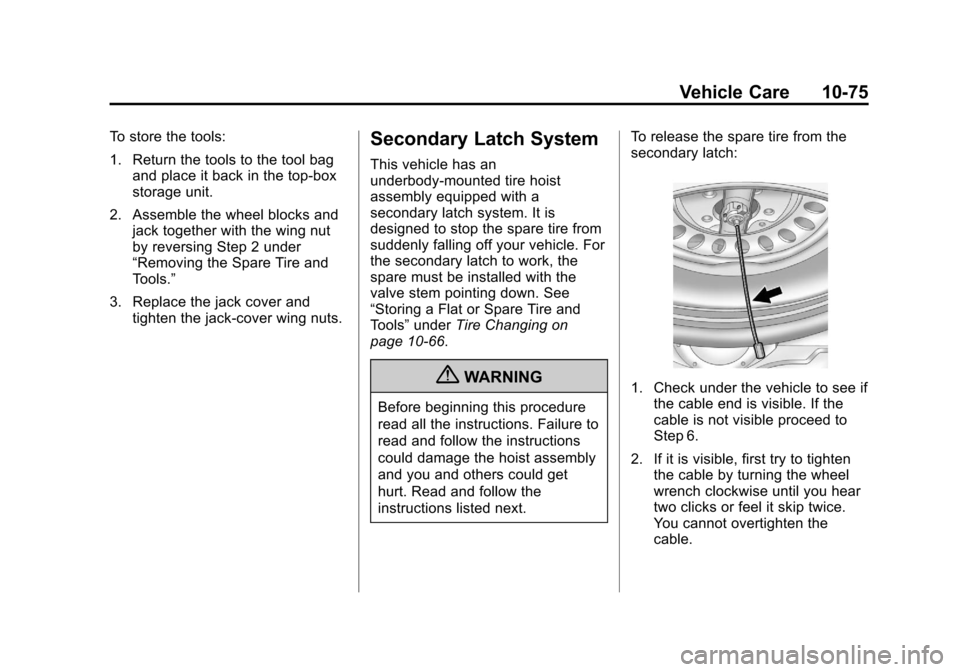
instructions listed next. To release the spare tire from the
secondary latch:
1. Check under the vehicle to see if
the cable end is visible. If the
cable is not visible proceed to
Step 6.
2. If it is visible, first try to tighten the cable by turning the wheel
wrench clockwise until you hear
two clicks or feel it skip twice.
You cannot overtighten the
cable.
Page 410 of 494
Black plate (76,1)Chevrolet Avalanche Owner Manual - 2013 - CRC - 8/27/12
10-76 Vehicle Care
3. Loosen the cable by turning thewrench counterclockwise three
or four turns.
4. Repeat this procedure at least two times. If the spare tire
lowers to the ground, continue
with Step 5 under “Removing the
Spare Tire and Tools” underTire
Changing on page 10‑66.
5. If the spare does not lower, turn the wrench counterclockwise
until approximately 15 cm (6 in)
of cable is exposed.
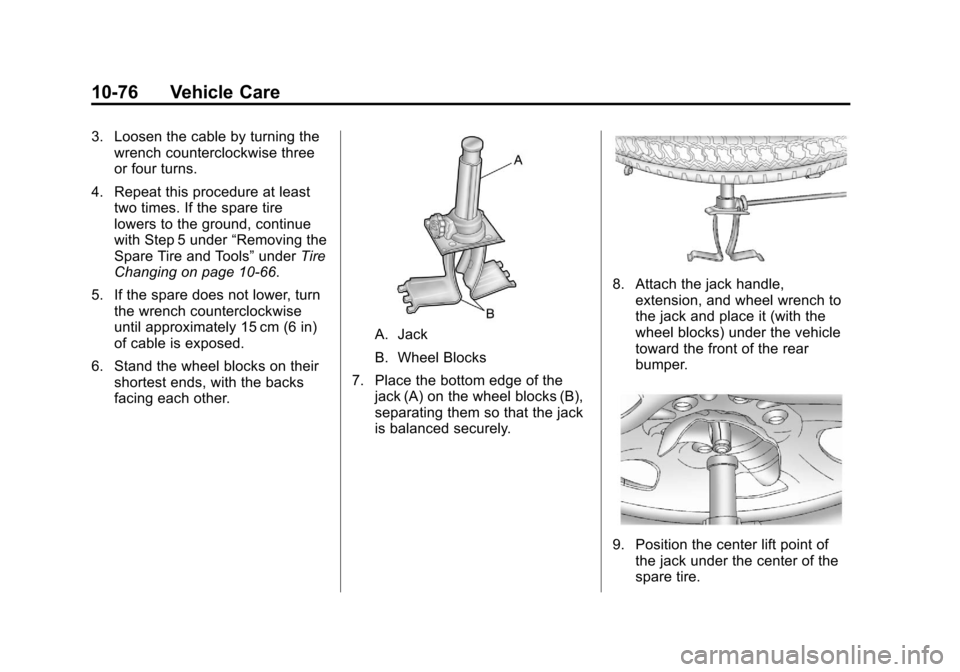
6. Stand the wheel blocks on their shortest ends, with the backs
facing each other.
A. Jack
B. Wheel Blocks
7. Place the bottom edge of the jack (A) on the wheel blocks (B),
separating them so that the jack
is balanced securely.
8. Attach the jack handle,extension, and wheel wrench to
the jack and place it (with the
wheel blocks) under the vehicle
toward the front of the rear
bumper.
9. Position the center lift point ofthe jack under the center of the
spare tire.
Page 411 of 494
Black plate (77,1)Chevrolet Avalanche Owner Manual - 2013 - CRC - 8/27/12
Vehicle Care 10-77
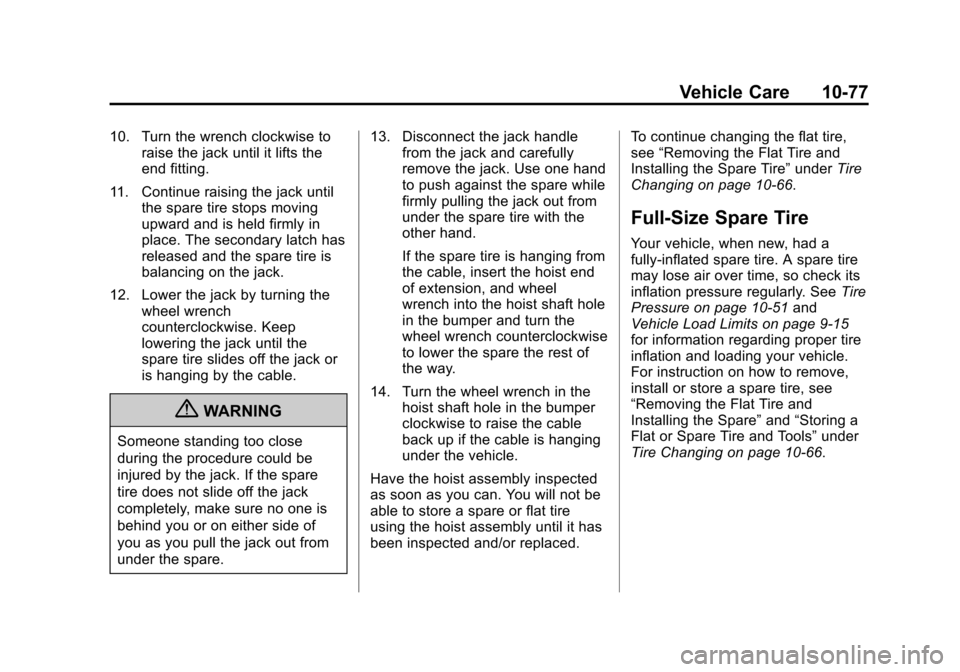
10. Turn the wrench clockwise toraise the jack until it lifts the
end fitting.
11. Continue raising the jack until the spare tire stops moving
upward and is held firmly in
place. The secondary latch has
released and the spare tire is
balancing on the jack.
12. Lower the jack by turning the wheel wrench
counterclockwise. Keep
lowering the jack until the
spare tire slides off the jack or
is hanging by the cable.
{WARNING
Someone standing too close
during the procedure could be
injured by the jack. If the spare
tire does not slide off the jack
completely, make sure no one is
behind you or on either side of
you as you pull the jack out from
under the spare. 13. Disconnect the jack handle
from the jack and carefully
remove the jack. Use one hand
to push against the spare while
firmly pulling the jack out from
under the spare tire with the
other hand.
If the spare tire is hanging from
the cable, insert the hoist end
of extension, and wheel
wrench into the hoist shaft hole
in the bumper and turn the
wheel wrench counterclockwise
to lower the spare the rest of
the way.
14. Turn the wheel wrench in the hoist shaft hole in the bumper
clockwise to raise the cable
back up if the cable is hanging
under the vehicle.
Have the hoist assembly inspected
as soon as you can. You will not be
able to store a spare or flat tire
using the hoist assembly until it has
been inspected and/or replaced. To continue changing the flat tire,
see
“Removing the Flat Tire and
Installing the Spare Tire” underTire
Changing on page 10‑66.
Full-Size Spare Tire
Your vehicle, when new, had a
fully-inflated spare tire. A spare tire
may lose air over time, so check its
inflation pressure regularly. See Tire
Pressure on page 10‑51 and
Vehicle Load Limits on page 9‑15
for information regarding proper tire
inflation and loading your vehicle.
For instruction on how to remove,
install or store a spare tire, see
“Removing the Flat Tire and
Installing the Spare” and“Storing a
Flat or Spare Tire and Tools” under
Tire Changing on page 10‑66.
Page 412 of 494

Black plate (78,1)Chevrolet Avalanche Owner Manual - 2013 - CRC - 8/27/12
10-78 Vehicle Care
Notice:If the vehicle has
four-wheel drive and a different
size spare tire is installed, do not
drive in four-wheel drive until the
flat tire is repaired and/or
replaced. The vehicle could be
damaged and the repairs would
not be covered by the warranty.
Never use four-wheel drive when
a different size spare tire is
installed on the vehicle.
Your vehicle may have a different
size spare tire than the road tires
originally installed on your vehicle.
This spare tire was developed for
use on your vehicle, so it is all right
to drive on it. If your vehicle has
four-wheel drive and the different
size spare tire is installed, keep the
vehicle in two-wheel drive. After installing the spare tire on your
vehicle, you should stop as soon as
possible and make sure the spare
tire is correctly inflated. Have the
damaged or flat road tire repaired or
replaced as soon as you can and
installed back onto your vehicle.
This way, the spare tire will be
available in case you need it again.
Do not mix tires and wheels of
different sizes, because they will not
fit. Keep your spare tire and its
wheel together. If your vehicle has a
spare tire that does not match your
vehicle's original road tires and
wheels in size and type, do not
include the spare in the tire rotation.Jump Starting
For more information about the
vehicle battery, see
Battery on
page 10‑25.
If the vehicle's battery has run
down, you may want to use another
vehicle and some jumper cables to
start your vehicle. Be sure to use
the following steps to do it safely.
{WARNING
Batteries can hurt you. They can
be dangerous because:
.They contain acid that can
burn you.
.They contain gas that can
explode or ignite.
.They contain enough
electricity to burn you.
If you do not follow these steps
exactly, some or all of these
things can hurt you.
Page 487 of 494

Black plate (5,1)Chevrolet Avalanche Owner Manual - 2013 - CRC - 8/27/12
INDEX i-5
Fog LampsBulb Replacement . . . . . . . . . . . . . 6-6
Folding Mirrors . . . . . . . . . . . . . . . . 2-20
Four-Wheel Drive . . . . . . . . . . . . 10-25, 9-34, 9-39
Front Axle . . . . . . . . . . . . . . . . . . . . 10-26
Front Fog Lamp Light . . . . . . . . . . . . . . . . . . . . . . . . . . 5-24
Front Seats Adjustment . . . . . . . . . . . . . . . . . . . . 3-3
Heated and Ventilated . . . . . . . . . 3-8
Fuel . . . . . . . . . . . . . . . . . . . . . . . . . . . 9-55 Additives . . . . . . . . . . . . . . . . . . . . . 9-56
E85 (85% Ethanol) . . . . . . . . . . . 9-57
Economy Driving . . . . . . . . . . . . . 1-27
Filling a Portable FuelContainer . . . . . . . . . . . . . . . . . . . 9-60
Filling the Tank . . . . . . . . . . . . . . . 9-58
Foreign Countries . . . . . . . . . . . . 9-56
Gasoline Specifications . . . . . . . 9-55
Gauge . . . . . . . . . . . . . . . . . . . . . . . . 5-11
Low Fuel Warning Light . . . . . . . 5-23
Management, Active . . . . . . . . . . 9-28
Recommended . . . . . . . . . . . . . . . 9-55
Requirements, California . . . . . 9-56
System Messages . . . . . . . . . . . . 5-38 Full-Size Spare Tire . . . . . . . . . . 10-77
Fuses
Engine CompartmentFuse Block . . . . . . . . . . . . . . . . 10-34
Fuses and Circuit Breakers . . . . . . . . . . . . . . . . . . 10-34
Instrument Panel Fuse
Block . . . . . . . . . . . . . . . . . . . . . . 10-39
G
Garage Door Opener . . . . . . . . . . 5-52Programming . . . . . . . . . . . . . . . . . 5-52
Gasoline
Specifications . . . . . . . . . . . . . . . . . 9-55
Gauges Engine CoolantTemperature . . . . . . . . . . . . . . . . 5-13
Engine Oil Pressure . . . . . . . . . . 5-12
Fuel . . . . . . . . . . . . . . . . . . . . . . . . . . 5-11
Odometer . . . . . . . . . . . . . . . . . . . . . 5-11
Speedometer . . . . . . . . . . . . . . . . . 5-11
Tachometer . . . . . . . . . . . . . . . . . . . 5-11
Trip Odometer . . . . . . . . . . . . . . . . 5-11
Voltmeter . . . . . . . . . . . . . . . . . . . . . 5-14
Warning Lights and
Indicators . . . . . . . . . . . . . . . . . . . . 5-9 General Information
Service and Maintenance . . . . . 11-1
Towing . . . . . . . . . . . . . . . . . . . . . . . . 9-60
Vehicle Care . . . . . . . . . . . . . . . . . . 10-2
Glass Replacement . . . . . . . . . . . 10-30
Glove Box . . . . . . . . . . . . . . . . . . . . . . 4-1
GM Mobility Reimbursement Program . . . . . . . . . . . . . . . . . . . . . . 13-7
H
Halogen Bulbs . . . . . . . . . . . . . . . . 10-31
Hazard Warning Flashers . . . . . . . 6-5
Head Restraints . . . . . . . . . . . . . . . . 3-2
HeadlampsAiming . . . . . . . . . . . . . . . . . . . . . . 10-30
Automatic . . . . . . . . . . . . . . . . . . . . . . 6-4
Bulb Replacement . . . . . . . . . . 10-31
Daytime RunningLamps (DRL) . . . . . . . . . . . . . . . . . 6-3
Flash-to-Pass . . . . . . . . . . . . . . . . . . 6-3
High-Beam On Light . . . . . . . . . . 5-24
High/Low Beam Changer . . . . . . 6-3
Heated and Ventilated Front
Seats . . . . . . . . . . . . . . . . . . . . . . . . . 3-8
Heated Mirrors . . . . . . . . . . . . . . . . . 2-21
Page 493 of 494

Black plate (11,1)Chevrolet Avalanche Owner Manual - 2013 - CRC - 8/27/12
INDEX i-11
Starting the Engine . . . . . . . . . . . . 9-23
Steering . . . . . . . . . . . . . . . . . . . . . . . . 9-4Fluid, Power . . . . . . . . . . . . . . . . 10-20
Wheel Adjustment . . . . . . . . . . . . . 5-2
Wheel Controls . . . . . . . . . . . . . . . . 5-2
Steps Power Assist . . . . . . . . . . . . . . . . . 2-15
Stoplamps and Back-Up Lamps Bulb Replacement . . . . . . . . . . 10-31
Storage Areas Armrest . . . . . . . . . . . . . . . . . . . . . . . . 4-1
Cargo Area . . . . . . . . . . . . . . . . . . . . 4-2
Center Console . . . . . . . . . . . . . . . . 4-1
Glove Box . . . . . . . . . . . . . . . . . . . . . 4-1
Roof Rack System . . . . . . . . . . . . 4-11
Top-Box Storage . . . . . . . . . . . . . . . 4-2
Stuck Vehicle . . . . . . . . . . . . . . . . . . 9-14
Sun Visors . . . . . . . . . . . . . . . . . . . . . 2-24
Sunroof . . . . . . . . . . . . . . . . . . . . . . . . 2-25
Symbols . . . . . . . . . . . . . . . . . . . . . . . . . . iv
System Infotainment . . . . . . . . . . . . . . . . . . . 7-1
Roof Rack . . . . . . . . . . . . . . . . . . . . 4-11T
Tachometer . . . . . . . . . . . . . . . . . . . . 5-11
Tailgate . . . . . . . . . . . . . . . . . . . . . . . . 2-14
TaillampsBulb Replacement . . . . . . . . . . 10-31
Text Telephone (TTY) Users . . . 13-6
Theft-Deterrent Systems . . . . . . . 2-17 Immobilizer . . . . . . . . . . . . . . . . . . . 2-17
Throttle, Adjustable . . . . . . . . . . . . 9-21
Time . . . . . . . . . . . . . . . . . . . . . . . . . . . . 5-7
Tires Buying New Tires . . . . . . . . . . . 10-58
Chains . . . . . . . . . . . . . . . . . . . . . . 10-63
Changing . . . . . . . . . . . . . . . . . . . 10-66
Designations . . . . . . . . . . . . . . . 10-46
Different Size . . . . . . . . . . . . . . . 10-60
Full-Size Spare . . . . . . . . . . . . . 10-77
If a Tire Goes Flat . . . . . . . . . . 10-64
Inflation Monitor System . . . . 10-53
Inspection . . . . . . . . . . . . . . . . . . 10-56
Messages . . . . . . . . . . . . . . . . . . . . 5-41
Pressure Light . . . . . . . . . . . . . . . . 5-22
Pressure Monitor System . . . 10-52
Rotation . . . . . . . . . . . . . . . . . . . . 10-56
Secondary Latch System . . . 10-75
Sidewall Labeling . . . . . . . . . . . 10-44 Tires (cont'd)
Terminology and
Definitions . . . . . . . . . . . . . . . . . 10-48
Uniform Tire Quality
Grading . . . . . . . . . . . . . . . . . . . 10-61
Wheel Alignment and Tire Balance . . . . . . . . . . . . . . . . . . . 10-62
Wheel Replacement . . . . . . . . 10-62
When It Is Time for New Tires . . . . . . . . . . . . . . . . . . . . . . 10-58
Winter . . . . . . . . . . . . . . . . . . . . . . 10-43
Top-Box Storage . . . . . . . . . . . . . . . . 4-2
Tow/Haul Mode . . . . . . . . . . . . . . . . 9-33
Tow/Haul Mode Light . . . . . . . . . . 5-21
Towing Driving Characteristics . . . . . . . . 9-60
Equipment . . . . . . . . . . . . . . . . . . . . 9-67
General Information . . . . . . . . . . 9-60
Recreational Vehicle . . . . . . . . 10-83
Trailer . . . . . . . . . . . . . . . . . . . . . . . . 9-63
Trailer Sway Control (TSC) . . . 9-76
Vehicle . . . . . . . . . . . . . . . . . . . . . 10-83
Traction
Control System (TCS)/StabiliTrak
®Light . . . . . . . . . . . . 5-22