2013 BMW Z4 Turn signal setting
[x] Cancel search: Turn signal settingPage 17 of 289

3Opening and closing front win‐
dows 414Exterior mirrors, folding in and out 505Adjust the exterior mirrors, Automatic Curb
Monitor 506Parking lamps 85Low beams 85Automatic headlamp con‐
trol 86
Adaptive light control 86
High-beam Assistant 877Turn signal 60High beams, head‐
lamp flasher 87High-beam Assistant 87Roadside parking lamps 87Computer 73Settings and information about
the vehicle 758Instrument cluster 149Buttons on the steering wheelChange the radio station
Select a music track
Leaf through the phone book and
through lists with stored phone
numbersNext entertainment sourceRecirculated air mode 11210Windshield wipers 61Rain sensor 6111Start/stop the engine and switch
the ignition on/off 5512Ignition lock 5513Steering wheel heating 5214Horn, the entire surface15Adjust the steering wheel 5216Cruise control 10317Buttons on the steering wheelTelephone 192VolumeActivate/deactivate the voice acti‐
vation system 2518Releasing the hood 23619Open the trunk lid 36Seite 13CockpitAt a glance13
Online Edition for Part no. 01 40 2 911 315 - VI/13
Page 18 of 289

Instrument cluster1Speedometer2Indicator lamps for turn signals3Indicator/warning lamps 154Tachometer 725Engine oil temperature 726Display for▷Clock 71▷External temperature 71▷Indicator/warning lamps 15▷Cruise control 1037Display for▷Gear display, 8-gear Sport automatic
transmission 65▷Gear display for 7-gear Sport auto‐
matic transmission with dual
clutch 66▷Computer 73▷Date of next scheduled service, and re‐
maining distance to be driven 78▷Odometer and trip odometer 71▷Programs for Dynamic Driving Con‐
trol 100▷High-beam Assistant 87▷Checking engine oil level 236▷Settings and information 75▷ Check Control message
present 828Fuel gauge 729Resetting the trip odometer 71Seite 14At a glanceCockpit14
Online Edition for Part no. 01 40 2 911 315 - VI/13
Page 35 of 289

▷The remote control used is detected when
the vehicle is unlocked and the stored pro‐
file is called up.▷Your personal settings will be recognized
and called up again even if the vehicle has
been used in the meantime by someone
else with another remote control.
The individual settings are stored for a maxi‐
mum of four remote controls. They are stored
for two remote controls if Comfort Access is in
use.
Personal Profile settingsThe following functions and settings can be
stored in a profile.
More information on the settings can be found
under:
▷Assigning the programmable memory but‐
tons, refer to page 22.▷Response of the central locking system
when the car is being unlocked, refer to
page 32.▷Automatic locking of the vehicle, refer to
page 35.▷Automatic retrieval of the driver's seat and
exterior mirror positions after unlocking,
refer to page 34.▷Triple turn signal activation, refer to
page 60.▷Settings for the display on the Control Dis‐
play and in the instrument cluster:▷12h/24h clock format, refer to
page 76.▷Date format, refer to page 77.▷Brightness of the Control Display, refer
to page 78.▷Language on the Control Display, refer
to page 78.▷Split screen, refer to page 22.▷Units of measure for fuel consumption,
distance covered/remaining distances
and temperature, refer to page 76.▷Volume of PDC Park Distance Control, re‐
fer to page 106.▷Light settings:▷Welcome lamps, refer to page 85.▷Headlamp courtesy delay feature, refer
to page 86.▷Daytime running lights, refer to
page 86.▷High-beam Assistant, refer to
page 87.▷Automatic climate control: AUTO program,
cooling function, and automatic recircu‐
lated air control activated/deactivated,
temperature, air flow rate, and air distribu‐
tion, refer to page 110.▷Navigation:▷Voice activation, refer to page 151.▷Map view settings, refer to page 153.▷Route criteria, refer to page 149.▷Entertainment:▷Tone control, refer to page 160.▷Radio, stored stations, refer to
page 168.▷CD/multimedia, audio source listened
to last, refer to page 170.▷Telephone:▷Volume, refer to page 196.
Central locking system
The concept The central locking system becomes active
when the driver's door is closed.
The system simultaneously engages and re‐
leases the locks on the following:
▷Doors.▷Trunk lid.▷Fuel filler flap.▷Center armrest.Seite 31Opening and closingControls31
Online Edition for Part no. 01 40 2 911 315 - VI/13
Page 64 of 289

The parking brake can only be released while
the ignition is switched on or the engine is run‐
ning.
Manual transmission
Press the switch of the parking brake. Depress
the brake and clutch pedals while doing so.
Sport automatic transmission Press the parking brake switch while the brake
is depressed or transmission position P is en‐
gaged.
Indicator lamps The indicator lamp in the instrument
cluster goes out.
Indicator lamp in Canadian models.
Malfunction
In the event of a failure or malfunction of the
parking brake, secure the vehicle against roll‐
ing using a wheel chock, for example, if you
leave the vehicle.
Turn signals/
headlamp flasher1High beams2Headlamp flasher3Turn signal
Using turn signals
Press the lever beyond the resistance point.
To switch off manually, press the lever to the
resistance point.
Unusually rapid flashing of the indicator lamp
indicates that a turn signal bulb has failed.
Signaling a turn briefly Press the lever to the resistance point and hold
it there for as long as you want the turn signal
to flash.
Triple turn signal activation Press the lever to the resistance point. The
turn signal flashes three times.
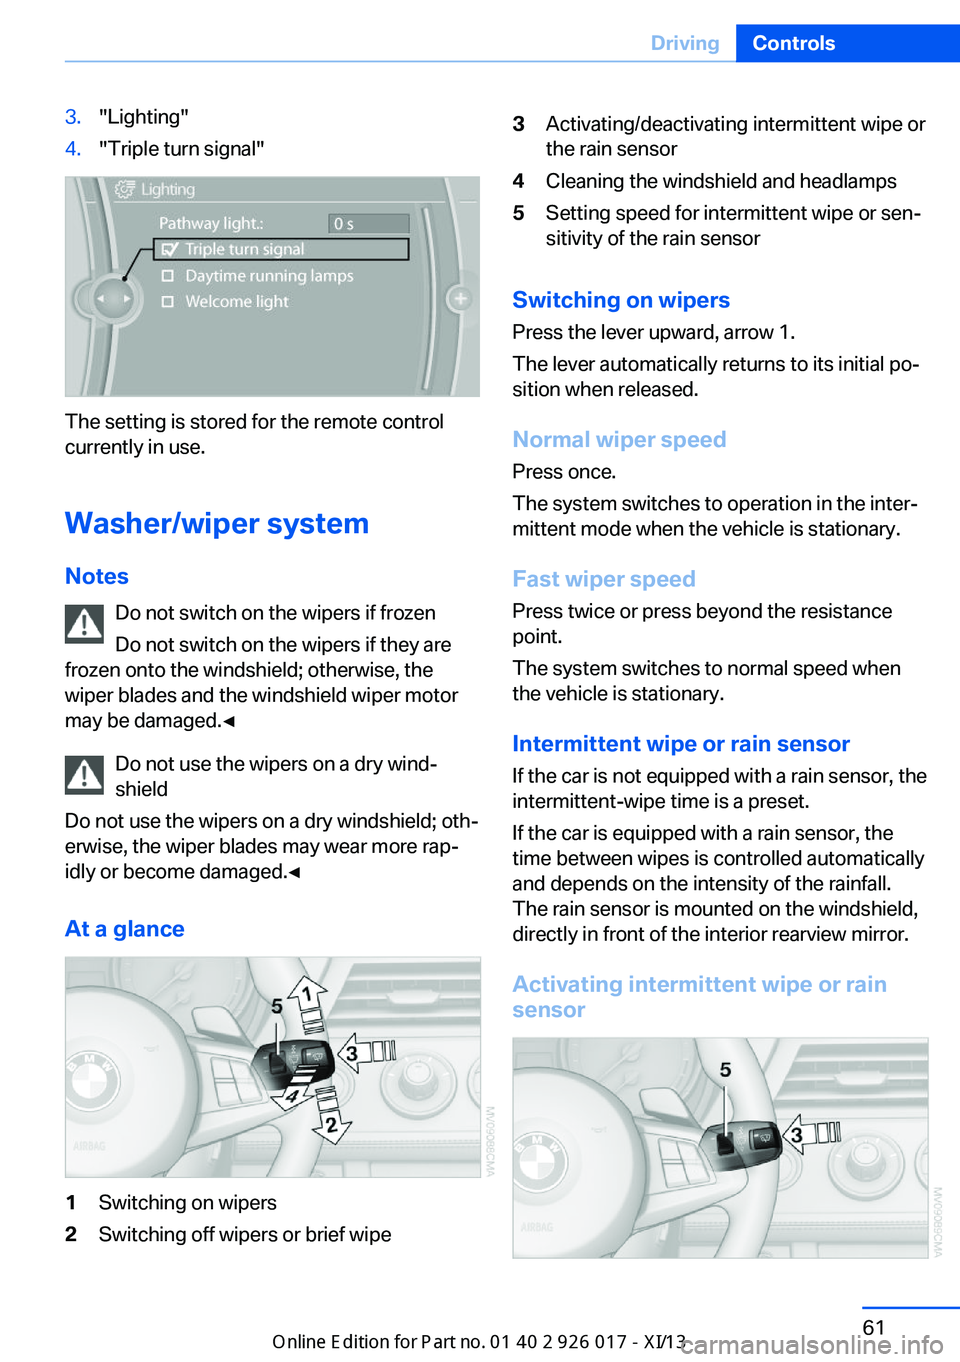
You can be set whether the turn signal should
flash once or three times when activated.
1. Press the button.2."Settings"Seite 60ControlsDriving60
Online Edition for Part no. 01 40 2 911 315 - VI/13
Page 65 of 289

3."Lighting"4."Triple turn signal"
The setting is stored for the remote control
currently in use.
Washer/wiper system Notes Do not switch on the wipers if frozen
Do not switch on the wipers if they are
frozen onto the windshield; otherwise, the wiper blades and the windshield wiper motor
may be damaged.◀
Do not use the wipers on a dry wind‐
shield
Do not use the wipers on a dry windshield; oth‐
erwise, the wiper blades may wear more rap‐
idly or become damaged.◀
At a glance
1Switching on wipers2Switching off wipers or brief wipe3Activating/deactivating intermittent wipe or
the rain sensor4Cleaning the windshield and headlamps5Setting speed for intermittent wipe or sen‐
sitivity of the rain sensor
Switching on wipers
Press the lever upward, arrow 1.
The lever automatically returns to its initial po‐
sition when released.
Normal wiper speed
Press once.
The system switches to operation in the inter‐
mittent mode when the vehicle is stationary.
Fast wiper speed
Press twice or press beyond the resistance
point.
The system switches to normal speed when
the vehicle is stationary.
Intermittent wipe or rain sensor
If the car is not equipped with a rain sensor, the
intermittent-wipe time is a preset.
If the car is equipped with a rain sensor, the
time between wipes is controlled automatically
and depends on the intensity of the rainfall.
The rain sensor is mounted on the windshield,
directly in front of the interior rearview mirror.
Activating intermittent wipe or rain sensor
Seite 61DrivingControls61
Online Edition for Part no. 01 40 2 911 315 - VI/13
Page 165 of 289

Multi-channel playback,
surround
Choose between stereo and multi-channel
playback, surround.
Setting multi-channel playback,
surround1."CD/Multimedia", "Radio" or "Settings"2."Tone"3."Surround"
When surround is activated, multi-channel
playback is simulated when a stereo audio
track is played.
Volume
▷"Speed volume": speed-dependent vol‐
ume control.▷"PDC": volume of the PDC signal com‐
pared to the entertainment sound output.▷"Gong": volume of the signal, such as the
safety belt reminder, compared to the en‐
tertainment sound output.▷"Microphone": volume of the microphone
during a phone call.▷"Loudspeak.": volume of the loudspeakers
during a phone call.
The following volumes are only stored for the
respective paired telephone: "Microphone",
"Loudspeak.".
Adjusting the volume1."CD/Multimedia", "Radio" or "Settings"2."Tone"3."Volume settings"4.Select the desired volume setting.5.To adjust: turn the controller.6.To store: press the controller.
Resetting the tone settings
All tone settings can be reset to the default
setting.
1."CD/Multimedia", "Radio" or "Settings"2."Tone"3."Reset"Seite 161ToneEntertainment161
Online Edition for Part no. 01 40 2 911 315 - VI/13
Page 167 of 289

3.Highlight the desired station.4.Press the controller for an extended period.5.Select the desired memory location.
The stations are stored for the remote control
currently in use.
The stations can also be stored on the pro‐
grammable memory buttons, refer to page 22.
Selecting a station manually
Station selection via the frequency.
1."Radio"2."FM" or "AM"3."Manual"4.To select the frequency: turn the control‐
ler.
To store the station: press the controller for an
extended period.
Renaming a station An FM station with changing station names
can be renamed.
1."Radio"2."FM"3.Select the desired station.4.Open "Options".5."Rename to:"
If necessary, wait for the desired name to
be displayed.
The selected station name is added to the list
of current stations and stored stations.
RDSRDS broadcasts additional information, such
as the station name, in the FM wave band.
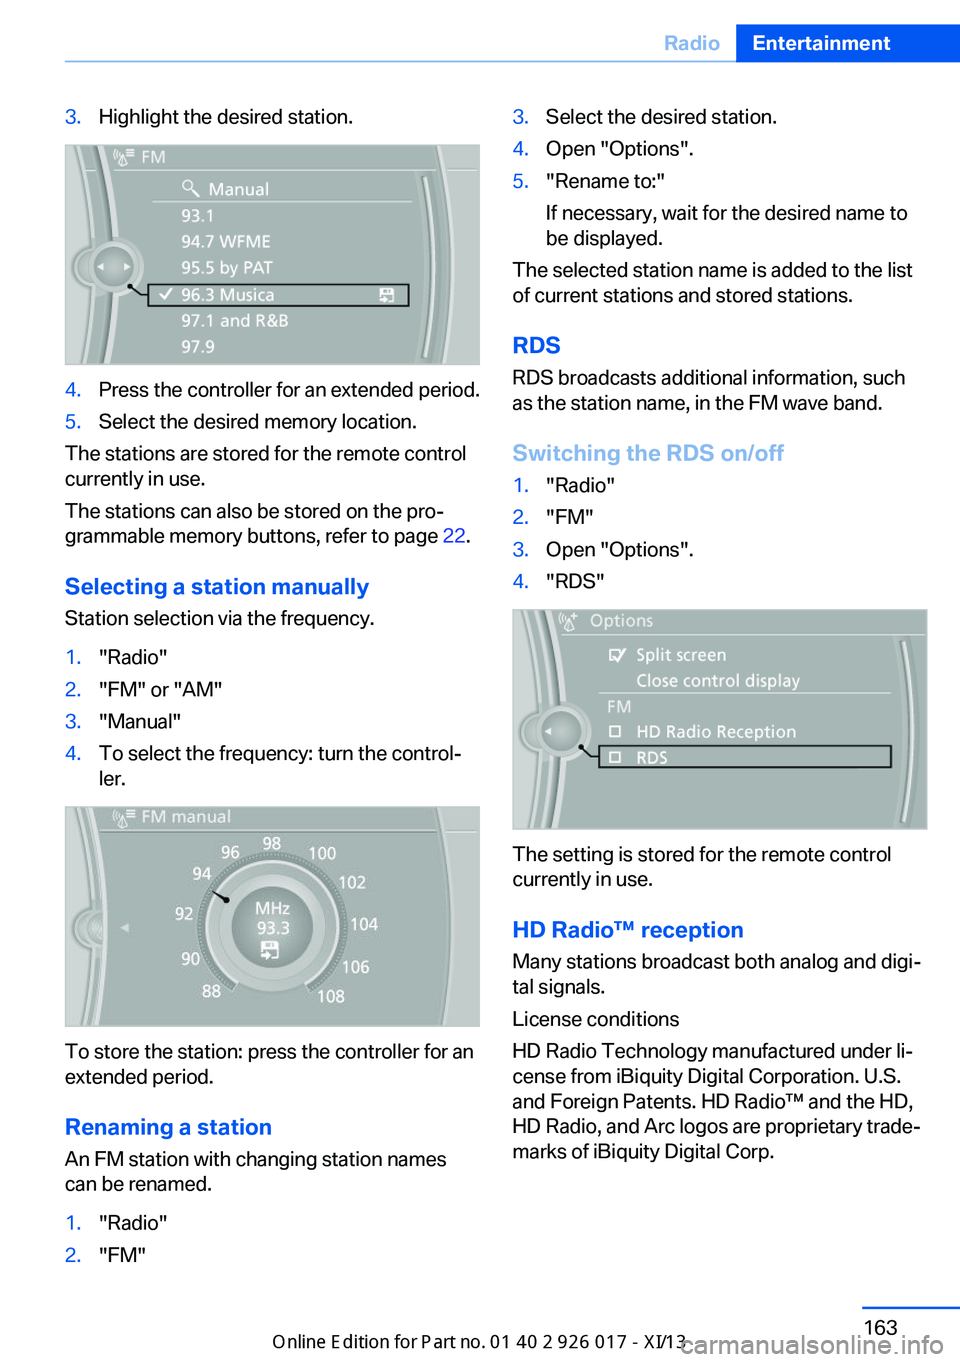
Switching the RDS on/off
1."Radio"2."FM"3.Open "Options".4."RDS"
The setting is stored for the remote control
currently in use.
HD Radio™ reception
Many stations broadcast both analog and digi‐
tal signals.
License conditions
HD Radio Technology manufactured under li‐
cense from iBiquity Digital Corporation. U.S.
and Foreign Patents. HD Radio™ and the HD,
HD Radio, and Arc logos are proprietary trade‐
marks of iBiquity Digital Corp.
Seite 163RadioEntertainment163
Online Edition for Part no. 01 40 2 911 315 - VI/13
Page 200 of 289

nected mobile phone from the vehicle and
pair and connect only one mobile phone.
The mobile phone no longer reacts.
▷Switch the mobile phone off and on again.▷Is the ambient temperature too high or
low? Do not expose the mobile phone to
extreme environmental conditions.
The telephone functions are not available.
▷Is the mobile phone paired as an additional
telephone and is the additional telephone
function deactivated? Activate the func‐
tion.▷Is an outgoing call not possible? Connect
the mobile phone as a telephone.
No phone book entries or only some phone
book entries are displayed, or they are incom‐
plete.
▷Transmission of the phone book entries is
not yet complete.▷It is possible that only the phone book en‐
tries of the mobile phone or the SIM card
are transmitted.▷It may not be possible to display phone
book entries with special characters.▷The number of phone book entries to be
stored is too high.▷Is the data volume of the contact too large,
e. g., due to stored information such as
notes? Reduce the data volume of the con‐
tact.▷Is the mobile phone connected as an audio
source or additional telephone? The mo‐
bile phone must be connected as a tele‐
phone.
The phone connection quality is poor.
▷The strength of the Bluetooth signal on the
mobile phone can be adjusted, depending
on the mobile phone.▷Insert the mobile phone into the snap-in
adapter or place it in the area of the center
console.▷Adjust the volume of the microphone and
loudspeakers separately.
If all points in this list have been checked and
the required function is still not available, con‐
tact Customer Relations or the service center.
Controls
Adjusting the volume
Turn the knob until the desired volume is se‐
lected. The setting is stored for the remote
control currently in use.
The vehicle automatically adjusts the volume
of the microphone on the telephone and the
volume of the called party. Depending on the
mobile phone, the volumes may need to be ad‐
justed. The settings can only be created during
a call and must be adjusted separately for each
telephone. The settings are deleted when the
telephone is unpaired.
1."Settings"2."Tone"3."Volume settings"4.Select the desired setting: "Microphone"
or "Loudspeak."5.To adjust: turn the controller.6.To store: press the controller.Seite 196CommunicationTelephone196
Online Edition for Part no. 01 40 2 911 315 - VI/13