2013 BMW X6M remote start
[x] Cancel search: remote startPage 219 of 327
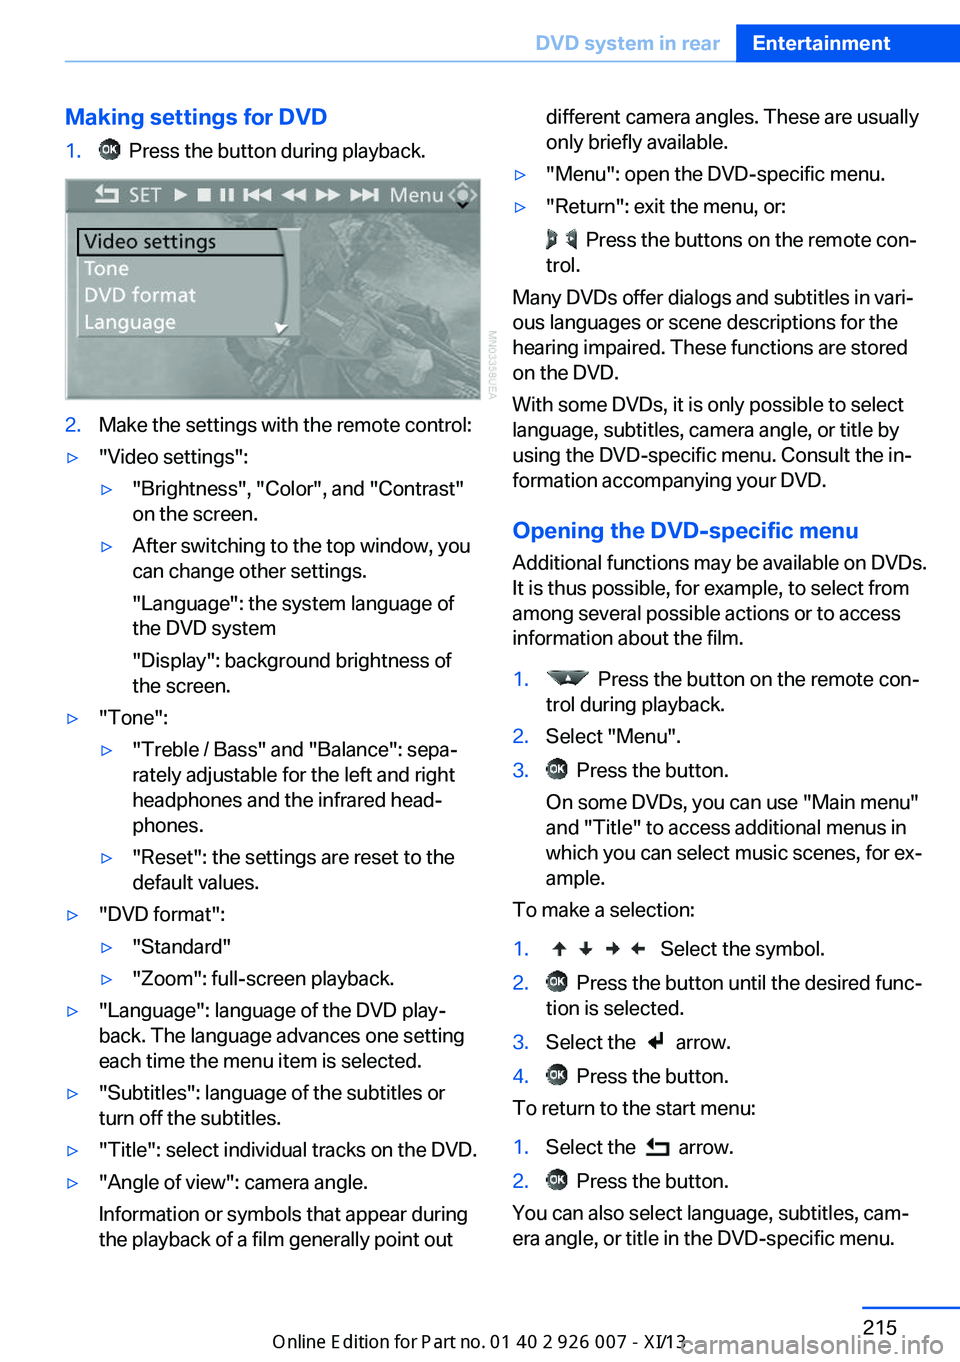
Making settings for DVD1. Press the button during playback.2.Make the settings with the remote control:▷"Video settings":▷"Brightness", "Color", and "Contrast"
on the screen.▷After switching to the top window, you
can change other settings.
"Language": the system language of
the DVD system
"Display": background brightness of
the screen.▷"Tone":▷"Treble / Bass" and "Balance": sepa‐
rately adjustable for the left and right
headphones and the infrared head‐
phones.▷"Reset": the settings are reset to the
default values.▷"DVD format":▷"Standard"▷"Zoom": full-screen playback.▷"Language": language of the DVD play‐
back. The language advances one setting
each time the menu item is selected.▷"Subtitles": language of the subtitles or
turn off the subtitles.▷"Title": select individual tracks on the DVD.▷"Angle of view": camera angle.
Information or symbols that appear during
the playback of a film generally point outdifferent camera angles. These are usually
only briefly available.▷"Menu": open the DVD-specific menu.▷"Return": exit the menu, or:
Press the buttons on the remote con‐
trol.
Many DVDs offer dialogs and subtitles in vari‐
ous languages or scene descriptions for the
hearing impaired. These functions are stored
on the DVD.
With some DVDs, it is only possible to select
language, subtitles, camera angle, or title by
using the DVD-specific menu. Consult the in‐
formation accompanying your DVD.
Opening the DVD-specific menu
Additional functions may be available on DVDs.
It is thus possible, for example, to select from
among several possible actions or to access
information about the film.
1. Press the button on the remote con‐
trol during playback.2.Select "Menu".3. Press the button.
On some DVDs, you can use "Main menu"
and "Title" to access additional menus in
which you can select music scenes, for ex‐
ample.
To make a selection:
1. Select the symbol.2. Press the button until the desired func‐
tion is selected.3.Select the arrow.4. Press the button.
To return to the start menu:
1.Select the arrow.2. Press the button.
You can also select language, subtitles, cam‐
era angle, or title in the DVD-specific menu.
Seite 215DVD system in rearEntertainment215
Online Edition for Part no. 01 40 2 910 876 - VII/13
Page 220 of 327
Consult the information accompanying your
DVD.
Compressed video files
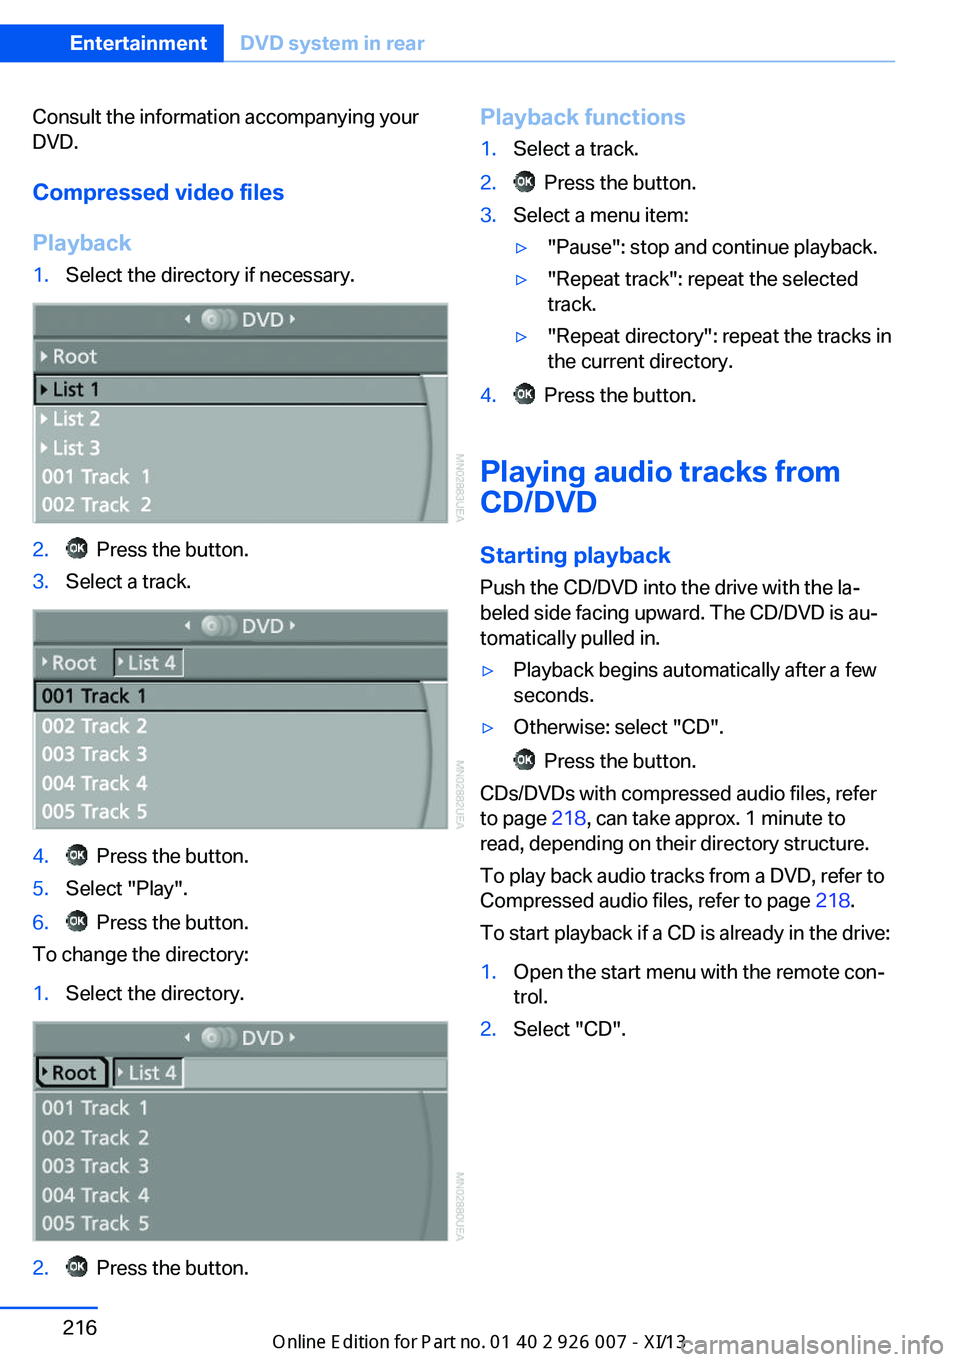
Playback1.Select the directory if necessary.2. Press the button.3.Select a track.4. Press the button.5.Select "Play".6. Press the button.
To change the directory:
1.Select the directory.2. Press the button.Playback functions1.Select a track.2. Press the button.3.Select a menu item:▷"Pause": stop and continue playback.▷"Repeat track": repeat the selected
track.▷"Repeat directory": repeat the tracks in
the current directory.4. Press the button.
Playing audio tracks from
CD/DVD
Starting playback Push the CD/DVD into the drive with the la‐
beled side facing upward. The CD/DVD is au‐
tomatically pulled in.
▷Playback begins automatically after a few
seconds.▷Otherwise: select "CD".
Press the button.
CDs/DVDs with compressed audio files, refer
to page 218, can take approx. 1 minute to
read, depending on their directory structure.
To play back audio tracks from a DVD, refer to
Compressed audio files, refer to page 218.
To start playback if a CD is already in the drive:
1.Open the start menu with the remote con‐
trol.2.Select "CD".Seite 216EntertainmentDVD system in rear216
Online Edition for Part no. 01 40 2 910 876 - VII/13
Page 221 of 327
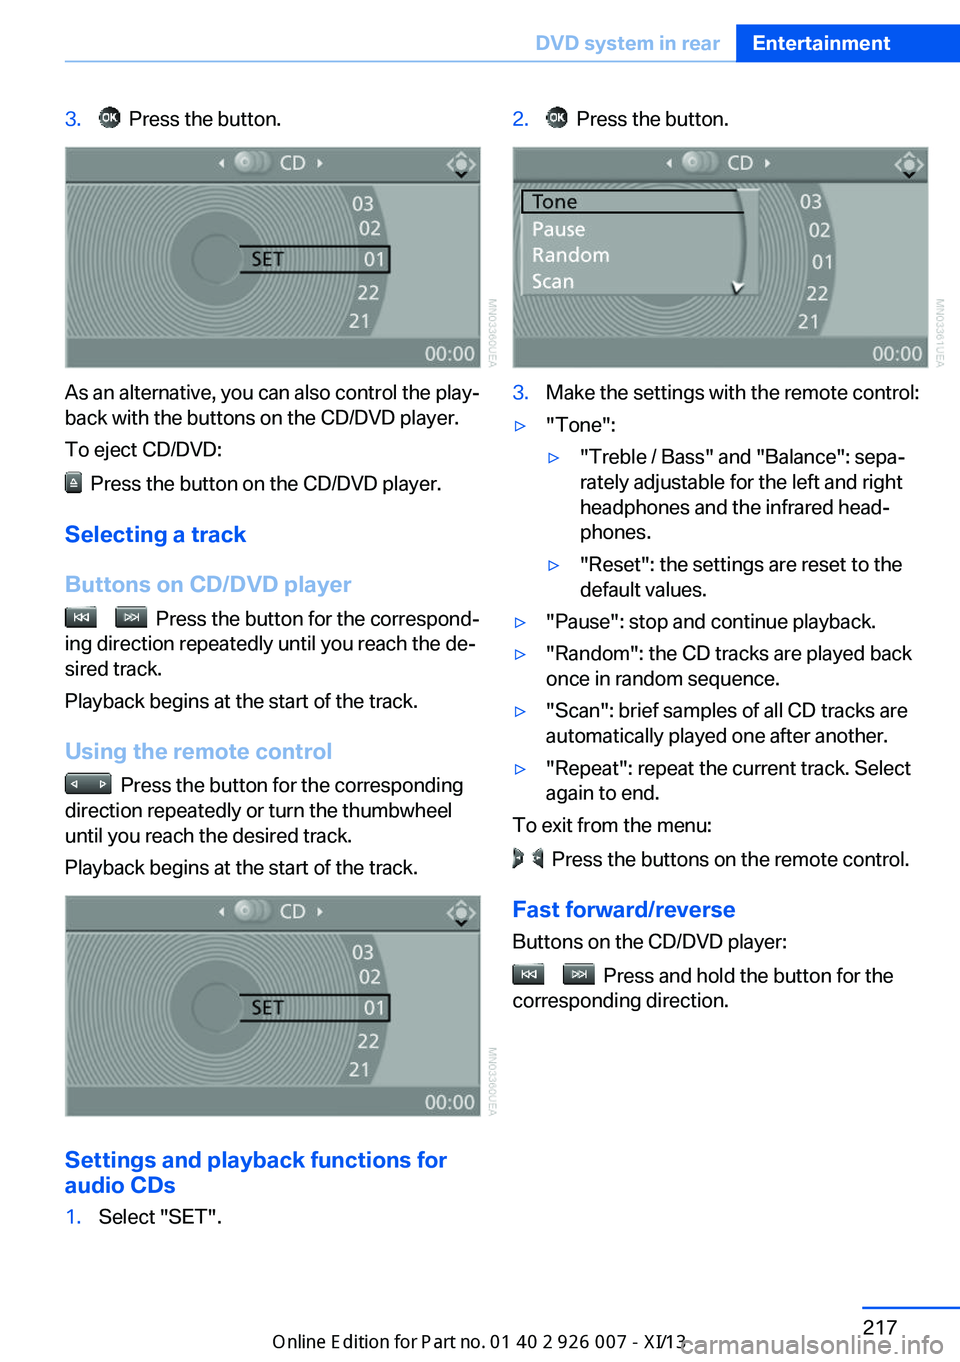
3. Press the button.
As an alternative, you can also control the play‐
back with the buttons on the CD/DVD player.
To eject CD/DVD:
Press the button on the CD/DVD player.
Selecting a track
Buttons on CD/DVD player
Press the button for the correspond‐
ing direction repeatedly until you reach the de‐
sired track.
Playback begins at the start of the track.
Using the remote control
Press the button for the corresponding
direction repeatedly or turn the thumbwheel
until you reach the desired track.
Playback begins at the start of the track.
Settings and playback functions for
audio CDs
1.Select "SET".2. Press the button.3.Make the settings with the remote control:▷"Tone":▷"Treble / Bass" and "Balance": sepa‐
rately adjustable for the left and right
headphones and the infrared head‐
phones.▷"Reset": the settings are reset to the
default values.▷"Pause": stop and continue playback.▷"Random": the CD tracks are played back
once in random sequence.▷"Scan": brief samples of all CD tracks are
automatically played one after another.▷"Repeat": repeat the current track. Select
again to end.
To exit from the menu:
Press the buttons on the remote control.
Fast forward/reverse Buttons on the CD/DVD player:
Press and hold the button for the
corresponding direction.
Seite 217DVD system in rearEntertainment217
Online Edition for Part no. 01 40 2 910 876 - VII/13
Page 222 of 327
Compressed audio files
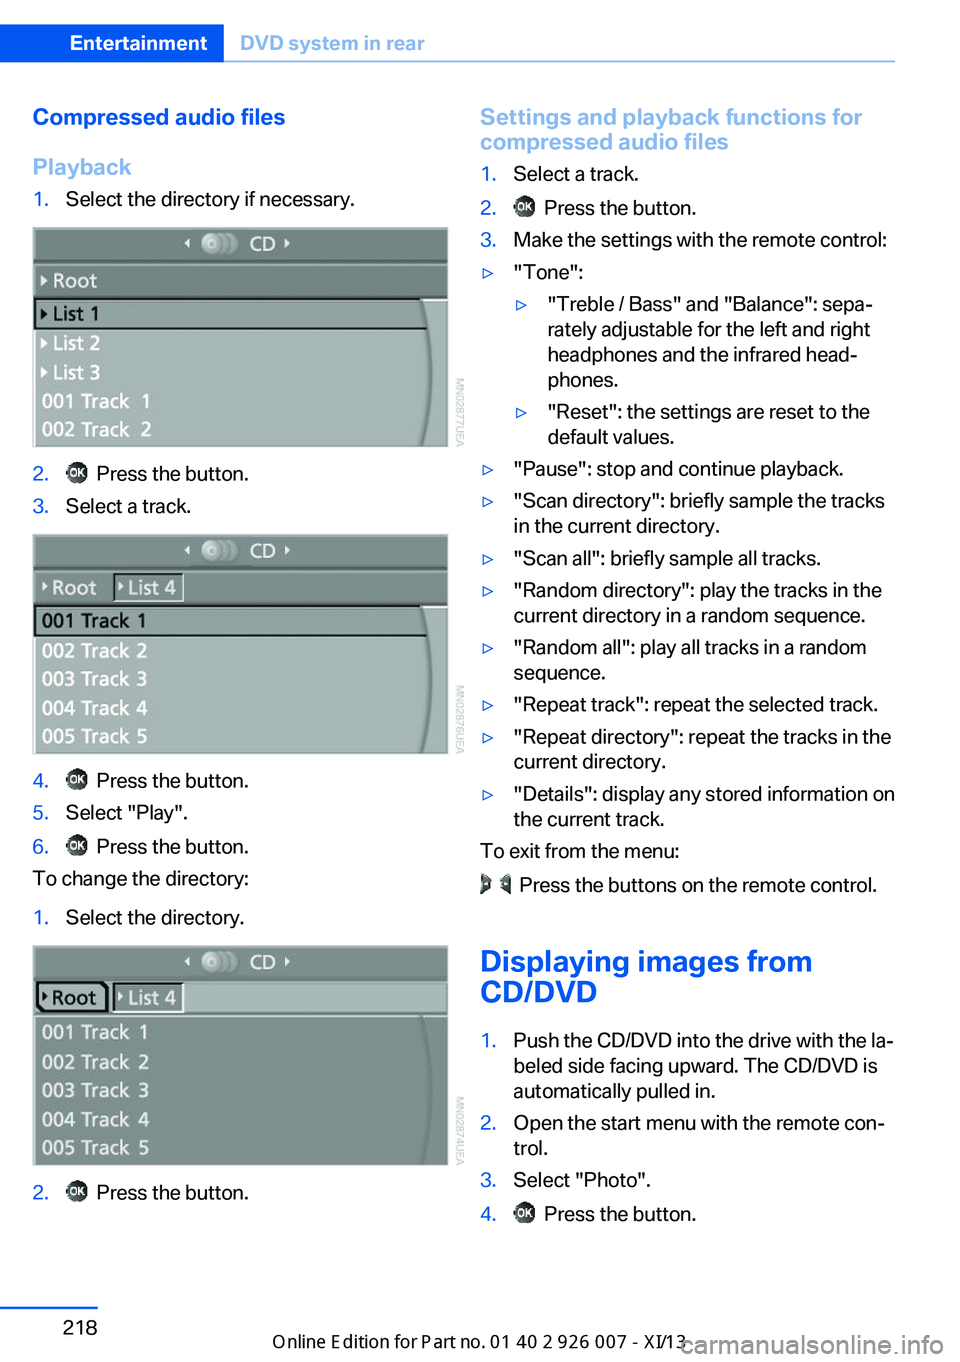
Playback1.Select the directory if necessary.2. Press the button.3.Select a track.4. Press the button.5.Select "Play".6. Press the button.
To change the directory:
1.Select the directory.2. Press the button.Settings and playback functions for
compressed audio files1.Select a track.2. Press the button.3.Make the settings with the remote control:▷"Tone":▷"Treble / Bass" and "Balance": sepa‐
rately adjustable for the left and right
headphones and the infrared head‐
phones.▷"Reset": the settings are reset to the
default values.▷"Pause": stop and continue playback.▷"Scan directory": briefly sample the tracks
in the current directory.▷"Scan all": briefly sample all tracks.▷"Random directory": play the tracks in the
current directory in a random sequence.▷"Random all": play all tracks in a random
sequence.▷"Repeat track": repeat the selected track.▷"Repeat directory": repeat the tracks in the
current directory.▷"Details": display any stored information on
the current track.
To exit from the menu:
Press the buttons on the remote control.
Displaying images from
CD/DVD
1.Push the CD/DVD into the drive with the la‐
beled side facing upward. The CD/DVD is
automatically pulled in.2.Open the start menu with the remote con‐
trol.3.Select "Photo".4. Press the button.Seite 218EntertainmentDVD system in rear218
Online Edition for Part no. 01 40 2 910 876 - VII/13
Page 223 of 327
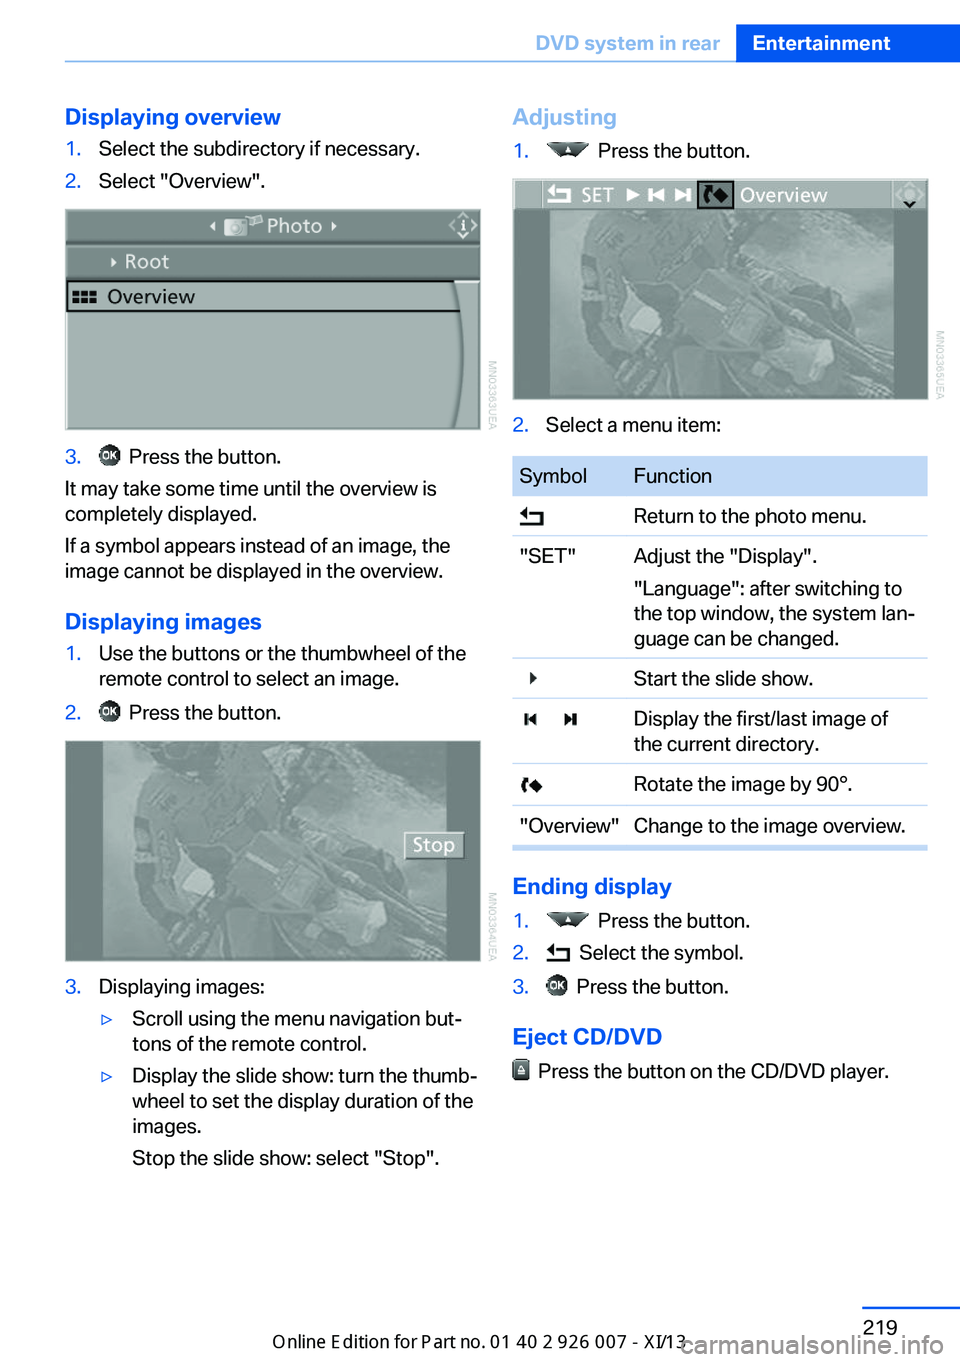
Displaying overview1.Select the subdirectory if necessary.2.Select "Overview".3. Press the button.
It may take some time until the overview is
completely displayed.
If a symbol appears instead of an image, the
image cannot be displayed in the overview.
Displaying images
1.Use the buttons or the thumbwheel of the
remote control to select an image.2. Press the button.3.Displaying images:▷Scroll using the menu navigation but‐
tons of the remote control.▷Display the slide show: turn the thumb‐
wheel to set the display duration of the
images.
Stop the slide show: select "Stop".Adjusting1. Press the button.2.Select a menu item:SymbolFunction Return to the photo menu."SET"Adjust the "Display".
"Language": after switching to
the top window, the system lan‐
guage can be changed. Start the slide show. Display the first/last image of
the current directory. Rotate the image by 90°."Overview"Change to the image overview.
Ending display
1. Press the button.2. Select the symbol.3. Press the button.
Eject CD/DVD
Press the button on the CD/DVD player.
Seite 219DVD system in rearEntertainment219
Online Edition for Part no. 01 40 2 910 876 - VII/13
Page 225 of 327
Foreign bodies/liquids in the CD/DVD
slot
Make sure that no foreign objects or liquids get
into the CD/DVD slot; otherwise, the CD/DVD
player will be damaged.◀
Humidity High levels of humidity can lead to condensa‐
tion on the CD/DVD or the laser's scan lens,
and temporarily prevent playback.
Malfunctions involving individual CDs/DVDs
If malfunctions occur only with particular CDs/
DVDs, this can be due to one of the following
causes.
Copied or self-recorded CDs/DVDs▷Possible reasons for malfunctions with
home-recorded CDs/DVDs are inconsis‐
tent data creation or recording processes,
or poor quality or old age of the blank CD/
DVD.▷Only label CDs/DVDs on the upper side
with a pen intended for this purpose.
Damaged CDs/DVDs
▷Avoid fingerprints, dust, scratches and
moisture.▷Store CDs/DVDs in a sleeve.▷Do not subject CDs/DVDs to temperatures
over 122 ℉/50 ℃, high humidity or direct
sunlight.
CDs/DVDs with copy protection
CDs/DVDs are often provided with a copy pro‐
tection feature by the manufacturer. As a re‐
sult, some CDs/DVDs cannot be played, can
only be played to a limited degree, or cause the
system to switch off. In this case, wait a short
while and then switch the system back on
again. Then remove the CD/DVD from the
drive.
CDs/DVDs with compressed audio
files
If the language set for the CD/DVD player does
not match the language of the music track, the
music tracks may be displayed incorrectly.
External device
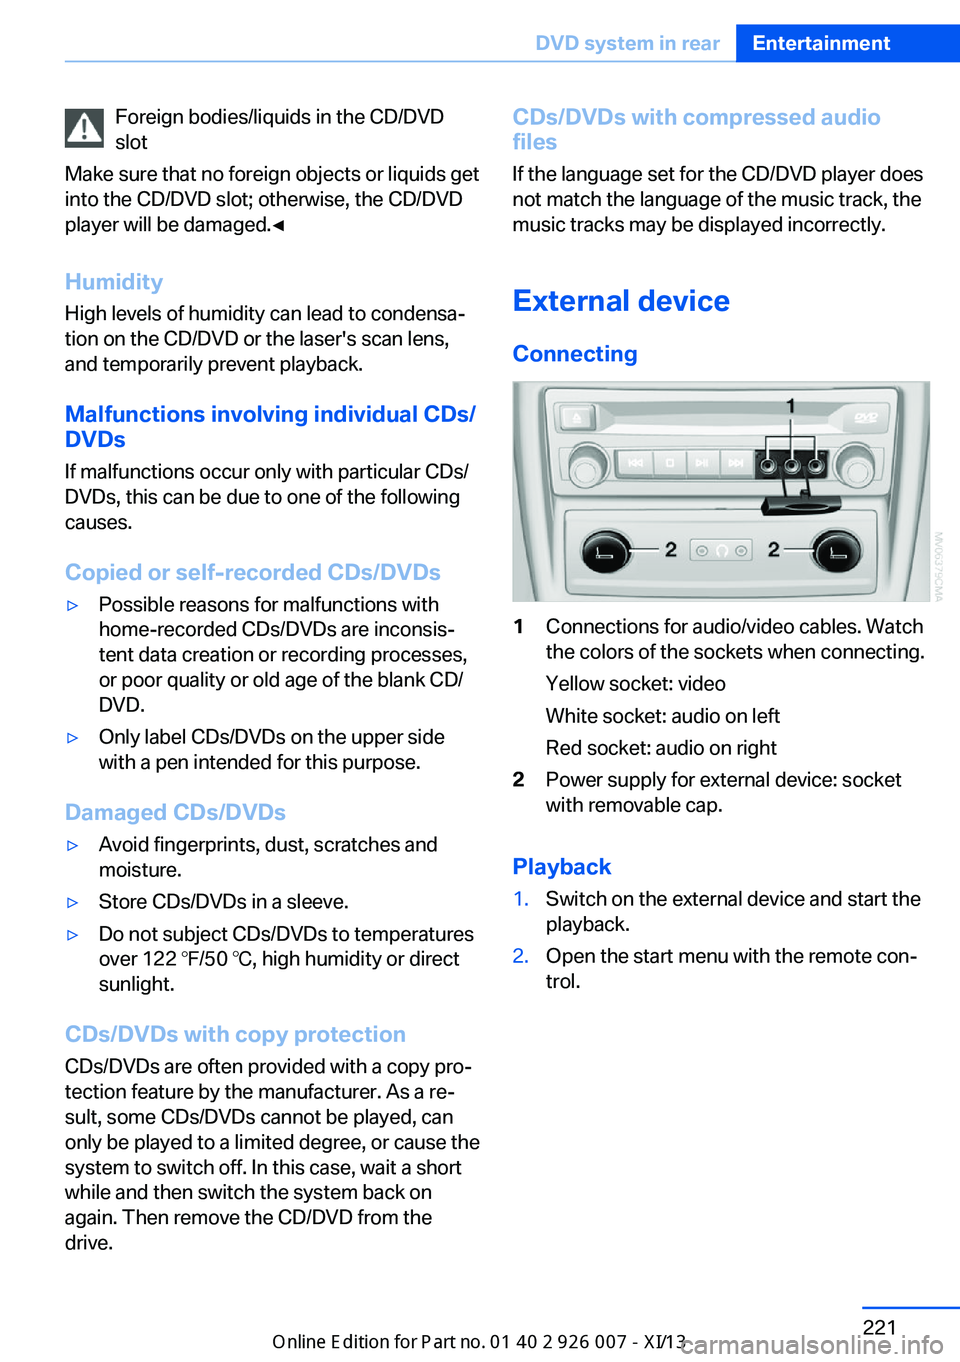
Connecting1Connections for audio/video cables. Watch
the colors of the sockets when connecting.
Yellow socket: video
White socket: audio on left
Red socket: audio on right2Power supply for external device: socket
with removable cap.
Playback
1.Switch on the external device and start the
playback.2.Open the start menu with the remote con‐
trol.Seite 221DVD system in rearEntertainment221
Online Edition for Part no. 01 40 2 910 876 - VII/13
Page 313 of 327

Automatic climate control inrear, air supply 127
Automatic climate control in rear, deactivating on Control
Display 126
Automatic climate control in rear, switching off 127
Automatic climate control, switching off 125, 127
Automatic climate control, ventilation in rear 126
Automatic climate control, with 2-zone control 122
Automatic climate control, with 4-zone control 126
Automatic, cruise control 109
Automatic Cruise Con‐ trol 102
Automatic Curb Monitor 52
Automatic headlamp con‐ trol 81, 82
Automatic Hold 62
Automatic Hold, activating 62
Automatic Hold, deactivat‐ ing 62
Automatic Hold, parking 63
Automatic recirculated air control 124
Automatic Soft Closing, doors 35
Automatic tailgate opera‐ tion 36
Automatic transmission with Steptronic 67
Automatic transmission with
Steptronic– Kickdown 67
AUTO program with auto‐
matic climate con‐
trol 122 , 127
AUX-IN port 138, 202
Average fuel consumption 73
Average fuel consumption, setting the units 79
Average speed 72
Average speed, refer to Com‐ puter 72
Axle loads, refer to
Weights 298
B
Backrest curvature, refer to Lumbar support 45
Backrest width 45
Back seats, adjusting the head restraints 50
Backup camera 113
Backup camera, obstacle marking 115
Backup camera, pathway lines 114
Backup camera, turning lines 114
Balance 180
Band-aids, refer to First aid kit 287
Bass 180
Battery– Remote control 30
Battery change, remote con‐
trol for rear DVD sys‐
tem 212
Battery disposal 284
Battery, refer to Vehicle bat‐ tery 283
Battery replacement, remote control for vehicle 39
Before entering the car wash 291
Belts, refer to Safety belts 47
Belt tensioners, refer to Safety belts 47
Beverage holder, refer to Cu‐ pholder 139
Black and white map dis‐ play 174
Blower, refer to Air flow rate 123
Bluetooth audio 205
Bluetooth connection, acti‐ vating/deactivating 227
BMW Apps 255
BMW EfficientDynamics, re‐
fer to Saving fuel 153
BMW Homepage 6
BMW Internet page 6
BMW maintenance sys‐ tem 274
BMW Online 252
Bottle holder, refer to Cu‐ pholder 139
Brake assistant 96
Brake discs, breaking in 146
Brake fluid, refer to Service requirements 74
Brake force display 95
Brake force distribution, elec‐ tronic 96
Brake lamps, brake force dis‐ play 95
Brake lights, adaptive 95
Brake pads, breaking in 146
Brakes, BMW maintenance system 274
Brakes, parking brake 61
Brakes, service require‐ ments 74
Brake system, BMW mainte‐ nance system 274
Braking, notes 147
Breakdown assistance 287
Breakdown, transporting the vehicle 289
Breaking in 146
Brightness, on the Control Display 79
Bulb replacement, refer to Lamp and bulb replace‐
ment 276
Button for starting the engine, refer to Start/Stop but‐
ton 59
C
Calendar 244
Calibration, driver's seat 49 Seite 309Everything from A to ZReference309
Online Edition for Part no. 01 40 2 910 876 - VII/13
Page 314 of 327

California Proposition 65Warning 7
Camera, care 294
Camera, refer to Backup cam‐ era 113
Camera, side view 118
Camera, Top View 117
Can holder, refer to Cu‐ pholder 139
Car battery, refer to Vehicle battery 283
Car care products 292
Care 291
Care, displays 294
Care, vehicle 292
Cargo 150
Cargo area– Comfort Access 38
Cargo area, capacities 298
Cargo area, enlarging 135
Cargo area lamp, refer to Inte‐ rior lamps 85
Cargo area lid, refer to Tail‐
gate 36
Cargo area, opening/closing, refer to Tailgate 36
Cargo area, refer to Cargo area 135
Cargo cover 135
Cargo, securing with ski bag, refer to Securing cargo 142
Cargo straps, securing cargo 151
Car key, refer to Integrated key/remote control 30
Carpet, care 293
Car phone, installation loca‐ tion, refer to Center arm‐
rest 138
Car phone, refer to Tele‐ phone 226
Car vacuum cleaner, connect‐ ing, refer to Connecting
electrical devices 133
Car wash 291
Catalytic converter, refer to Hot exhaust system 146
CBC, refer to Cornering Brake
Control 96
CBS Condition Based Serv‐ ice 274
CD/DVD 190
CD/DVD changer 194
CD/DVD in rear 211
CD/DVD notes 196
CD, refer to Playing audio tracks, rear DVD sys‐
tem 216
CDs, storing 197
Cell phone 226
Cell phone, installation loca‐ tion, refer to Center arm‐
rest 138
Center armrest, front 138
Center armrest, rear 138
Center brake lamp 280
Center console, refer to Around the center con‐
sole 16
Central locking– Comfort Access 37– From the inside 35– Setting the unlocking char‐
acteristics 32
Central locking system
– From the outside 32– Principle 32
Central screen, refer to Con‐
trol Display 19
Changes, technical, refer to Safety 6
Changing wheels/tires 267
Chassis number, refer to En‐ gine compartment 270
Check Control 76
Children, transporting 54
Child restraint fixing system LATCH 55
Child restraint fixing sys‐ tems 54
Child restraint fixing systems, mounting 54
Child safety locks 57
Child seat, mounting 54
Child seats, refer to Trans‐
porting children safely 54
Chrome parts, care 293
Cigarette lighter, connecting electrical devices 133
Cigarette lighter, refer to Lighter 133
Cigarette lighter socket 133
Circulation of air, refer to Re‐ circulated air mode 124
Cleaning, displays 294
Cleaning your BMW, refer to Care 291
Clock 70
Clock, 12h/24h mode 78
Closing– From the inside 35– From the outside 32
Clothes hooks 138
Cockpit 12
Cold start, refer to Starting the engine 60
Combination instrument, refer to Instrument cluster 14
Combination switch, refer to Turn signal/high beams/
headlamp flasher 64
Combination switch, refer to Washer/wiper system 65
Comfort Access
– Battery replacement 39
Comfort area, refer to Around
the center console 16
Compact wheel, inflation pressure 262
Compartment for remote control, refer to Ignition
lock 59
Compartments, refer to Stor‐ age compart‐
ments 137, 138
Compass, digital 131
Computer 72
Computer, displaying infor‐ mation 72
Computer, displays on the Control Display 73
Seite 310ReferenceEverything from A to Z310
Online Edition for Part no. 01 40 2 910 876 - VII/13