2013 BMW X5 XDRIVE 35I SPORT ACTIVITY towing capacity
[x] Cancel search: towing capacityPage 151 of 345

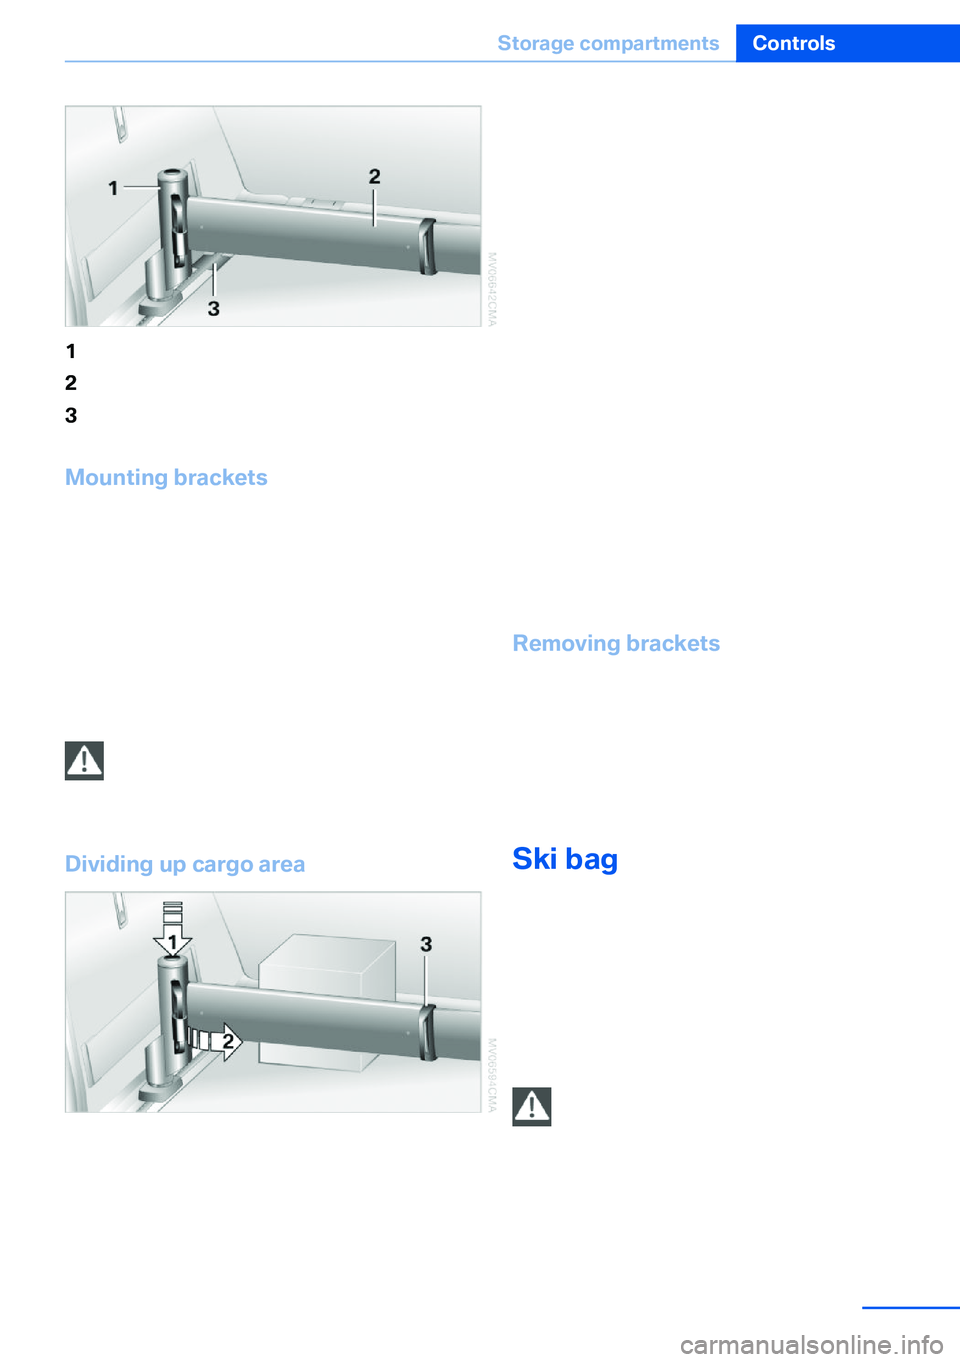
1Brackets2Telescopic rail3Notch in the cargo area rail
Mounting brackets
The two brackets are connected with a tele‐
scopic rail.
1.Insert the brackets at the respective notch
in the rail on the cargo area floor.2.Press down the brackets to push them into
the desired position.3.Check the firm seating of the brackets.
They must be clearly heard to engage.
No cargo on brackets
Do not lay cargo on the brackets, as oth‐
erwise they could be unlocked.◀
Dividing up cargo area
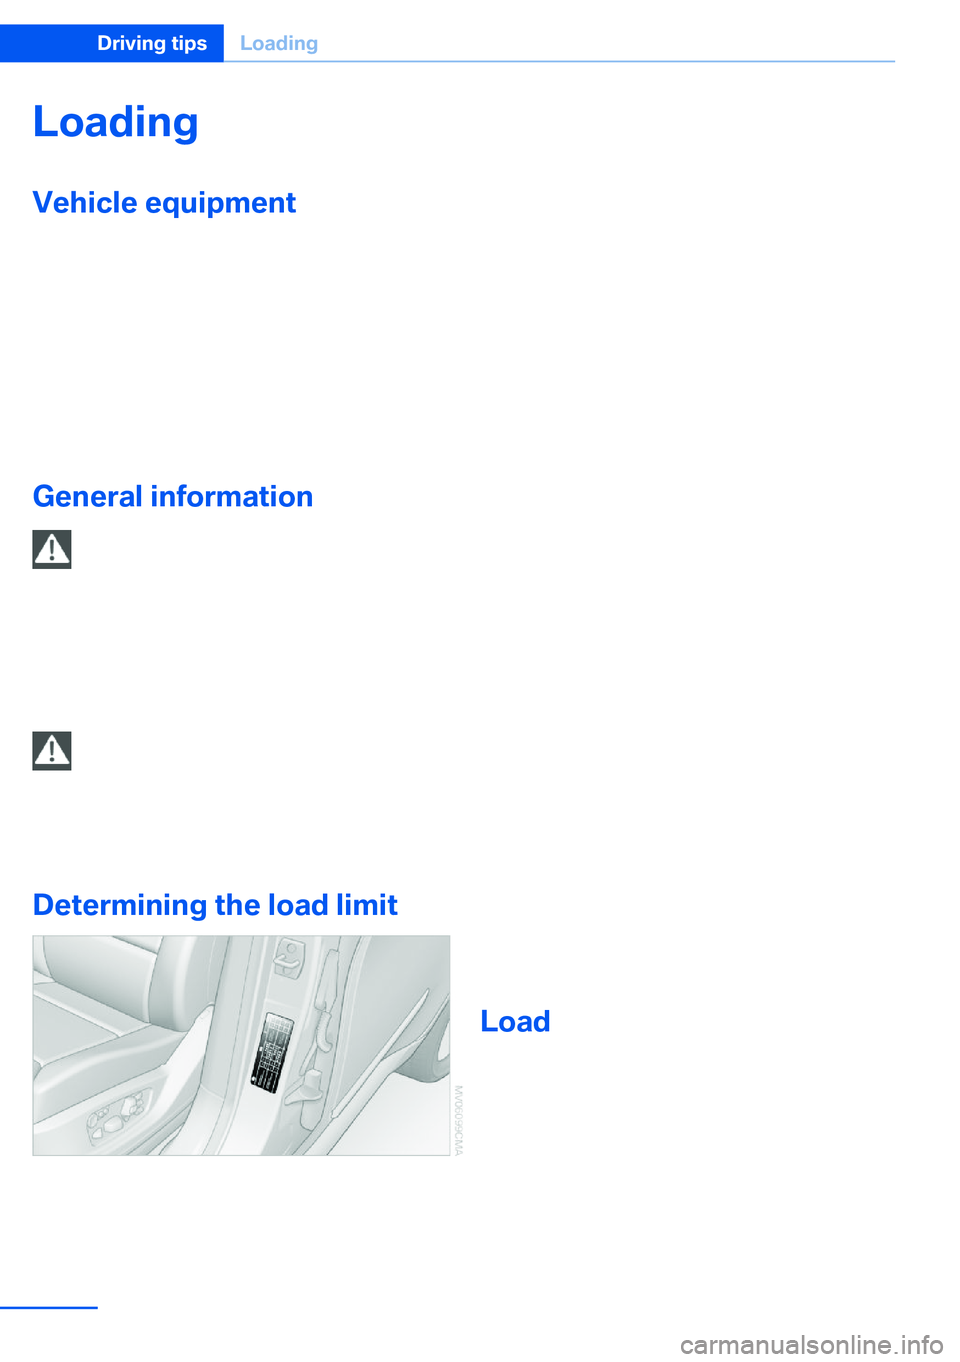
The cargo can be positioned as follows:
▷Between the rear seat backrest and the
telescopic rail▷Between the telescopic rail and the retain‐
ing strapPositioning cargo between telescopic rail and
retaining strap:1.Lay the cargo on the telescopic rail. Press
the button, arrow 1, and route the retaining
strap around the cargo, arrow 2.2.Hook the retaining strap into the mount 3
on the telescopic rail.3.Press the button of the bracket, arrow 1.
The retaining strap is tensioned.
It is also possible to hook the two retaining
straps onto each other.
When the adaptive fixing system is no longer
needed, unhook the retaining strap and guide
it back into the bracket holding the hook to
prevent damage and injury.
Then slide the fastening system toward the
front in order to permit the best possible use of
the cargo area.
Removing brackets Press down the brackets, slide them up to the
notches of the rails and remove them.
Depending on the vehicle's equipment, the adaptive fixing system can be stored under thecargo floor panel in the cargo area.
Ski bag
The ski bag is designed for safe, clean trans‐
port of up to 4 pairs of standard skis or up to
2 snowboards.
Skis with a length of up to 6 ft/2.10 m can be
stowed using the ski bag. When stowing skis
with a length of 6 ft/2.10 m, the capacity of the
ski bag is reduced as the bag narrows.
Folding in display screen
Before loading the ski bag, fold in the
display screen of the DVD systems in the rear;
otherwise, the display screen could be dam‐
aged.◀
Seite 151Storage compartmentsControls151
Online Edition for Part no. 01 40 2 918 395 - III/13
Page 160 of 345

LoadingVehicle equipment
This chapter describes all series equipment as
well as country-specific and special equipment
offered for this model series.Therefore, it also
describes equipment that may not be found in
your vehicle, for instance due to the selected
special equipment or the country version. This
also applies to safety-related functions and
systems.
General information Overloading the vehicle
To avoid exceeding the approved carry‐
ing capacity of the tires, never overload the ve‐
hicle. Overloading can lead to overheating and
increases the rate at which damage develops
inside the tires. This could result in a sudden
loss of tire inflation pressure.◀
No fluids in the cargo area
Make sure that fluids do not leak into the
cargo area; otherwise, the vehicle may be dam‐
aged.◀
Determining the load limit1.Locate the following statement on your ve‐
hicle’s placard:▷The combined weight of occupants
and cargo should never exceed XXX kgor YYY lbs. Otherwise, damage to the
vehicle and unstable driving situations
may result.2.Determine the combined weight of the
driver and passengers that will be riding in
your vehicle.3.Subtract the combined weight of the driver
and passengers from XXX kilograms or
YYY pounds.4.The resulting figure equals the available
amount of cargo and luggage load ca‐
pacity.
For example, if the YYY amount equals
1,400 lbs and there will be five 150 lbs pas‐
sengers in your vehicle, the amount of
available cargo and luggage load capacity
is 650 lbs: 1,400 lbs minus 750 lbs =
650 lbs.5.Determine the combined weight of lug‐
gage and cargo being loaded on the vehi‐
cle. That weight may not safely exceed the
available cargo and luggage load capacity
calculated in Step 4.6.If your vehicle will be towing a trailer, load
from your trailer will be transfered to your
vehicle. Consult the manual for transport‐
ing a trailer to determine how this may re‐
duce the available cargo and luggage load
capacity of your vehicle.
Load
BMW X5:
Seite 160Driving tipsLoading160
Online Edition for Part no. 01 40 2 918 395 - III/13
Page 335 of 345

External temperature display,changing the units of meas‐
ure, changing the units of
measure on the Control Dis‐
play 88
External temperature warn‐ ing 79
Externel temperature dis‐ play 79
Eyes for securing cargo 162
F
Fader 190
Failure messages, refer to Check Control 85
False alarm– Avoiding unintentional
alarms 43– Ending an alarm 43
Fastening safety belts, refer
to Safety belts 54
Fault messages, refer to Check Control 85
Filling capacities 321
Filter, refer to Microfilter/acti‐ vated-charcoal filter 135
Fine wood, care 314
First aid kit 308
Fitting for towing 310
Fixing system, adaptive 150
Flashing when locking/ unlocking 33
Flat Tire Monitor FTM 97
Flat Tire Monitor FTM, snow chains 287
Flat tire, run-flat tires 286
Flat tire, Tire Pressure Moni‐ tor TPM 99
Flat tire, warning lamp 98, 100
Flat tire, wheel change 302
Flooding, refer to Driving through water 157
Floor carpet, care 315
Floor mats, care 315
FM/AM station 192
Fog on windows, remov‐
ing 132
Foldable rear seat back‐ rest 146
Foot brake 157
Footwell lamps, refer to Inte‐ rior lamps 94
For your own safety 6
Four-wheel drive, refer to xDrive 107
Front airbags 95
Front fog lamps 93
Front fog lamps, bulb replace‐ ment 297, 300
Front fog lamps, indicator lamp 93
FTM Flat Tire Monitor 97
Fuel 270
Fuel– Refer to Average fuel con‐
sumption 82
Fuel, additives 270
Fuel, average consump‐ tion 82
Fuel cap 268
Fuel cap, closing 268
Fuel consumption display
– Average fuel consump‐
tion 82
Fuel consumption display,
current fuel consump‐
tion 80
Fuel-efficient driving, refer to Current fuel consump‐
tion 80
Fuel filler flap, closing 268
Fuel filler flap, opening 268
Fuel filler flap, unlocking in case of an electrical mal‐
function 268
Fuel gauge 81
Fuel, saving 164
Fuel tank capacity, refer to Filling capacities 321
Fuel tank contents, refer to Filling capacities 321
Fuel tank, refer to Filling ca‐
pacities 321
Fuse 305
G
Garage door opener, refer to Universal Garage Door
Opener 139
Gasoline 270
Gasoline gauge, refer to Fuel gauge 81
Gasoline quality 270
Gas station recommenda‐ tion 181
Gear change, automatic transmission with Step‐
tronic 77
Gear change, via shift pad‐ dles 77
General driving notes 156
Glass sunroof, closing 47
Glass sunroof, electric– Convenient operation 33– Remote control 33
Glass sunroof, initializing 48
Glass sunroof, opening 47
Glass sunroof, pinch protec‐ tion 47
Glass sunroof, power fail‐ ure 48
Glass sunroof, refer to Panor‐ amic glass sunroof 45
Glass sunroof, tilting 47
Glove compartment 147
Glove compartment, light‐ ing 147
GPS navigation, refer to Navi‐ gation system 168
Gross vehicle weight, refer to Weights 320
H
Handbrake, refer to Parking brake 69
Seite 335Everything from A to ZReference335
Online Edition for Part no. 01 40 2 918 395 - III/13
Page 340 of 345

Remote control– Battery replacement 42– Comfort Access 40– Garage door opener 139– Malfunction 34, 41– Tailgate 33– Universal 139
Remote control, rear DVD
system 221
Remote control, removing from the ignition lock 67
Remote control, service data 293
Remote inquiry 242
Replacement fuse 305
Replacement remote con‐ trol 30
Replacing wheels/tires 285
Reporting safety defects 8
Reserve warning, refer to Fuel gauge 81
Reservoir for washer fluid, re‐ fer to Washer fluid reser‐
voir 75
Resetting, Tire Pressure Monitor TPM 100
Residual heat 134
Restraining systems
– Refer to Safety belts 54
Restraint systems for chil‐
dren 61
Retaining straps, securing cargo 162
Retreaded tires 286
Rim cleaner, care 314
Road, avoiding 179
Road detour 179
Roadside Assistance 262
Roadside parking lamps 92
Roller sunblinds 45
RON gasoline quality 270
RON, refer to Fuel qual‐ ity 270
Roof load capacity 320
Roof-mounted luggage rack 162
Rope, refer to Towing 310
Route 180
Route criteria, route 179
Route, displaying 180
Route section, bypass‐ ing 180
RSC Runflat System Compo‐ nent, refer to Run-flat
tires 286
Rubber components, care 314
Run-flat tires 286
Run-flat tires, tire inflation pressure 275
Running lights, refer to Park‐ ing lamps/low beams 90
S Safe braking 157
Safety 6
Safety belts 54
Safety belts– Damage 55
Safety belts, care 314
Safety belts, indicator/warn‐ ing lamp 55
Safety belts, reminder 55
Safety switch for rear win‐ dows 44
Safety systems
– Safety belts 54
Safety systems, airbags 95
Safety tires, refer to Run-flat tires 286
Satellite radio 194
Saving fuel 164
Scale, changing during navi‐ gation 182
Screen, folding open/closed, rear DVD system 220
Screen, refer to Control Dis‐ play 19
Search, refer to BMW On‐ line 262
Seat adjustment, electric 50
Seat adjustment, manual 49
Seat and mirror memory 57
Seat belts– Refer to Safety belts 54
Seat heating 52, 53
Seat heating, rear 52
Seats
– Adjusting electrically 50– Heating 52– Memory, refer to Seat and
mirror memory 57– Sitting safely 49– Storing the setting, refer to
Seat and mirror memory 57– Ventilation, refer to Active
seat ventilation and seat
heating 53
Seats, adjusting 49
Seats, backrest width 50
Seats in the rear 51
Seats, shoulder support 50
2nd row seats 51
Selector lever, automatic transmission with Step‐
tronic 76
Selector lever lock, releas‐ ing 76
Self-leveling suspension 110
Sensors, care 315
Service and warranty 7
Service data in the remote control 293
Service interval display, refer to Condition Based Service
CBS 293
Service interval display, refer to Service requirements 83
Service requirements 83
Service requirements, CBS Condition Based Serv‐
ice 293
Service, Roadside Assis‐ tance 308
Settings, clock, 12h/24h mode 87
Settings, configuring, refer to Personal Profile 30
Settings, DVD 203
Seite 340ReferenceEverything from A to Z340
Online Edition for Part no. 01 40 2 918 395 - III/13