2013 BMW X5 XDRIVE 35I service
[x] Cancel search: servicePage 305 of 345

▷When the vehicle has not been driven for
more than one month.
Starting aid terminals
Only charge using the starting aid terminals,
refer to page 309, in the engine compartment
while the engine is switched off.
Power failure
After a temporary power loss, some equipment
needs to be reinitialized.
Individual settings need to be reprogrammed:
▷Seat and mirror memory: store the posi‐
tions again, refer to page 57.▷Time: update, refer to page 87.▷Date: update, refer to page 87.▷Radio station: save again, refer to
page 192.▷Navigation system: wait for the navigation
system to be operational.▷Glass sunroof/panoramic glass sunroof: it
may only be possible to raise the roof.
Have the system initialized by the service
center.▷Digital compass: recalibrate, refer to
page 141.▷Active steering: the system automatically
initializes for a short time as you drive. Dur‐
ing this time, the system is deactivated, re‐
fer to page 110.▷xDrive: the system automatically initializes
as you drive. During this time, indicator
lamps light up. If the lamps do not disap‐
pear during the current trip, have the sys‐
tem checked.
Disposing of old batteries
Have old batteries disposed of by your
service center or bring them to a recy‐
cling center.
Maintain the battery in an upright position for
transport and storage. Secure the battery so
that it does not tip over during transport.
Fuses
Replacing fuses
Never attempt to repair a blown fuse and
do not replace a defective fuse with a substi‐
tute of another color or amperage rating; this
could lead to a circuit overload, ultimately re‐
sulting in a fire in the vehicle.◀
In interior The fuses are located in the front passenger
footwell on the underside of the instrument
cluster.1.Unscrew screws, refer to arrows, of foot‐
well trim panel.2.Lay the trim panel in the footwell.3.Release the screw, arrow 1, and fold the
fuse carrier down, arrow 2.4.Replace the fuse concerned.5.Installation is carried out in the reverse or‐
der of removal. Ensure correct and secure
attachment of the footwell trim panel in the
process.Seite 305Replacing componentsMobility305
Online Edition for Part no. 01 40 2 918 395 - III/13
Page 307 of 345

Breakdown assistanceVehicle equipment
This chapter describes all series equipment as
well as country-specific and special equipment
offered for this model series.Therefore, it also
describes equipment that may not be found in
your vehicle, for instance due to the selected
special equipment or the country version. This
also applies to safety-related functions and
systems.
Hazard warning flashers
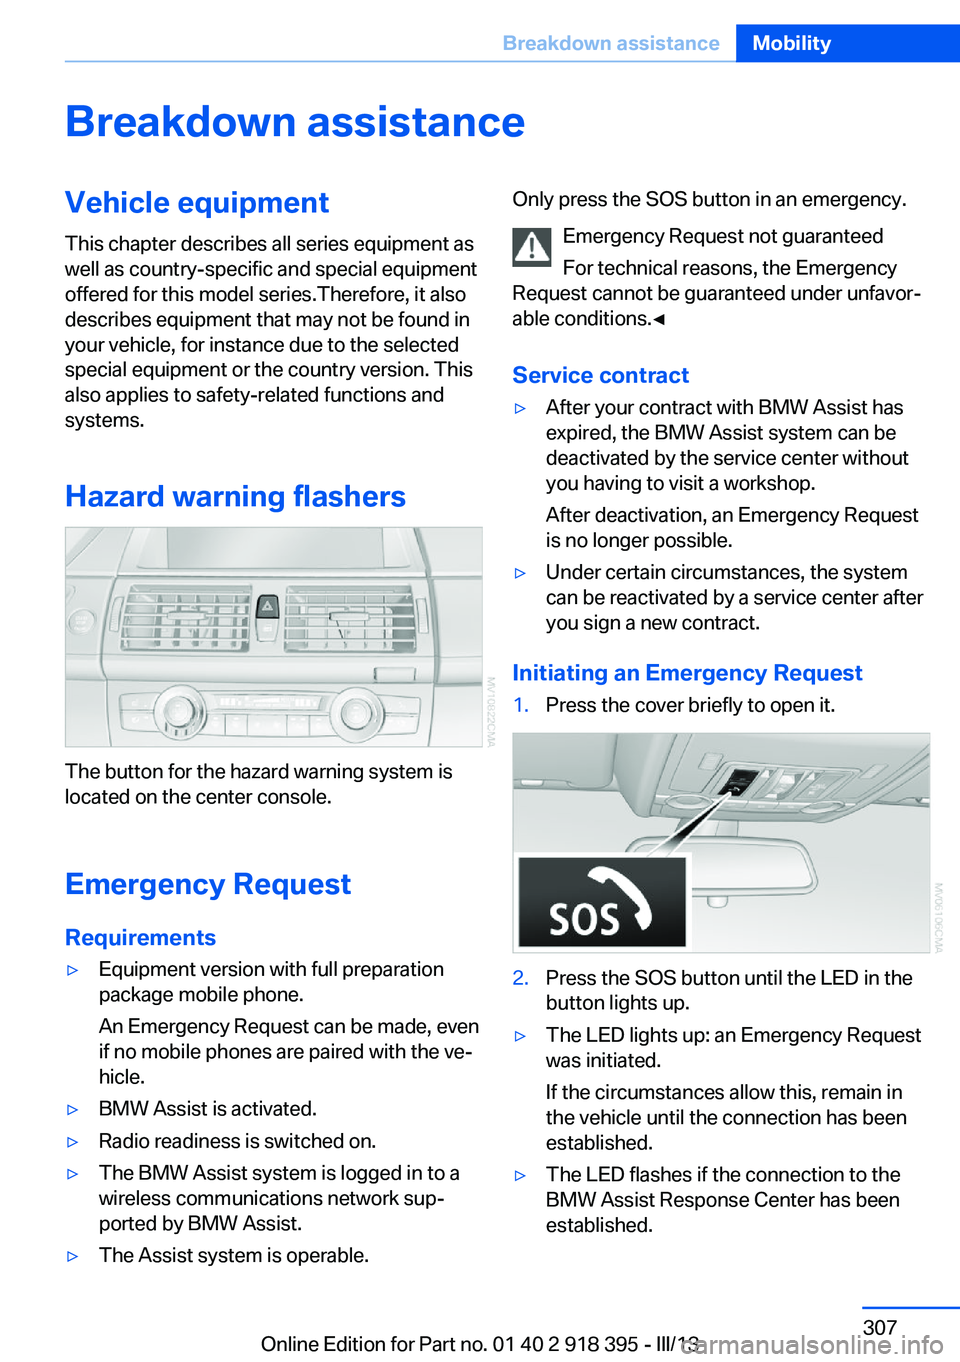
The button for the hazard warning system is
located on the center console.
Emergency RequestRequirements
▷Equipment version with full preparation
package mobile phone.
An Emergency Request can be made, even
if no mobile phones are paired with the ve‐
hicle.▷BMW Assist is activated.▷Radio readiness is switched on.▷The BMW Assist system is logged in to a
wireless communications network sup‐
ported by BMW Assist.▷The Assist system is operable.Only press the SOS button in an emergency.
Emergency Request not guaranteed
For technical reasons, the Emergency
Request cannot be guaranteed under unfavor‐
able conditions.◀
Service contract▷After your contract with BMW Assist has
expired, the BMW Assist system can be
deactivated by the service center without
you having to visit a workshop.
After deactivation, an Emergency Request
is no longer possible.▷Under certain circumstances, the system
can be reactivated by a service center after
you sign a new contract.
Initiating an Emergency Request
1.Press the cover briefly to open it.2.Press the SOS button until the LED in the
button lights up.▷The LED lights up: an Emergency Request
was initiated.
If the circumstances allow this, remain in
the vehicle until the connection has been
established.▷The LED flashes if the connection to the
BMW Assist Response Center has been
established.Seite 307Breakdown assistanceMobility307
Online Edition for Part no. 01 40 2 918 395 - III/13
Page 308 of 345

Once the BMW Response Center has re‐
ceived your Emergency Request, the BMW
Response Center contacts you and takes
further steps to help you.
Even if you are unable to respond, the
BMW Response Center can take further
steps to help you under certain circum‐
stances.
For this purpose, data that are used to de‐
termine the necessary rescue measures,
such as the current position of the vehicle
if it can be established, are transmitted to
the BMW Response Center.▷If the LED is flashing but the BMW Re‐
sponse Center cannot be heard on the
hands-free system, the hands-free system
may be malfunctioning. However, the
BMW Response Center may still be able to
hear you.
Initiating an Emergency Request
automatically
Under certain conditions, an Emergency Re‐
quest is automatically initiated immediately af‐
ter a severe accident. Automatic Collision Noti‐
fication is not affected by pressing the SOS
button.
Roadside Assistance
Service availability Roadside Assistance can be reached around
the clock in many countries. You can obtain as‐
sistance there in the event of a vehicle break‐
down.
Roadside Assistance The Roadside Assistance, refer to page 262,
phone number can be viewed on the iDrive or a
connection to Roadside Assistance can be es‐
tablished directly.
Warning triangle
The warning triangle is located in the cargo
area.
First aid kit
The first aid kit is located in a storage compart‐
ment on the right side in the cargo area.
Some of the articles contained in the first aid
pouch have a limited service life.
Check the expiration dates of the contents
regularly and replace any items promptly.
Jump-starting
Notes
If the battery is discharged, an engine can be started using the battery of another vehicle
and two jumper cables. Only use jumper ca‐ bles with fully insulated clamp handles.
To prevent personal injury or damage to both
vehicles, adhere strictly to the following proce‐
dure.
Do not touch live parts
To avoid the risk of potentially fatal in‐
jury, always avoid all contact with electrical
components while the engine is running.◀
Preparation1.Check whether the battery of the other ve‐
hicle has a voltage of 12 volts and approxi‐
mately the same capacitance in Ah. This
information can be found on the battery.2.Switch off the engine of the assisting vehi‐
cle.3.Switch off any electronic systems/power
consumers in both vehicles.Seite 308MobilityBreakdown assistance308
Online Edition for Part no. 01 40 2 918 395 - III/13
Page 310 of 345

No additional passengers
Do not transport any passengers other
than the driver in a vehicle that is being
towed.◀
Transporting your vehicle
Note Your vehicle is not permitted to be towed.
Therefore, contact a service center in the
event of a breakdown.
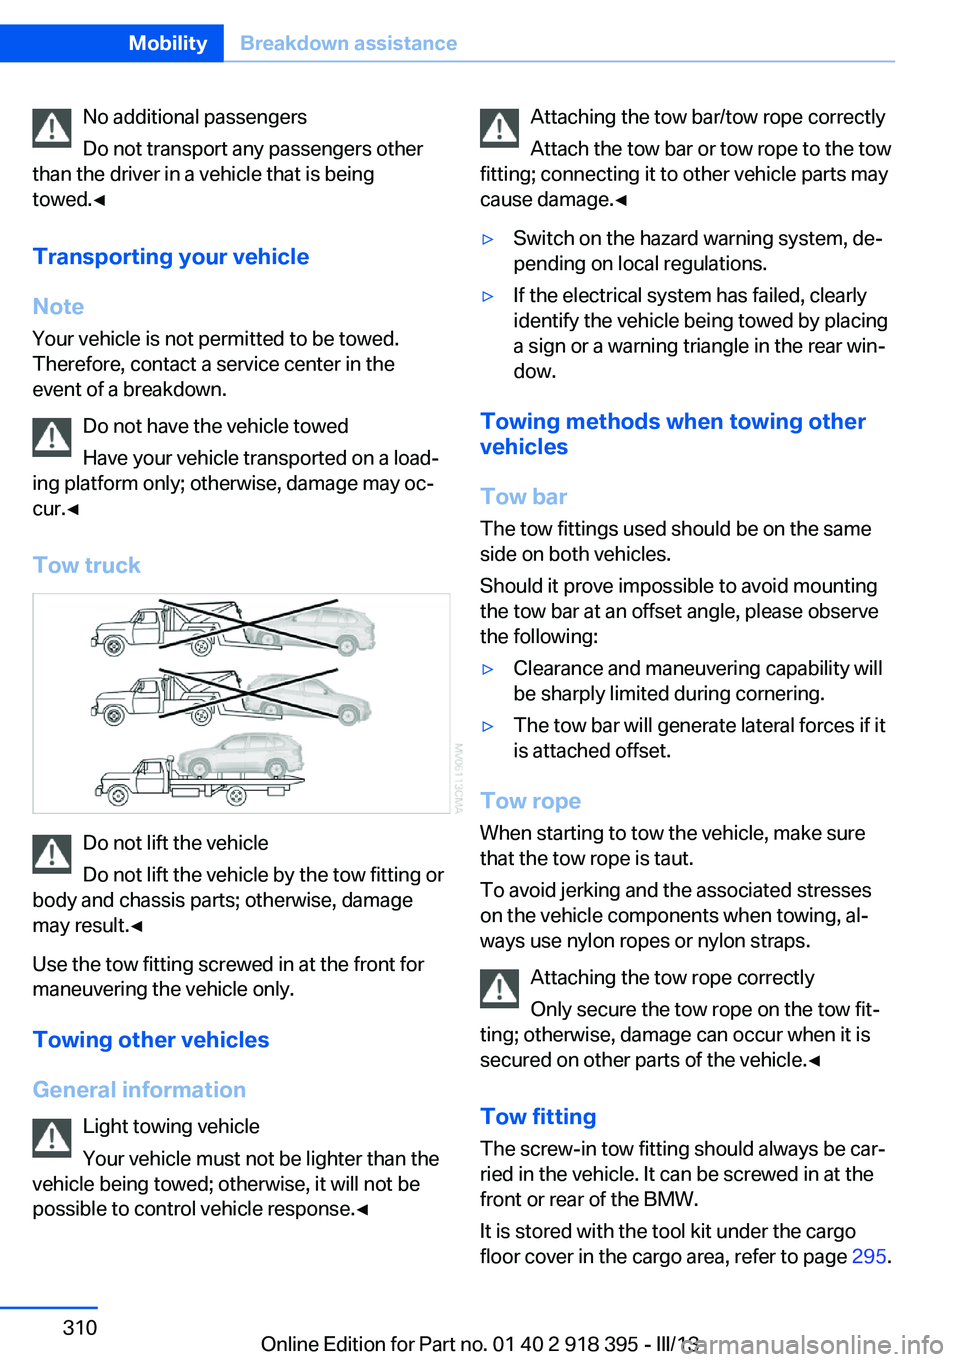
Do not have the vehicle towed
Have your vehicle transported on a load‐
ing platform only; otherwise, damage may oc‐
cur.◀
Tow truck
Do not lift the vehicle
Do not lift the vehicle by the tow fitting or
body and chassis parts; otherwise, damage
may result.◀
Use the tow fitting screwed in at the front for
maneuvering the vehicle only.
Towing other vehicles
General information Light towing vehicle
Your vehicle must not be lighter than the
vehicle being towed; otherwise, it will not be
possible to control vehicle response.◀
Attaching the tow bar/tow rope correctly
Attach the tow bar or tow rope to the tow
fitting; connecting it to other vehicle parts may
cause damage.◀▷Switch on the hazard warning system, de‐
pending on local regulations.▷If the electrical system has failed, clearly
identify the vehicle being towed by placing
a sign or a warning triangle in the rear win‐
dow.
Towing methods when towing other
vehicles
Tow bar The tow fittings used should be on the same
side on both vehicles.
Should it prove impossible to avoid mounting
the tow bar at an offset angle, please observe
the following:
▷Clearance and maneuvering capability will
be sharply limited during cornering.▷The tow bar will generate lateral forces if it
is attached offset.
Tow rope
When starting to tow the vehicle, make sure
that the tow rope is taut.
To avoid jerking and the associated stresses
on the vehicle components when towing, al‐
ways use nylon ropes or nylon straps.
Attaching the tow rope correctly
Only secure the tow rope on the tow fit‐
ting; otherwise, damage can occur when it is
secured on other parts of the vehicle.◀
Tow fitting
The screw-in tow fitting should always be car‐
ried in the vehicle. It can be screwed in at the
front or rear of the BMW.
It is stored with the tool kit under the cargo
floor cover in the cargo area, refer to page 295.
Seite 310MobilityBreakdown assistance310
Online Edition for Part no. 01 40 2 918 395 - III/13
Page 313 of 345

Transmission position P will be engaged:▷Automatically after approx. 30 minutes.▷When the remote control is removed from
the ignition lock.
Mixed tires
Note the vehicle width
Before driving into a car wash, make sure
that the vehicle width is not too large for the
car wash, as otherwise the vehicle and the car
wash could be damaged.◀
Headlamps
▷Do not rub dry and do not use abrasive or
caustic cleansers.▷Soak areas that have been soiled e.g. due
to insects, with shampoo and wash off with
water.▷Thaw ice with de-icing spray; do not use an
ice scraper.
After washing the vehicle
After washing the vehicle, apply the brakes
briefly to dry them; otherwise, braking action
can be reduced and corrosion of the brake
discs can occur.
Fully remove any residue from the windows to
prevent obstruction of view from streaking,
wiping noises, and wiper wear.
Vehicle careCar care productsBMW recommends using cleaning and care
products from BMW, since these have been
tested and approved.
Car care and cleaning products
Follow the instructions on the container.
When cleaning the interior, open the doors or
windows.
Only use products intended for cleaning vehi‐
cles.
Cleansers can contain substances that are
dangerous and harmful to your health.◀
Vehicle paint
Regular care contributes to driving safety and value retention. Environmental influences in
areas with high air pollution or natural contami‐
nants, such as tree resin or pollen, can have an
impact on the vehicle paint. Tailor the fre‐
quency and extent of your car care to these in‐
fluences.
Immediately remove aggressive substances,
such as spilled fuel, oil, grease, or bird drop‐
pings, to prevent damage to or discoloration of
the paintwork.
Leather care
Remove dust from the leather often, using a
cloth or vacuum cleaner.
Otherwise, particles of dust and road grime
chafe in pores and folds, and lead to increased
wear and premature degradation of the leather
surface.
To guard against discoloration, such as from
clothing, provide leather care roughly every
two months.
Clean light-colored leather more frequently as
dust and dirt are more noticeable.
Use leather care products; otherwise, dirt and
grease will gradually break down the protective
layer of the leather surface.
Suitable care products are available from the
service center.
Upholstery material care Vacuum regularly with a vacuum cleaner.
If they are very dirty, e.g., beverage stains, use
a soft sponge or microfiber cloth with a suita‐
ble interior cleaner.Seite 313CareMobility313
Online Edition for Part no. 01 40 2 918 395 - III/13
Page 315 of 345

Carpets and floor matsNo objects in the area around the pedals
Keep floor mats, carpets, and any other
objects out of the area of motion of the pedals;
otherwise, the function of the pedals could be
impeded while driving
Do not place additional floor mats over existing
mats or other objects.
Only use floor mats that have been approved for the vehicle and can be properly fixed in
place.
Ensure that the floor mats are securely fas‐
tened again when they are returned after being removed, such as for cleaning.◀
Floor mats can be removed from the passen‐
ger compartment for cleaning.
When returning the floor mats, secure them
again to prevent slipping.
If the floor carpets are very dirty, clean with a
microfiber cloth and water or a textile cleaner.
To prevent matting of the carpet, rub back and
forth in the direction of travel only.
Sensors/cameras
To clean sensors or cameras, use a cloth mois‐
tened with a small amount of glass cleaner.
Displays/screens
Clean the displays with an anti-static micro‐
fiber cloth.
Cleaning displays
Do not use chemical or household
cleansers.
Keep all fluids and moisture away from the
unit.
Otherwise, they could affect or damage surfa‐
ces or electrical components.
Avoid pressing too hard when cleaning and do
not use abrasive materials; otherwise, damage
can result.◀Long-term vehicle storage
Your service center can advise you on what to
consider when storing the vehicle for longer
than three months.Seite 315CareMobility315
Online Edition for Part no. 01 40 2 918 395 - III/13
Page 331 of 345

Automatic climate control,automatic air distribu‐
tion 131, 136
Automatic climate control, in rear 135
Automatic climate control in rear, activating on Control
Display 136
Automatic climate control in rear, air supply 136
Automatic climate control in rear, deactivating on Control
Display 136
Automatic climate control in rear, switching off 136
Automatic climate control, switching off 134, 136
Automatic climate control, ventilation in rear 135
Automatic climate control, with 2-zone control 131
Automatic climate control, with 4-zone control 135
Automatic, cruise control 118
Automatic Cruise Con‐ trol 111
Automatic Curb Monitor 58
Automatic headlamp con‐ trol 90, 91
Automatic Hold 70
Automatic Hold, activating 70
Automatic Hold, deactivat‐ ing 70
Automatic Hold, parking 71
Automatic recirculated air control 133
Automatic Soft Closing, doors 35
Automatic Soft Closing, tail‐ gate 36
Automatic tailgate opera‐ tion 37, 38
Automatic transmission with Steptronic 75
Automatic transmission with
Steptronic– Kickdown 75AUTO program with auto‐
matic climate con‐
trol 131 , 136
AUX-IN port 148, 212
Average fuel consumption 82
Average fuel consumption, setting the units 88
Average speed 81
Average speed, refer to Com‐ puter 81
Axle loads, refer to Weights 320
B
Backrest curvature, refer to Lumbar support 50
Backrest width 50
Back seats, adjusting the head restraints 57
Backup camera 122
Backup camera, cleaning 124
Backup camera, obstacle marking 124
Backup camera, pathway lines 123
Backup camera, turning lines 123
Balance 190
Band-aids, refer to First aid kit 308
Bass 190
Battery– Remote control 30
Battery change, remote con‐
trol for rear DVD sys‐
tem 222
Battery disposal 305
Battery, refer to Vehicle bat‐ tery 304
Battery replacement, remote control for vehicle 42
Before entering the car wash 312
Belts, refer to Safety belts 54
Belt tensioners, refer to Safety belts 54
Beverage holder, refer to Cu‐
pholder 149
Black and white map dis‐ play 184
Blower, refer to Air flow rate 132
Bluetooth audio 215
Bluetooth connection, acti‐ vating/deactivating 237
BMW Advanced Diesel 271
BMW Apps 265
BMW EfficientDynamics, re‐ fer to Saving fuel 164
BMW Homepage 6
BMW Internet page 6
BMW maintenance sys‐ tem 293
BMW Online 262
Bottle holder, refer to Cu‐ pholder 149
Brake assistant 105
Brake discs, breaking in 156
Brake fluid, refer to Service requirements 83
Brake force display 104
Brake force distribution, elec‐ tronic 105
Brake lamps, brake force dis‐ play 104
Brake lights, adaptive 104
Brake pads, breaking in 156
Brakes, BMW maintenance system 293
Brakes, parking brake 69
Brakes, service require‐ ments 83
Brake system, BMW mainte‐ nance system 293
Braking, notes 157
Breakdown assistance 308
Breakdown, transporting the vehicle 310
Breaking in 156
Brightness, on the Control Display 88 Seite 331Everything from A to ZReference331
Online Edition for Part no. 01 40 2 918 395 - III/13
Page 333 of 345

Combination instrument, referto Instrument cluster 14
Combination switch, refer to Turn signal/high beams/
headlamp flasher 72
Combination switch, refer to Washer/wiper system 73
Comfort Access– Battery replacement 42
Comfort area, refer to Around
the center console 16
Compact wheel, inflation pressure 275, 276
Compartment for remote control, refer to Ignition
lock 67
Compartments, refer to Stor‐ age compart‐
ments 147, 148
Compass, digital 141
Computer 81
Computer, displaying infor‐ mation 81
Computer, displays on the Control Display 82
Concierge service 261
Condensation on windows, removing 132
Condensation under the vehi‐ cle 158
Condition Based Service CBS 293
Confirmation signals for lock‐ ing/unlocking the vehicle 33
Connecting, mobile phone, refer to Pairing the mobile
phone 237
Consumption, refer to Aver‐ age fuel consumption 82
Contacts 250, 258
Control Display 19
Control Display, care 315
Control Display, setting the brightness 88
Controller, refer to Con‐ trols 18
Controls and displays 12
Controls, rear DVD sys‐
tem 220
Control systems, driving sta‐ bility 105
Convenient operation– Glass sunroof 33– Window 33
Coolant 292
Coolant, checking the level 292
Coolant temperature 80
Cooling function, switching on and off 133
Cooling, maximum 133
Cooling system, refer to Cool‐ ant 292
Cornering Brake Control CBC 105
Corrosion on brake discs 158
Courtesy lamps, refer to Inte‐ rior lamps 94
Cradle for telephone or mo‐ bile phone, refer to Snap-in
adapter 247
Cruise control 118
Cruise control
– Malfunction 119
Cruise control, active 111
Cupholder 149
Curb weight, refer to Weights 320
Current fuel consumption 80
Current location, storing 172
Curve lights, refer to Adaptive Light Control 91
D
Dashboard lighting, refer to Instrument lighting 94
Dashboard, refer to Cock‐ pit 12
Data, technical 318
Date 79
Date, display format 88
Date, retrieving 79
Date, setting 87
Daytime running lights 91
Defroster, rear window 132
Defrosting windows 132
Defrost setting, refer to De‐ frosting windows 132
Destination entry via the ad‐ dress book 172
Destination guidance 179
Destination guidance with in‐ termediate destinations 177
Destination input, naviga‐ tion 170
Diesel exhaust fluid, at low temperatures 272
Diesel exhaust fluid, at mini‐ mum 272
Diesel exhaust fluid, having refilled 272
Diesel exhaust fluid, refilling yourself 272
Diesel particulate filter 157
Digital clock 79
Digital compass 141
Digital radio 193
Dimming mirrors 59
Directional indicators, refer to Turn signals 72
Display in front wind‐ shield 127
Display lighting, refer to In‐ strument lighting 94
Displays and controls 12
Displays, care 315
Displays, cleaning 315
Displays, refer to Instrument cluster 14
Disposal, coolant 292
Disposal, vehicle battery 305
Distance control, refer to Ac‐ tive Cruise Control 111
Distance, selecting, with Ac‐ tive Cruise Control 113
Distance warning, refer to Park Distance Control
PDC 120 Seite 333Everything from A to ZReference333
Online Edition for Part no. 01 40 2 918 395 - III/13