2013 BMW X3 XDRIVE 28I park assist
[x] Cancel search: park assistPage 13 of 211

Automatic headlamp con‐
trol 87
Daytime running lights 87
Adaptive light control 88
High-beam Assistant 88Instrument lighting 896Steering column stalk, leftTurn signal 65High beams, head‐
lamp flasher 65High-beam Assistant 88Roadside parking lamps 87Computer 817Steering wheel buttons, leftStore speed 110Resume speed 111Cruise control on/off, interrupt‐
ing 110Cruise control rocker switch 818Instrument cluster 729Steering wheel buttons, rightEntertainment sourceVolumeVoice activation 23Phone, see user's manual for Nav‐
igation, Entertainment and Com‐
munication.Thumbwheel for selection lists 11010Steering column stalk, rightWindshield wipers 66Rain sensor 67Clean the windshields and head‐
lamps 67Rear window wiper 6711Start/stop the engine and switch
the ignition on/off 60Auto Start/Stop function 6112Horn13Steering wheel heating 5414Adjust steering wheel 5415Open the tailgate 3716Unlock hood 163Seite 13CockpitAt a glance13
Online Edition for Part no. 01 40 2 903 813 - 07 12 490
Page 64 of 211
Inadvertent operation of the accelerator
pedal
Make sure that the accelerator pedal is not op‐
erated unintentionally; otherwise, the vehicle is
set in motion and there is a risk of an accident. ◀
Automatic Hold
The concept
This system assists the driver by automatically
setting and releasing the brake, such as when
moving in stop-and-go traffic.
The vehicle is automatically held in place when
it is stationary.
On inclines, the system prevents the vehicle
from rolling backward when driving away.
For your safety
Under the following conditions, Automatic Hold
is automatically deactivated and the parking
brake is set:
▷The engine is switched off.▷A door is opened and driver's safety belt is
unbuckled while the vehicle is stationary.▷The moving vehicle is brought to a standstill
using the parking brake.
The indicator lamp switches from green
to red and the letters AUTO H go out.
Lower lamp: indicator lamp in Canadian
models.
Before driving away:
▷Release the parking brake manually.▷Reactivate Automatic Hold.
Leaving the vehicle with the engine run‐
ning
Before leaving the vehicle with the engine run‐
ning, engage position P of the automatic trans‐
mission and ensure that the parking brake is set.
Otherwise, the vehicle may begin to roll.◀
Activating
This function can be activated when the driver's
door is closed and the safety belt is fastened,
and while driving.
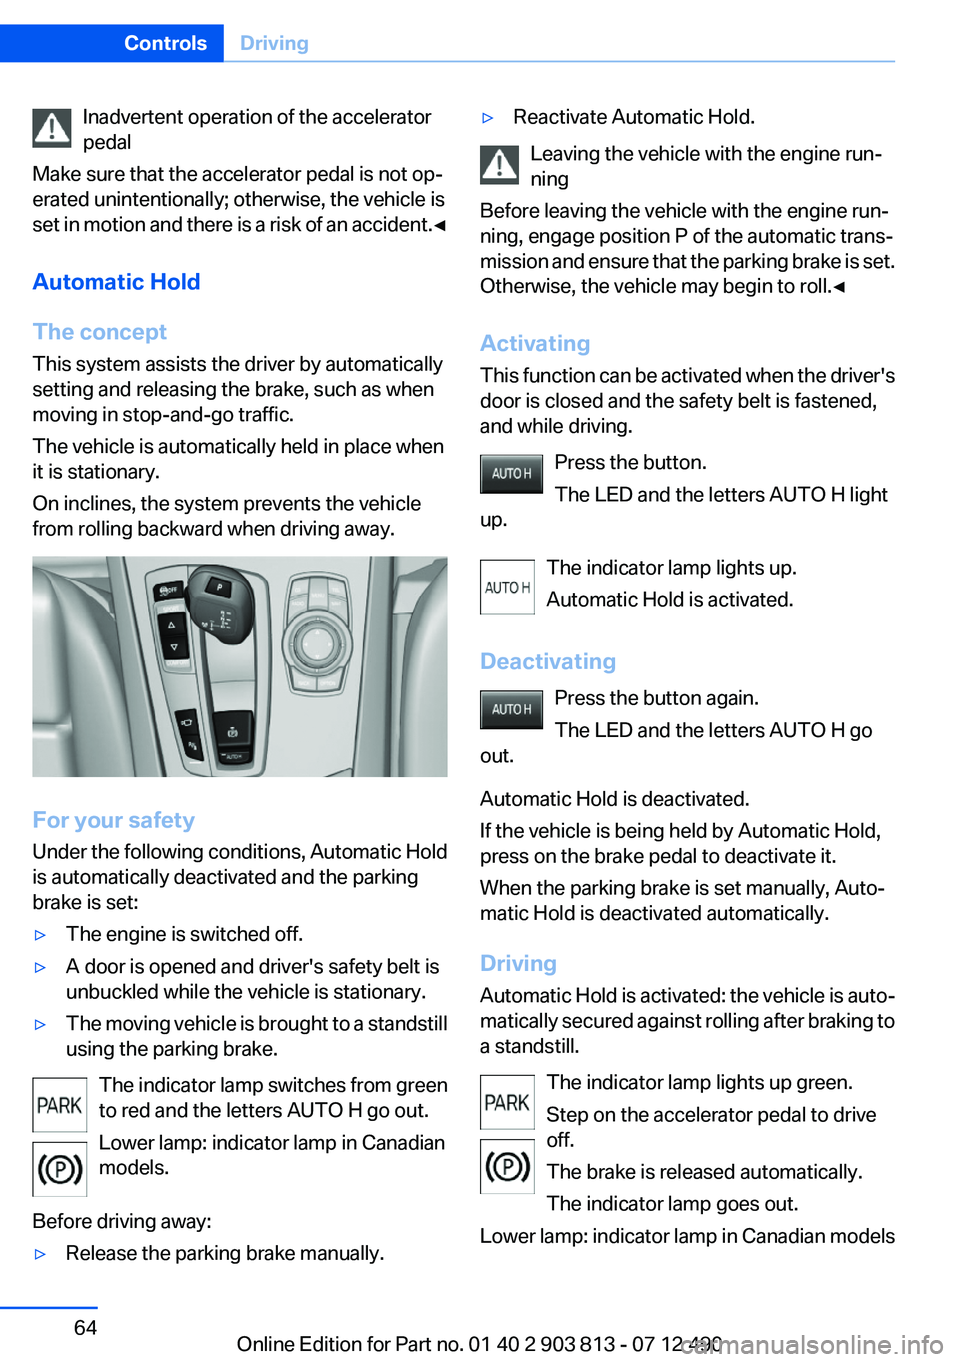
Press the button.
The LED and the letters AUTO H light
up.
The indicator lamp lights up.
Automatic Hold is activated.
Deactivating Press the button again.
The LED and the letters AUTO H go
out.
Automatic Hold is deactivated.
If the vehicle is being held by Automatic Hold,
press on the brake pedal to deactivate it.
When the parking brake is set manually, Auto‐
matic Hold is deactivated automatically.
Driving
Automatic Hold is activated: the vehicle is auto‐
matically secured against rolling after braking to
a standstill.
The indicator lamp lights up green.
Step on the accelerator pedal to drive
off.
The brake is released automatically.
The indicator lamp goes out.
Lower lamp: indicator lamp in Canadian models
Seite 64ControlsDriving64
Online Edition for Part no. 01 40 2 903 813 - 07 12 490
Page 75 of 211
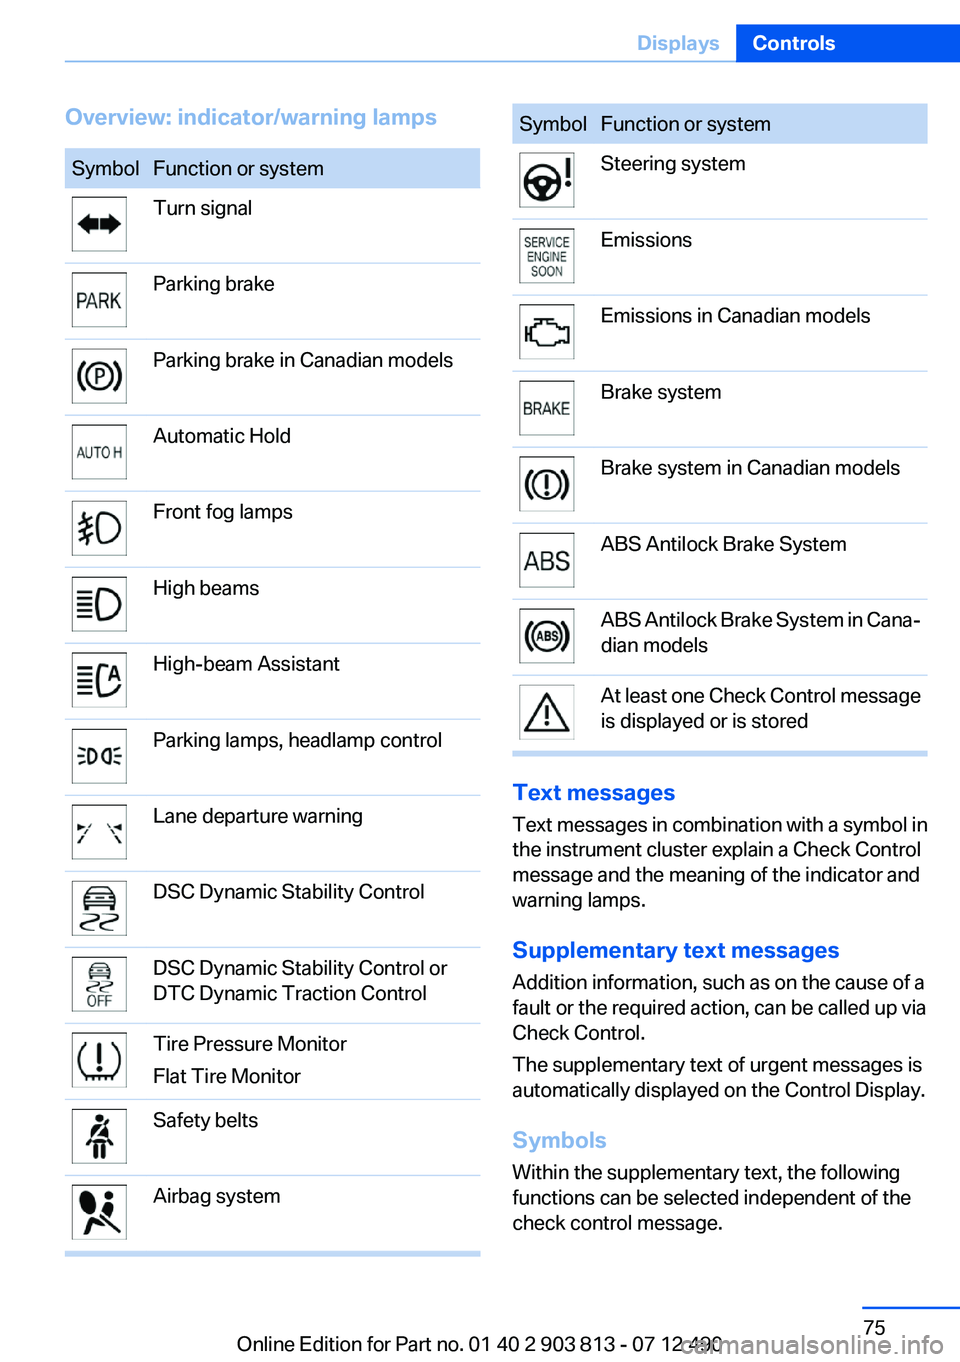
Overview: indicator/warning lampsSymbolFunction or systemTurn signalParking brakeParking brake in Canadian modelsAutomatic HoldFront fog lampsHigh beamsHigh-beam AssistantParking lamps, headlamp controlLane departure warningDSC Dynamic Stability ControlDSC Dynamic Stability Control or
DTC Dynamic Traction ControlTire Pressure Monitor
Flat Tire MonitorSafety beltsAirbag systemSymbolFunction or systemSteering systemEmissionsEmissions in Canadian modelsBrake systemBrake system in Canadian modelsABS Antilock Brake SystemABS Antilock Brake System in Cana‐
dian modelsAt least one Check Control message
is displayed or is stored
Text messages
Text messages in combination with a symbol in
the instrument cluster explain a Check Control
message and the meaning of the indicator and
warning lamps.
Supplementary text messages
Addition information, such as on the cause of a
fault or the required action, can be called up via
Check Control.
The supplementary text of urgent messages is
automatically displayed on the Control Display.
Symbols
Within the supplementary text, the following
functions can be selected independent of the
check control message.
Seite 75DisplaysControls75
Online Edition for Part no. 01 40 2 903 813 - 07 12 490
Page 86 of 211
LampsVehicle equipment
All standard, country-specific and optional
equipment that is offered in the model series is
described in this chapter. Therefore, equipment
is also described that is not available in a vehicle,
e. g., because of the selected optional equip‐
ment or country variant. This also applies for
safety-related functions and systems.
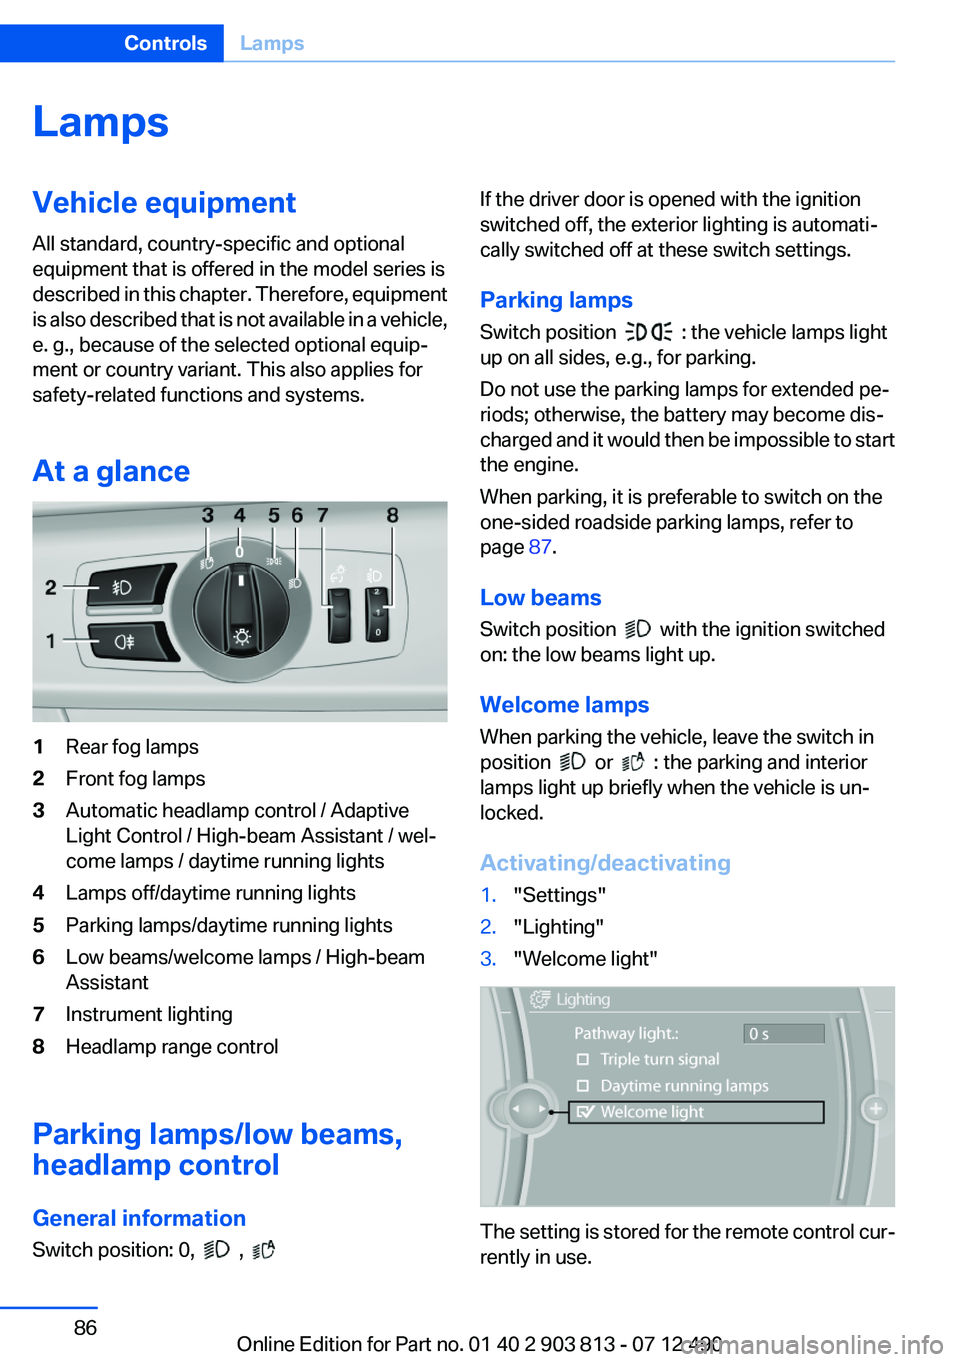
At a glance1Rear fog lamps2Front fog lamps3Automatic headlamp control / Adaptive
Light Control / High-beam Assistant / wel‐
come lamps / daytime running lights4Lamps off/daytime running lights5Parking lamps/daytime running lights6Low beams/welcome lamps / High-beam
Assistant7Instrument lighting8Headlamp range control
Parking lamps/low beams,
headlamp control
General information
Switch position: 0,
,
If the driver door is opened with the ignition
switched off, the exterior lighting is automati‐
cally switched off at these switch settings.
Parking lamps
Switch position
: the vehicle lamps light
up on all sides, e.g., for parking.
Do not use the parking lamps for extended pe‐
riods; otherwise, the battery may become dis‐
charged and it would then be impossible to start
the engine.
When parking, it is preferable to switch on the
one-sided roadside parking lamps, refer to
page 87.
Low beams
Switch position
with the ignition switched
on: the low beams light up.
Welcome lamps
When parking the vehicle, leave the switch in
position
or : the parking and interior
lamps light up briefly when the vehicle is un‐
locked.
Activating/deactivating
1."Settings"2."Lighting"3."Welcome light"
The setting is stored for the remote control cur‐
rently in use.
Seite 86ControlsLamps86
Online Edition for Part no. 01 40 2 903 813 - 07 12 490
Page 89 of 211
Switching the high beams on and off
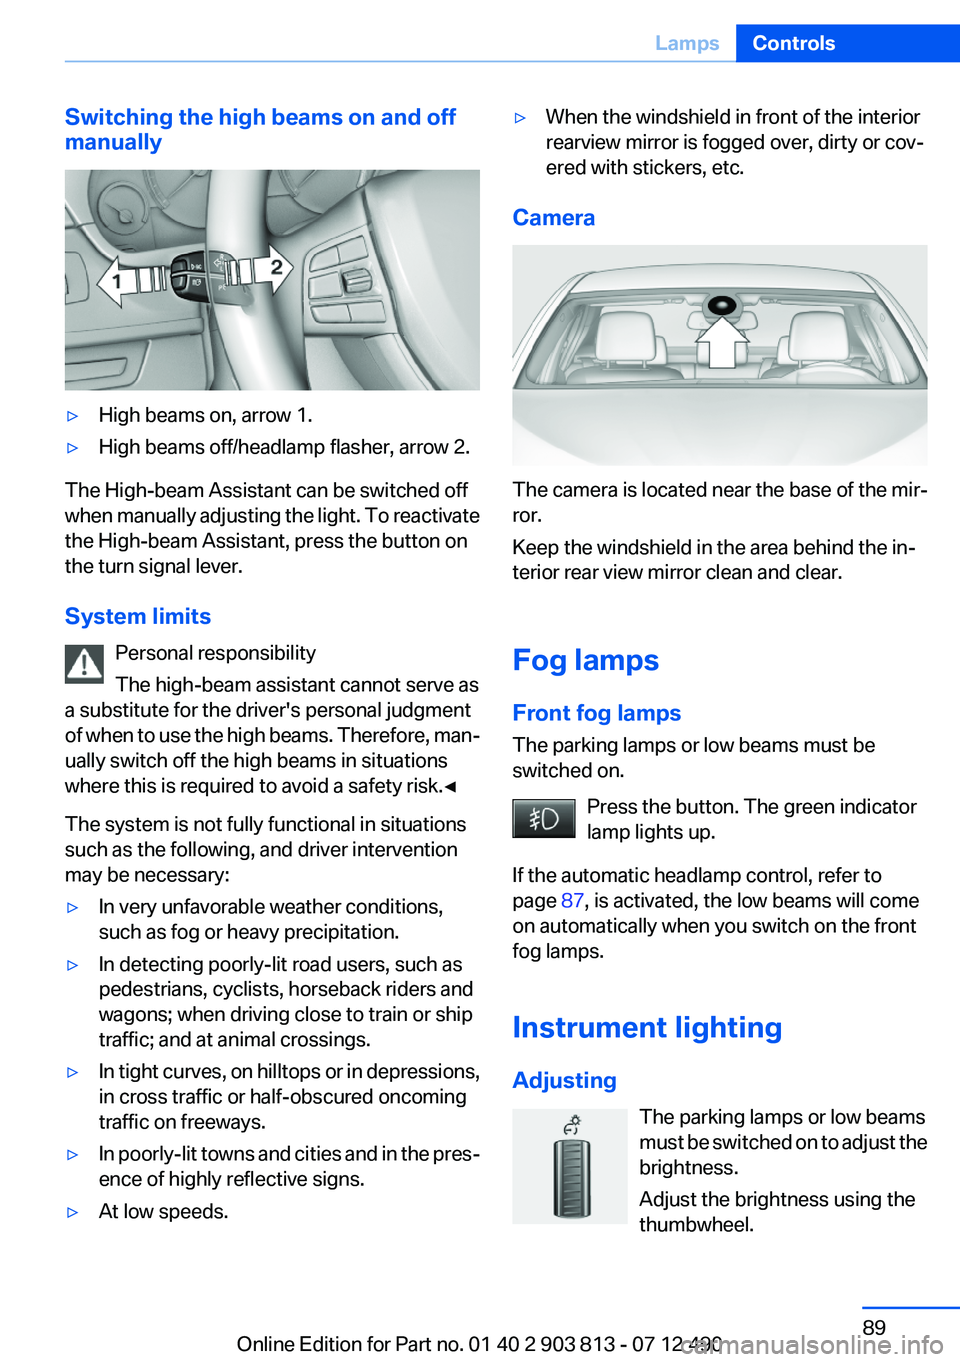
manually▷High beams on, arrow 1.▷High beams off/headlamp flasher, arrow 2.
The High-beam Assistant can be switched off
when manually adjusting the light. To reactivate
the High-beam Assistant, press the button on
the turn signal lever.
System limits Personal responsibility
The high-beam assistant cannot serve as
a substitute for the driver's personal judgment
of when to use the high beams. Therefore, man‐
ually switch off the high beams in situations
where this is required to avoid a safety risk.◀
The system is not fully functional in situations
such as the following, and driver intervention
may be necessary:
▷In very unfavorable weather conditions,
such as fog or heavy precipitation.▷In detecting poorly-lit road users, such as
pedestrians, cyclists, horseback riders and
wagons; when driving close to train or ship
traffic; and at animal crossings.▷In tight curves, on hilltops or in depressions,
in cross traffic or half-obscured oncoming
traffic on freeways.▷In poorly-lit towns and cities and in the pres‐
ence of highly reflective signs.▷At low speeds.▷When the windshield in front of the interior
rearview mirror is fogged over, dirty or cov‐
ered with stickers, etc.
Camera
The camera is located near the base of the mir‐
ror.
Keep the windshield in the area behind the in‐
terior rear view mirror clean and clear.
Fog lamps
Front fog lamps
The parking lamps or low beams must be
switched on.
Press the button. The green indicator
lamp lights up.
If the automatic headlamp control, refer to
page 87, is activated, the low beams will come
on automatically when you switch on the front
fog lamps.
Instrument lighting
Adjusting The parking lamps or low beams
must be switched on to adjust the
brightness.
Adjust the brightness using the
thumbwheel.
Seite 89LampsControls89
Online Edition for Part no. 01 40 2 903 813 - 07 12 490
Page 114 of 211

Malfunction
A Check Control message, refer to page 74, is
displayed in the instrument cluster.
On the Control Display, the areas in front of and
behind the vehicle are shaded. PDC has failed.
Have the system checked.
To ensure full operability:▷Keep the sensors clean and free of ice.▷When using high-pressure washers, do not
spray the sensors for long periods and main‐
tain a distance of at least 12 in/30 cm.
Backup camera
The concept
The backup camera provides assistance in park‐
ing and maneuvering backwards. The area be‐
hind the vehicle is shown on the Control Display.
Notes Check the traffic situation as well
Check the traffic situation around the ve‐
hicle with your own eyes. Otherwise, an accident
could result from road users or objects located
outside the picture area of the backup camera. ◀
At a glance
Button in the vehicle
Backup camera
Camera
The camera lens is located in the handle of the
tailgate. The image quality may be impaired by
dirt.
Clean the lens, refer to page 186.
Switching on/off
Switching on automatically
Select transmission position R with the engine
running.
The backup camera image is displayed if the
system was switched on via the iDrive.
Automatic deactivation during forward
travel
The system switches off when a certain driving
distance or speed is exceeded.
Switch the system back on if necessary.
Switching on/off manually Press the button.
▷On: the LED lights up.▷Off: the LED goes out.
The PDC is shown on the Control Display.
Switch on the backup camera via the iDrive, refer
to page 112.
Switching on the backup camera via the
iDrive
With PDC activated:
"Rear view camera"
Seite 114ControlsDriving comfort114
Online Edition for Part no. 01 40 2 903 813 - 07 12 490
Page 115 of 211
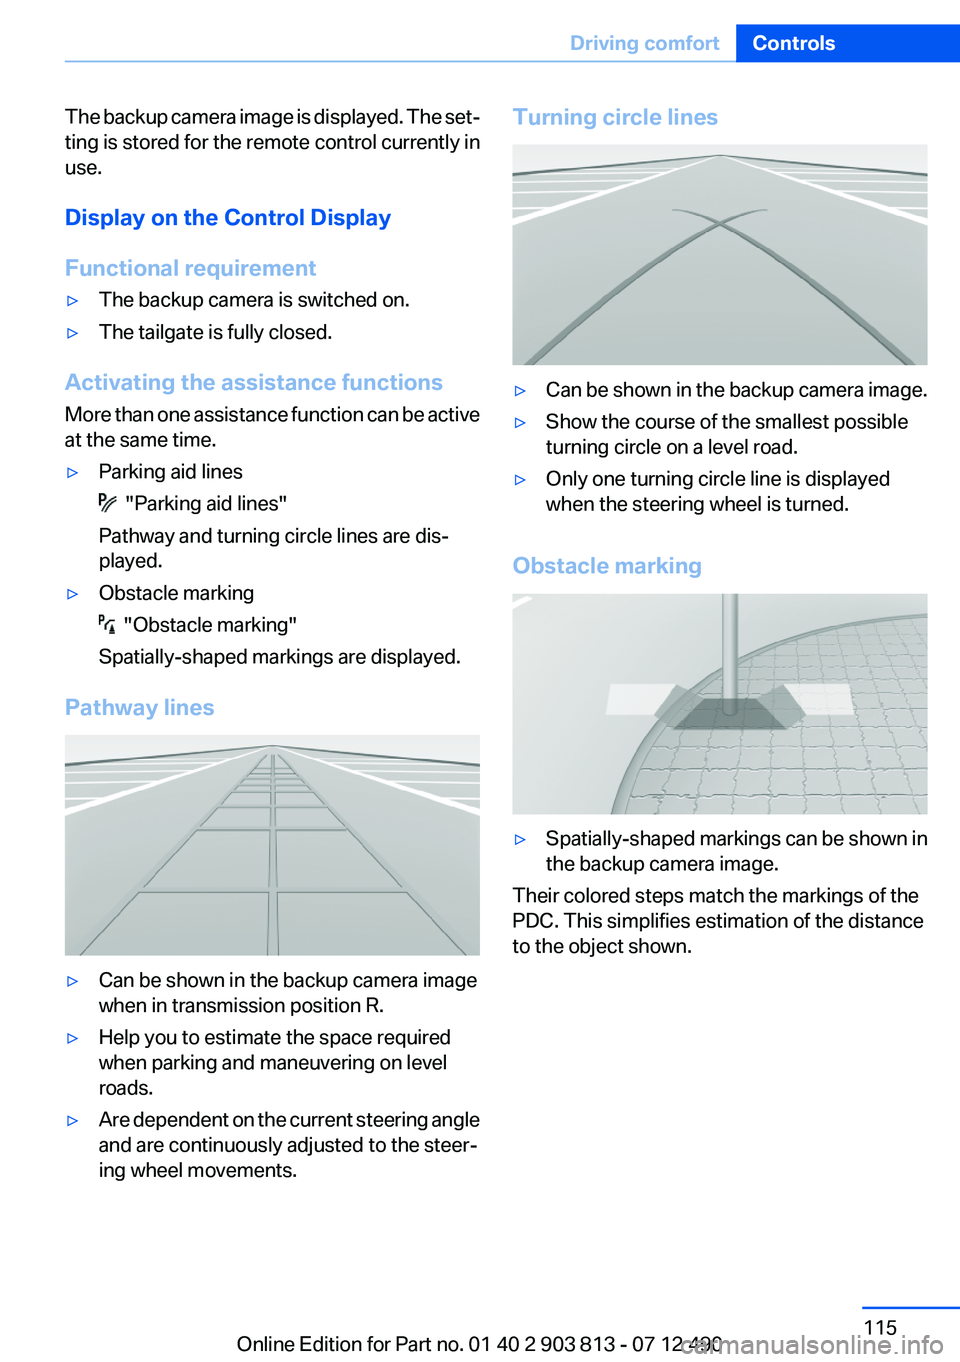
The backup camera image is displayed. The set‐
ting is stored for the remote control currently in
use.
Display on the Control Display
Functional requirement▷The backup camera is switched on.▷The tailgate is fully closed.
Activating the assistance functions
More than one assistance function can be active
at the same time.
▷Parking aid lines
"Parking aid lines"
Pathway and turning circle lines are dis‐
played.
▷Obstacle marking
"Obstacle marking"
Spatially-shaped markings are displayed.
Pathway lines
▷Can be shown in the backup camera image
when in transmission position R.▷Help you to estimate the space required
when parking and maneuvering on level
roads.▷Are dependent on the current steering angle
and are continuously adjusted to the steer‐
ing wheel movements.Turning circle lines▷Can be shown in the backup camera image.▷Show the course of the smallest possible
turning circle on a level road.▷Only one turning circle line is displayed
when the steering wheel is turned.
Obstacle marking
▷Spatially-shaped markings can be shown in
the backup camera image.
Their colored steps match the markings of the
PDC. This simplifies estimation of the distance
to the object shown.
Seite 115Driving comfortControls115
Online Edition for Part no. 01 40 2 903 813 - 07 12 490
Page 116 of 211
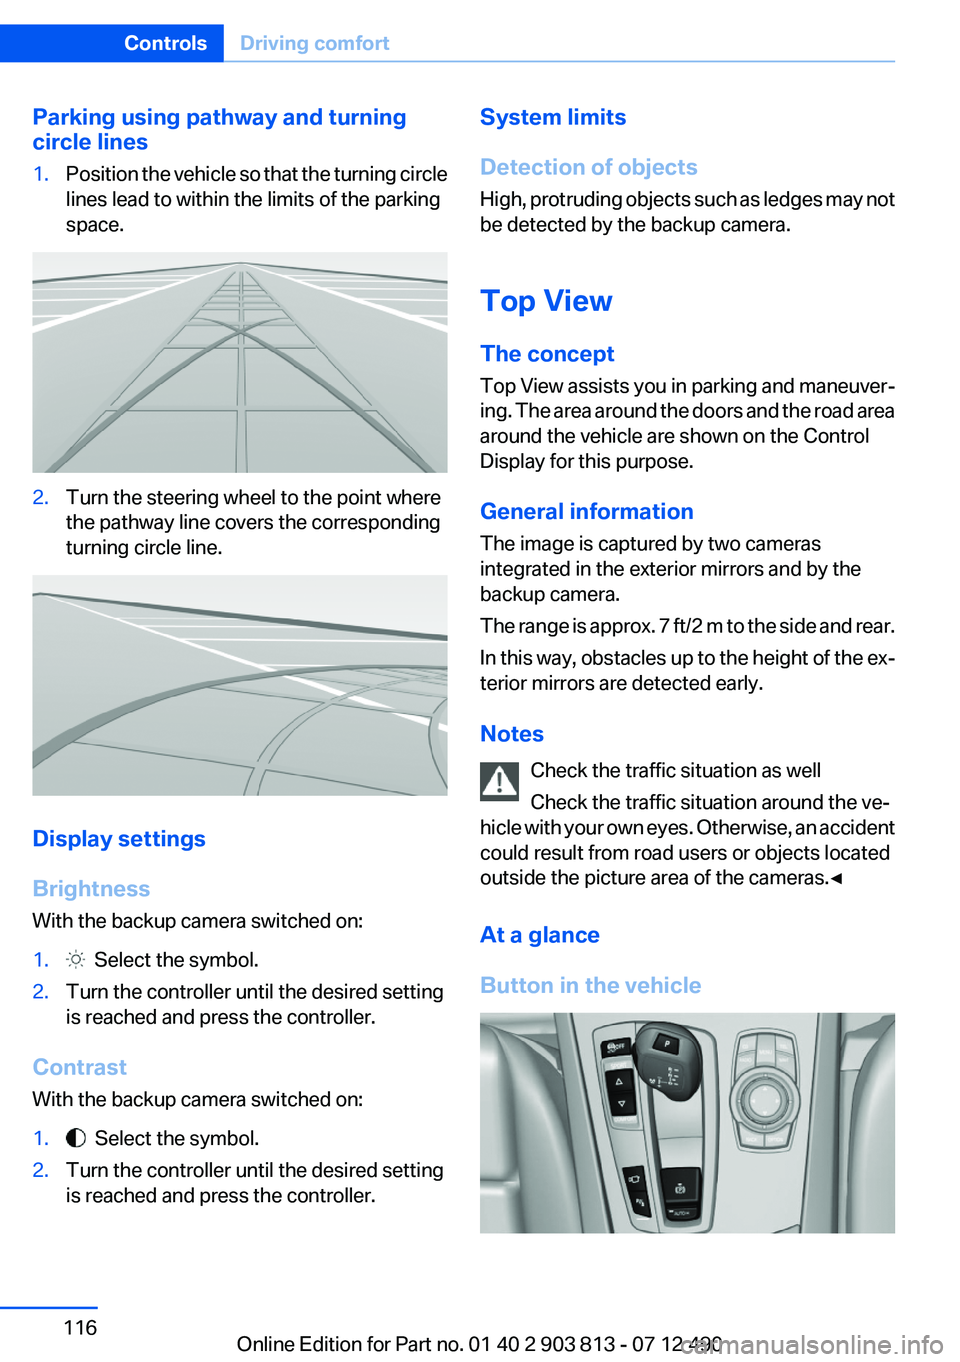
Parking using pathway and turning
circle lines1.Position the vehicle so that the turning circle
lines lead to within the limits of the parking
space.2.Turn the steering wheel to the point where
the pathway line covers the corresponding
turning circle line.
Display settings
Brightness
With the backup camera switched on:
1. Select the symbol.2.Turn the controller until the desired setting
is reached and press the controller.
Contrast
With the backup camera switched on:
1. Select the symbol.2.Turn the controller until the desired setting
is reached and press the controller.System limits
Detection of objects
High, protruding objects such as ledges may not
be detected by the backup camera.
Top View
The concept
Top View assists you in parking and maneuver‐
ing. The area around the doors and the road area
around the vehicle are shown on the Control
Display for this purpose.
General information
The image is captured by two cameras
integrated in the exterior mirrors and by the
backup camera.
The range is approx. 7 ft/2 m to the side and rear.
In this way, obstacles up to the height of the ex‐
terior mirrors are detected early.
Notes Check the traffic situation as well
Check the traffic situation around the ve‐
hicle with your own eyes. Otherwise, an accident
could result from road users or objects located
outside the picture area of the cameras.◀
At a glance
Button in the vehicleSeite 116ControlsDriving comfort116
Online Edition for Part no. 01 40 2 903 813 - 07 12 490