2013 BMW X1 XDRIVE 35I lights
[x] Cancel search: lightsPage 134 of 291
Use coasting conditions
When approaching a red light, take your foot off
the accelerator and let the vehicle coast to a halt.
On a downhill gradient, take your foot off the ac‐
celerator and let the vehicle roll.
The flow of fuel is interrupted while coasting.
Switch off the engine during
longer stops
Switch off the engine during longer stops, e.g.,
at traffic lights, railroad crossings or in traffic
congestion.
Fuel savings are already achieved after the en‐
gine is turned off for as little as 4 seconds.
Automatic Engine Start/Stop Function
The Automatic Start/Stop Function of your ve‐
hicle automatically switches off the engine dur‐
ing a stop. Additional information on the Auto‐
matic Engine Start/Stop Function, refer to
page 56.
If the engine is stopped and then started again,
fuel consumption and emissions drop com‐
pared to an engine that runs permanently. Stop‐
ping the engine even for just a few seconds can
result in savings.
Use of this system can cause premature wear on
certain vehicle components.
In addition, fuel consumption depends on other
factors as well, such as driving style, road con‐
ditions, maintenance, and environmental fac‐
tors.
Switch off any functions that
are not currently needed
Functions such as seat heating and the rear win‐
dow defroster require a lot of energy and con‐
sume additional fuel, especially in city and stop-
and-go traffic.Therefore, switch off these functions if they are
not actually needed.
Have maintenance carried out
Have vehicles maintained regularly to achieve
optimal vehicle economy and operating life.
Have the maintenance carried out by your serv‐
ice center.
Please also note the BMW Maintenance Sys‐
tem, refer to page 243.
ECO PRO
The concept
ECO PRO supports the driver in achieving high
fuel economy. Engine control and comfort func‐
tions, such as the climate control system, are
adjusted accordingly.
In addition, situation-related information can be
displayed that helps the driver achieve lower fuel
consumption.
The resulting range extension can be displayed
in the instrument cluster.
Activating ECO PRO Press the button; the LED above the
button lights up.
ECO PRO appears in the instrument cluster and
DSC is activated if necessary.Seite 134Driving tipsSaving fuel134
Online Edition for Part no. 01 40 2 914 595 - VI/12
Page 244 of 291
Maintenance and repair should be performed by
your service center. Make sure to have regular
maintenance procedures recorded in the vehi‐
cle's Service and Warranty Information Booklet
for US models, and in the Warranty and Service
Guide Booklet for Canadian models. These en‐
tries are proof of regular maintenance.
Socket for OBD Onboard
Diagnosis
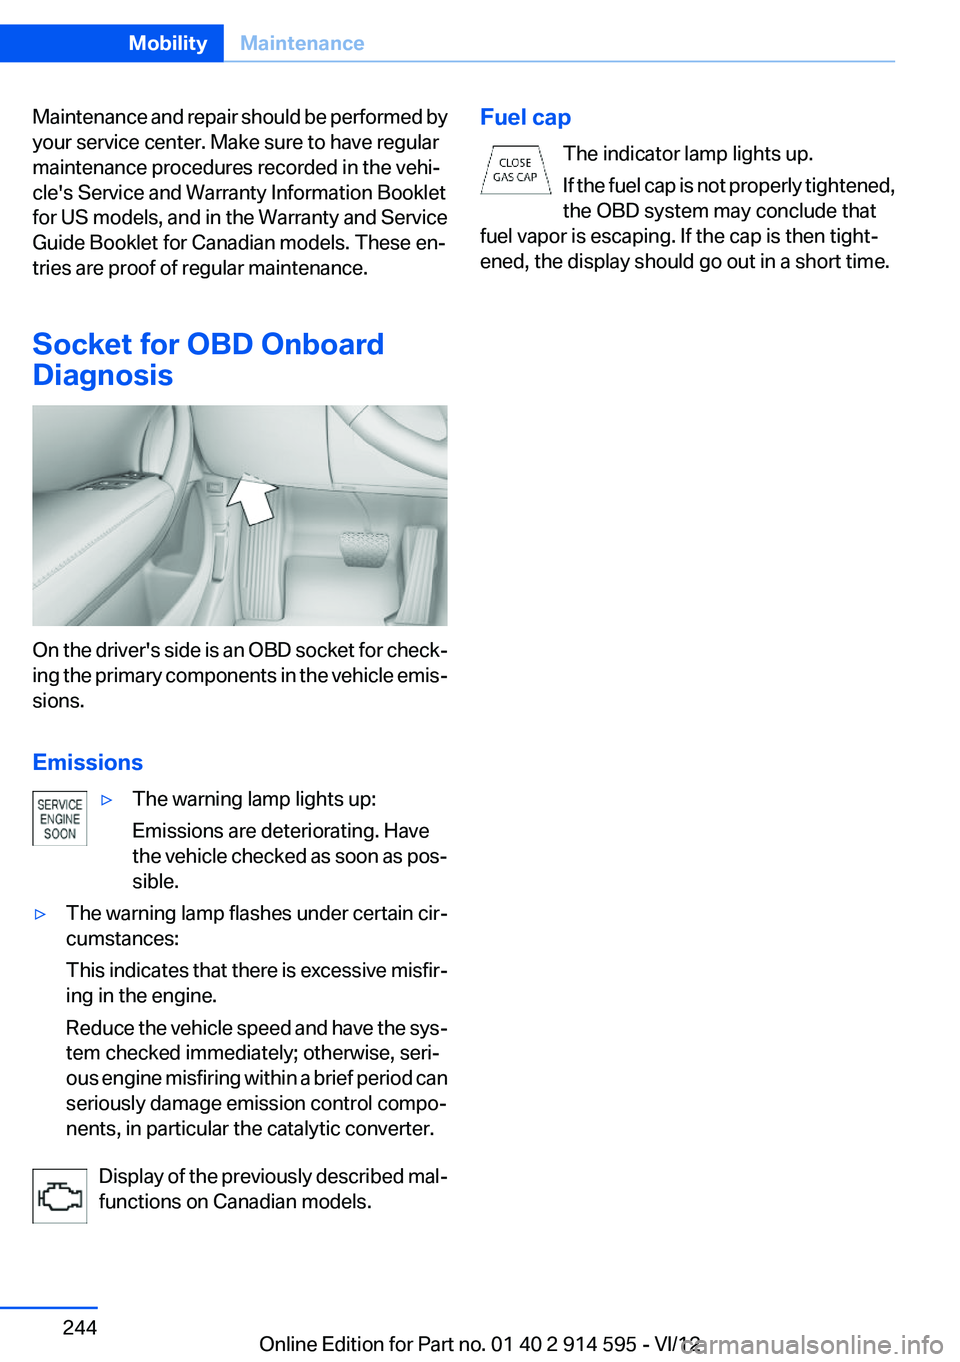
On the driver's side is an OBD socket for check‐
ing the primary components in the vehicle emis‐
sions.
Emissions
▷The warning lamp lights up:
Emissions are deteriorating. Have
the vehicle checked as soon as pos‐
sible.▷The warning lamp flashes under certain cir‐
cumstances:
This indicates that there is excessive misfir‐
ing in the engine.
Reduce the vehicle speed and have the sys‐
tem checked immediately; otherwise, seri‐
ous engine misfiring within a brief period can
seriously damage emission control compo‐
nents, in particular the catalytic converter.
Display of the previously described mal‐
functions on Canadian models.
Fuel cap
The indicator lamp lights up.
If the fuel cap is not properly tightened,
the OBD system may conclude that
fuel vapor is escaping. If the cap is then tight‐
ened, the display should go out in a short time.Seite 244MobilityMaintenance244
Online Edition for Part no. 01 40 2 914 595 - VI/12
Page 246 of 291
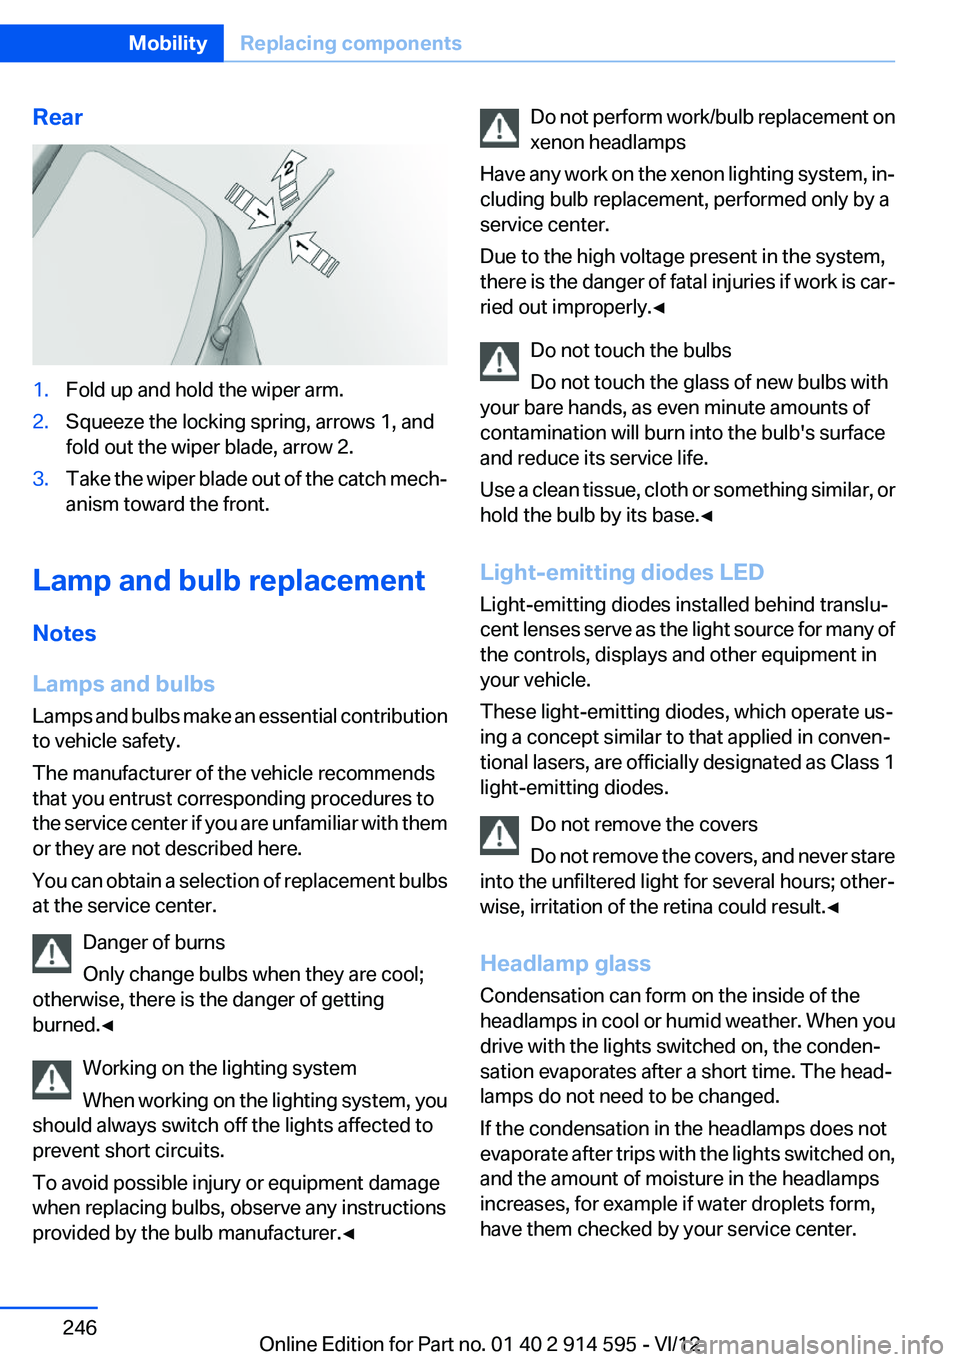
Rear1.Fold up and hold the wiper arm.2.Squeeze the locking spring, arrows 1, and
fold out the wiper blade, arrow 2.3.Take the wiper blade out of the catch mech‐
anism toward the front.
Lamp and bulb replacement
Notes
Lamps and bulbs
Lamps and bulbs make an essential contribution
to vehicle safety.
The manufacturer of the vehicle recommends
that you entrust corresponding procedures to
the service center if you are unfamiliar with them
or they are not described here.
You can obtain a selection of replacement bulbs
at the service center.
Danger of burns
Only change bulbs when they are cool;
otherwise, there is the danger of getting
burned.◀
Working on the lighting system
When working on the lighting system, you
should always switch off the lights affected to
prevent short circuits.
To avoid possible injury or equipment damage
when replacing bulbs, observe any instructions
provided by the bulb manufacturer.◀
Do not perform work/bulb replacement on
xenon headlamps
Have any work on the xenon lighting system, in‐
cluding bulb replacement, performed only by a
service center.
Due to the high voltage present in the system,
there is the danger of fatal injuries if work is car‐
ried out improperly.◀
Do not touch the bulbs
Do not touch the glass of new bulbs with
your bare hands, as even minute amounts of
contamination will burn into the bulb's surface
and reduce its service life.
Use a clean tissue, cloth or something similar, or
hold the bulb by its base.◀
Light-emitting diodes LED
Light-emitting diodes installed behind translu‐
cent lenses serve as the light source for many of
the controls, displays and other equipment in
your vehicle.
These light-emitting diodes, which operate us‐
ing a concept similar to that applied in conven‐
tional lasers, are officially designated as Class 1
light-emitting diodes.
Do not remove the covers
Do not remove the covers, and never stare
into the unfiltered light for several hours; other‐
wise, irritation of the retina could result.◀
Headlamp glass
Condensation can form on the inside of the
headlamps in cool or humid weather. When you
drive with the lights switched on, the conden‐
sation evaporates after a short time. The head‐
lamps do not need to be changed.
If the condensation in the headlamps does not
evaporate after trips with the lights switched on,
and the amount of moisture in the headlamps
increases, for example if water droplets form,
have them checked by your service center.Seite 246MobilityReplacing components246
Online Edition for Part no. 01 40 2 914 595 - VI/12
Page 248 of 291
6.Remove the bulb.7.Insert the new bulb.8.Fold up the wire bracket and lock it.9.Plug in the connector.10.Reattach the cover.11.Low beam: attach the folding cover in the
wheel arch.
Parking and roadside parking lamps
5-watt bulb, W5W
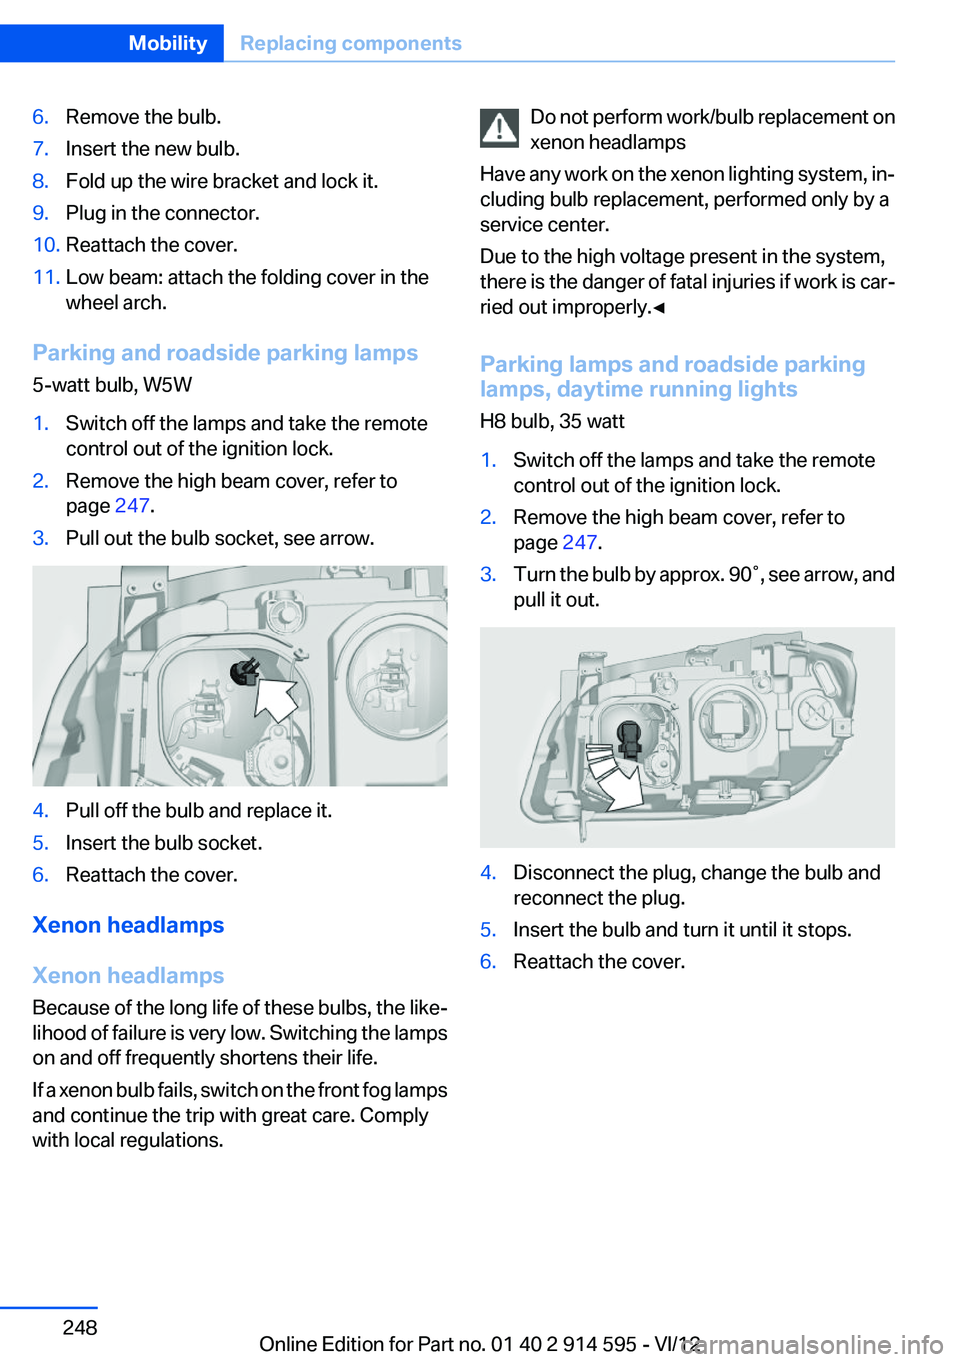
1.Switch off the lamps and take the remote
control out of the ignition lock.2.Remove the high beam cover, refer to
page 247.3.Pull out the bulb socket, see arrow.4.Pull off the bulb and replace it.5.Insert the bulb socket.6.Reattach the cover.
Xenon headlamps
Xenon headlamps
Because of the long life of these bulbs, the like‐
lihood of failure is very low. Switching the lamps
on and off frequently shortens their life.
If a xenon bulb fails, switch on the front fog lamps
and continue the trip with great care. Comply
with local regulations.
Do not perform work/bulb replacement on
xenon headlamps
Have any work on the xenon lighting system, in‐
cluding bulb replacement, performed only by a
service center.
Due to the high voltage present in the system,
there is the danger of fatal injuries if work is car‐
ried out improperly.◀
Parking lamps and roadside parking
lamps, daytime running lights
H8 bulb, 35 watt1.Switch off the lamps and take the remote
control out of the ignition lock.2.Remove the high beam cover, refer to
page 247.3.Turn the bulb by approx. 90˚, see arrow, and
pull it out.4.Disconnect the plug, change the bulb and
reconnect the plug.5.Insert the bulb and turn it until it stops.6.Reattach the cover.Seite 248MobilityReplacing components248
Online Edition for Part no. 01 40 2 914 595 - VI/12
Page 253 of 291
Breakdown assistanceVehicle equipment
This chapter describes all series equipment as
well as country-specific and special equipment
offered for this model series.Therefore, it also
describes equipment that may not be found in
your vehicle, for instance due to the selected
special equipment or the country version. This
also applies to safety-related functions and sys‐
tems.
Hazard warning flashers
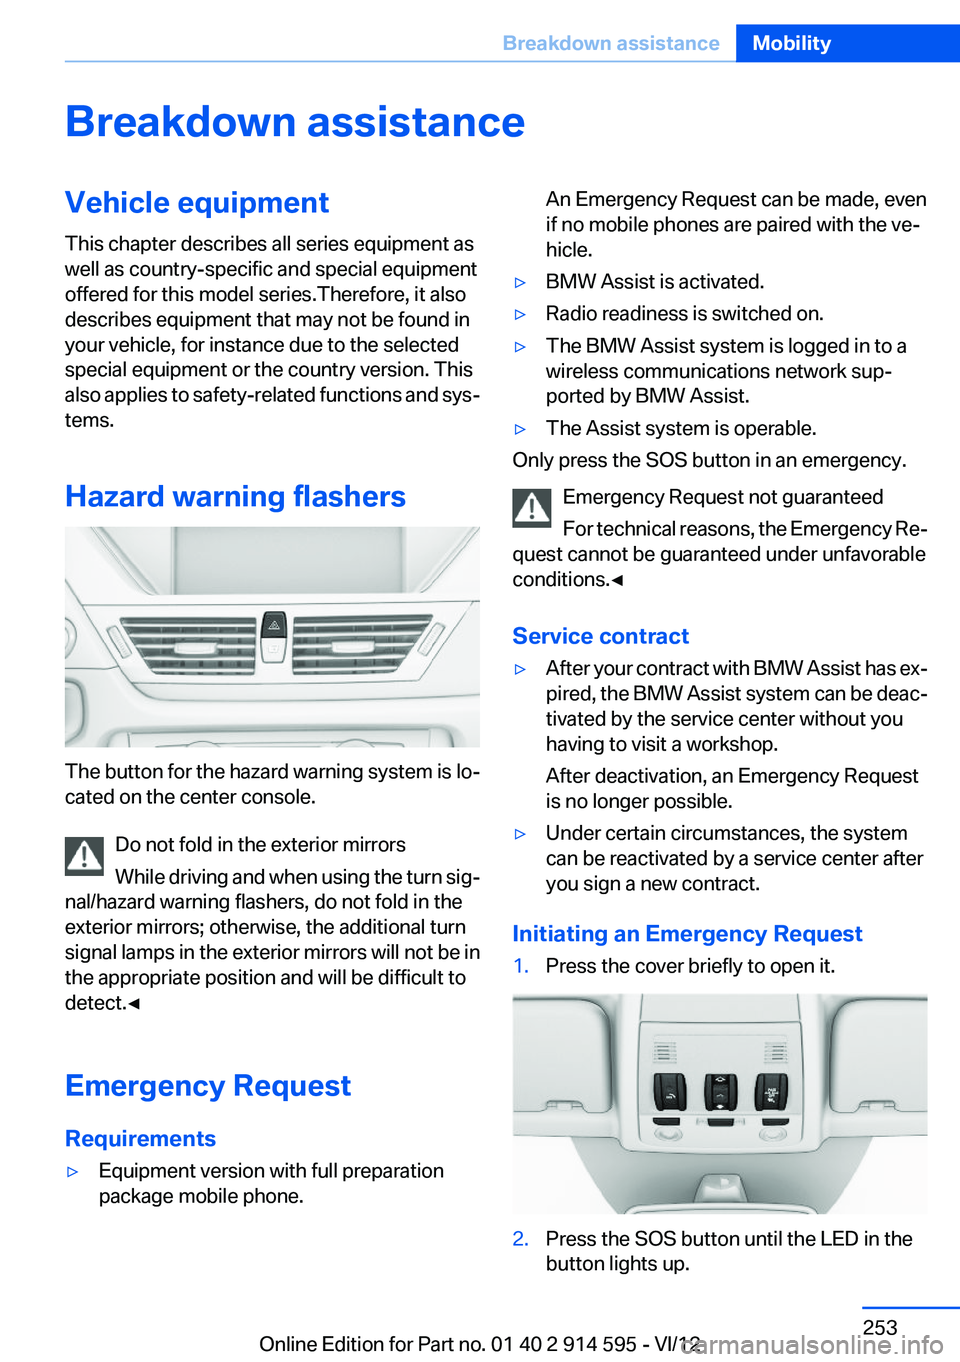
The button for the hazard warning system is lo‐
cated on the center console.
Do not fold in the exterior mirrors
While driving and when using the turn sig‐
nal/hazard warning flashers, do not fold in the
exterior mirrors; otherwise, the additional turn
signal lamps in the exterior mirrors will not be in
the appropriate position and will be difficult to
detect.◀
Emergency Request
Requirements
▷Equipment version with full preparation
package mobile phone.An Emergency Request can be made, even
if no mobile phones are paired with the ve‐
hicle.▷BMW Assist is activated.▷Radio readiness is switched on.▷The BMW Assist system is logged in to a
wireless communications network sup‐
ported by BMW Assist.▷The Assist system is operable.
Only press the SOS button in an emergency.
Emergency Request not guaranteed
For technical reasons, the Emergency Re‐
quest cannot be guaranteed under unfavorable
conditions.◀
Service contract
▷After your contract with BMW Assist has ex‐
pired, the BMW Assist system can be deac‐
tivated by the service center without you
having to visit a workshop.
After deactivation, an Emergency Request
is no longer possible.▷Under certain circumstances, the system
can be reactivated by a service center after
you sign a new contract.
Initiating an Emergency Request
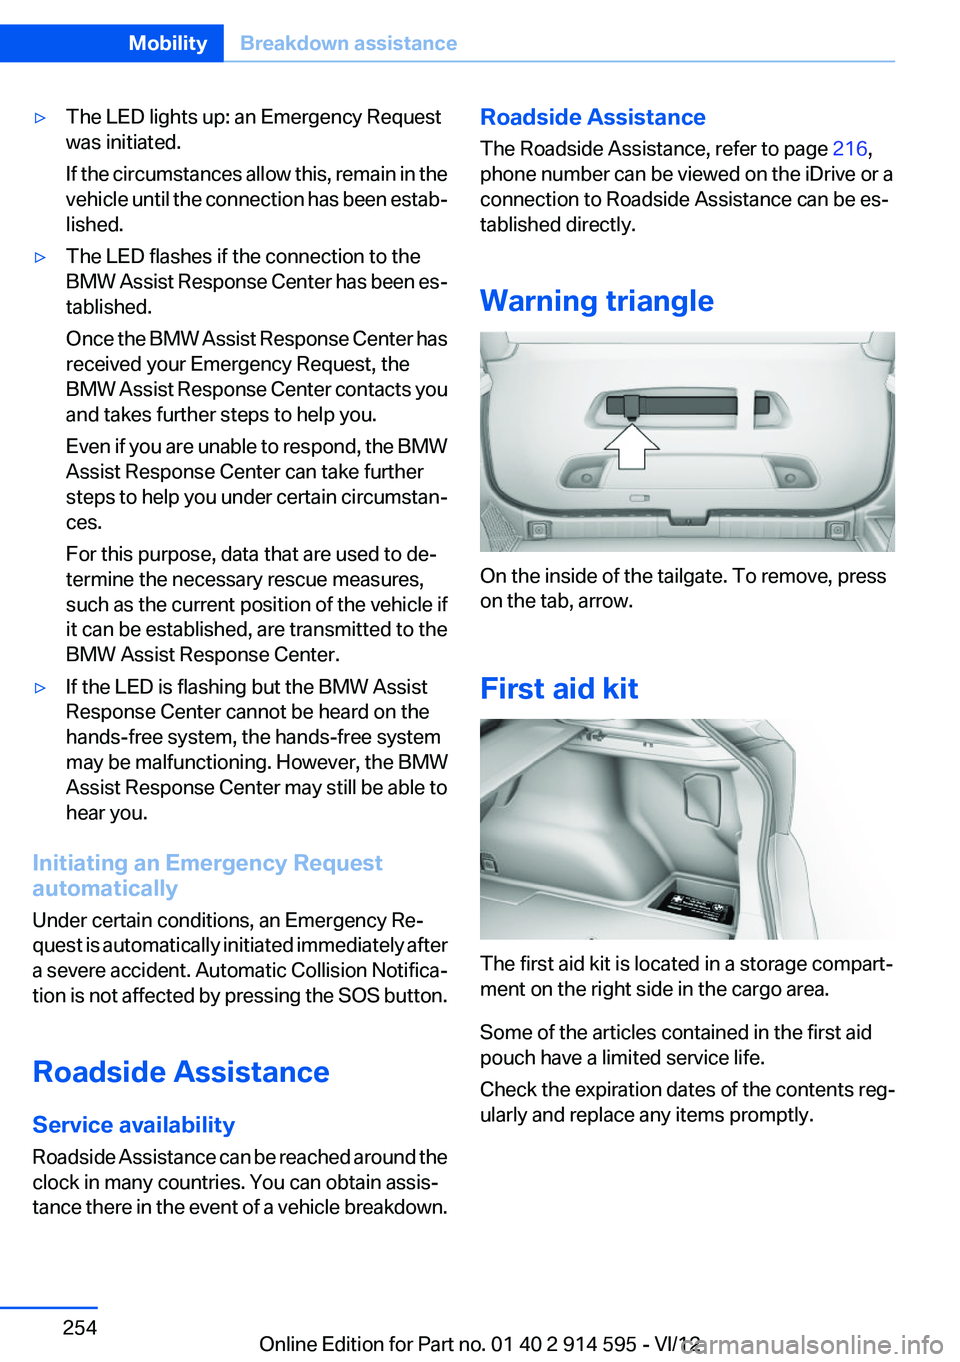
1.Press the cover briefly to open it.2.Press the SOS button until the LED in the
button lights up.Seite 253Breakdown assistanceMobility253
Online Edition for Part no. 01 40 2 914 595 - VI/12
Page 254 of 291
▷The LED lights up: an Emergency Request
was initiated.
If the circumstances allow this, remain in the
vehicle until the connection has been estab‐
lished.▷The LED flashes if the connection to the
BMW Assist Response Center has been es‐
tablished.
Once the BMW Assist Response Center has
received your Emergency Request, the
BMW Assist Response Center contacts you
and takes further steps to help you.
Even if you are unable to respond, the BMW
Assist Response Center can take further
steps to help you under certain circumstan‐
ces.
For this purpose, data that are used to de‐
termine the necessary rescue measures,
such as the current position of the vehicle if
it can be established, are transmitted to the
BMW Assist Response Center.▷If the LED is flashing but the BMW Assist
Response Center cannot be heard on the
hands-free system, the hands-free system
may be malfunctioning. However, the BMW
Assist Response Center may still be able to
hear you.
Initiating an Emergency Request
automatically
Under certain conditions, an Emergency Re‐
quest is automatically initiated immediately after
a severe accident. Automatic Collision Notifica‐
tion is not affected by pressing the SOS button.
Roadside Assistance
Service availability
Roadside Assistance can be reached around the
clock in many countries. You can obtain assis‐
tance there in the event of a vehicle breakdown.
Roadside Assistance
The Roadside Assistance, refer to page 216,
phone number can be viewed on the iDrive or a
connection to Roadside Assistance can be es‐
tablished directly.
Warning triangle
On the inside of the tailgate. To remove, press
on the tab, arrow.
First aid kit
The first aid kit is located in a storage compart‐
ment on the right side in the cargo area.
Some of the articles contained in the first aid
pouch have a limited service life.
Check the expiration dates of the contents reg‐
ularly and replace any items promptly.
Seite 254MobilityBreakdown assistance254
Online Edition for Part no. 01 40 2 914 595 - VI/12
Page 276 of 291

Everything from A to Z
IndexA
ABS, Antilock Brake Sys‐ tem 94
Accident, refer to Emergency Request, initiating 253
Acoustic signal, refer to Check Control 77
Activated charcoal filter with automatic climate con‐
trol 108
Adaptive brake lights, refer to Brake force display 93
Adaptive light control 81
Additional telephone 192
Additives, coolant 242
Additives, engine oil 241
After washing vehicle 260
Airbags 85
Airbags, indicator/warning light 88
Air circulation, refer to Recir‐ culated air mode 107
Air conditioning mode– Automatic climate con‐
trol 105– Ventilation 108
Air distribution
– Automatic 106– Manual 106
Air drying, refer to Cooling
function 107
Air flow rate 106
Airing, refer to Ventilation 108
Air pressure, refer to Tire infla‐ tion pressure 228
Air supply
– Automatic climate con‐
trol 105– Ventilation 108
Air vents
– Refer to Ventilation 108Alarm system 38
Alarm system– Avoiding unintentional
alarms 39– Ending an alarm 39– Interior motion sensor 39– Tilt alarm sensor 39
All around the headliner 17
ALL program 107
All-season tires, refer to Win‐ ter tires 236
All-wheel drive, refer to
xDrive 96
Alternating-code hand-held transmitter 111
AM/FM station 162
Announcement, navigation, refer to Spoken instruc‐
tions 151
Antifreeze, coolant 242
Antifreeze, washer fluid 61
Antilock Brake System, ABS 94
Anti-slip control, refer to Dy‐ namic Stability Control
DSC 94
Anti-theft protection 32
Appointments 209
Approved axle loads, refer to Weights 267
Approved engine oils 241
Approved gross vehicle weight, refer to Weights 267
Armrest, refer to Center arm‐ rest 120
Arrival time, refer to Com‐ puter 70
Ashtray 114
Assist 215
Assistance, Roadside Assis‐ tance 254
Assistance with driving off, re‐
fer to Drive-off assistant 97
Assistance with starting en‐ gine, refer to Jump-start‐
ing 255
Audio device, external 121
Audio playback 171
Audio playback, Blue‐ tooth 185
Automatic– Air distribution 106– Air flow rate 106
Automatic car wash 259
Automatic climate control
– Automatic air distribu‐
tion 106
Automatic, cruise control 98
Automatic Curb Monitor 48
Automatic Engine Start/Stop Function 56
Automatic headlamp con‐ trol 80, 81
Automatic recirculated air control 107
Automatic transmission with Steptronic 62, 64
Automatic transmission with
Steptronic
– Interlock 62– Kickdown 63, 64– Overriding selector lever
lock 64
AUTO program with automatic
climate control 106
AUX-IN port 121, 181
Average fuel consumption 70
Average fuel consumption
– Setting the units 72
Average speed 70
Average speed, refer to Com‐ puter 70
Seite 276ReferenceEverything from A to Z276
Online Edition for Part no. 01 40 2 914 595 - VI/12
Page 277 of 291
Axle loads, refer toWeights 267
B
Backrest curvature, refer to Lumbar support 44
Backrests, refer to Seats 43
Backrest width adjustment 44
Back seats– Adjusting the backrest
tilt 115
Backup camera 102
Backup camera, cleaning 104
Backup camera, obstacle marking 103
Backup camera, pathway lines 103
Backup camera, turning lines 103
Backup lamps, bulb replace‐ ment 249
Balance 160
Band-aids, refer to First aid kit 254
Bass 160
Battery
– Remote control 30
Battery disposal 251
Battery, refer to Vehicle bat‐ tery 251
Battery replacement, remote control for vehicle 38
Before entering the car wash 259
Belts, refer to Safety belts 45
Belt tensioners, refer to Safety belts 45
Beverage holder, refer to Cu‐ pholder 122
Black and white map dis‐ play 154
Blower, refer to Air flow rate 106
Bluetooth audio 185
Bluetooth connection, activat‐ ing/deactivating 193
BMW Apps 219
BMW Apps, video play‐ back 184
BMW Assist 215
BMW Assist, refer to Connec‐ tedDrive 215
BMW EfficientDynamics, refer to Saving fuel 133
BMW Homepage 6
BMW Internet page 6
BMW maintenance sys‐ tem 243
BMW Online 217
Bottle holder, refer to Cu‐ pholder 122
Brake assistant 94
Brake discs, breaking in 126
Brake fluid, refer to Service re‐ quirements 75
Brake force display 93
Brake force distribution, elec‐ tronic 94
Brake lamps– Bulb replacement 249
Brake lamps, brake force dis‐
play 93
Brake lights, adaptive 93
Brake pads, breaking in 126
Brakes
– Handbrake 58
Brakes, BMW maintenance
system 243
Brakes, service require‐ ments 75
Brake system, BMW mainte‐ nance system 243
Braking, notes 127
Breakdown assistance 254
Breakdown, transporting the vehicle 256
Breaking in 126
Brightness on the Control Dis‐ play 75
Bulb replacement, refer to Lamp and bulb replace‐
ment 246
Button for starting the engine,
refer to Start/Stop button 54
C
Calendar 209
California Proposition 65 Warning 7
Camera, care 261
Camera, refer to Backup cam‐ era 102
Can holder, refer to Cu‐ pholder 122
Car battery, refer to Vehicle battery 251
Car care products 260
Care 259
Care, displays 262
Care, vehicle 260
Cargo 130
Cargo area 115
Cargo area– Comfort Access 37– Cover 115– Folding up the cargo floor
panel 118– Multi-function hook 118– Partition net 116
Cargo area, capacities 267
Cargo area, enlarging 115
Cargo area lamp, refer to Inte‐ rior lamps 84
Cargo area lid, refer to Tail‐ gate 35
Cargo area net, refer to Parti‐ tion net 116
Cargo area, opening from the inside 35
Cargo area, opening from the outside 36
Cargo floor panel
– Folding up 118
Cargo floor panel, raising 118
Cargo straps, securing cargo 131
Car key, refer to Integrated key/remote control 30
Seite 277Everything from A to ZReference277
Online Edition for Part no. 01 40 2 914 595 - VI/12