2013 BMW X1 XDRIVE 28I steering
[x] Cancel search: steeringPage 92 of 291
Because the possible driving distance depends
on how the vehicle is used during the trip, the
actual distance may be smaller or greater de‐
pending on the driving speed, road conditions,
external temperature, cargo load, etc.
Continued driving with a flat tire
Drive moderately and do not exceed a
speed of 50 mph/80 km/h.
A loss of tire inflation pressure results in a
change in the handling characteristics, e.g., re‐
duced lane stability during braking, a longer
braking distance and altered self-steering prop‐
erties.◀
Final tire failure
Vibrations or loud noises while driving can
indicate the final failure of the tire. Reduce speed
and stop; otherwise, pieces of the tire could
come loose and cause an accident. Do not con‐
tinue driving, and contact your service center. ◀
Message when the system was not
reset
The yellow warning lamp lights up. A
message appears on the Control Dis‐
play.
The system detected a wheel change but was
not reset.
Warnings regarding the current tire inflation
pressure are not reliable.
Check the tire inflation pressure and reset the
system.
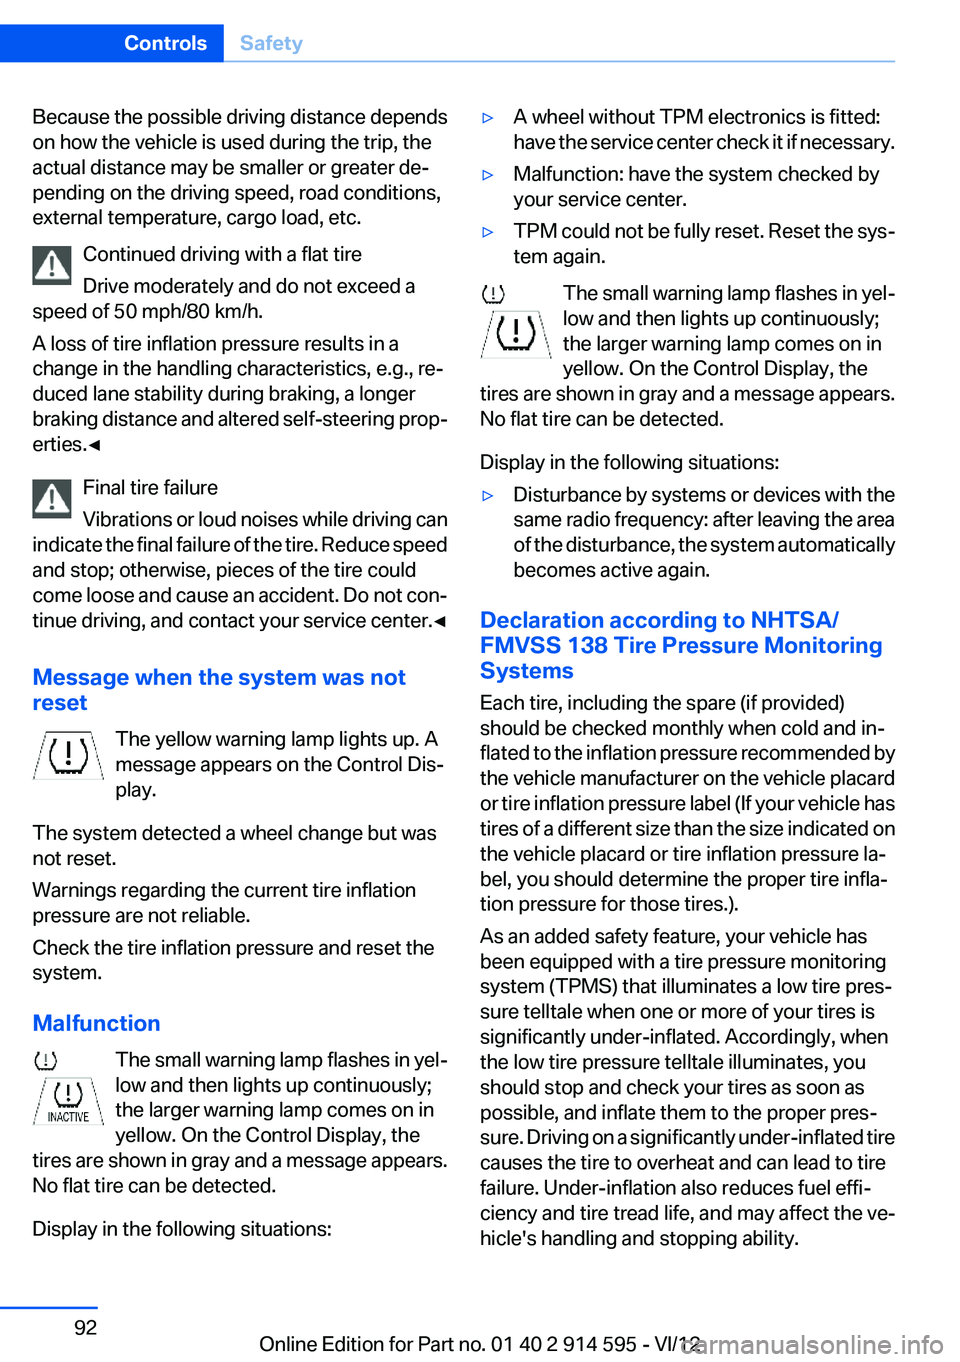
Malfunction The small warning lamp flashes in yel‐
low and then lights up continuously;
the larger warning lamp comes on in
yellow. On the Control Display, the
tires are shown in gray and a message appears.
No flat tire can be detected.
Display in the following situations:▷A wheel without TPM electronics is fitted:
have the service center check it if necessary.▷Malfunction: have the system checked by
your service center.▷TPM could not be fully reset. Reset the sys‐
tem again.
The small warning lamp flashes in yel‐
low and then lights up continuously;
the larger warning lamp comes on in
yellow. On the Control Display, the
tires are shown in gray and a message appears.
No flat tire can be detected.
Display in the following situations:
▷Disturbance by systems or devices with the
same radio frequency: after leaving the area
of the disturbance, the system automatically
becomes active again.
Declaration according to NHTSA/
FMVSS 138 Tire Pressure Monitoring
Systems
Each tire, including the spare (if provided)
should be checked monthly when cold and in‐
flated to the inflation pressure recommended by
the vehicle manufacturer on the vehicle placard
or tire inflation pressure label (If your vehicle has
tires of a different size than the size indicated on
the vehicle placard or tire inflation pressure la‐
bel, you should determine the proper tire infla‐
tion pressure for those tires.).
As an added safety feature, your vehicle has
been equipped with a tire pressure monitoring
system (TPMS) that illuminates a low tire pres‐
sure telltale when one or more of your tires is
significantly under-inflated. Accordingly, when
the low tire pressure telltale illuminates, you
should stop and check your tires as soon as
possible, and inflate them to the proper pres‐
sure. Driving on a significantly under-inflated tire
causes the tire to overheat and can lead to tire
failure. Under-inflation also reduces fuel effi‐
ciency and tire tread life, and may affect the ve‐
hicle's handling and stopping ability.
Seite 92ControlsSafety92
Online Edition for Part no. 01 40 2 914 595 - VI/12
Page 97 of 291
Activating HDC
Press the button; the LED above the
button lights up.
The LED flashes when the brakes are applied
automatically.
Deactivating HDC Press the button again; the LED goes
out. HDC is automatically deactivated
above approx. 37 mph/60 km/h.
Using HDC
HDC can be used in every driving position.
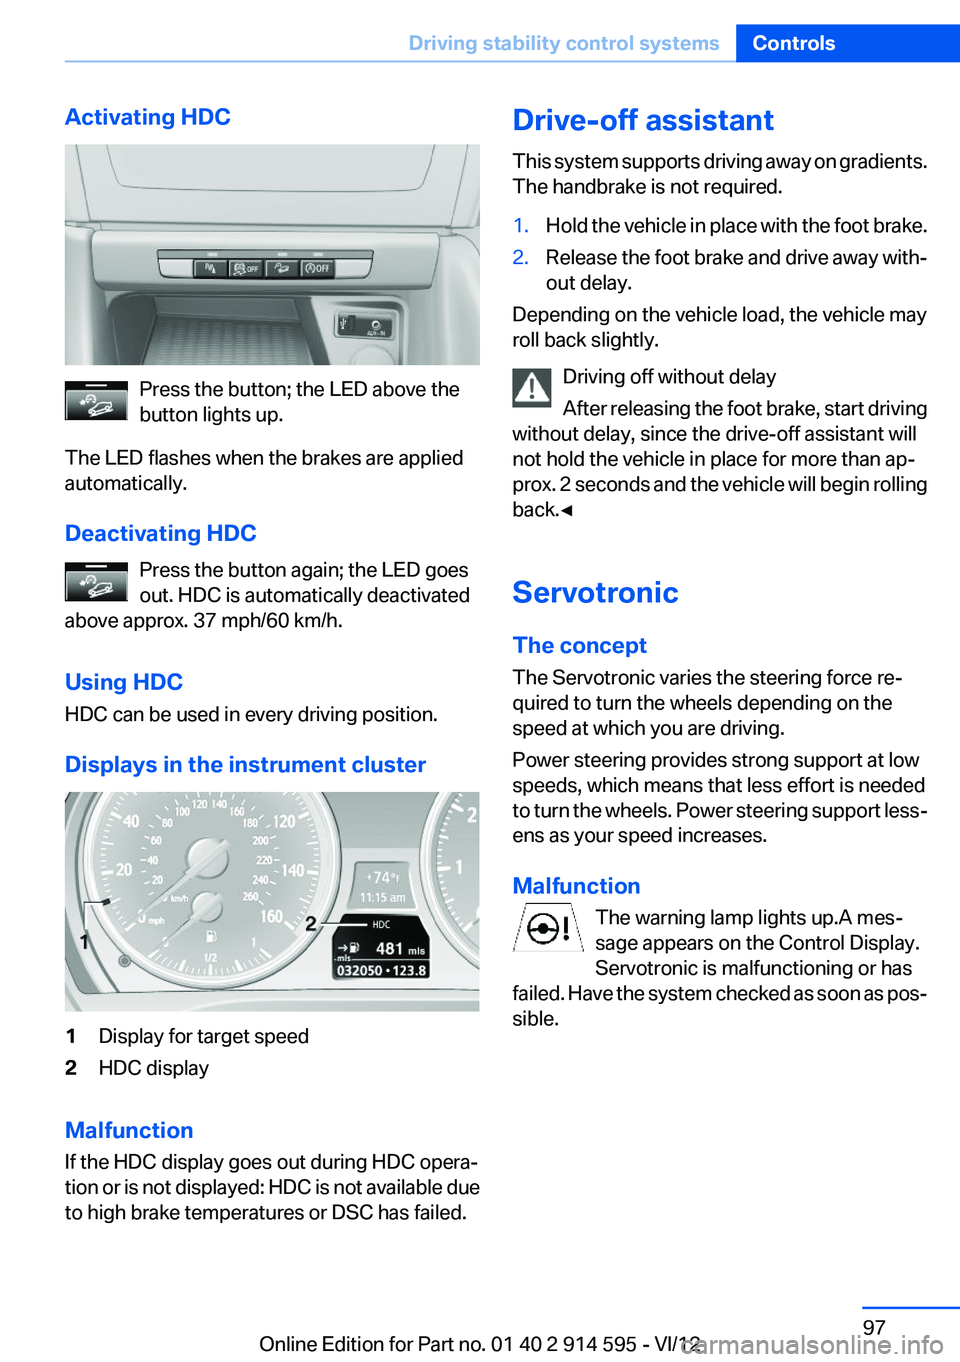
Displays in the instrument cluster
1Display for target speed2HDC display
Malfunction
If the HDC display goes out during HDC opera‐
tion or is not displayed: HDC is not available due
to high brake temperatures or DSC has failed.
Drive-off assistant
This system supports driving away on gradients.
The handbrake is not required.1.Hold the vehicle in place with the foot brake.2.Release the foot brake and drive away with‐
out delay.
Depending on the vehicle load, the vehicle may
roll back slightly.
Driving off without delay
After releasing the foot brake, start driving
without delay, since the drive-off assistant will
not hold the vehicle in place for more than ap‐
prox. 2 seconds and the vehicle will begin rolling
back.◀
Servotronic
The concept
The Servotronic varies the steering force re‐
quired to turn the wheels depending on the
speed at which you are driving.
Power steering provides strong support at low
speeds, which means that less effort is needed
to turn the wheels. Power steering support less‐
ens as your speed increases.
Malfunction The warning lamp lights up.A mes‐
sage appears on the Control Display.
Servotronic is malfunctioning or has
failed. Have the system checked as soon as pos‐
sible.
Seite 97Driving stability control systemsControls97
Online Edition for Part no. 01 40 2 914 595 - VI/12
Page 98 of 291
Driving comfortVehicle equipment
This chapter describes all series equipment as
well as country-specific and special equipment
offered for this model series.Therefore, it also
describes equipment that may not be found in
your vehicle, for instance due to the selected
special equipment or the country version. This
also applies to safety-related functions and sys‐
tems.
Cruise control
The concept
The system is functional at speeds beginning at
approx. 20 mph/30 km/h.
The speed specified using the lever on the
steering column is maintained.
The system brakes on downhill gradients if en‐
gine braking action is insufficient.
Do not use cruise control
Do not use the system if unfavorable con‐
ditions make it impossible to drive at a constant
speed, for instance:▷On curvy roads.▷In heavy traffic.▷On slippery roads, in fog, snow or rain, or on
a loose road surface.
Otherwise, you could lose control of the vehicle
and cause an accident.◀
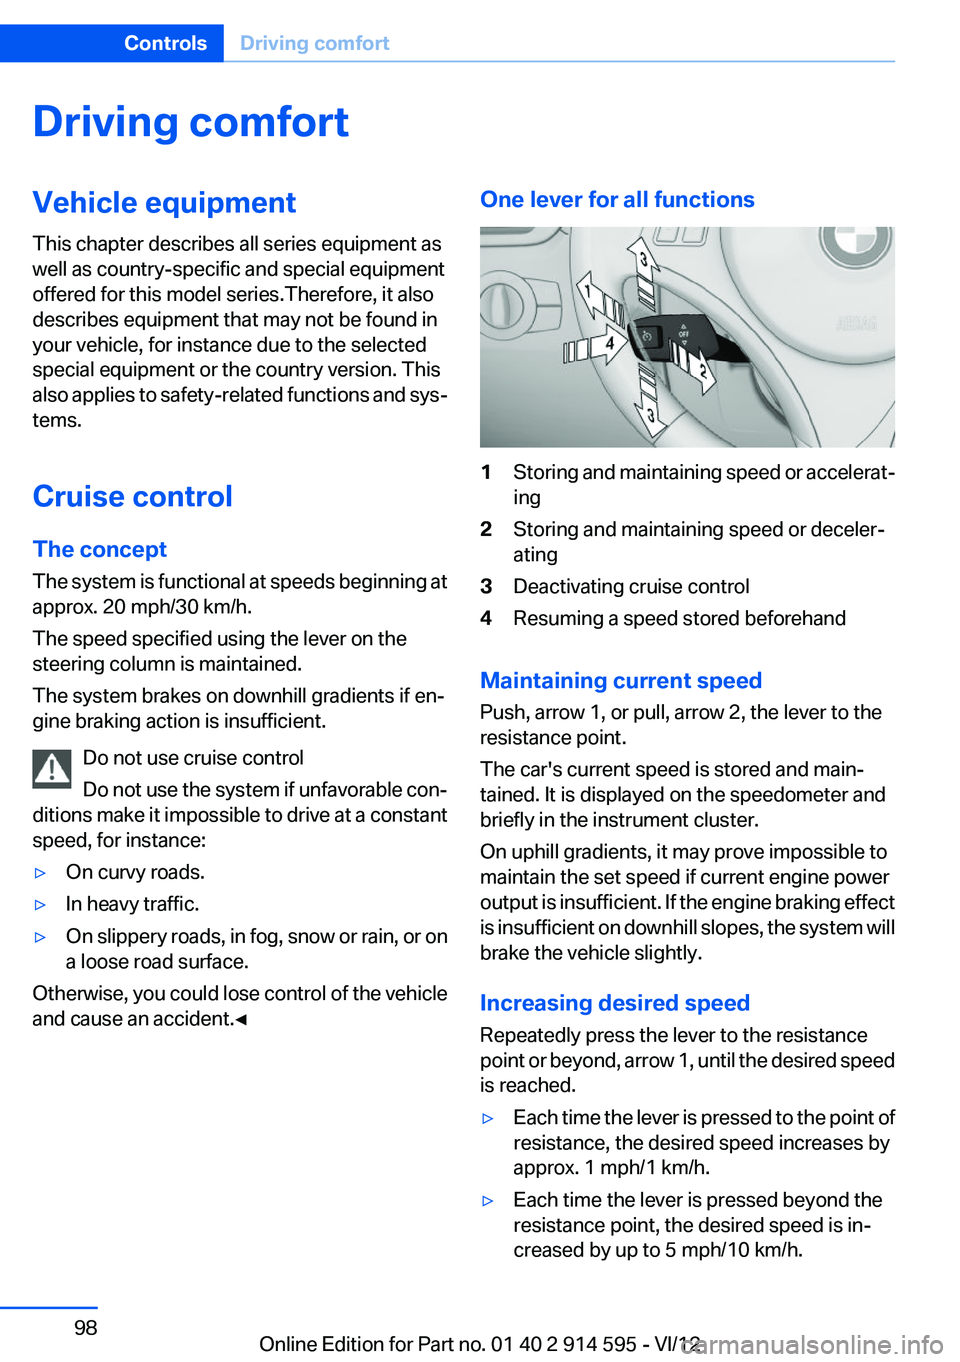
One lever for all functions1Storing and maintaining speed or accelerat‐
ing2Storing and maintaining speed or deceler‐
ating3Deactivating cruise control4Resuming a speed stored beforehand
Maintaining current speed
Push, arrow 1, or pull, arrow 2, the lever to the
resistance point.
The car's current speed is stored and main‐
tained. It is displayed on the speedometer and
briefly in the instrument cluster.
On uphill gradients, it may prove impossible to
maintain the set speed if current engine power
output is insufficient. If the engine braking effect
is insufficient on downhill slopes, the system will
brake the vehicle slightly.
Increasing desired speed
Repeatedly press the lever to the resistance
point or beyond, arrow 1, until the desired speed
is reached.
▷Each time the lever is pressed to the point of
resistance, the desired speed increases by
approx. 1 mph/1 km/h.▷Each time the lever is pressed beyond the
resistance point, the desired speed is in‐
creased by up to 5 mph/10 km/h.Seite 98ControlsDriving comfort98
Online Edition for Part no. 01 40 2 914 595 - VI/12
Page 103 of 291
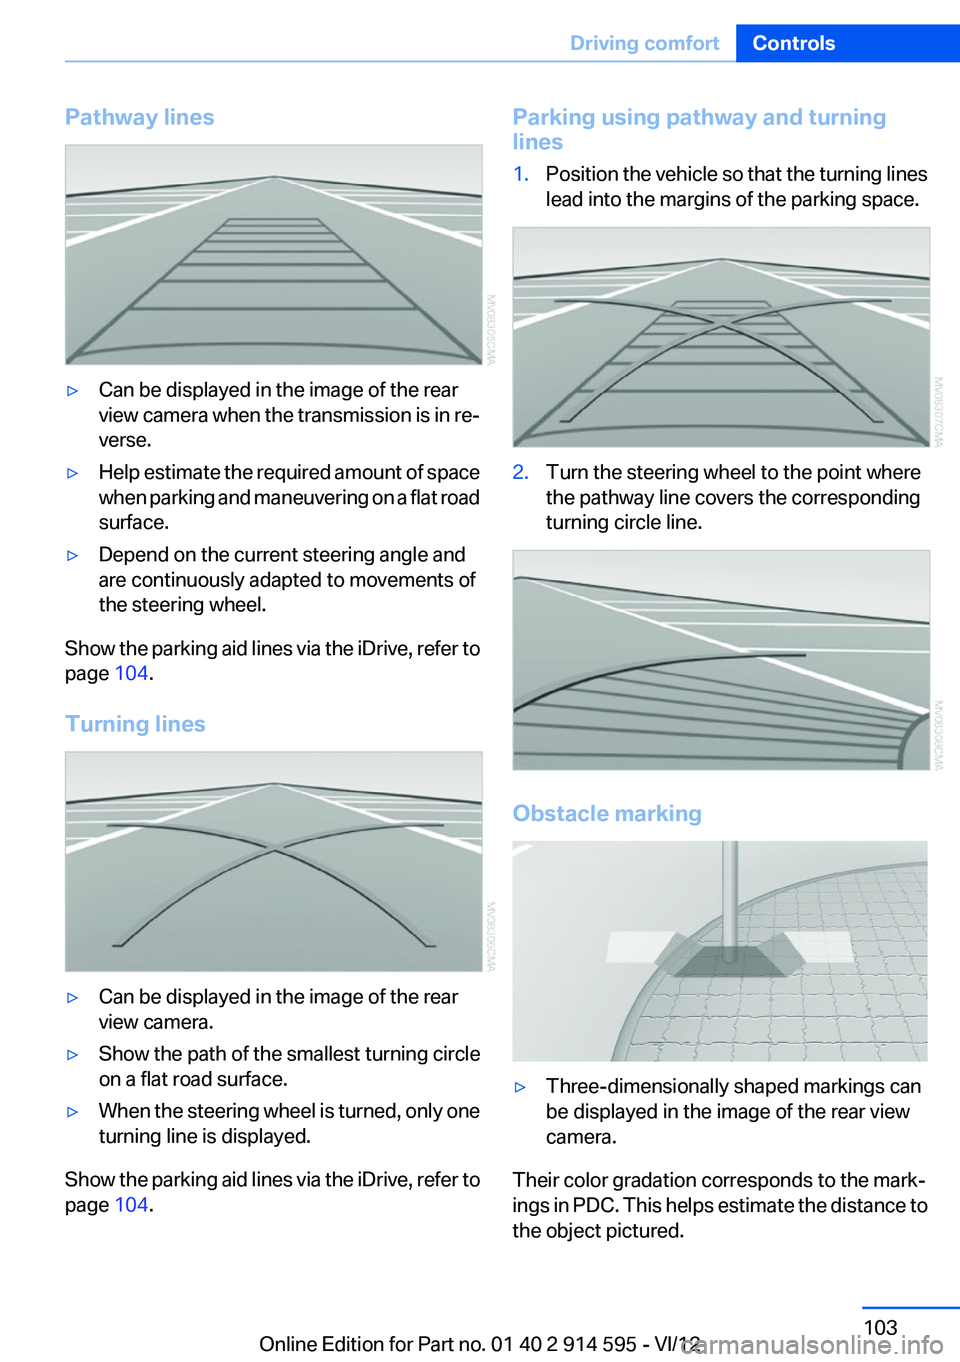
Pathway lines▷Can be displayed in the image of the rear
view camera when the transmission is in re‐
verse.▷Help estimate the required amount of space
when parking and maneuvering on a flat road
surface.▷Depend on the current steering angle and
are continuously adapted to movements of
the steering wheel.
Show the parking aid lines via the iDrive, refer to
page 104.
Turning lines
▷Can be displayed in the image of the rear
view camera.▷Show the path of the smallest turning circle
on a flat road surface.▷When the steering wheel is turned, only one
turning line is displayed.
Show the parking aid lines via the iDrive, refer to
page 104.
Parking using pathway and turning
lines1.Position the vehicle so that the turning lines
lead into the margins of the parking space.2.Turn the steering wheel to the point where
the pathway line covers the corresponding
turning circle line.
Obstacle marking
▷Three-dimensionally shaped markings can
be displayed in the image of the rear view
camera.
Their color gradation corresponds to the mark‐
ings in PDC. This helps estimate the distance to
the object pictured.
Seite 103Driving comfortControls103
Online Edition for Part no. 01 40 2 914 595 - VI/12
Page 107 of 291

Press the left or right side of the button:
decrease or increase air volume.
The selected air volume is shown on the display
of the automatic climate control.
The air volume of the automatic climate control
may be reduced automatically to save battery
power.
Automatic recirculated air mode/
recirculated air mode
You can respond to unpleasant odors or pollu‐
tants in the immediate environment by tempo‐
rarily suspending the supply of outside air. The
system then recirculates the air currently within
the vehicle.
Press the button repeatedly to select
an operating mode:▷LEDs off: outside air flows in continuously.▷Left LED on, automatic recirculated-air con‐
trol: a sensor detects pollutants in the out‐
side air and controls the shutoff automati‐
cally.▷Right LED on, recirculated air mode: the
supply of outside air into the vehicle is per‐
manently blocked.
If the windows are fogged over, switch off
the recirculated-air mode and press the
AUTO button to utilize the condensation
sensor. Make sure that air can flow onto the
windshield.
Continuous recirculated-air mode
The recirculated air mode should not be
used for an extended period of time, as the air
quality inside the vehicle deteriorates steadily. ◀
Via the button on the steering wheel
A button on the steering wheel can be used to
quickly switch between recirculated air mode
and the previous setting.
ALL program
Press the button.
The current temperature setting for the
driver's side is transferred to the front passenger
side.
If the temperature setting is changed on the
driver's side, the temperature on the front pas‐
senger side changes as well.
The program is switched off if the setting is
changed on the front passenger side or the but‐
ton is pressed again.
Defrosting and defogging windows Press the button.
Ice and condensation are quickly re‐
moved from the windshield and the front side
windows.
For this purpose, also switch on the cooling
function.
Cooling function
The passenger compartment can only be
cooled with the engine running.
Press the button.
The air is cooled and dehumidified and
– depending on the temperature setting –
warmed again.
Depending on the weather, the windshield may
fog up briefly when the engine is started.
The cooling function is switched on automati‐
cally with the AUTO program.
When using the automatic climate control, con‐
densation water, refer to page 128, develops
that exits underneath the vehicle.
Rear window defroster Press the button.
The rear window defroster switches off
automatically after a certain period of time.Seite 107ClimateControls107
Online Edition for Part no. 01 40 2 914 595 - VI/12
Page 112 of 291
ControlsPrior to operation
Before operating a unit with the Universal
Garage Door Opener, ensure that there are no
people, animals, or objects in the range of move‐
ment of the system; otherwise, there is a risk of
injury or damage.
Also follow the safety instructions of the hand-
held transmitter.◀
The system, such as the garage door, can be
operated using the button on the interior rear‐
view mirror with the engine running or the igni‐
tion switched on. When you are within the re‐
ception range of the system, press and hold the
button until the function is initiated. The LED on
the interior rearview mirror lights up continu‐
ously while the radio signal is being transmitted.
Deleting stored functions
Press the right and left buttons on the interior
rearview mirror simultaneously for approx.
20 seconds until the LED flashes rapidly. All
stored functions are deleted. The functions can‐
not be deleted individually.
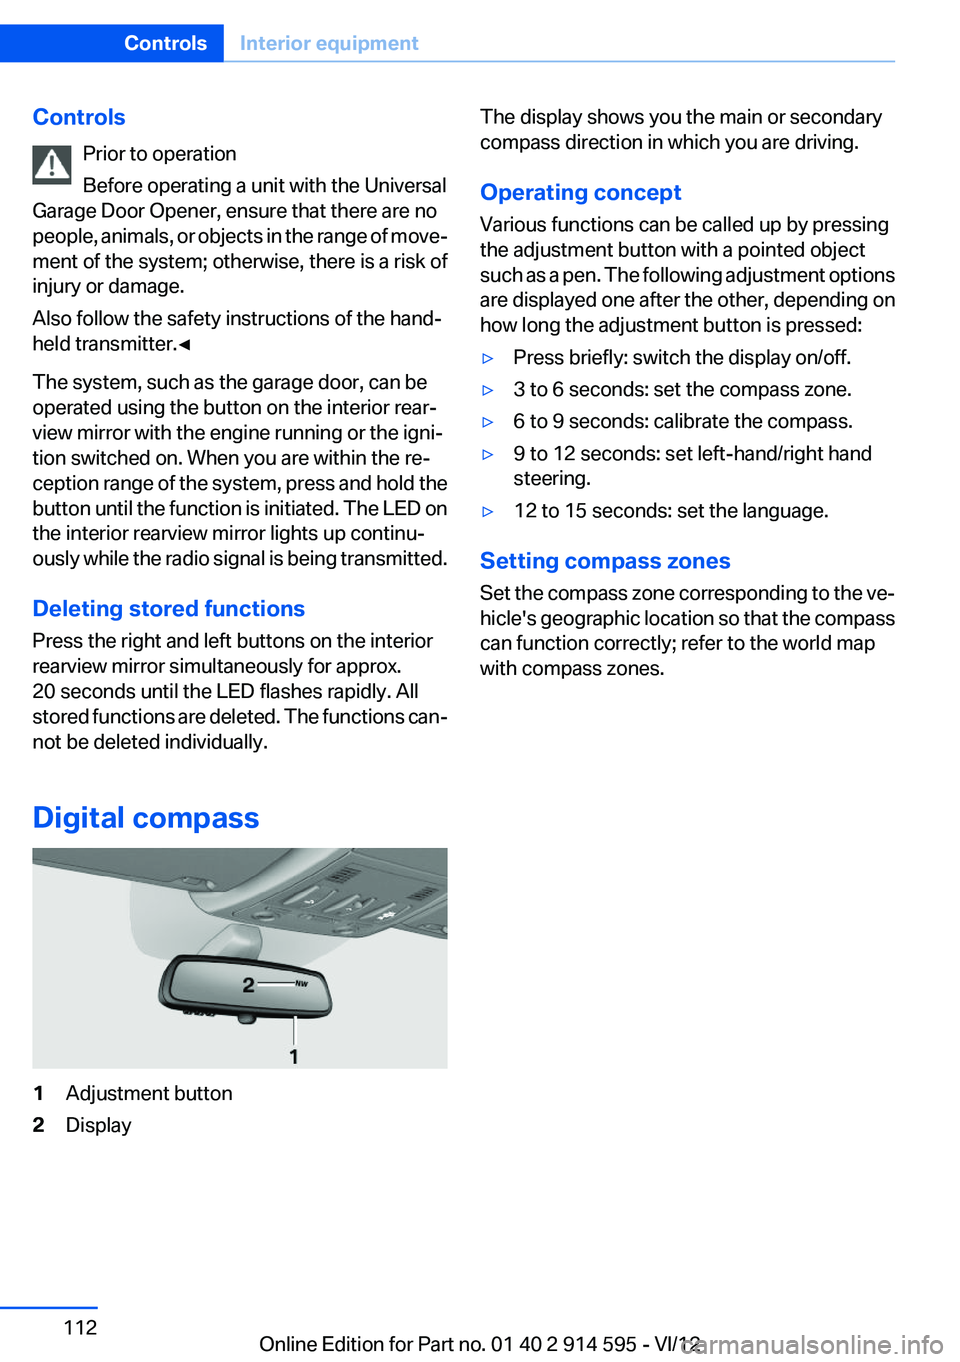
Digital compass1Adjustment button2DisplayThe display shows you the main or secondary
compass direction in which you are driving.
Operating concept
Various functions can be called up by pressing
the adjustment button with a pointed object
such as a pen. The following adjustment options
are displayed one after the other, depending on
how long the adjustment button is pressed:▷Press briefly: switch the display on/off.▷3 to 6 seconds: set the compass zone.▷6 to 9 seconds: calibrate the compass.▷9 to 12 seconds: set left-hand/right hand
steering.▷12 to 15 seconds: set the language.
Setting compass zones
Set the compass zone corresponding to the ve‐
hicle's geographic location so that the compass
can function correctly; refer to the world map
with compass zones.
Seite 112ControlsInterior equipment112
Online Edition for Part no. 01 40 2 914 595 - VI/12
Page 113 of 291
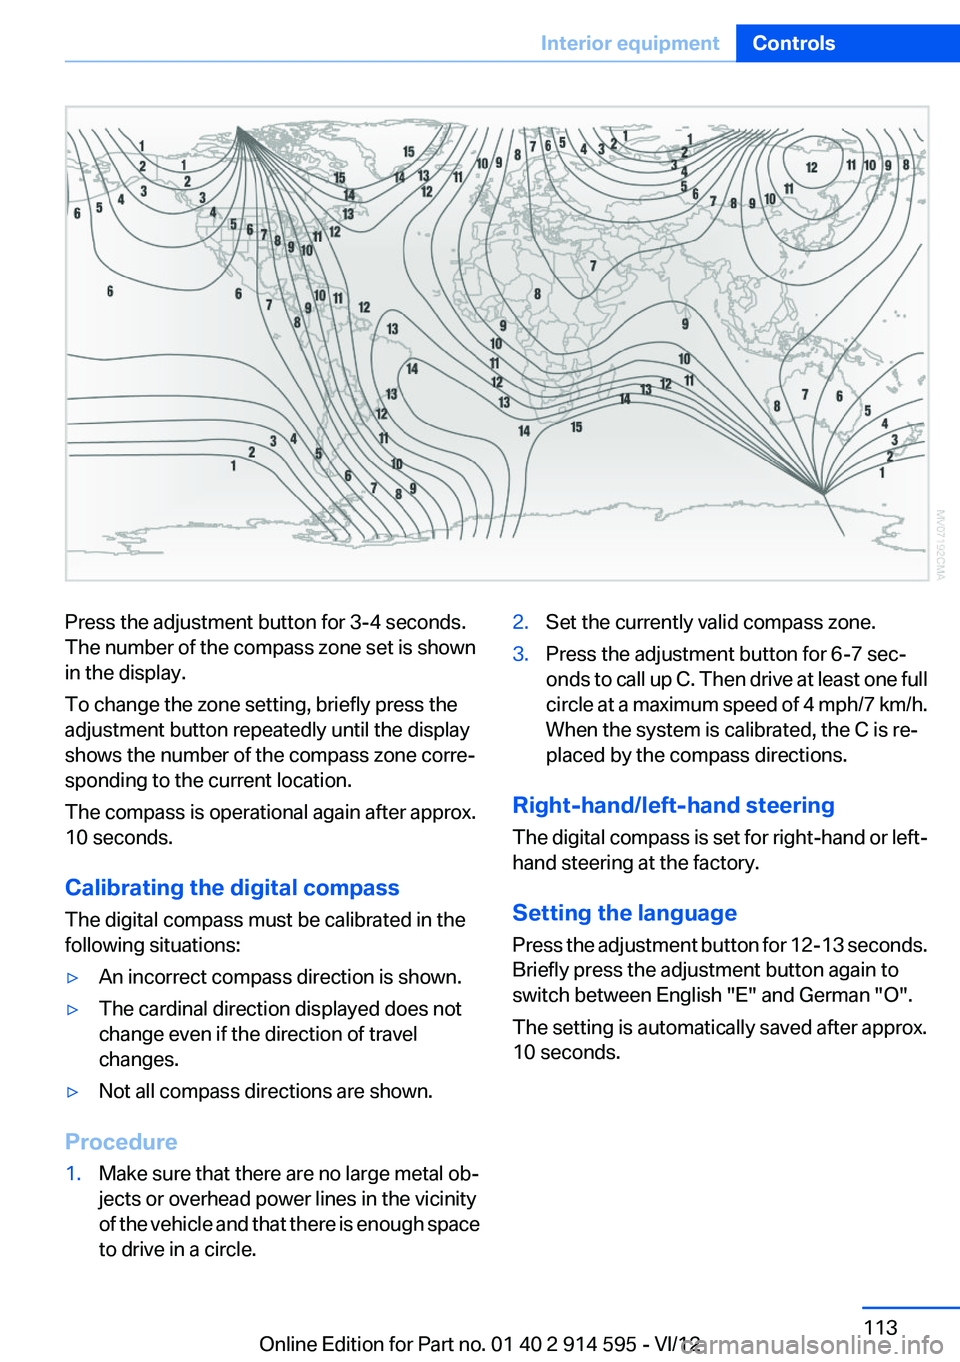
Press the adjustment button for 3‑4 seconds.
The number of the compass zone set is shown
in the display.
To change the zone setting, briefly press the
adjustment button repeatedly until the display
shows the number of the compass zone corre‐
sponding to the current location.
The compass is operational again after approx.
10 seconds.
Calibrating the digital compass
The digital compass must be calibrated in the
following situations:▷An incorrect compass direction is shown.▷The cardinal direction displayed does not
change even if the direction of travel
changes.▷Not all compass directions are shown.
Procedure
1.Make sure that there are no large metal ob‐
jects or overhead power lines in the vicinity
of the vehicle and that there is enough space
to drive in a circle.2.Set the currently valid compass zone.3.Press the adjustment button for 6‑7 sec‐
onds to call up C. Then drive at least one full
circle at a maximum speed of 4 mph/7 km/h.
When the system is calibrated, the C is re‐
placed by the compass directions.
Right-hand/left-hand steering
The digital compass is set for right-hand or left-
hand steering at the factory.
Setting the language
Press the adjustment button for 12‑13 seconds.
Briefly press the adjustment button again to
switch between English "E" and German "O".
The setting is automatically saved after approx.
10 seconds.
Seite 113Interior equipmentControls113
Online Edition for Part no. 01 40 2 914 595 - VI/12
Page 127 of 291
Do not remove the heat shields installed and
never apply undercoating to them. Make sure
that flammable materials, e. g. hay, leaves, grass,
etc. do not come in contact with the hot exhaust
system during driving, while in idle position
mode, or when parked. Such contact could lead
to a fire, and with it the risk of serious personal
injury as well as property damage.
Do not touch hot exhaust pipes; otherwise, there
is the danger of getting burned.◀
Mobile communication devices in the
vehicle
Mobile communication devices in the ve‐
hicle
It is not recommended to use mobile phones,
such as mobile phones without a direct connec‐
tion to an external aerial in the vehicle's passen‐
ger compartment. Otherwise, the vehicle elec‐
tronics and mobile communication devices can
interfere with each other. In addition, there is no
assurance that the radiation generated during
transmission will be discharged from the vehicle
interior.◀
Hydroplaning
On wet or slushy roads, a wedge of water can
form between the tires and road surface.
This phenomenon is referred to as hydroplan‐
ing. It is characterized by a partial or complete
loss of contact between the tires and the road
surface, ultimately undermining your ability to
steer and brake the vehicle.
Hydroplaning
When driving on wet or slushy roads, re‐
duce your speed to prevent hydroplaning.◀
The risk of hydroplaning increases as the tire
tread depth decreases. Minimum tread depth,
refer to page 234.Driving through water
Drive though calm water only if it is not deeper
than 12 inches/30 cm and at this height, no
faster than walking speed, up to 6 mph/10 km/h.
Adhere to water depth and speed limita‐
tions
Do not exceed this water depth and walking
speed; otherwise, the vehicle's engine, the elec‐
trical systems and the transmission may be
damaged.◀
Braking safely
Your vehicle is equipped with ABS as a standard
feature.
Applying the brakes fully is the most effective
way of braking in situations when this is neces‐
sary.
The vehicle maintains steering responsiveness.
You can still avoid any obstacles with a minimum
of steering effort.
Pulsation of the brake pedal and sounds from
the hydraulic circuits indicate that ABS is in its
active mode.
Do not let your foot rest on the brake pedal
Do not drive with your foot resting on the
brake pedal. Even light but consistent pedal
pressure can lead to high temperatures, brake
wear and possibly even brake failure.◀
Objects in the area around the pedals No objects in the area around the pedals
Keep floor mats, carpets, and any other
objects out of the area of motion of the pedals;
otherwise, the function of the pedals could be
impeded while driving
Do not place additional floor mats over existing
mats or other objects.
Only use floor mats that have been approved for
the vehicle and can be properly fixed in place.Seite 127Things to remember when drivingDriving tips127
Online Edition for Part no. 01 40 2 914 595 - VI/12