2013 BMW X1 XDRIVE 28I ECU
[x] Cancel search: ECUPage 132 of 291
Roof-mounted luggage rack
Notes
A special rack system is available as an optional
accessory.
Anchorage points
The anchorage points are located on the roof
railing.
Attachment
Follow the installation instructions for the roof-
mounted luggage rack.
Be sure that adequate clearance is maintained
for tilting and opening the panoramic glass sun‐
roof.
Loading
Because roof racks raise the vehicle's center of
gravity when loaded, they have a major effect on
vehicle handling and steering response.
Therefore, note the following when loading and
driving:▷Do not exceed the approved roof/axle loads
and the approved gross vehicle weight.▷Distribute the roof load uniformly.▷The roof load should not be too large in area.▷Always load the heaviest pieces on the bot‐
tom.▷Fasten the roof-mounted luggage securely,
for instance using lashing straps.▷Do not let objects project into the opening
path of the tailgate.▷Drive smoothly. Avoid sudden acceleration
and braking maneuvers. Take corners gen‐
tly.Rear luggage rack
Notes
A special rear rack is available as an optional ac‐
cessory. It does not require a trailer hitch.
Follow the installation instructions for the rear
rack.
Anchorage points
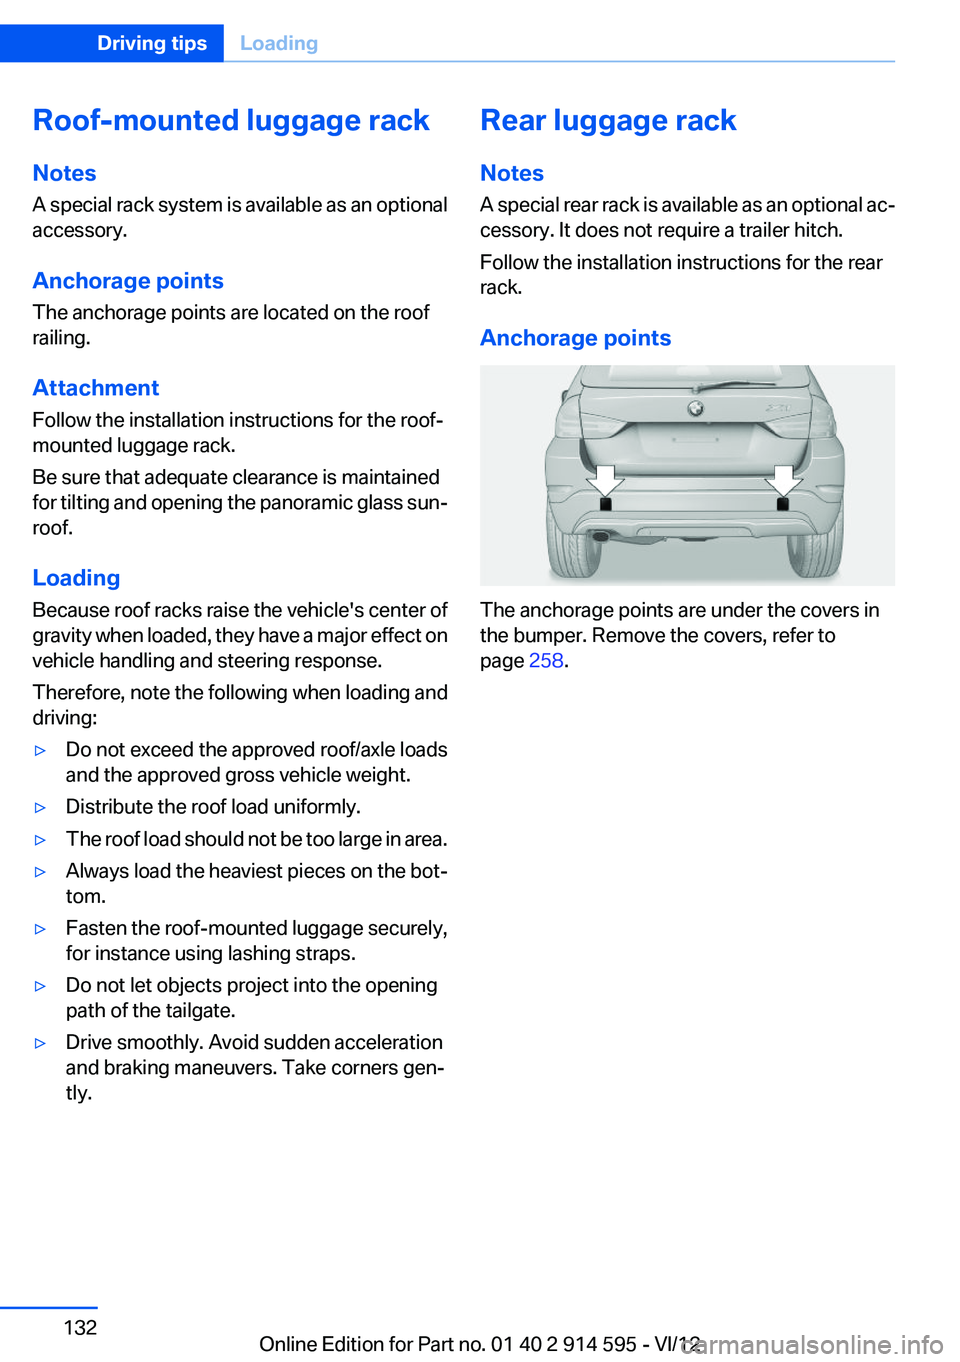
The anchorage points are under the covers in
the bumper. Remove the covers, refer to
page 258.
Seite 132Driving tipsLoading132
Online Edition for Part no. 01 40 2 914 595 - VI/12
Page 193 of 291
Notes
At high temperatures, the charging function of
the mobile phone may be limited and functions
may not be executed.
When using the mobile phone via the vehicle,
note the operating instructions of the mobile
phone.
Pairing/unpairing the mobile
phone
General information
The following functions are available:▷Use of a mobile phone as a telephone.▷Use of a mobile phone as an additional tele‐
phone.▷Use of a mobile phone as an audio source.▷Use of an audio device as an audio source,
refer to page 185.
Requirements
▷The mobile phone is suitable, refer to
page 192.▷The mobile phone is ready for operation.▷Bluetooth is activated in the vehicle and on
the mobile phone.▷Bluetooth presettings may need to be made
on the mobile phone, e.g., for a connection
without confirmation or visibility, refer to the
mobile phone operating instructions.▷Deactivate Bluetooth audio if necessary.▷A number with at least four and a maximum
of 16 digits was defined as the Bluetooth
passkey. It is only required once for pairing.▷The ignition is switched on.
Activating/deactivating Bluetooth
Bluetooth is not permitted everywhere. Comply
with all safety guidelines and regulations.
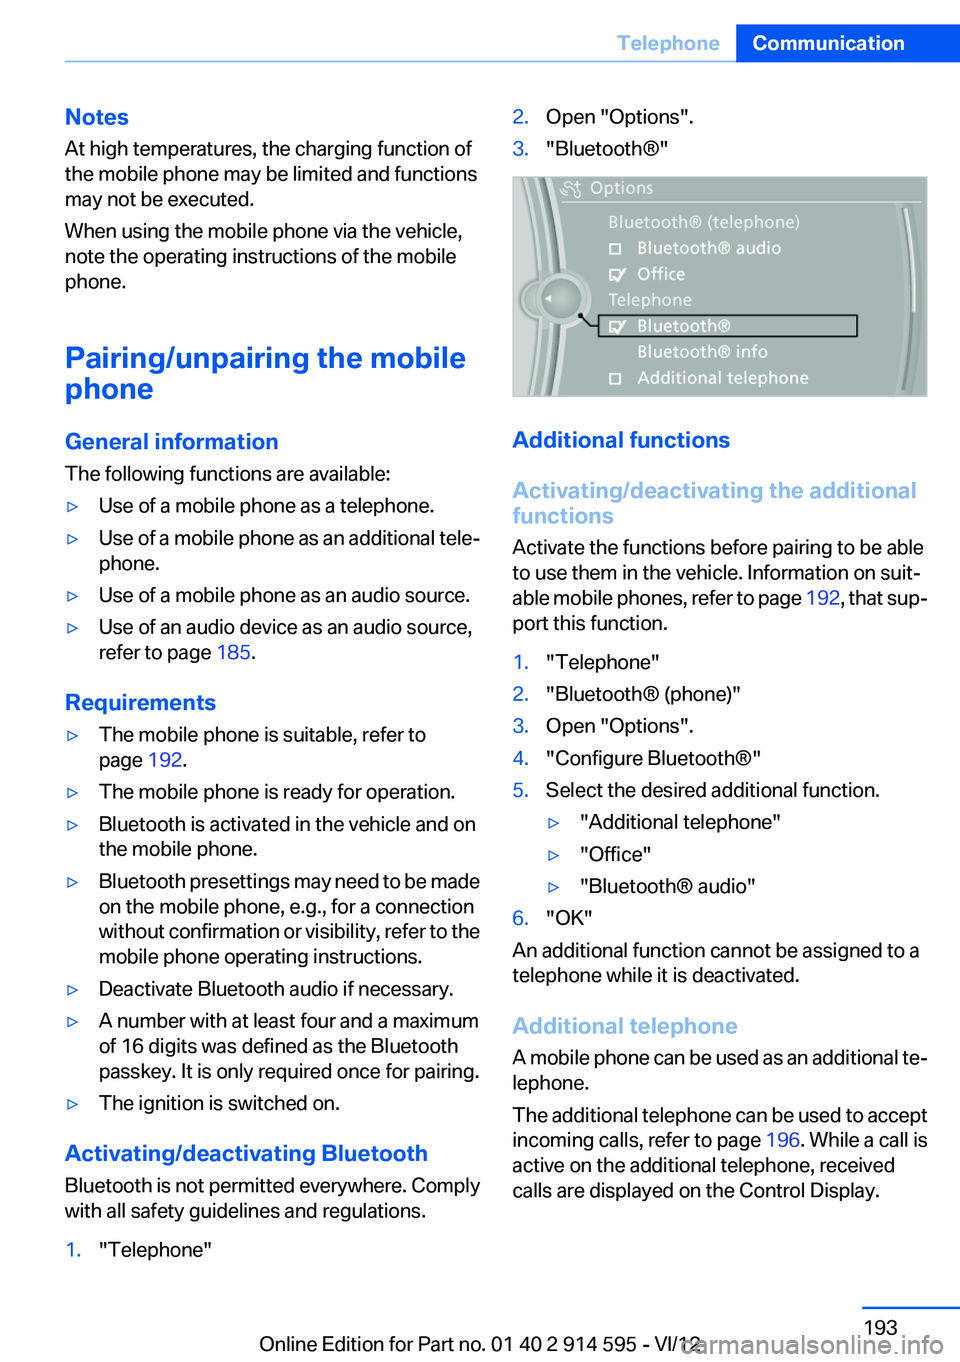
1."Telephone"2.Open "Options".3."Bluetooth®"
Additional functions
Activating/deactivating the additional
functions
Activate the functions before pairing to be able
to use them in the vehicle. Information on suit‐
able mobile phones, refer to page 192, that sup‐
port this function.
1."Telephone"2."Bluetooth® (phone)"3.Open "Options".4."Configure Bluetooth®"5.Select the desired additional function.▷"Additional telephone"▷"Office"▷"Bluetooth® audio"6."OK"
An additional function cannot be assigned to a
telephone while it is deactivated.
Additional telephone
A mobile phone can be used as an additional te‐
lephone.
The additional telephone can be used to accept
incoming calls, refer to page 196. While a call is
active on the additional telephone, received
calls are displayed on the Control Display.
Seite 193TelephoneCommunication193
Online Edition for Part no. 01 40 2 914 595 - VI/12
Page 202 of 291
2.Say the name after being prompted to do so.3.Confirm the prompt: ›Yes‹
Deleting all entries
1.›Delete phone book‹2.Confirm the prompt: ›Yes‹3.Confirm the prompt again: ›Yes‹
Reading and selecting entries
1.›Read phonebook‹2.When the desired entry is read aloud:
say ›Dial number‹
Selecting an entry
1.›Dial name‹2.Say the name after being prompted to do so.3.Confirm the prompt: ›Yes‹
Adjusting the volume
Turn the knob during an announcement.
▷The volume remains constant even if the
volume of other audio sources is changed.▷The volume is stored for the remote control
currently in use.
Notes
Do not use voice operation to initiate an Emer‐
gency Request. In stressful situations, the voice
and vocal pitch can change. This can unneces‐
sarily delay the establishment of a telephone
connection.
Instead, use the SOS button, refer to
page 253, in the vicinity of the interior mirror.
Environmental conditions▷Say the commands, numbers, and letters
smoothly and with normal volume, empha‐
sis, and speed.▷Always say commands in the language of
the system. The language for the mobile
phone voice operation is preset and cannot
be changed in the Control Display.▷Keep the doors, windows, and glass sunroof
closed to prevent noise interference.▷Avoid making other noise in the vehicle
while speaking.
Snap-in adapter
General information
More information on compatible snap-in adapt‐
ers that support the functions of the mobile
phone is available at the service center.
Notes
At high temperatures, the charging function of
the mobile phone may be limited and functions
may not be executed.
When using the mobile phone via the vehicle,
note the operating instructions of the mobile
phone.
Installation position
In the center armrest.
Inserting/removing the snap-in adapter
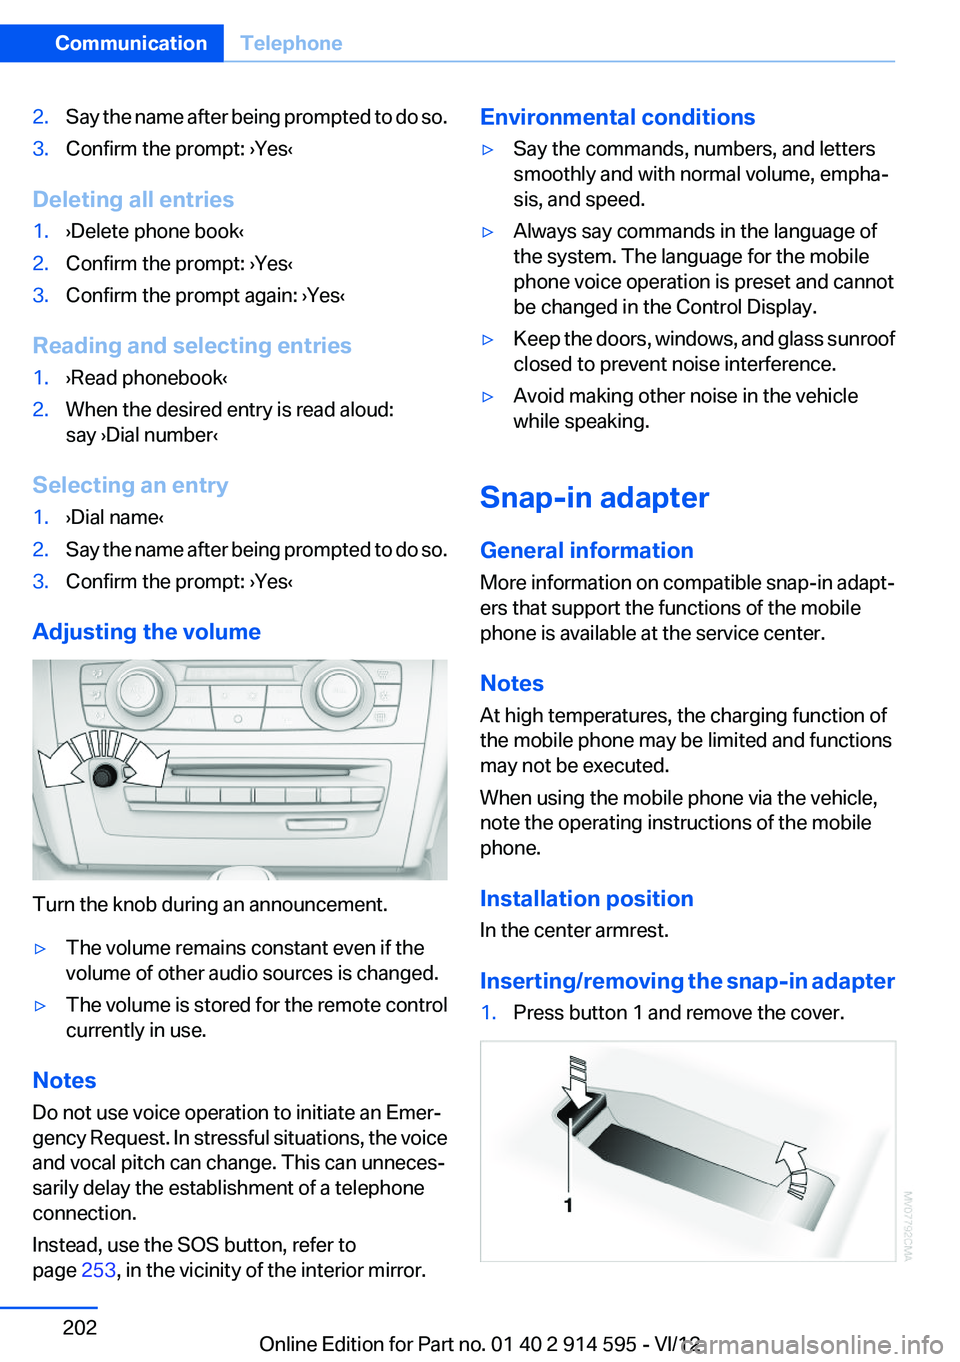
1.Press button 1 and remove the cover.Seite 202CommunicationTelephone202
Online Edition for Part no. 01 40 2 914 595 - VI/12
Page 239 of 291
Risk of damage
Before opening the hood, ensure that the
wiper arms with wiper blades are folded onto the
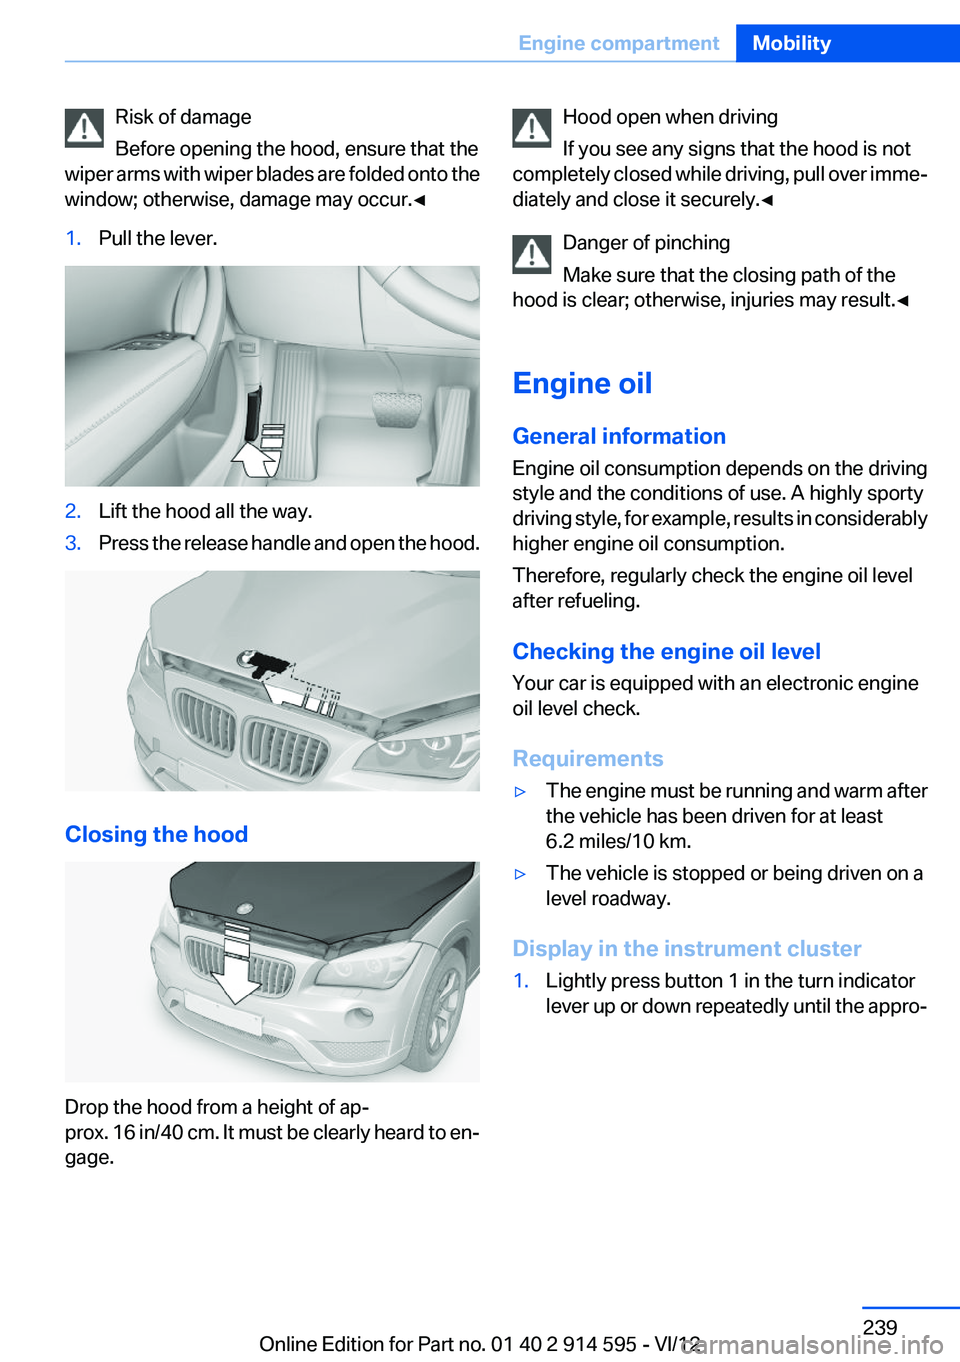
window; otherwise, damage may occur.◀1.Pull the lever.2.Lift the hood all the way.3.Press the release handle and open the hood.
Closing the hood
Drop the hood from a height of ap‐
prox. 16 in/40 cm. It must be clearly heard to en‐
gage.
Hood open when driving
If you see any signs that the hood is not
completely closed while driving, pull over imme‐
diately and close it securely.◀
Danger of pinching
Make sure that the closing path of the
hood is clear; otherwise, injuries may result.◀
Engine oil
General information
Engine oil consumption depends on the driving
style and the conditions of use. A highly sporty
driving style, for example, results in considerably
higher engine oil consumption.
Therefore, regularly check the engine oil level
after refueling.
Checking the engine oil level
Your car is equipped with an electronic engine
oil level check.
Requirements▷The engine must be running and warm after
the vehicle has been driven for at least
6.2 miles/10 km.▷The vehicle is stopped or being driven on a
level roadway.
Display in the instrument cluster
1.Lightly press button 1 in the turn indicator
lever up or down repeatedly until the appro‐Seite 239Engine compartmentMobility239
Online Edition for Part no. 01 40 2 914 595 - VI/12
Page 252 of 291
Maintain the battery in an upright position for
transport and storage. Secure the battery so
that it does not tip over during transport.
Fuses Replacing fuses
Never attempt to repair a blown fuse and
do not replace a defective fuse with a substitute
of another color or amperage rating; this could
lead to a circuit overload, ultimately resulting in
a fire in the vehicle.◀
Access to fuse box:
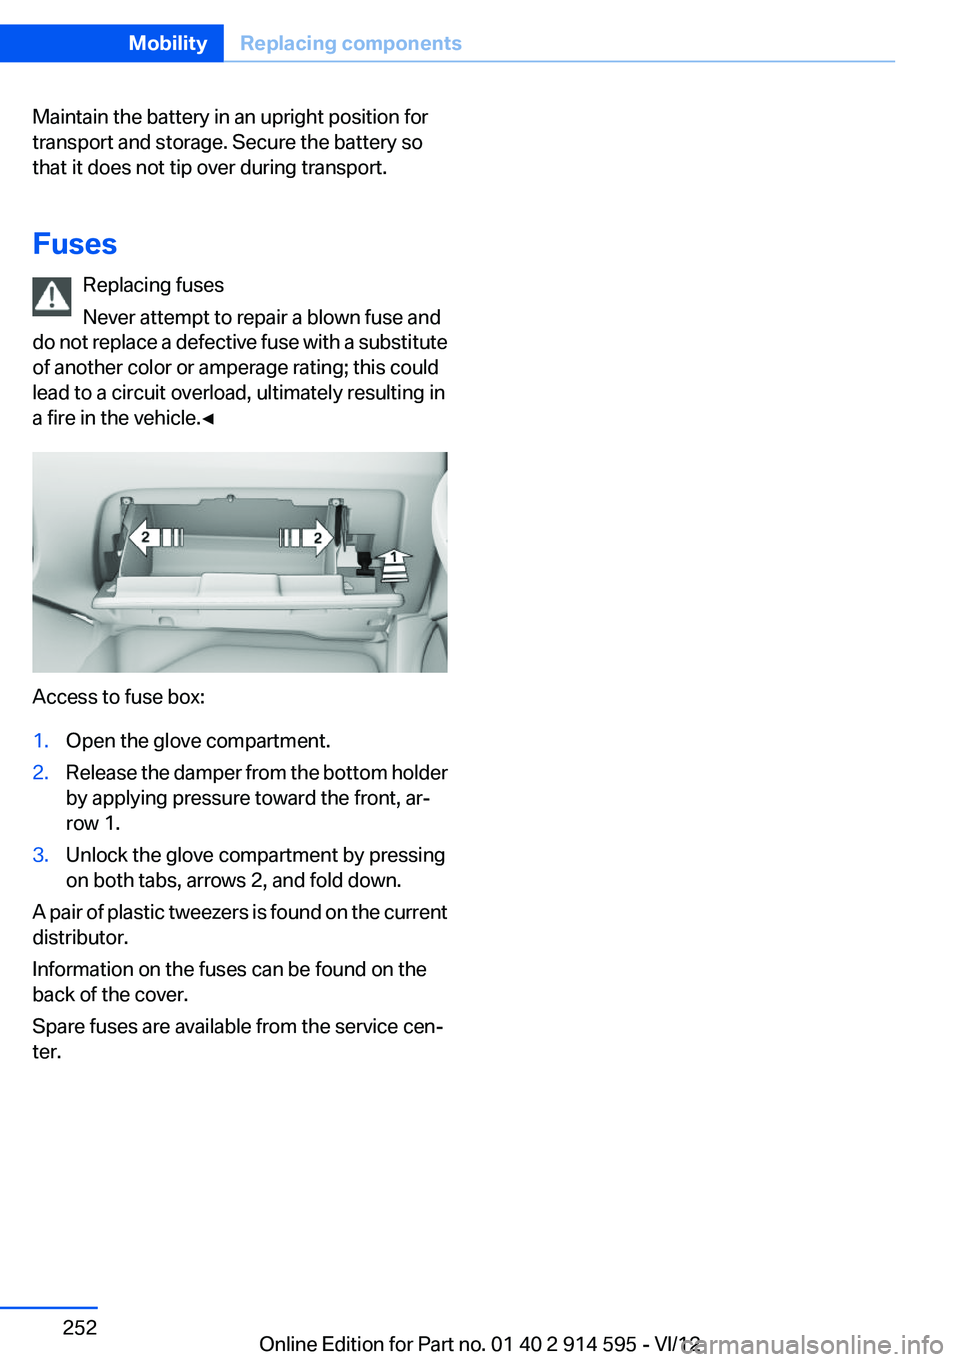
1.Open the glove compartment.2.Release the damper from the bottom holder
by applying pressure toward the front, ar‐
row 1.3.Unlock the glove compartment by pressing
on both tabs, arrows 2, and fold down.
A pair of plastic tweezers is found on the current
distributor.
Information on the fuses can be found on the
back of the cover.
Spare fuses are available from the service cen‐
ter.
Seite 252MobilityReplacing components252
Online Edition for Part no. 01 40 2 914 595 - VI/12
Page 257 of 291
Being towedFollow the towing instructions
Follow all towing instructions, or vehicle
damage or accidents may occur.◀▷Make sure that the ignition is switched on;
otherwise, the low beams, tail lamps, turn
signals, and windshield wipers may be un‐
available.▷Do not tow the vehicle with the rear axle
tilted, as the front wheels could turn.▷When the engine is stopped, there is no
power assist. Consequently, more force
needs to be applied when braking and steer‐
ing.▷Larger steering wheel movements are re‐
quired.▷Switch on the hazard warning system, de‐
pending on local regulations.▷If the electrical system has failed, clearly
identify the vehicle being towed by placing
a sign or a warning triangle in the rear win‐
dow.
Towing other vehicles
General information Light towing vehicle
Your vehicle must not be lighter than the
vehicle being towed; otherwise, it will not be
possible to control vehicle response.◀
Attaching the tow bar/tow rope correctly
Attach the tow bar or tow rope to the tow
fitting; connecting it to other vehicle parts may
cause damage.◀
▷Switch on the hazard warning system, de‐
pending on local regulations.▷If the electrical system has failed, clearly
identify the vehicle being towed by placing
a sign or a warning triangle in the rear win‐
dow.Towing methods
Do not lift the vehicle
Do not lift the vehicle by the tow fitting or
body and chassis parts; otherwise, damage may
result.◀
Tow bar
The tow fittings used should be on the same
side on both vehicles.
Should it prove impossible to avoid mounting
the tow bar at an offset angle, please observe
the following:▷Clearance and maneuvering capability will
be sharply limited during cornering.▷The tow bar will generate lateral forces if it
is attached offset.
Tow rope
When starting to tow the vehicle, make sure that
the tow rope is taut.
To avoid jerking and the associated stresses on
the vehicle components when towing, always
use nylon ropes or nylon straps.
Attaching the tow rope correctly
Only secure the tow rope on the tow fit‐
ting; otherwise, damage can occur when it is se‐
cured on other parts of the vehicle.◀
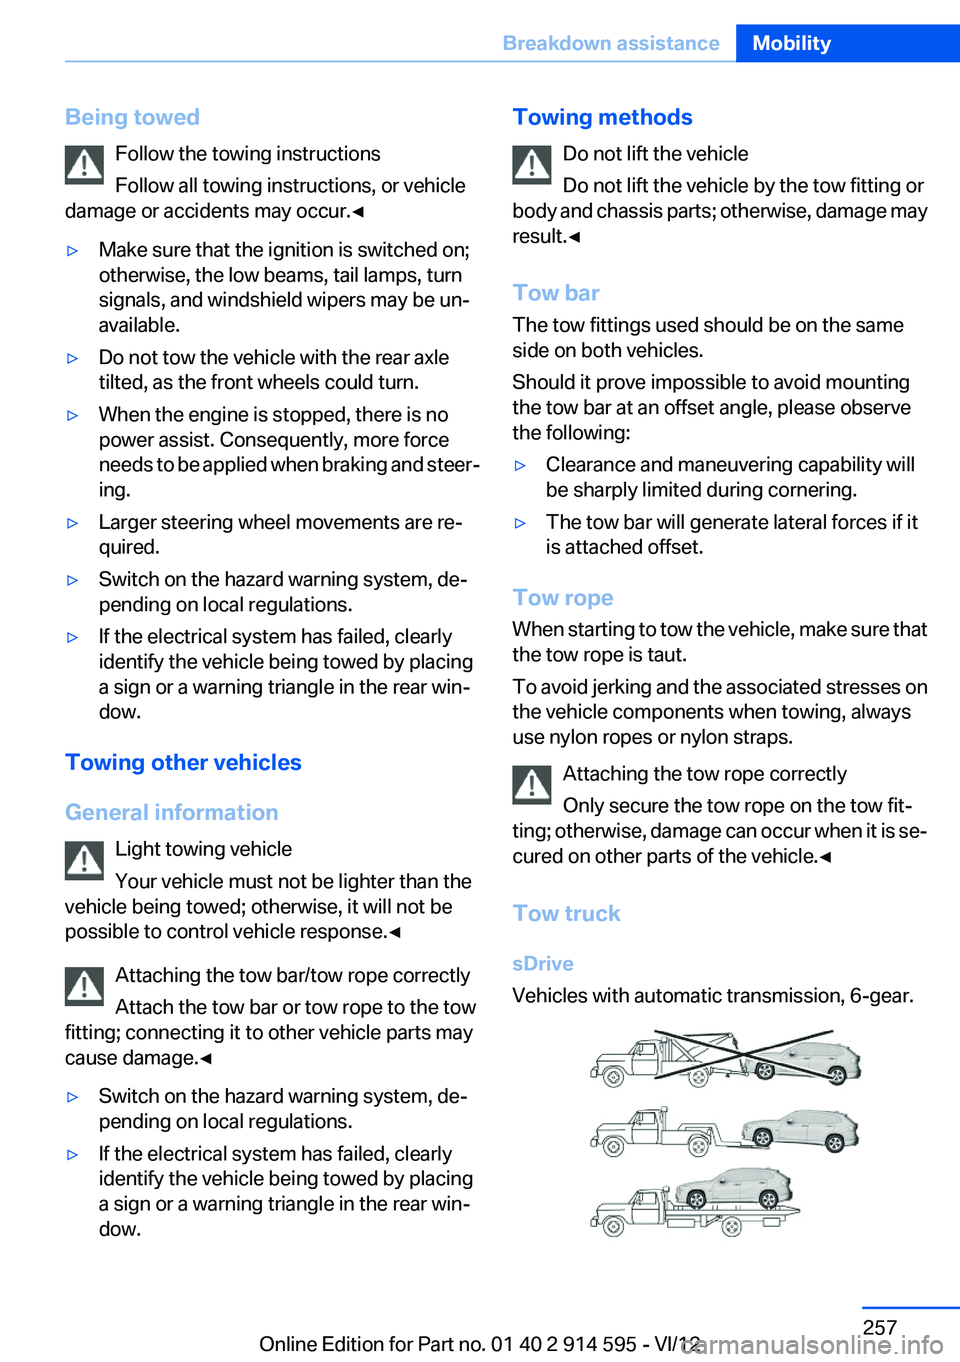
Tow truck
sDrive
Vehicles with automatic transmission, 6-gear.
Seite 257Breakdown assistanceMobility257
Online Edition for Part no. 01 40 2 914 595 - VI/12
Page 261 of 291

Caring for special components
Light-alloy wheels
Use wheel cleaner, particularly during the winter
months. Do not use aggressive, acidic, strongly
alkaline or abrasive cleaners, or steam jets
above 140 ℉/60 ℃; follow the manufacturer's
instructions.
Chrome surfaces
Carefully clean components such as the radiator
grille or door handles with an ample supply of
water, possibly with shampoo added, particu‐
larly when they have been exposed to road salt.
Rubber components
Aside from water, treat only with rubber cleans‐
ers.
When cleaning rubber seals, do not use any sil‐
icon-containing car care products in order to
avoid damage or reduced noise damping.
Fine wood parts
Clean fine wood facing and fine wood compo‐
nents only with a moist rag. Then dry with a soft
cloth.
Plastic components
These include:▷Imitation leather surfaces.▷Headliner.▷Lamp lenses.▷Instrument cluster cover.▷Matte black spray-coated components.▷Painted parts in the interior.
Clean with a microfiber cloth.
Moisten the cloth lightly with water if necessary.
Do not soak the headliner.
Do not use cleansers that contain alcohol
or solvents
Do not use cleansers that contain alcohol or sol‐
vents, such as lacquer thinners, heavy-duty
grease removers, fuel, or such; this could lead to
surface damage.◀
Safety belts
Dirty belt straps impede the reeling action and
thus have a negative impact on safety.
No chemical cleaning
Do not clean chemically; this can destroy
the webbing.◀
Use only a mild soapy solution, with the safety
belts clipped into their buckles.
Do not allow the reels to retract the safety belts
until they are dry.
Carpets and floor mats No objects in the area around the pedals
Keep floor mats, carpets, and any other
objects out of the area of motion of the pedals;
otherwise, the function of the pedals could be
impeded while driving
Do not place additional floor mats over existing
mats or other objects.
Only use floor mats that have been approved for
the vehicle and can be properly fixed in place.
Ensure that the floor mats are securely fastened
again when they are returned after being re‐
moved, such as for cleaning.◀
Floor mats can be removed from the passenger
compartment for cleaning.
When returning the floor mats, secure them
again to prevent slipping.
If the floor carpets are very dirty, clean with a
microfiber cloth and water or a textile cleaner. To
prevent matting of the carpet, rub back and forth
in the direction of travel only.
Sensors/cameras
To clean sensors or cameras, use a cloth mois‐
tened with a small amount of glass cleaner.Seite 261CareMobility261
Online Edition for Part no. 01 40 2 914 595 - VI/12
Page 277 of 291
Axle loads, refer toWeights 267
B
Backrest curvature, refer to Lumbar support 44
Backrests, refer to Seats 43
Backrest width adjustment 44
Back seats– Adjusting the backrest
tilt 115
Backup camera 102
Backup camera, cleaning 104
Backup camera, obstacle marking 103
Backup camera, pathway lines 103
Backup camera, turning lines 103
Backup lamps, bulb replace‐ ment 249
Balance 160
Band-aids, refer to First aid kit 254
Bass 160
Battery
– Remote control 30
Battery disposal 251
Battery, refer to Vehicle bat‐ tery 251
Battery replacement, remote control for vehicle 38
Before entering the car wash 259
Belts, refer to Safety belts 45
Belt tensioners, refer to Safety belts 45
Beverage holder, refer to Cu‐ pholder 122
Black and white map dis‐ play 154
Blower, refer to Air flow rate 106
Bluetooth audio 185
Bluetooth connection, activat‐ ing/deactivating 193
BMW Apps 219
BMW Apps, video play‐ back 184
BMW Assist 215
BMW Assist, refer to Connec‐ tedDrive 215
BMW EfficientDynamics, refer to Saving fuel 133
BMW Homepage 6
BMW Internet page 6
BMW maintenance sys‐ tem 243
BMW Online 217
Bottle holder, refer to Cu‐ pholder 122
Brake assistant 94
Brake discs, breaking in 126
Brake fluid, refer to Service re‐ quirements 75
Brake force display 93
Brake force distribution, elec‐ tronic 94
Brake lamps– Bulb replacement 249
Brake lamps, brake force dis‐
play 93
Brake lights, adaptive 93
Brake pads, breaking in 126
Brakes
– Handbrake 58
Brakes, BMW maintenance
system 243
Brakes, service require‐ ments 75
Brake system, BMW mainte‐ nance system 243
Braking, notes 127
Breakdown assistance 254
Breakdown, transporting the vehicle 256
Breaking in 126
Brightness on the Control Dis‐ play 75
Bulb replacement, refer to Lamp and bulb replace‐
ment 246
Button for starting the engine,
refer to Start/Stop button 54
C
Calendar 209
California Proposition 65 Warning 7
Camera, care 261
Camera, refer to Backup cam‐ era 102
Can holder, refer to Cu‐ pholder 122
Car battery, refer to Vehicle battery 251
Car care products 260
Care 259
Care, displays 262
Care, vehicle 260
Cargo 130
Cargo area 115
Cargo area– Comfort Access 37– Cover 115– Folding up the cargo floor
panel 118– Multi-function hook 118– Partition net 116
Cargo area, capacities 267
Cargo area, enlarging 115
Cargo area lamp, refer to Inte‐ rior lamps 84
Cargo area lid, refer to Tail‐ gate 35
Cargo area net, refer to Parti‐ tion net 116
Cargo area, opening from the inside 35
Cargo area, opening from the outside 36
Cargo floor panel
– Folding up 118
Cargo floor panel, raising 118
Cargo straps, securing cargo 131
Car key, refer to Integrated key/remote control 30
Seite 277Everything from A to ZReference277
Online Edition for Part no. 01 40 2 914 595 - VI/12