2013 BMW X1 XDRIVE 28I transmission
[x] Cancel search: transmissionPage 62 of 291

Washer fluid reservoirAdding washer fluid
Only add washer fluid when the engine is
cool, and then close the cover completely to
avoid contact between the washer fluid and hot
engine parts.
Otherwise, there is the danger of fire and a risk
to personal safety if the fluid is spilled.◀
All washer nozzles are supplied from one reser‐
voir.
Fill with water and – if required – with a washer
antifreeze, according to the manufacturer's rec‐
ommendations.
Mix the washer fluid before adding to maintain
the correct mixing ratio.
Capacity
Approx. 6.3 US quarts/6 liters.
Automatic transmission with
Steptronic, 6-gear
In addition to the fully automatic mode, gears
can also be shifted manually using Steptronic,
refer to page 63.
Parking the vehicle Secure the vehicle
Before leaving the vehicle with the engine
running, move the selector lever to position P
and set the handbrake; otherwise, the vehicle
will begin moving.◀
Disengaging the remote control
To remove the remote control from the ignition
lock, first move the selector lever to position P
and switch off the engine: interlock. Remove the
remote control from the ignition lock, refer to
page 54.
Selector lever positions
P R N D M/S + –
Displays in the instrument cluster
The selector lever position is displayed and the
engaged gear, such as M4, is displayed in
manual mode.
Changing selector lever positions
▷With the ignition switched on or the engine
running, the selector lever can be moved out
of position P.▷When the vehicle is stationary, step on the
brake before shifting out of P or N; other‐
wise, the selector lever is locked: shiftlock.
Press on the brake pedal until you start
driving
To prevent the vehicle from creeping after
you select a driving position, maintain pres‐
sure on the brake pedal until you are ready
to start.◀Seite 62ControlsDriving62
Online Edition for Part no. 01 40 2 914 595 - VI/12
Page 64 of 291
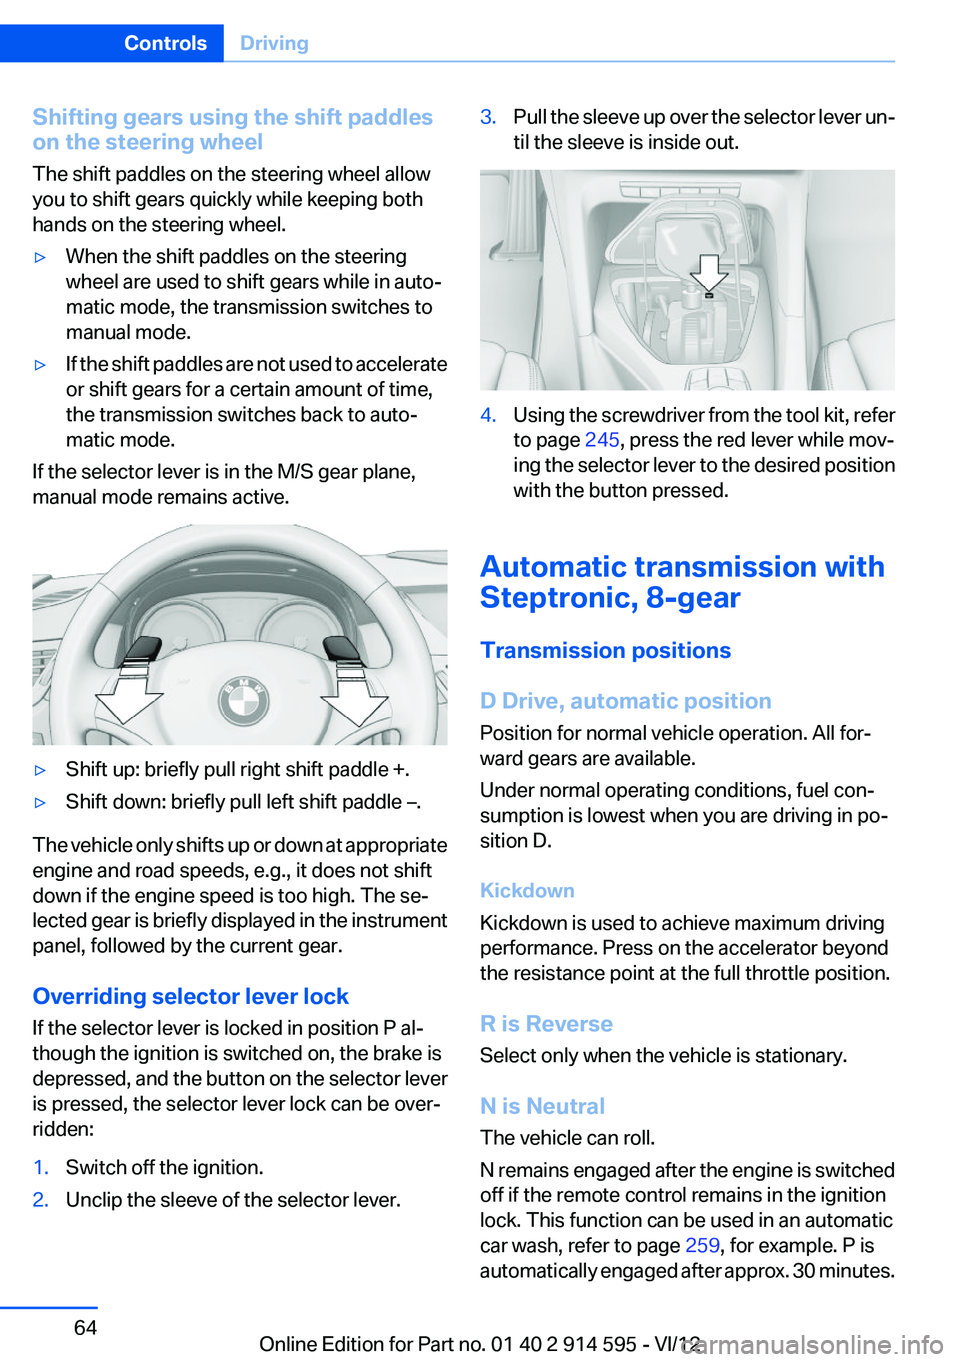
Shifting gears using the shift paddles
on the steering wheel
The shift paddles on the steering wheel allow
you to shift gears quickly while keeping both
hands on the steering wheel.▷When the shift paddles on the steering
wheel are used to shift gears while in auto‐
matic mode, the transmission switches to
manual mode.▷If the shift paddles are not used to accelerate
or shift gears for a certain amount of time,
the transmission switches back to auto‐
matic mode.
If the selector lever is in the M/S gear plane,
manual mode remains active.
▷Shift up: briefly pull right shift paddle +.▷Shift down: briefly pull left shift paddle –.
The vehicle only shifts up or down at appropriate
engine and road speeds, e.g., it does not shift
down if the engine speed is too high. The se‐
lected gear is briefly displayed in the instrument
panel, followed by the current gear.
Overriding selector lever lock
If the selector lever is locked in position P al‐
though the ignition is switched on, the brake is
depressed, and the button on the selector lever
is pressed, the selector lever lock can be over‐
ridden:
1.Switch off the ignition.2.Unclip the sleeve of the selector lever.3.Pull the sleeve up over the selector lever un‐
til the sleeve is inside out.4.Using the screwdriver from the tool kit, refer
to page 245, press the red lever while mov‐
ing the selector lever to the desired position
with the button pressed.
Automatic transmission with
Steptronic, 8-gear
Transmission positions
D Drive, automatic position
Position for normal vehicle operation. All for‐
ward gears are available.
Under normal operating conditions, fuel con‐
sumption is lowest when you are driving in po‐
sition D.
Kickdown
Kickdown is used to achieve maximum driving
performance. Press on the accelerator beyond
the resistance point at the full throttle position.
R is Reverse
Select only when the vehicle is stationary.
N is Neutral
The vehicle can roll.
N remains engaged after the engine is switched
off if the remote control remains in the ignition
lock. This function can be used in an automatic
car wash, refer to page 259, for example. P is
automatically engaged after approx. 30 minutes.
Seite 64ControlsDriving64
Online Edition for Part no. 01 40 2 914 595 - VI/12
Page 65 of 291
P Park
The drive wheels are blocked.
P is engaged automatically when the following
conditions are met:▷The driver's door is opened while the engine
is running, the safety belt is not fastened and
neither the brake pedal nor the accelerator
is activated.▷The engine is switched off unless N is en‐
gaged and the remote control is in the igni‐
tion lock.▷The remote control is removed from the ig‐
nition lock.
Before leaving the vehicle, ensure that the trans‐
mission position P is engaged; otherwise, the
vehicle may begin to roll.
Engaging transmission position
▷Transmission position P can only be disen‐
gaged if the engine is running and the brake
pedal is pressed.▷With the vehicle stationary, press on the
brake pedal before shifting out of P or N;
otherwise, the shift command will not be
executed: shift lock.
Press on the brake pedal until you start
driving
To prevent the vehicle from creeping after you
select a driving position, maintain pressure on
the brake pedal until you are ready to start.◀
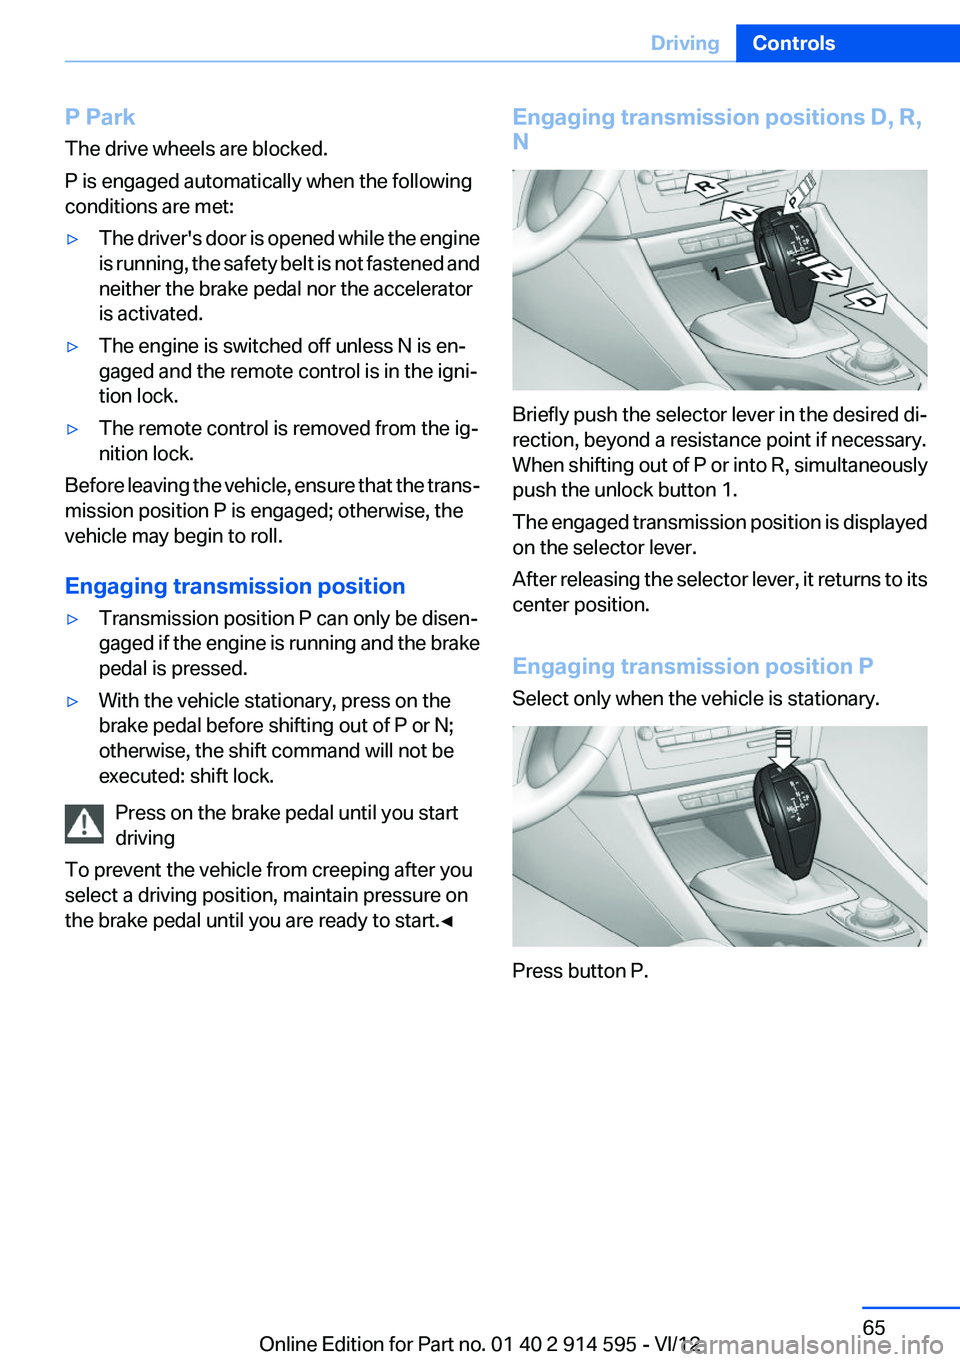
Engaging transmission positions D, R,
N
Briefly push the selector lever in the desired di‐
rection, beyond a resistance point if necessary.
When shifting out of P or into R, simultaneously
push the unlock button 1.
The engaged transmission position is displayed
on the selector lever.
After releasing the selector lever, it returns to its
center position.
Engaging transmission position P
Select only when the vehicle is stationary.
Press button P.
Seite 65DrivingControls65
Online Edition for Part no. 01 40 2 914 595 - VI/12
Page 66 of 291
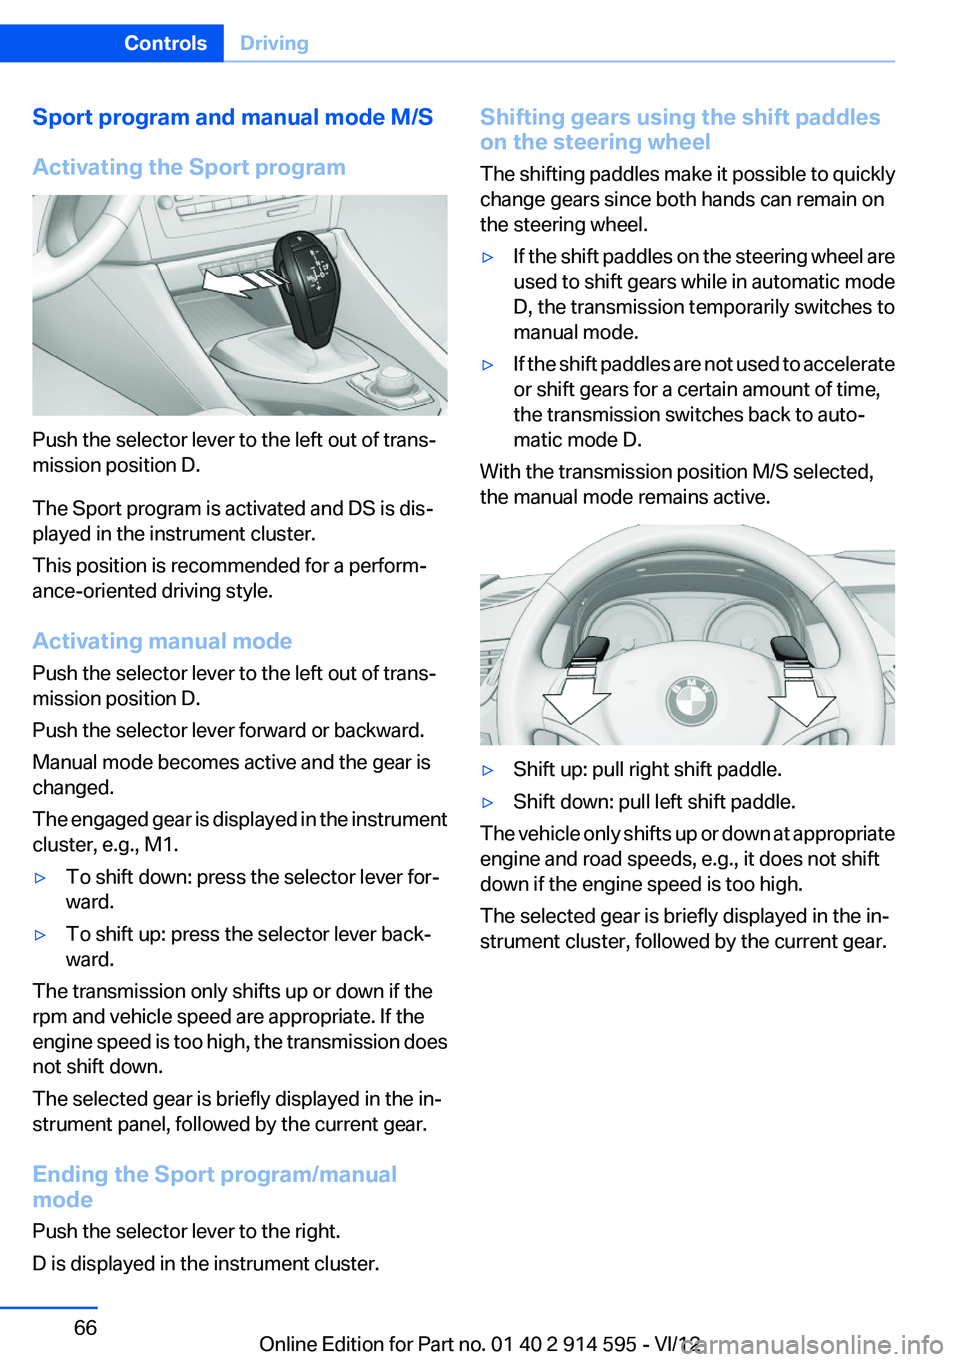
Sport program and manual mode M/S
Activating the Sport program
Push the selector lever to the left out of trans‐
mission position D.
The Sport program is activated and DS is dis‐
played in the instrument cluster.
This position is recommended for a perform‐
ance-oriented driving style.
Activating manual mode
Push the selector lever to the left out of trans‐
mission position D.
Push the selector lever forward or backward.
Manual mode becomes active and the gear is
changed.
The engaged gear is displayed in the instrument
cluster, e.g., M1.
▷To shift down: press the selector lever for‐
ward.▷To shift up: press the selector lever back‐
ward.
The transmission only shifts up or down if the
rpm and vehicle speed are appropriate. If the
engine speed is too high, the transmission does
not shift down.
The selected gear is briefly displayed in the in‐
strument panel, followed by the current gear.
Ending the Sport program/manual
mode
Push the selector lever to the right.
D is displayed in the instrument cluster.
Shifting gears using the shift paddles
on the steering wheel
The shifting paddles make it possible to quickly
change gears since both hands can remain on
the steering wheel.▷If the shift paddles on the steering wheel are
used to shift gears while in automatic mode
D, the transmission temporarily switches to
manual mode.▷If the shift paddles are not used to accelerate
or shift gears for a certain amount of time,
the transmission switches back to auto‐
matic mode D.
With the transmission position M/S selected,
the manual mode remains active.
▷Shift up: pull right shift paddle.▷Shift down: pull left shift paddle.
The vehicle only shifts up or down at appropriate
engine and road speeds, e.g., it does not shift
down if the engine speed is too high.
The selected gear is briefly displayed in the in‐
strument cluster, followed by the current gear.
Seite 66ControlsDriving66
Online Edition for Part no. 01 40 2 914 595 - VI/12
Page 67 of 291
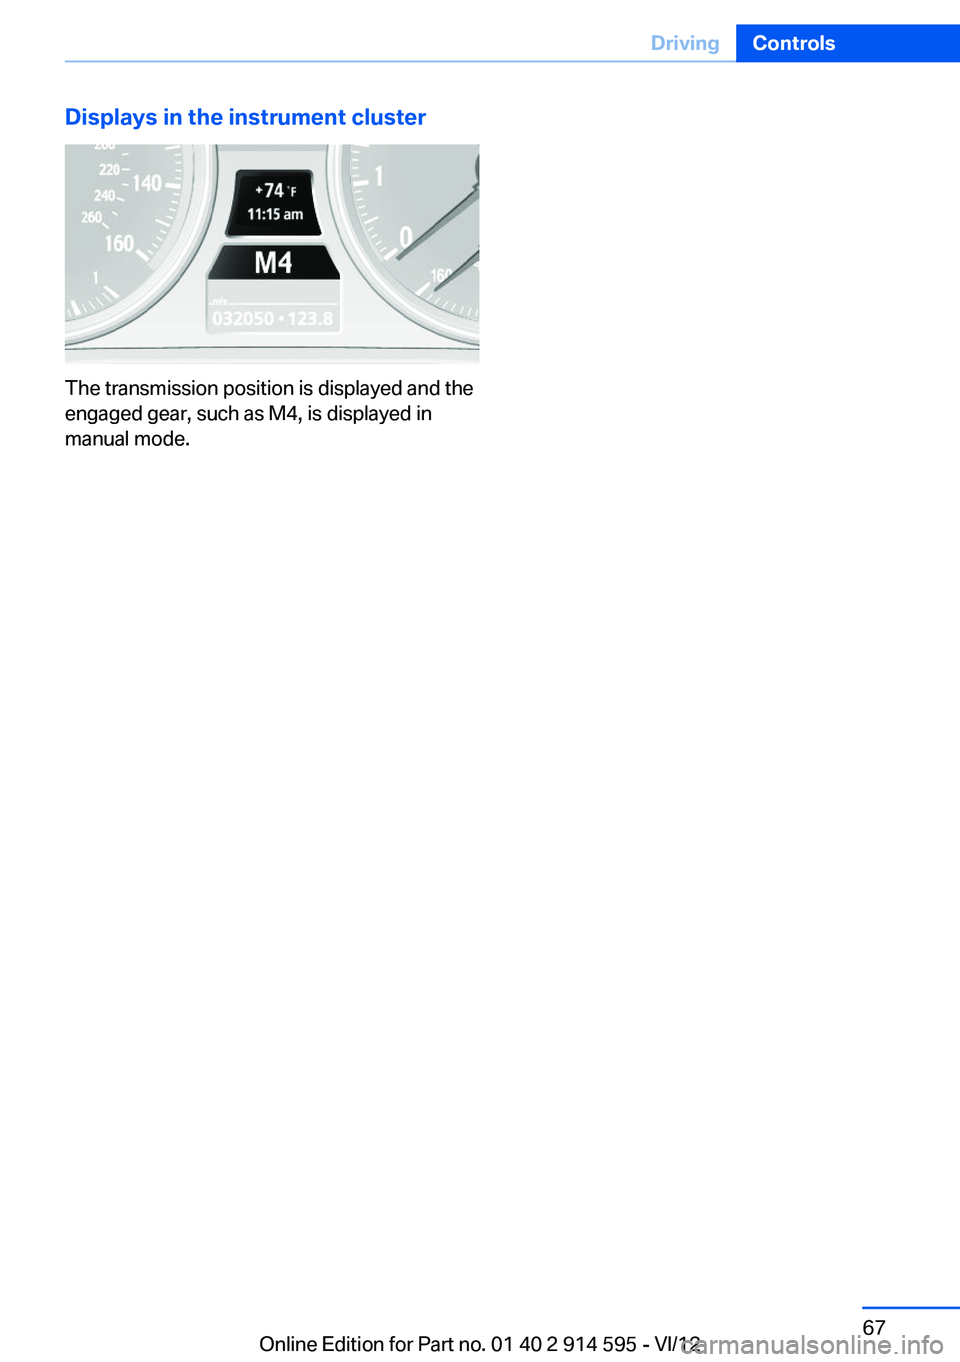
Displays in the instrument cluster
The transmission position is displayed and the
engaged gear, such as M4, is displayed in
manual mode.
Seite 67DrivingControls67
Online Edition for Part no. 01 40 2 914 595 - VI/12
Page 99 of 291
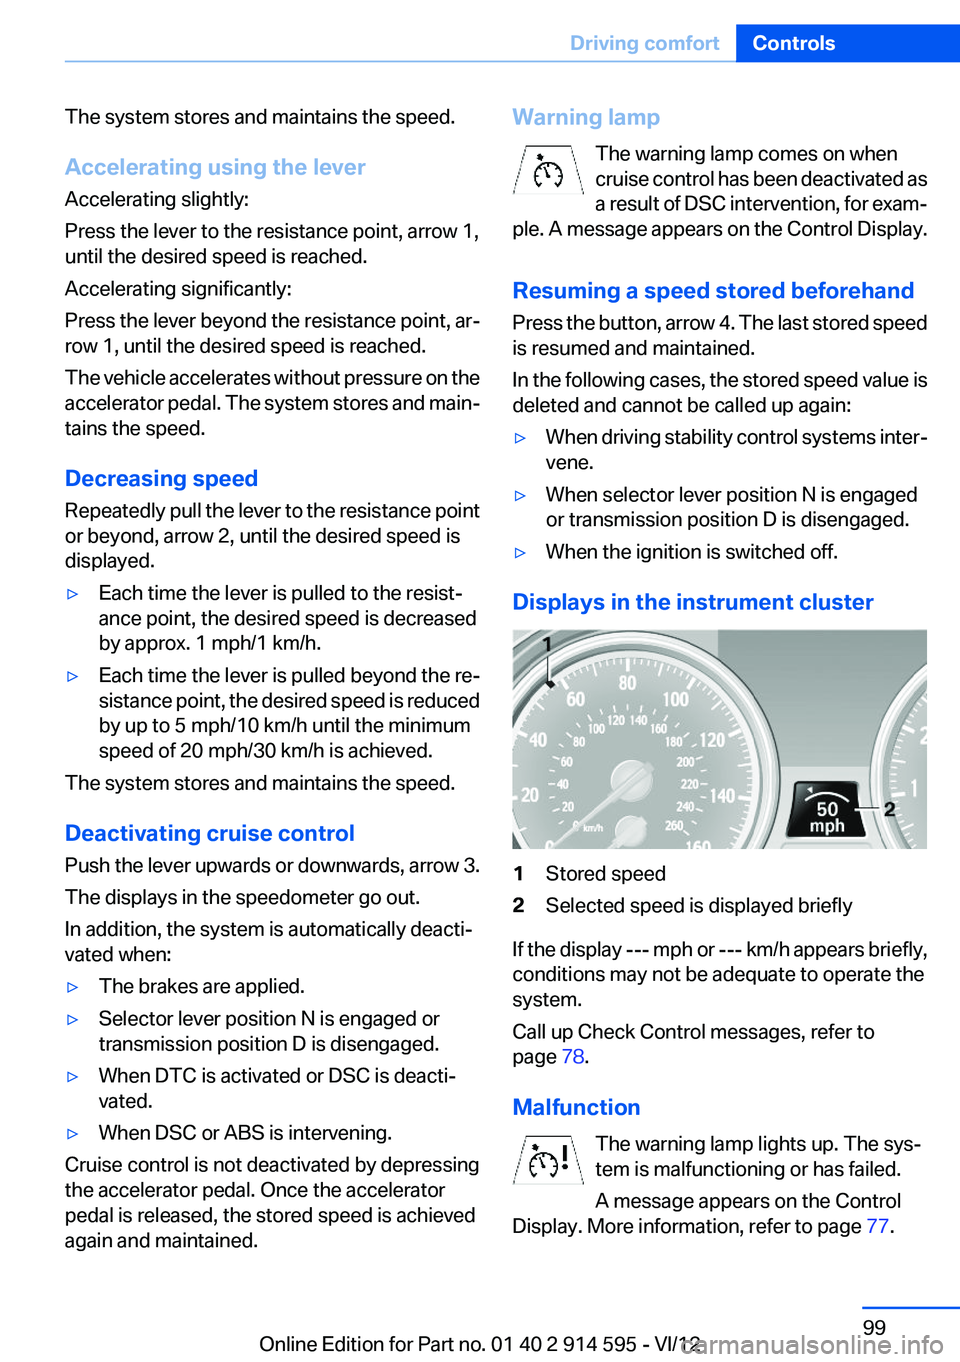
The system stores and maintains the speed.
Accelerating using the lever
Accelerating slightly:
Press the lever to the resistance point, arrow 1,
until the desired speed is reached.
Accelerating significantly:
Press the lever beyond the resistance point, ar‐
row 1, until the desired speed is reached.
The vehicle accelerates without pressure on the
accelerator pedal. The system stores and main‐
tains the speed.
Decreasing speed
Repeatedly pull the lever to the resistance point
or beyond, arrow 2, until the desired speed is
displayed.▷Each time the lever is pulled to the resist‐
ance point, the desired speed is decreased
by approx. 1 mph/1 km/h.▷Each time the lever is pulled beyond the re‐
sistance point, the desired speed is reduced
by up to 5 mph/10 km/h until the minimum
speed of 20 mph/30 km/h is achieved.
The system stores and maintains the speed.
Deactivating cruise control
Push the lever upwards or downwards, arrow 3.
The displays in the speedometer go out.
In addition, the system is automatically deacti‐
vated when:
▷The brakes are applied.▷Selector lever position N is engaged or
transmission position D is disengaged.▷When DTC is activated or DSC is deacti‐
vated.▷When DSC or ABS is intervening.
Cruise control is not deactivated by depressing
the accelerator pedal. Once the accelerator
pedal is released, the stored speed is achieved
again and maintained.
Warning lamp
The warning lamp comes on when
cruise control has been deactivated as
a result of DSC intervention, for exam‐
ple. A message appears on the Control Display.
Resuming a speed stored beforehand
Press the button, arrow 4. The last stored speed
is resumed and maintained.
In the following cases, the stored speed value is
deleted and cannot be called up again:▷When driving stability control systems inter‐
vene.▷When selector lever position N is engaged
or transmission position D is disengaged.▷When the ignition is switched off.
Displays in the instrument cluster
1Stored speed2Selected speed is displayed briefly
If the display --- mph or --- km/h appears briefly,
conditions may not be adequate to operate the
system.
Call up Check Control messages, refer to
page 78.
Malfunction The warning lamp lights up. The sys‐
tem is malfunctioning or has failed.
A message appears on the Control
Display. More information, refer to page 77.
Seite 99Driving comfortControls99
Online Edition for Part no. 01 40 2 914 595 - VI/12
Page 101 of 291
Switching on/off manually
Press the button.
▷On: the LED lights up.▷Off: the LED goes out.
Signal tones
When approaching an object, an intermittent
tone is sounded that indicates the position of the
object. For example, if an object is detected to
the left rear of the vehicle, a signal tone sounds
from the left rear speaker.
The shorter the distance to the object becomes,
the shorter the intervals.
If the distance to a detected object is less than
approx. 12 in/30 cm, a continuous tone is
sounded.
If objects are located both in front of and behind
the vehicle, an alternating continuous signal is
sounded.
The intermittent tone is interrupted after approx.
3 seconds:
▷If the vehicle stops in front of an object that
is detected by only one of the corner sen‐
sors.▷If moving parallel to a wall.
The signal tone is switched off:
▷When the vehicle moves away from an ob‐
ject by more than approx. 4 in/10 cm.▷When transmission position P is engaged.Volume
You can set the volume of the PDC signal tone,
refer to page 161.
The setting is stored for the remote control cur‐
rently in use.
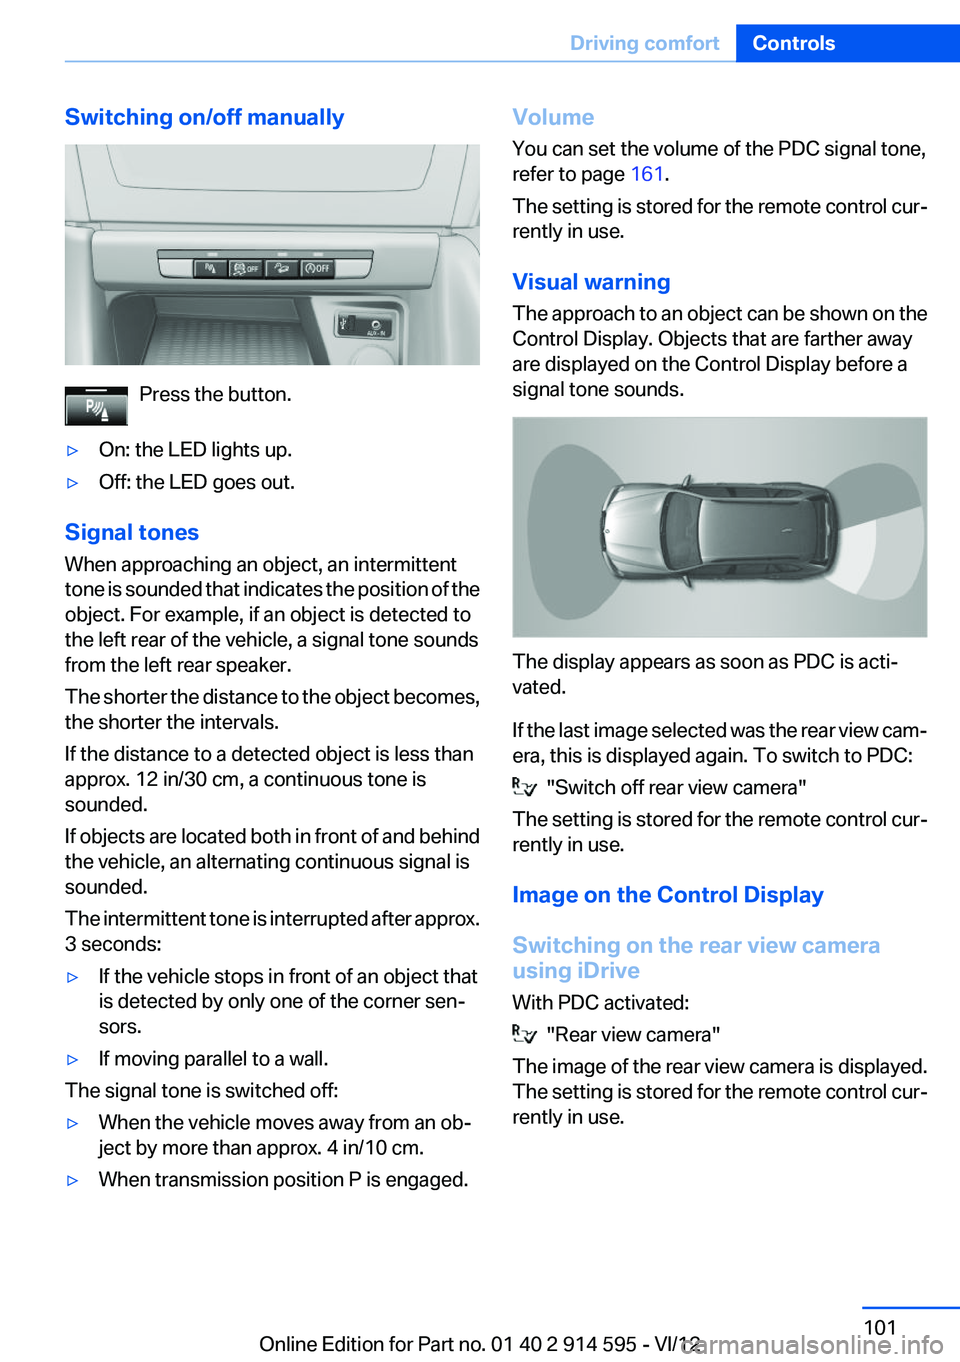
Visual warning
The approach to an object can be shown on the
Control Display. Objects that are farther away
are displayed on the Control Display before a
signal tone sounds.
The display appears as soon as PDC is acti‐
vated.
If the last image selected was the rear view cam‐
era, this is displayed again. To switch to PDC:
"Switch off rear view camera"
The setting is stored for the remote control cur‐
rently in use.
Image on the Control Display
Switching on the rear view camera
using iDrive
With PDC activated:
"Rear view camera"
The image of the rear view camera is displayed.
The setting is stored for the remote control cur‐
rently in use.
Seite 101Driving comfortControls101
Online Edition for Part no. 01 40 2 914 595 - VI/12
Page 103 of 291
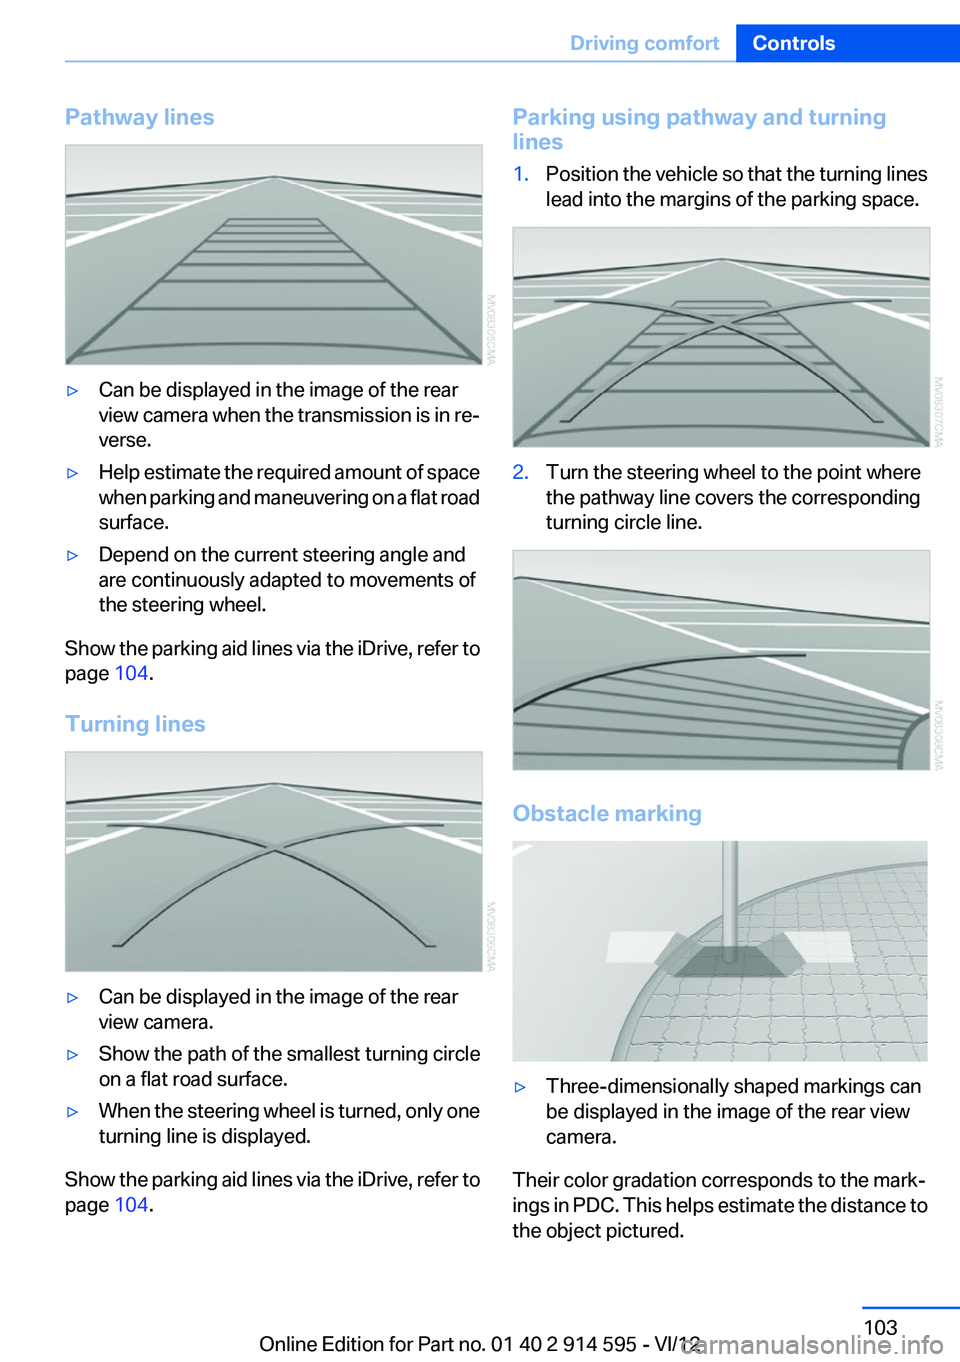
Pathway lines▷Can be displayed in the image of the rear
view camera when the transmission is in re‐
verse.▷Help estimate the required amount of space
when parking and maneuvering on a flat road
surface.▷Depend on the current steering angle and
are continuously adapted to movements of
the steering wheel.
Show the parking aid lines via the iDrive, refer to
page 104.
Turning lines
▷Can be displayed in the image of the rear
view camera.▷Show the path of the smallest turning circle
on a flat road surface.▷When the steering wheel is turned, only one
turning line is displayed.
Show the parking aid lines via the iDrive, refer to
page 104.
Parking using pathway and turning
lines1.Position the vehicle so that the turning lines
lead into the margins of the parking space.2.Turn the steering wheel to the point where
the pathway line covers the corresponding
turning circle line.
Obstacle marking
▷Three-dimensionally shaped markings can
be displayed in the image of the rear view
camera.
Their color gradation corresponds to the mark‐
ings in PDC. This helps estimate the distance to
the object pictured.
Seite 103Driving comfortControls103
Online Edition for Part no. 01 40 2 914 595 - VI/12