2013 BMW X1 xdrive
[x] Cancel search: xdrivePage 103 of 299

Deactivating DTCPress the button again.
TRACTION and the indicator lamp in
the instrument cluster go out.
For better control The indicator lamp flashes: DTC con‐
trols the drive forces and brake forces.
The indicator lamp lights up: DSC and
DTC has failed.
DTC activated: The indicator lamp lights up and
TRACTION appears in the instrument
cluster.
DTC is activated.
Performance Control
Performance Control enhances the agility of
your vehicle. To enhance performance during
sporty driving, the rear wheel on the inside of
the curve is braked while the resulting braking
effect is largely compensated by engine inter‐
vention.
xDrivexDrive is the all-wheel-drive system of your ve‐
hicle. The combined effects of xDrive and DSC
further optimize the traction and dynamic driv‐
ing characteristics. The 4-wheel drive system
xDrive variably distributes the drive forces to
the front and rear axle depending on the driv‐
ing situation and prevailing road conditions.
Hill Descent Control HDC
The concept HDC is a downhill driving assistant that auto‐
matically controls vehicle speed on steep
downhill gradients. Without requiring brake ap‐
plication, the vehicle moves at slightly more
than twice walking speed.
You can activate the Hill Descent Control at
speeds below approx. 22 mph/35 km/h. When
driving downhill at below approx.
22 mph/35 km/h, the vehicle reduces its speed
to approx. twice walking speed and keeps it
constant.
While you are actively braking, the system is
on standby. The system does not brake the
vehicle during this time.
Increasing or reducing speed
The speed can be changed in the range from
roughly twice walking speed to approx.
15 mph/25 km/h by pressing the accelerator or
brake pedal lightly.
A target speed within the same range can be
specified using the lever of the cruise control.1Increasing speed2Decreasing speedSeite 99Driving stability control systemsControls99
Online Edition for Part no. 01 40 2 911 269 - VI/13
Page 233 of 299

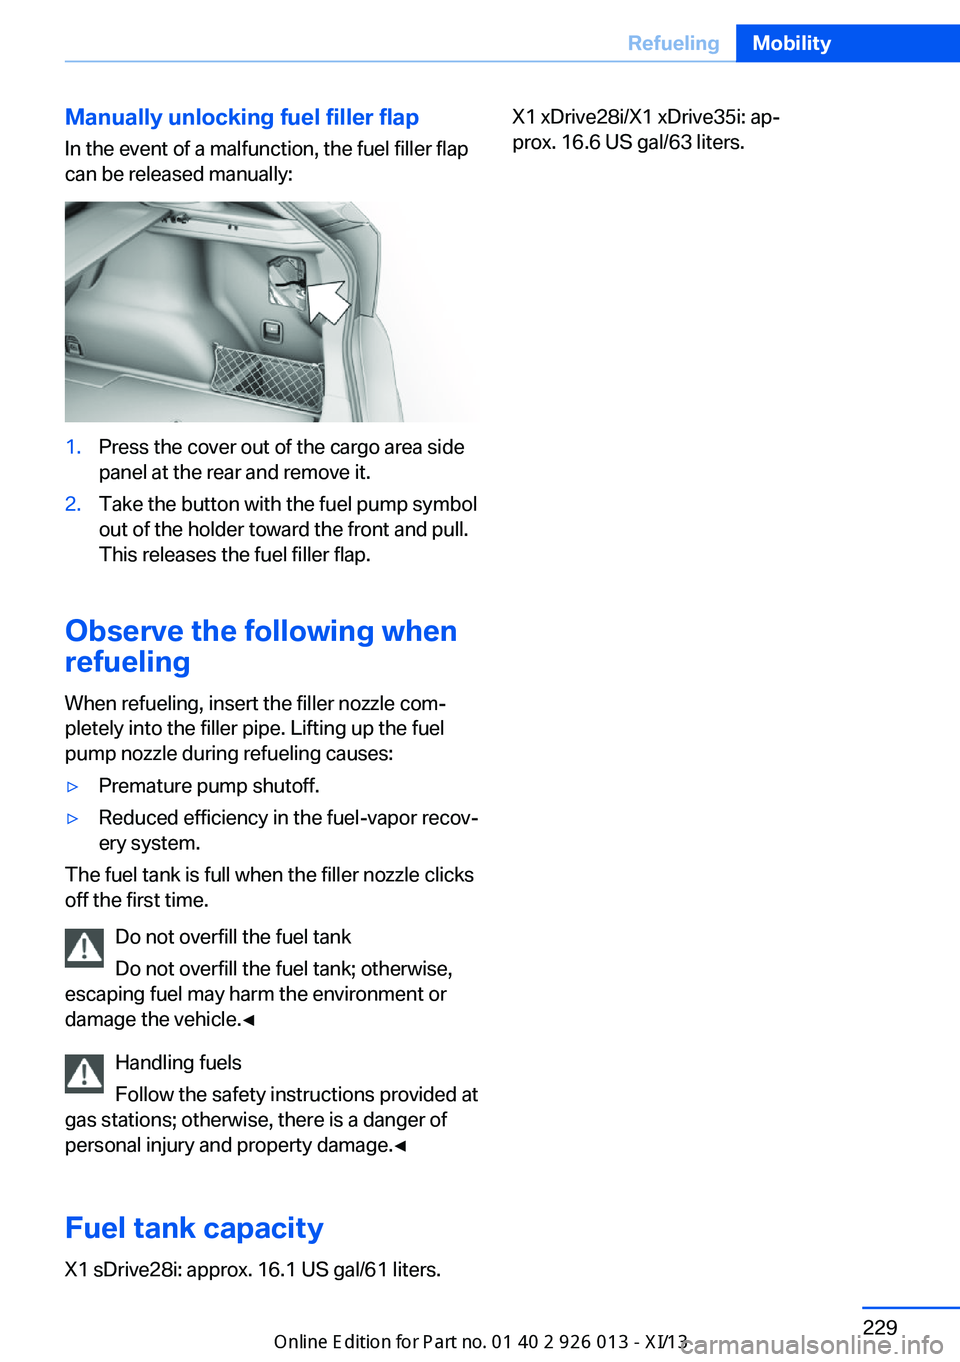
Manually unlocking fuel filler flapIn the event of a malfunction, the fuel filler flap
can be released manually:1.Press the cover out of the cargo area side
panel at the rear and remove it.2.Take the button with the fuel pump symbol
out of the holder toward the front and pull.
This releases the fuel filler flap.
Observe the following when
refueling
When refueling, insert the filler nozzle com‐
pletely into the filler pipe. Lifting up the fuel
pump nozzle during refueling causes:
▷Premature pump shutoff.▷Reduced efficiency in the fuel-vapor recov‐
ery system.
The fuel tank is full when the filler nozzle clicks
off the first time.
Do not overfill the fuel tank
Do not overfill the fuel tank; otherwise,
escaping fuel may harm the environment or
damage the vehicle.◀
Handling fuels
Follow the safety instructions provided at
gas stations; otherwise, there is a danger of
personal injury and property damage.◀
Fuel tank capacity
X1 sDrive28i: approx. 16.1 US gal/61 liters.
X1 xDrive28i/X1 xDrive35i: ap‐
prox. 16.6 US gal/63 liters.Seite 229RefuelingMobility229
Online Edition for Part no. 01 40 2 911 269 - VI/13
Page 239 of 299

Tire sizePressure specifications in
bar/PSIFront: 225/40 R 19 89 W RSC
Rear: 255/35 R 19 92 W RSC2.8/41
--
3.1/45Compact wheel:
T 135/80 R 17 102 MSpeeds of up to 50 mph/
80 km/h
4.2/60
Tire inflation pressures X1 xDrive28i/X1 xDrive35i
Tire inflation pressure values up to 100 mph/160 km/h
Tire sizePressure specifications in
bar/PSIAll pressure specifications in the table are indicated in bar/PSI with
cold tires.
Cold = ambient temperature225/50 R 17 94 H M+S A/S RSC
225/50 R 17 94 H RSC
225/50 R 17 94 H M+S RSC2.2/322.6/38225/45 R 18 91 V M+S A/S RSC
225/45 R 18 91 V RSC
225/45 R 18 91 H M+S RSC2.4/352.8/41Front: 225/45 R 18 91 V RSC
Rear: 255/40 R 18 95 V RSC2.4/35
--
2.6/38Front: 225/40 R 19 89 W RSC
Rear: 255/35 R 19 92 W RSC2.6/38
--
2.8/41Compact wheel:
T 135/80 R 17 102 MSpeeds of up to 50 mph/
80 km/h
4.2/60
Tire inflation pressure values over 100 mph/160 km/h
Without high-speed tuning featureSeite 235Wheels and tiresMobility235
Online Edition for Part no. 01 40 2 911 269 - VI/13
Page 259 of 299

Jacking points for the vehicle jack
The jacking points for the vehicle jack are lo‐
cated in the positions shown.
Vehicle battery
Maintenance
The battery is maintenance-free, i.e., the elec‐ trolyte will last for the life of the battery.
Your service center will be glad to advise you
on questions regarding the battery.
Battery replacement Use approved vehicle batteries
Only use vehicle batteries that have been
approved for your vehicle by the manufacturer;
otherwise, the vehicle could be damaged and
systems or functions may not be fully availa‐
ble.◀
After a battery replacement, have the battery
registered on the vehicle by your service cen‐
ter to ensure that all comfort functions are fully
available.
Charging the battery
Note Do not connect the charger to the socket
Do not connect the battery charger to
the socket installed in the vehicle at the factory
as this could damage the battery.◀
General information
Ensure that the battery is sufficiently charged
to achieve the full battery life.
It may be necessary to charge the battery in
the following cases:▷When the vehicle is frequently used to
drive short distances.▷When the vehicle has not been driven for
more than one month.
Starting aid terminals
Only charge using the starting aid terminals,
refer to page 259, in the engine compartment
while the engine is switched off.
Power failure
After a temporary power loss, some equipment
needs to be reinitialized.
Individual settings need to be reprogrammed:
▷Seat and mirror memory: store the posi‐
tions again, refer to page 48.▷Time: update, refer to page 75.▷Date: update, refer to page 76.▷Radio station: save again, refer to
page 166.▷Navigation system: wait for the navigation
system to be operational.▷Panoramic glass sunroof: it may only be
possible to tilt the roof. Have the system
initialized by the service center.▷Digital compass: recalibrate, refer to
page 115.▷xDrive: the system automatically initializes
as you drive. During this time, indicator
lamps light up. If the lamps do not disap‐
pear during the current trip, have the sys‐
tem checked.
Disposing of old batteries
Have old batteries disposed of by your
service center or bring them to a recy‐
cling center.
Seite 255Replacing componentsMobility255
Online Edition for Part no. 01 40 2 911 269 - VI/13
Page 265 of 299

needs to be applied when braking and
steering.▷Larger steering wheel movements are re‐
quired.▷Switch on the hazard warning system, de‐
pending on local regulations.▷If the electrical system has failed, clearly
identify the vehicle being towed by placing
a sign or a warning triangle in the rear win‐
dow.
Tow truck
sDrive
Vehicles with automatic transmission, 6-gear.
Have your vehicle transported with a tow truck
with a so-called lift bar or on a flat bed.
xDrive
Towing a vehicle with xDrive
Do not tow a vehicle with xDrive with just
the front or rear axle raised; otherwise, the
wheels could lock up and the transfer case
could be damaged.◀
Towing other vehicles
General information Light towing vehicle
Your vehicle must not be lighter than the
vehicle being towed; otherwise, it will not be
possible to control vehicle response.◀
Attaching the tow bar/tow rope correctly
Attach the tow bar or tow rope to the tow
fitting; connecting it to other vehicle parts may
cause damage.◀▷Switch on the hazard warning system, de‐
pending on local regulations.▷If the electrical system has failed, clearly
identify the vehicle being towed by placing
a sign or a warning triangle in the rear win‐
dow.
Towing methods
Do not lift the vehicle
Do not lift the vehicle by the tow fitting or
body and chassis parts; otherwise, damage
may result.◀
Tow bar The tow fittings used should be on the same
side on both vehicles.
Should it prove impossible to avoid mounting
the tow bar at an offset angle, please observe
the following:
▷Clearance and maneuvering capability will
be sharply limited during cornering.▷The tow bar will generate lateral forces if it
is attached offset.
Tow rope
When starting to tow the vehicle, make sure
that the tow rope is taut.
To avoid jerking and the associated stresses
on the vehicle components when towing, al‐
ways use nylon ropes or nylon straps.
Seite 261Breakdown assistanceMobility261
Online Edition for Part no. 01 40 2 911 269 - VI/13
Page 274 of 299

Technical dataVehicle equipment
This chapter describes all series equipment as
well as country-specific and special equipment
offered for this model series.Therefore, it alsodescribes equipment that may not be found in
your vehicle, for instance due to the selected
special equipment or the country version. This
also applies to safety-related functions and
systems.
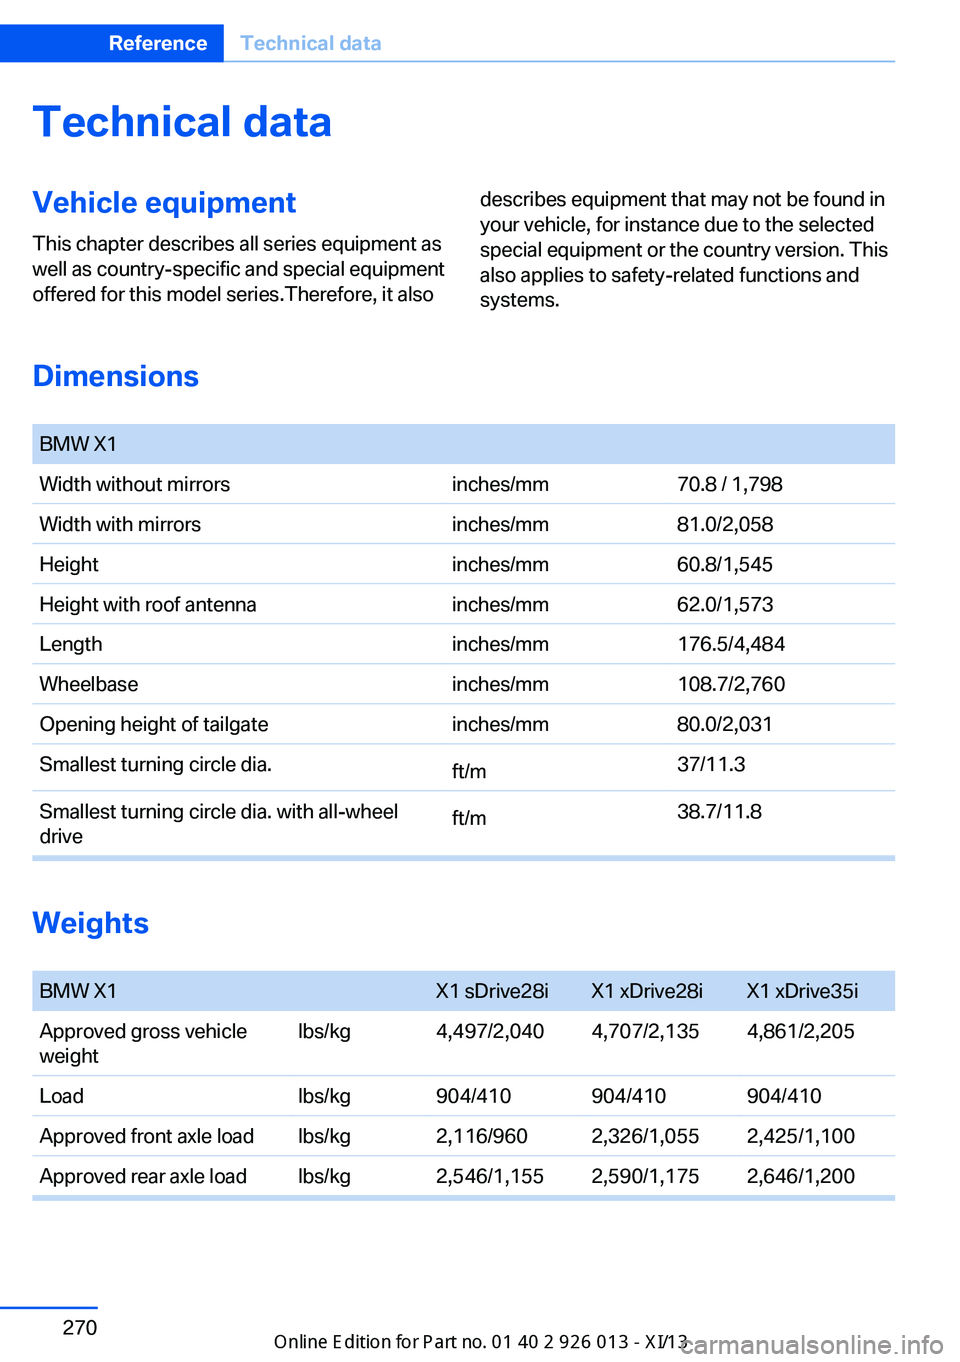
Dimensions
BMW X1Width without mirrorsinches/mm70.8 / 1,798Width with mirrorsinches/mm81.0/2,058Heightinches/mm60.8/1,545Height with roof antennainches/mm62.0/1,573Lengthinches/mm176.5/4,484Wheelbaseinches/mm108.7/2,760Opening height of tailgateinches/mm80.0/2,031Smallest turning circle dia.ft/m37/11.3Smallest turning circle dia. with all-wheel
driveft/m38.7/11.8
Weights
BMW X1X1 sDrive28iX1 xDrive28iX1 xDrive35iApproved gross vehicle
weightlbs/kg4,497/2,0404,707/2,1354,861/2,205Loadlbs/kg904/410904/410904/410Approved front axle loadlbs/kg2,116/9602,326/1,0552,425/1,100Approved rear axle loadlbs/kg2,546/1,1552,590/1,1752,646/1,200Seite 270ReferenceTechnical data270
Online Edition for Part no. 01 40 2 911 269 - VI/13
Page 275 of 299

BMW X1X1 sDrive28iX1 xDrive28iX1 xDrive35iApproved roof load ca‐
pacity
lbs/kg165/75165/75165/75Cargo area capacitycu ft/liter25.0-56.0/420‐
1,350
25.0-56.0/420‐
1,350
25.0-56.0/420-
1,350
Capacities
BMW X1NotesFuel tankFuel specifications, refer to
page 230
US gal/litersApprox. 16.6/63Seite 271Technical dataReference271
Online Edition for Part no. 01 40 2 911 269 - VI/13
Page 284 of 299

Everything from A to Z
IndexA ABS, Antilock Brake Sys‐ tem 97
Accident, refer to Emergency Request, initiating 257
Acoustic signal, refer to Check Control 80
Activated charcoal filter with automatic climate con‐
trol 111
Adaptive brake lights, refer to Brake force display 96
Adaptive Light Control 84
Additional telephone 196
Additives, coolant 246
Additives, engine oil 245
After washing vehicle 264
Airbags 88
Airbags, indicator/warning light 91
Air circulation, refer to Recir‐ culated air mode 110
Air conditioning mode– Automatic climate con‐
trol 108– Ventilation 111
Air distribution
– Automatic 109– Manual 109
Air drying, refer to Cooling
function 110
Air flow rate 110
Airing, refer to Ventila‐ tion 111
Air pressure, refer to Tire in‐ flation pressure 232
Air supply
– Automatic climate con‐
trol 108– Ventilation 111Air vents– Refer to Ventilation 111
Alarm system 39
Alarm system
– Avoiding unintentional
alarms 40– Ending an alarm 39– Interior motion sensor 40– Tilt alarm sensor 40
All around the headliner 17
ALL program 110
All-season tires, refer to Win‐ ter tires 240
All-wheel drive, refer to xDrive 99
Alternating-code hand-held transmitter 114
AM/FM station 166
Announcement, navigation, refer to Spoken instruc‐
tions 155
Antifreeze, coolant 246
Antifreeze, washer fluid 65
Antilock Brake System, ABS 97
Anti-slip control, refer to Dy‐ namic Stability Control
DSC 97
Anti-theft protection 32
Appointments 214
Approved axle loads, refer to Weights 270
Approved engine oils 245
Approved gross vehicle weight, refer to
Weights 270
Armrest, refer to Center arm‐ rest 124
Arrival time, refer to Com‐ puter 74
Ashtray 117
Assistance, Roadside Assis‐
tance 258
Assistance with driving off, refer to Drive-off assis‐
tant 100
Assistance with starting en‐ gine, refer to Jump-start‐
ing 258
Audio device, external 124
Audio playback 175
Audio playback, Blue‐ tooth 187
Automatic– Air distribution 109– Air flow rate 109
Automatic car wash 263
Automatic climate control
– Automatic air distribu‐
tion 109
Automatic, cruise control 101
Automatic Curb Monitor 49
Automatic Engine Start/Stop Function 59
Automatic headlamp con‐ trol 83, 84
Automatic recirculated air control 110
Automatic transmission with Steptronic 65, 68
Automatic transmission with
Steptronic
– Interlock 65– Kickdown 66, 68– Overriding selector lever
lock 67
AUTO program with auto‐
matic climate control 109
AUX-IN port 124, 184
Average fuel consumption 73
Average fuel consumption
– Setting the units 75
Average speed 73
Seite 280ReferenceEverything from A to Z280
Online Edition for Part no. 01 40 2 911 269 - VI/13