2013 BMW ACTIVEHYBRID3 USB
[x] Cancel search: USBPage 22 of 220

5.Turn the controller until "Time:" is high‐
lighted, and then press the controller.6.Turn the controller to set the hours and
press the controller.7.Turn the controller to set the minutes and
press the controller.
Status information
Status field
The following information is displayed in the sta‐
tus field at the top right:
▷Time.▷Current entertainment source.▷Sound output, on/off.▷Wireless network reception strength.▷Telephone status.▷Traffic bulletin reception.
Status field symbols
The symbols are grouped as follows.
Radio symbols
SymbolMeaning Satellite radio is switched on.Telephone symbolsSymbolMeaning Incoming or outgoing call. Missed call. Wireless network reception
strength.
Symbol flashes: network search. Wireless network is not available. Bluetooth is switched on. Roaming is active. Text message was received. Check the SIM card. SIM card is blocked. SIM card is missing. Enter the PIN.
Entertainment symbols
SymbolMeaning CD/DVD player. Music collection. Gracenote® database. AUX-IN port. USB audio interface/mobile phone
audio interface. USB audio interface. Mobile phone audio interface.
Additional symbols
SymbolMeaning Spoken instructions are switched off.Seite 22At a glanceiDrive22
Online Edition for Part no. 01 40 2 917 825 - II/13
Page 36 of 220

▷Via the USB interface for data transfer.
Profile management
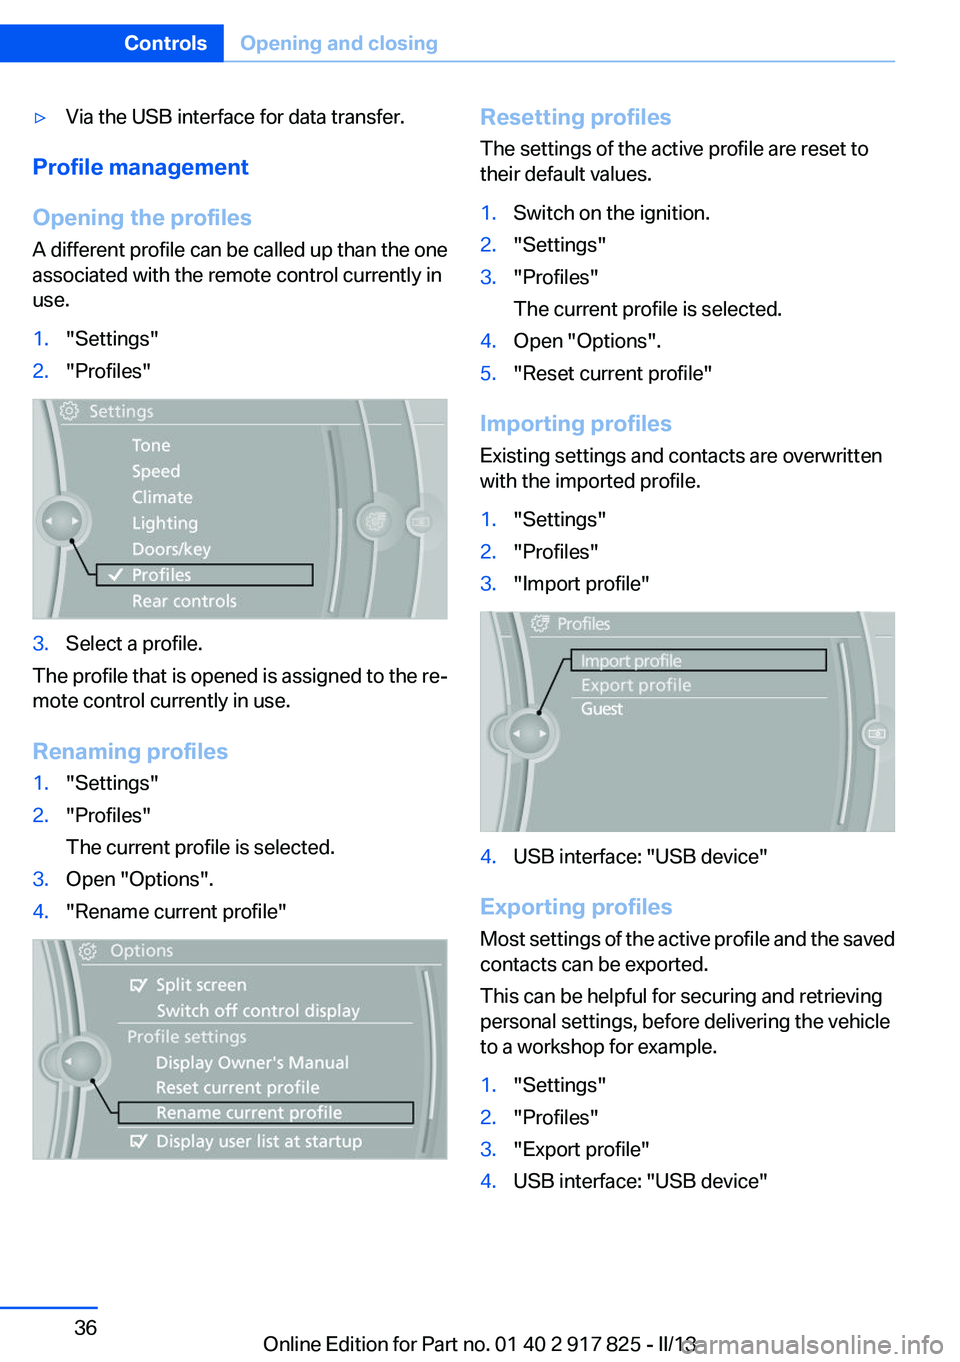
Opening the profiles
A different profile can be called up than the one
associated with the remote control currently in
use.
1."Settings"2."Profiles"3.Select a profile.
The profile that is opened is assigned to the re‐
mote control currently in use.
Renaming profiles
1."Settings"2."Profiles"
The current profile is selected.3.Open "Options".4."Rename current profile"Resetting profiles
The settings of the active profile are reset to
their default values.1.Switch on the ignition.2."Settings"3."Profiles"
The current profile is selected.4.Open "Options".5."Reset current profile"
Importing profiles
Existing settings and contacts are overwritten
with the imported profile.
1."Settings"2."Profiles"3."Import profile"4.USB interface: "USB device"
Exporting profiles
Most settings of the active profile and the saved
contacts can be exported.
This can be helpful for securing and retrieving
personal settings, before delivering the vehicle
to a workshop for example.
1."Settings"2."Profiles"3."Export profile"4.USB interface: "USB device"Seite 36ControlsOpening and closing36
Online Edition for Part no. 01 40 2 917 825 - II/13
Page 143 of 220

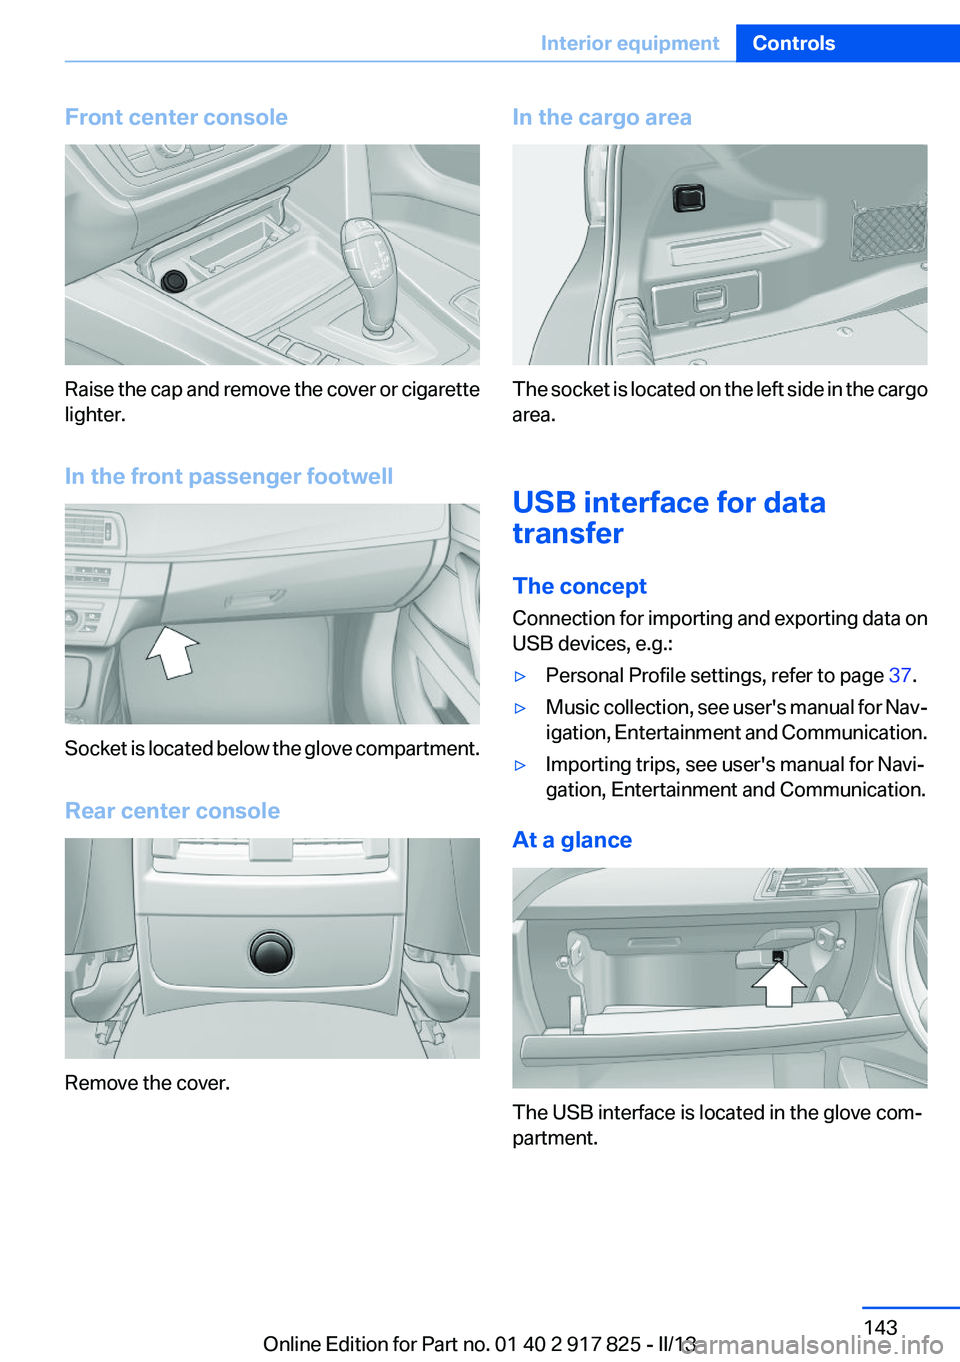
Front center console
Raise the cap and remove the cover or cigarette
lighter.
In the front passenger footwell
Socket is located below the glove compartment.
Rear center console
Remove the cover.
In the cargo area
The socket is located on the left side in the cargo
area.
USB interface for data
transfer
The concept
Connection for importing and exporting data on
USB devices, e.g.:
▷Personal Profile settings, refer to page 37.▷Music collection, see user's manual for Nav‐
igation, Entertainment and Communication.▷Importing trips, see user's manual for Navi‐
gation, Entertainment and Communication.
At a glance
The USB interface is located in the glove com‐
partment.
Seite 143Interior equipmentControls143
Online Edition for Part no. 01 40 2 917 825 - II/13
Page 144 of 220

With Professional navigation system or
TV: at a glance
The USB interface is located in the center arm‐
rest.
Notes
Observe the following when connecting:
▷Do not use force when plugging the con‐
nector into the USB interface.▷Do not connect devices such as fans or
lamps to the USB interface.▷Do not connect USB hard drives.▷Do not use the USB interface to recharge
external devices.
Through-loading system
The concept
The cargo area can be enlarged by folding down
the rear seat backrest.
The rear seat backrest is divided at a ratio of 40–
20–40.
The sides can be folded down separately or to‐
gether.
Hints Danger of pinching
Before folding down the rear seat back‐
rests, ensure that the area of movement of the
backrests is clear. In particular, ensure that no
one is located in or reaches into the area of
movement of the rear seat backrests when the
middle section is folded down. Otherwise, injury
or damage may result.◀
Lock the rear seat backrests in position
Before mounting child restraint fixing sys‐
tems, place the seat backrest as far as possible
at an angle at which the child seat is resting
firmly against the backrest and all backrests can
be locked securely in place. Otherwise, the child
seat will not be as stable as it should be, and
there is increased danger of injury due to unex‐
pected movement of the seat backrest.◀
Retract the head restraint if necessary be‐
fore backrest is folded down
With folding head restraints, fold in the head re‐
straints before folding down the backrests, or
damage may result.◀
Opening1.Unlock the belt lock of the center safety belt
in the rear using the latch plate of another
safety belt.2.Insert the latch plate at the end of the belt
into the specially designated fixture on the
rear window shelf.3.Push the corresponding head restraint
down as far as it will go.Seite 144ControlsInterior equipment144
Online Edition for Part no. 01 40 2 917 825 - II/13
Page 217 of 220

Starting the combustion en‐gine 65
Status display, tires 98
Status information, iDrive 22
Status of Owner's Manual 7
Steering wheel, adjusting 58
Steering wheel heating 58
Steptronic, automatic trans‐ mission 71
Storage compartments 146
Storage compartments, loca‐ tions 146
Storage, tires 175
Storing the vehicle 203
Summer tires, tread 173
Supplementary text mes‐ sage 77
Surround View 120
Switch for Dynamic Driv‐ ing 113
Switch-on times, parked-car ventilation 135
Switch, refer to Cockpit 14
Symbols 6
T
Tachometer 77
Tailgate 41
Tailgate opening with no- touch activation 43
Tailgate via remote control 39
Tail lamps 189
Technical changes, refer to Safety 7
Technical data 206
Telephone, see user's manual for Navigation, Entertain‐
ment and Communication
Temperature, automatic cli‐ mate control 133
Temperature display, external temperature 78
Temperature, engine oil 78
Terminal, jump-starting 196 Text message, supplemen‐
tary 77
Theft alarm system, refer to Alarm system 44
Theft protection, refer to Cen‐ tral locking system 37
Thigh support 51
Through-loading system 144
Tilt alarm sensor 45
Time of arrival 85
Tire damage 173
Tire identification marks 171
Tire inflation pressure 169
Tire inflation pressure monitor, refer to FTM 101
Tire Pressure Monitor TPM 98
Tires, changing 173
Tires, everything on wheels and tires 169
Tires, run-flat tires 175
Tire tread 173
Tone, see user's manual for Navigation, Entertainment
and Communication
Tools 183
Top View 123
Total vehicle weight 207
Tow fitting 198
Towing 197
Tow-starting 197
TPM Tire Pressure Moni‐ tor 98
Traction control 112
TRACTION program, Dynamic Driving Control 112
Transmission, automatic 71
Transporting children safely 59
Tread, tires 173
Trip computer 86
Triple turn signal activa‐ tion 68
Trip odometer 78
Trunk lid 41 Trunk lid, emergency unlock‐
ing 42
Trunk lid, hotel function 42
Trunk lid opening with no- touch activation 43
Trunk lid via remote con‐ trol 39
Turning circle 207
Turning circle lines, backup camera 122
Turn signals, operation 68
Turn signals, rear, bulb re‐ placement 189
U
Unintentional alarm 45
Units of measure 88
Universal remote control 138
Unlock button, automatic transmission 72
Unlocking/locking from in‐ side 41
Unlocking/locking via door lock 40
Unlocking/locking with remote control 38
Updates made after the edito‐ rial deadline 7
Upholstery care 201
USB interface 143
V
Variable sport steering 112
Vehicle battery 191
Vehicle battery, replacing 192
Vehicle, breaking in 152
Vehicle care 201
Vehicle equipment 6
Vehicle identification number, refer to Identification number
in the engine compart‐
ment 176
Vehicle jack 191
Vehicle paint 201 Seite 217Everything from A to ZReference217
Online Edition for Part no. 01 40 2 917 825 - II/13