2013 BMW ACTIVEHYBRID3 display
[x] Cancel search: displayPage 134 of 220

side air and controls the shutoff automati‐
cally.▷Right LED on, recirculated-air mode: the
supply of outside air into the vehicle is per‐
manently blocked.
If the windows are fogged over, switch off the
recirculated-air mode and press the AUTO but‐
ton to utilize the condensation sensor. Make
sure that air can flow onto the windshield.
Continuous recirculated-air mode
The recirculated-air mode should not be
used for an extended period of time, as the air
quality inside the vehicle deteriorates steadily. ◀
Manual air distribution Press the button repeatedly to select a
program:
▷Upper body region.▷Upper body region and footwell.▷Footwell.▷Windows and footwell: driver's side only.▷Windows, upper body region and footwell:
driver's side only.
If the windows are fogged over, press the AUTO
button to utilize the condensation sensor.
Air flow, manual
To be able to manually adjust the air flow, switch
off the AUTO program first.
Press the left or right side of the button:
decrease or increase air flow.
The selected air flow is shown on the display of
the automatic climate control.
The air flow of the automatic climate control may
be reduced automatically to save battery power.
Rear window defroster Press the button.
The rear window defroster switches off auto‐
matically after a certain period of time.
Defrosting windows and removing
condensation
Press the button.
Ice and condensation are quickly re‐
moved from the windshield and the front side
windows.
The air flow can be adjusted when the program
is active.
If the windows are fogged over, you can also
switch on the cooling function or press the
AUTO button to utilize the condensation sensor.
Switching the system on/off
Switching off Press the left button for the minimum
speed.
Switching on
Press any button except▷Rear window defroster.▷Seat heating.
Microfilter/activated-charcoal filter
In external and recirculated air mode the micro‐
filter/activated charcoal filter filters dust, pollen,
and gaseous pollutants out of the air.
This filter should be replaced during scheduled
maintenance, refer to page 181, of your vehicle.
Seite 134ControlsClimate control134
Online Edition for Part no. 01 40 2 917 825 - II/13
Page 136 of 220

The symbol on the automatic climate control
flashes when the system has been switched on.
The system will only be switched on within the
next 24 hours. After that, it needs to reactivated.
Residual cooling
When the automatic climate control has re‐
duced the interior temperature, this tempera‐
ture can be maintained after the engine has been
switched off. This function can be activated up
to 15 minutes after the engine is switched off
and for a maximum period of 6 minutes.
Functional requirement▷The high-voltage battery is sufficiently
charged.▷External temperature at least ap‐
prox. 59 ℉/15 ℃.
Switching on
1.Switch off the ignition.2.Press the right side of the button on the driv‐
er's side.
The symbol appears on the automatic climate
Control Display.
The interior temperature, air flow and air distri‐
bution can be adjusted with the radio ready state
switched on.
Switching off At the lowest fan speed, press the left
side of the button on the driver's side.
The symbol on the automatic climate Control
Display disappears.
Auxiliary air conditioning
The concept
To cool the heated passenger compartment im‐
mediately before starting to drive, the automatic
climate control can be activated via a remote
control.
The automatic climate control reduces the inte‐
rior temperature with high cooling power for ap‐
prox. two minutes.
The auxiliary air conditioning can be switched on
or off using the remote control.
Remote control
The concept
If the high-voltage battery is sufficiently
charged, the auxiliary air conditioning can be ac‐
tivated for two minutes using the remote control.
At a glance1Unlocking2Locking3Opening the trunk lid4Panic mode, auxiliary air conditioning
Remote control range
The average range is the range when the vehicle
is locked/unlocked.
Seite 136ControlsClimate control136
Online Edition for Part no. 01 40 2 917 825 - II/13
Page 137 of 220

Switching onPress the button on the remote control
for approx. 1 second. You can hear that
the air conditioning starts to run.
The symbol is displayed on the air condition‐
ing system.
Switching off
The function switches off automatically after ap‐
prox. two minutes or when the ignition is
switched on.
Seite 137Climate controlControls137
Online Edition for Part no. 01 40 2 917 825 - II/13
Page 140 of 220

can then be controlled by the button on the
interior rearview mirror.
If the LED does not flash faster after at least
60 seconds, change the distance and repeat
the step. Several more attempts at different
distances may be necessary. Wait at least
15 seconds between attempts.
Canada: if programming with the hand-held
transmitter was interrupted, hold down the
interior rearview mirror button and repeat‐
edly press and release the hand-held trans‐
mitter button for 2 seconds.
Controls
Before operation
Before operating a system using the
integrated universal remote control, ensure that
there are no people, animals, or objects within
the range of movement of the remote-controlled
system; otherwise, there is a risk of injury or
damage.
Also follow the safety instructions of the hand-
held transmitter.◀
The system, such as the garage door, can be
operated using the button on the interior rear‐
view mirror while the engine is running or when
the ignition is started. To do this, hold down the
button within receiving range of the system until
the function is activated. The interior rearview
mirror LED stays lit while the wireless signal is
being transmitted.
Deleting stored functions
Press and hold the left and right button on the
interior rearview mirror simultaneously for ap‐
proximately 20 seconds until the LED flashes
rapidly. All stored functions are deleted. The
functions cannot be deleted individually.
Digital compass
At a glance1Control button2Mirror display
Mirror display
The point of the compass is displayed in the
mirror when driving straight.
Operating concept
Various functions can be called up by pressing
the control button with a pointed object, such as
the tip of a ballpoint pen or similar object. The
following setting options are displayed in suc‐
cession, depending on how long the control but‐
ton is pressed:
▷Pressed briefly: turns display on/off.▷3 to 6 seconds: compass zone setting.▷6 to 9 seconds: compass calibration.▷9 to 12 seconds: left/right-hand steering
setting.▷12 to 15 seconds: language setting.
Setting the compass zones
Sets the particular compass zones on the vehi‐
cle so that the compass operates correctly; refer
to World map with compass zones.
Seite 140ControlsInterior equipment140
Online Edition for Part no. 01 40 2 917 825 - II/13
Page 141 of 220

World map with magnetic zonesProcedure1.Press and hold the control button for approx.
3 to 4 seconds. The number of the set com‐
pass zone appears in the mirror.2.To change the zone setting, press the con‐
trol button quickly and repeatedly until the
number of the compass zone corresponding
to your location appears in the mirror.
The set zone is stored automatically. The com‐
pass is ready for use again after approximately
10 seconds.
Calibrating the digital compass
The digital compass must be calibrated in the
event of the following:
▷The wrong point of the compass is dis‐
played.▷The point of the compass displayed does
not change despite changing the direction
of travel.▷Not all points of the compass are displayed.Procedure1.Make sure that there are no large metallic
objects or overhead power lines near the ve‐
hicle and that there is sufficient room to drive
around in a circle.2.Set the currently applicable compass zone.3.Press and hold the control button for approx.
6 to 7 seconds so that "C" appears on the
display. Next, drive in a complete circle at
least once at a speed of no more than
4 mph/7 km/h. If calibration is successful, the
"C" is replaced by the points of the com‐
pass.
Left/right-hand steering
The digital compass is already set for right or
left-hand steering at the factory.
Setting the language
Press and hold the control button for approx. 12
to 13 seconds. Briefly press the control button
again to switch between English "E" and Ger‐
man "O".
Seite 141Interior equipmentControls141
Online Edition for Part no. 01 40 2 917 825 - II/13
Page 153 of 220

When coasting to a halt without pressing the
brake pedal.
Average energy recovery:
During a slight deceleration by gently pressing
the brake pedal.
Maximum energy recovery:
By pressing the brake pedal harder.
Brake according to the situation
Brake in accordance with the traffic con‐
ditions, or there is the risk of accident.◀
Optimum energy recovery
As soon as the display shows the maximum en‐
ergy recovery, only press the brake pedal harder
if required by the situation.
Driving situation examples for fuel
economy
In many driving situations, the hybrid system al‐
lows for a particularly efficient energy manage‐
ment.
▷Stop-and-go traffic:The combustion engine is switched on or
over automatically by the hybrid system.▷Driving with constant speed:
The electric motor relieves the combustion
engine periodically by also being switched
on.
Discharge of the high-voltage battery
In normal operation, a sufficient charging of the
high-voltage battery is ensured by energy re‐
covery. Longer idle periods can reduce the
charge state of the high-voltage battery.
Do not allow the vehicle to sit idle for ex‐
tended periods with a low charging state
Before storing the vehicle for an extended pe‐
riod, check the battery charge indicator to en‐
sure that the high-voltage battery is fully
charged. If necessary, charge the high-voltage
battery by driving the vehicle. Check the charge
level regularly, and if necessary recharge the
high-voltage battery by driving the vehicle. Al‐
lowing the high-voltage battery charge to drop
too low will damage the battery.◀
Charging by driving
In order to charge the high-voltage battery most
effectively when driving, activated the transmis‐
sion's Sport program DS, refer to page 72.
Coasting to a standstill and braking phases are
used more often to recover energy.
eDRIVE electric driving and the Auto Start Stop
function will also be deactivated.
Fast charging
In exceptional cases it can be charged in place,
such as before extended idle phases in order to
prevent damage to the high-voltage battery.
1.Start the engine.2.Engage transmission position P and set
parking brake.Seite 153Things to remember when drivingDriving tips153
Online Edition for Part no. 01 40 2 917 825 - II/13
Page 160 of 220

Braking longer will charge the high-voltage bat‐
tery more.
Use coasting conditions
When approaching a red light, take your foot off
the accelerator and let the vehicle coast to a halt.
On a downhill gradient, take your foot off the ac‐
celerator and let the vehicle roll.
The flow of fuel is interrupted while coasting.
Switch off the engine during
longer stops
Switch off the engine during longer stops, e.g.,
at traffic lights, railroad crossings or in traffic
congestion.
Auto Start/Stop function
The Auto Start/Stop function of your vehicle au‐
tomatically switches off the engine during a
stop.
If the engine is switched off and then restarted
rather than leaving the engine running con‐
stantly, fuel consumption and emissions are re‐
duced. Savings can begin within a few seconds
of switching off the engine.
Using this system can cause certain compo‐
nents of the vehicle to become worn prema‐
turely.
In addition, fuel consumption is also determined
by other factors, such as driving style, road con‐
ditions, maintenance or environmental factors.
Switch off any functions that
are not currently needed
Functions such as seat heating and the rear win‐
dow defroster require a lot of energy and con‐
sume additional fuel, especially in city and stop-
and-go traffic.Therefore, switch off these functions if they are
not actually needed.
Have maintenance carried out
Have vehicles maintained regularly to achieve
optimal vehicle economy and operating life.
Have the maintenance carried out by your serv‐
ice center.
Please also note the BMW Maintenance Sys‐
tem, refer to page 181.
ECO PRO
The concept
ECO PRO supports a driving style that saves on
fuel consumption. For this purpose, the engine
control and comfort functions, e. g. the climate
control output, are adjusted.
eDRIVE electric driving, refer to page 66, is be‐
coming possible in more and more areas.
In addition, context-sensitive instructions can
be displayed that assist in driving in a manner
that optimizes fuel consumption.
The extension of the range that is achieved as a
result can be displayed in the instrument cluster.
At a glance
The system includes the following
EfficientDynamics functions and displays:▷ECO PRO bonus range, refer to page 161▷ECO PRO tips driving instruction, refer to
page 162▷ECO PRO climate control, refer to
page 161
Activating ECO PRO
Press button repeatedly until ECO PRO
is displayed in the instrument cluster.
Seite 160Driving tipsSaving fuel160
Online Edition for Part no. 01 40 2 917 825 - II/13
Page 161 of 220

Configuring ECO PRO
Via the Driving Dynamics Control1.Activate ECO PRO.2."Configure ECO PRO"3.Configure the program.
Via the iDrive
1."Settings"2."ECO PRO mode"
Or
1."Settings"2."Driving mode"3."Configure ECO PRO"
Configure the program.
ECO PRO Tip
▷"ECO PRO limit:":
Set ECO Pro speed at which an ECO PRO
Tip is to be displayed.▷"ECO PRO speed warning":
A reminder is displayed if the set ECO PRO
speed is exceeded.
ECO PRO climate control
"ECO PRO climate control"
The climate control is adjusted to be fuel-effi‐
cient.
By making a slight change to the set tempera‐
ture, or adjusting the rate of heating or cooling
of the passenger compartment fuel consump‐
tion can be economized.
The outputs of the seat heater and the exterior
mirror heating are also reduced.
The exterior mirror heating is made available
when outside temperatures are very cold.
ECO PRO potential
The percentage of potential savings that can be
achieved with the current configuration is dis‐
played.
Display in the instrument cluster
ECO PRO bonus range An extension of the range can be
achieved by an adjusted driving
style.
This may be displayed as the bo‐
nus range in the instrument clus‐
ter.
The bonus range is shown in the range display.
The bonus range is automatically reset every
time the vehicle is refueled.
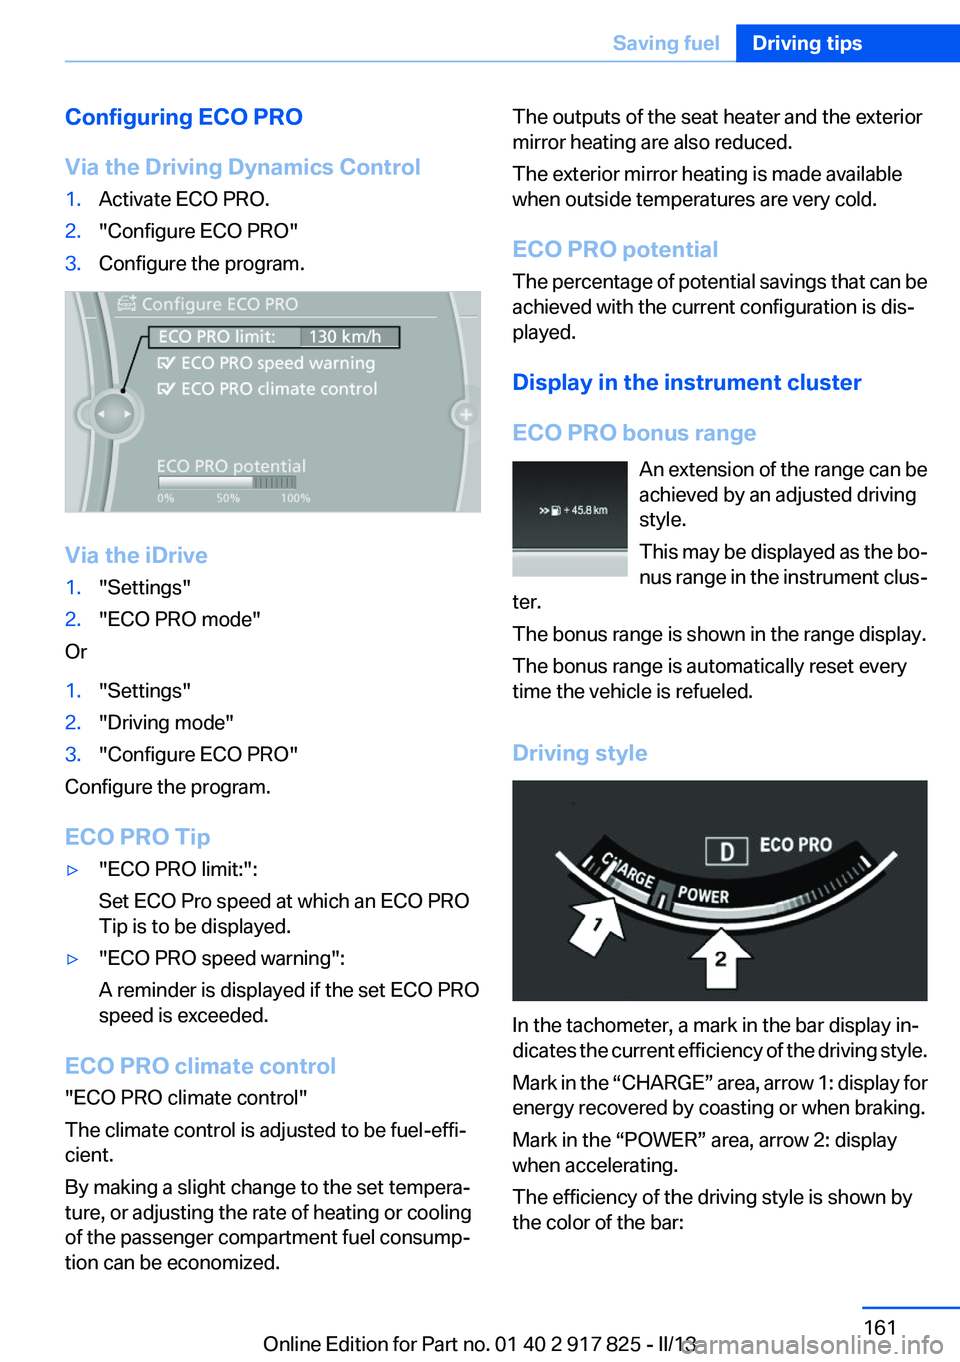
Driving style
In the tachometer, a mark in the bar display in‐
dicates the current efficiency of the driving style.
Mark in the “CHARGE” area, arrow 1: display for
energy recovered by coasting or when braking.
Mark in the “POWER” area, arrow 2: display
when accelerating.
The efficiency of the driving style is shown by
the color of the bar:
Seite 161Saving fuelDriving tips161
Online Edition for Part no. 01 40 2 917 825 - II/13