2013 BMW 750I XDRIVE language
[x] Cancel search: languagePage 21 of 243
Running a functionPress the button.
The function will run immediately. This
means, for example, that the number is dialed
when a phone number is selected.
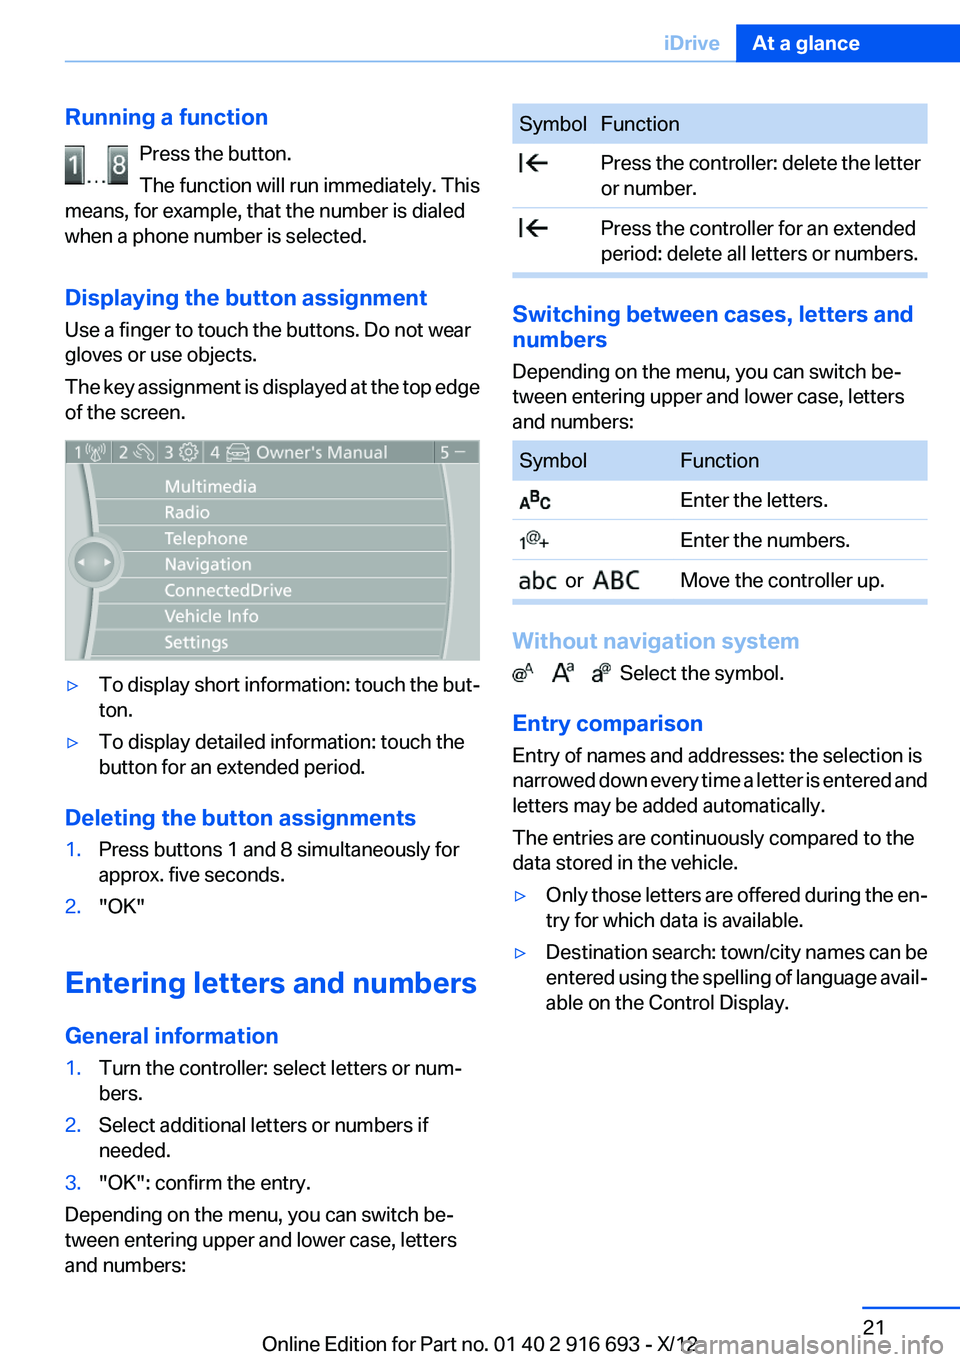
Displaying the button assignment
Use a finger to touch the buttons. Do not wear
gloves or use objects.
The key assignment is displayed at the top edge
of the screen.▷To display short information: touch the but‐
ton.▷To display detailed information: touch the
button for an extended period.
Deleting the button assignments
1.Press buttons 1 and 8 simultaneously for
approx. five seconds.2."OK"
Entering letters and numbers
General information
1.Turn the controller: select letters or num‐
bers.2.Select additional letters or numbers if
needed.3."OK": confirm the entry.
Depending on the menu, you can switch be‐
tween entering upper and lower case, letters
and numbers:
SymbolFunction Press the controller: delete the letter
or number. Press the controller for an extended
period: delete all letters or numbers.
Switching between cases, letters and
numbers
Depending on the menu, you can switch be‐
tween entering upper and lower case, letters
and numbers:
SymbolFunction Enter the letters. Enter the numbers. or Move the controller up.
Without navigation system
Select the symbol.
Entry comparison
Entry of names and addresses: the selection is
narrowed down every time a letter is entered and
letters may be added automatically.
The entries are continuously compared to the
data stored in the vehicle.
▷Only those letters are offered during the en‐
try for which data is available.▷Destination search: town/city names can be
entered using the spelling of language avail‐
able on the Control Display.Seite 21iDriveAt a glance21
Online Edition for Part no. 01 40 2 916 693 - X/12
Page 22 of 243
Voice activation systemVehicle equipment
All standard, country-specific and optional
equipment that is offered in the model series is
described in this chapter. Therefore, equipment
is also described that is not available in a vehicle,
e. g., because of the selected optional equip‐
ment or country variant. This also applies for
safety-related functions and systems.
The concept▷Most functions that are displayed on the
Control Display can be operated by spoken
commands via the voice activation system.
The system prompts you to make your en‐
tries.▷Functions that can only be used when the
vehicle is stationary cannot be operated us‐
ing the voice activation system.▷The system uses a special microphone on
the driver's side.▷›...‹ Verbal instructions in the Owner's
Manual to use with the voice activation sys‐
tem.
Requirements
Via the Control Display, set a language that is
also supported by the voice activation system
so that the spoken commands can be identified.
Set the language, refer to page 93.
Using voice activation
Activating the voice activation system
1. Press the button on the steering
wheel.2.Wait for the signal.3.Say the command.
The command is displayed in the instrument
cluster.
This symbol in the instrument cluster indi‐
cates that the voice activation system is active.
If no other commands are available, operate the
function in this case via iDrive.
Terminating the voice activation
system
Briefly press the button on the steering
wheel or ›Cancel‹.
Possible commands
Most menu items on the Control Display can be
voiced as commands.
The available commands depend on which
menu is currently displayed on the Control Dis‐
play.
Short commands exist for many functions.
Some list entries, e.g., Phone book entries, can
also be selected via the voice activation system.
Speak these list entries exactly as they are dis‐
played in the respective list.
Having possible commands read aloud
You can have the available commands read out
loud for you: ›Voice commands‹
For example, if the "Settings" menu is displayed,
the commands for the settings are read out loud.
Executing functions using short
commands
Functions on the main menu can be performed
directly by means of short commands, nearly ir‐
respective of which menu item is currently se‐
lected, e.g., ›Vehicle status‹.
Seite 22At a glanceVoice activation system22
Online Edition for Part no. 01 40 2 916 693 - X/12
Page 23 of 243
List of short commands of the voice activation
system, see Navigation, Entertainment, Com‐
munication Owner's Manual.
Help dialog for the voice activation
system
Calling up help dialog: ›Help‹
Additional commands for the help dialog:▷›Help with examples‹: information about the
current operating options and the most im‐
portant commands for them are announced.▷›Help with voice activation‹: information
about the principle of operation for the voice
activation system is announced.
Example: playing back a CD
Via the main menu
The commands of the menu items are spoken
just as they are selected via the controller.
1.Switch on the Entertainment sound output
if necessary.2. Press the button on the steering
wheel.3.›Multimedia‹
The medium last played is played back.4.›C D‹5.›C D drive‹6.›Track ...‹, e.g., CD track 4.
Via short command
Playback of the CD can also be started via a short
command.
1.Switch on the Entertainment sound output
if necessary.2. Press the button on the steering
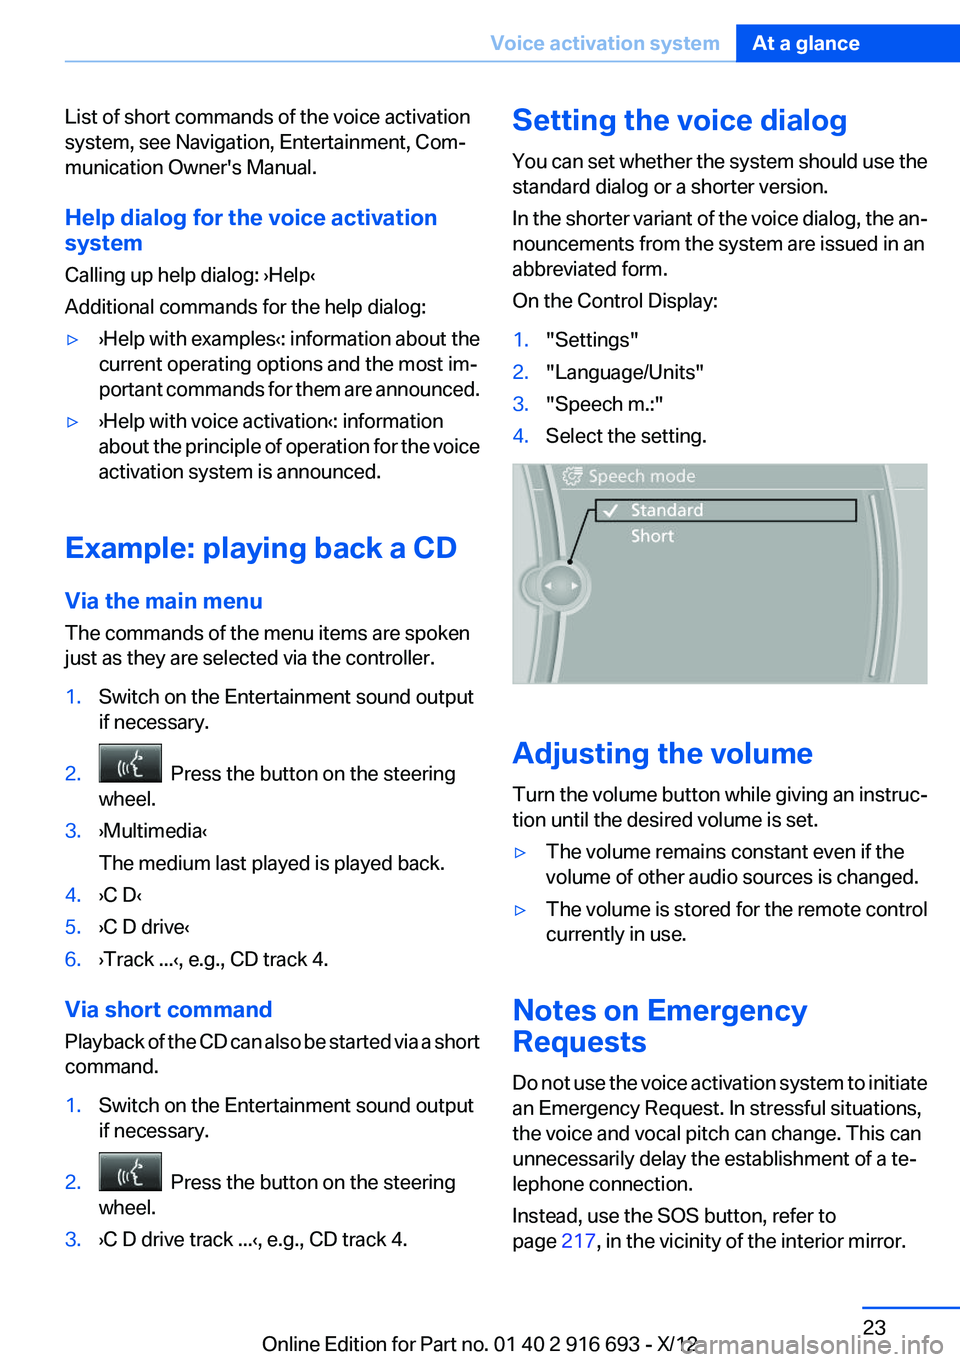
wheel.3.›C D drive track ...‹, e.g., CD track 4.Setting the voice dialog
You can set whether the system should use the
standard dialog or a shorter version.
In the shorter variant of the voice dialog, the an‐
nouncements from the system are issued in an
abbreviated form.
On the Control Display:1."Settings"2."Language/Units"3."Speech m.:"4.Select the setting.
Adjusting the volume
Turn the volume button while giving an instruc‐
tion until the desired volume is set.
▷The volume remains constant even if the
volume of other audio sources is changed.▷The volume is stored for the remote control
currently in use.
Notes on Emergency
Requests
Do not use the voice activation system to initiate
an Emergency Request. In stressful situations,
the voice and vocal pitch can change. This can
unnecessarily delay the establishment of a te‐
lephone connection.
Instead, use the SOS button, refer to
page 217, in the vicinity of the interior mirror.
Seite 23Voice activation systemAt a glance23
Online Edition for Part no. 01 40 2 916 693 - X/12
Page 24 of 243
Environmental conditions▷Say the commands, numbers, and letters
smoothly and with normal volume, empha‐
sis, and speed.▷Always say commands in the language of
the voice activation system.▷Keep the doors, windows, and glass sunroof
closed to prevent noise interference.▷Avoid making other noise in the vehicle
while speaking.Seite 24At a glanceVoice activation system24
Online Edition for Part no. 01 40 2 916 693 - X/12
Page 33 of 243
4.Open "Guest".5.Adjust the settings.
Note: the guest profile cannot be renamed.
Display profile list during start
The profile list can be displayed during each
start for selecting the desired profile.
1."Settings"2."Profiles"3.Open "Options".4."Display user list at startup"
Personal Profile settings
The following functions and settings can be
stored in a profile.
More information on the settings can be found
under:
▷Active Cruise Control: collision warning.▷Collision warning: warning time, last setting
on/off.▷Exterior mirror position.▷CD/Multimedia: audio source listened to
last.▷Driving Dynamics Control: sport program.▷Driver's seat position: automatic retrieval af‐
ter unlocking.▷Programmable memory buttons: assign‐
ment.▷Head-up Display: selection, brightness, po‐
sition and rotation of the display.▷Headlamp courtesy delay feature: time set‐
ting.▷Tone: tone settings.▷Automatic climate control: settings.▷Steering wheel position.▷Navigation: map views, route criteria, voice
output on/off.▷Night Vision with pedestrian detection: se‐
lection of functions and type of display.▷Park Distance Control PDC: adjusting the
signal tone volume.▷Radio: stored stations, station listened to
last, special settings.▷Backup camera: selection of functions and
type of display.▷Side View: selection of the display type.▷Language on the Control Display.▷Lane departure warning: last setting, on/off.▷Active Blind Spot Detection: last setting, on/
off.▷Daytime running lights: current setting.▷Triple turn signal activation.▷Locking the vehicle: after a brief period or
after starting to drive.
Central locking system
The concept
The central locking system becomes active
when the driver's door is closed.
The system simultaneously engages and re‐
leases the locks on the following:
▷Doors.▷Trunk lid.▷Fuel filler flap.
Operating from the outside
▷Via the remote control.▷Via the driver's door lock.▷Via the door handles.▷Via the button in the trunk lid.
The following takes place simultaneously when
locking/unlocking the vehicle via the remote
control:
▷Depending on how the vehicle is equipped,
the theft protection is activated/deactivated.
Theft protection prevents the doors from
being unlocked using the lock buttons or the
door opener.Seite 33Opening and closingControls33
Online Edition for Part no. 01 40 2 916 693 - X/12
Page 93 of 243
Settings on the Control
Display
Time
Setting the time zone1."Settings"2."Time/Date"3."Time zone"4.Select the desired time zone.
The time zone is stored.
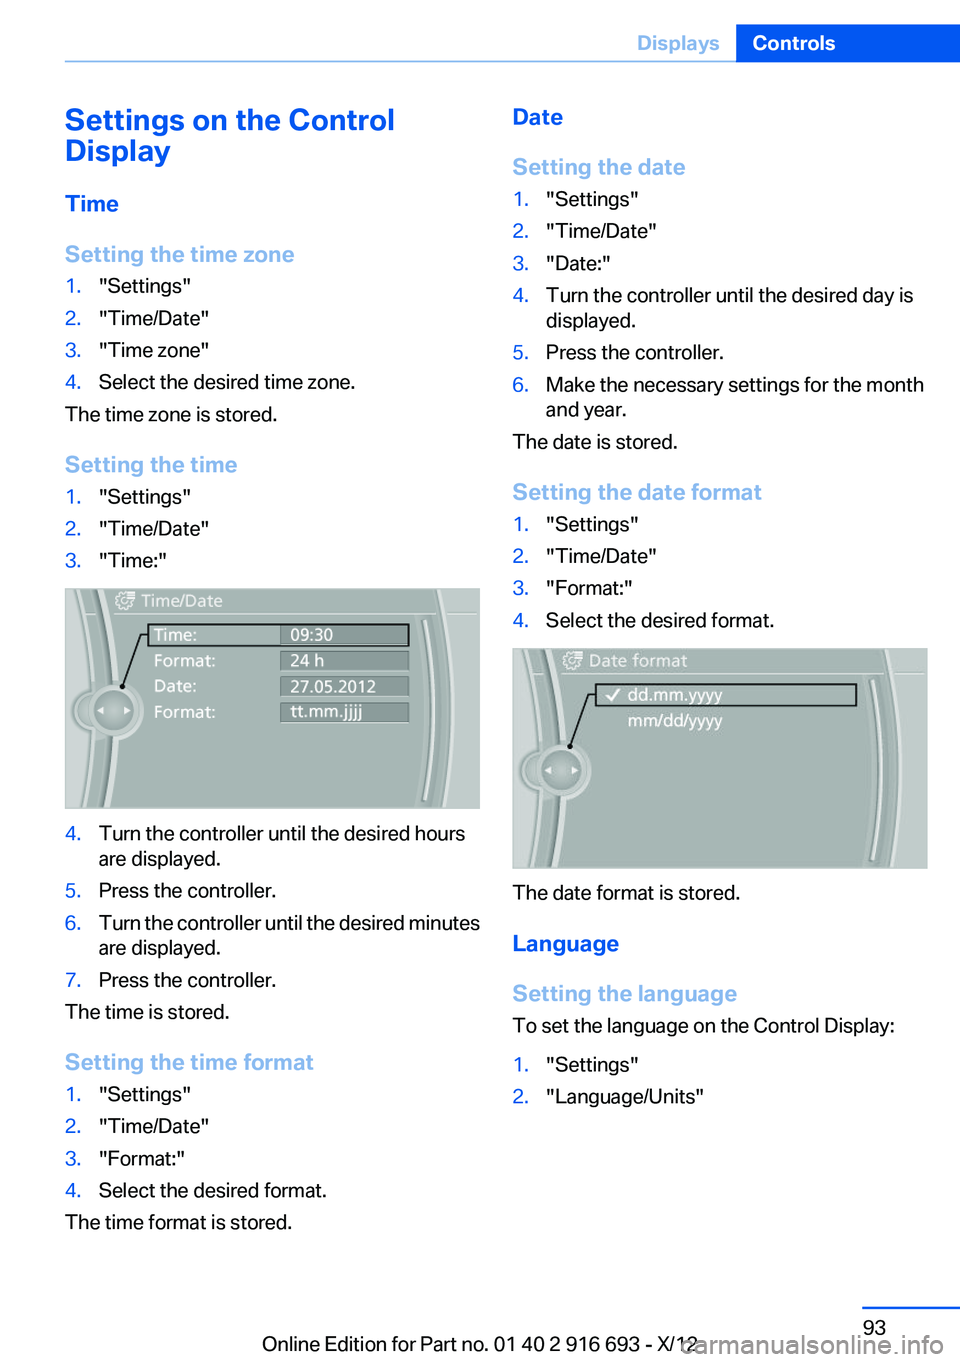
Setting the time
1."Settings"2."Time/Date"3."Time:"4.Turn the controller until the desired hours
are displayed.5.Press the controller.6.Turn the controller until the desired minutes
are displayed.7.Press the controller.
The time is stored.
Setting the time format
1."Settings"2."Time/Date"3."Format:"4.Select the desired format.
The time format is stored.
Date
Setting the date1."Settings"2."Time/Date"3."Date:"4.Turn the controller until the desired day is
displayed.5.Press the controller.6.Make the necessary settings for the month
and year.
The date is stored.
Setting the date format
1."Settings"2."Time/Date"3."Format:"4.Select the desired format.
The date format is stored.
Language
Setting the language
To set the language on the Control Display:
1."Settings"2."Language/Units"Seite 93DisplaysControls93
Online Edition for Part no. 01 40 2 916 693 - X/12
Page 94 of 243
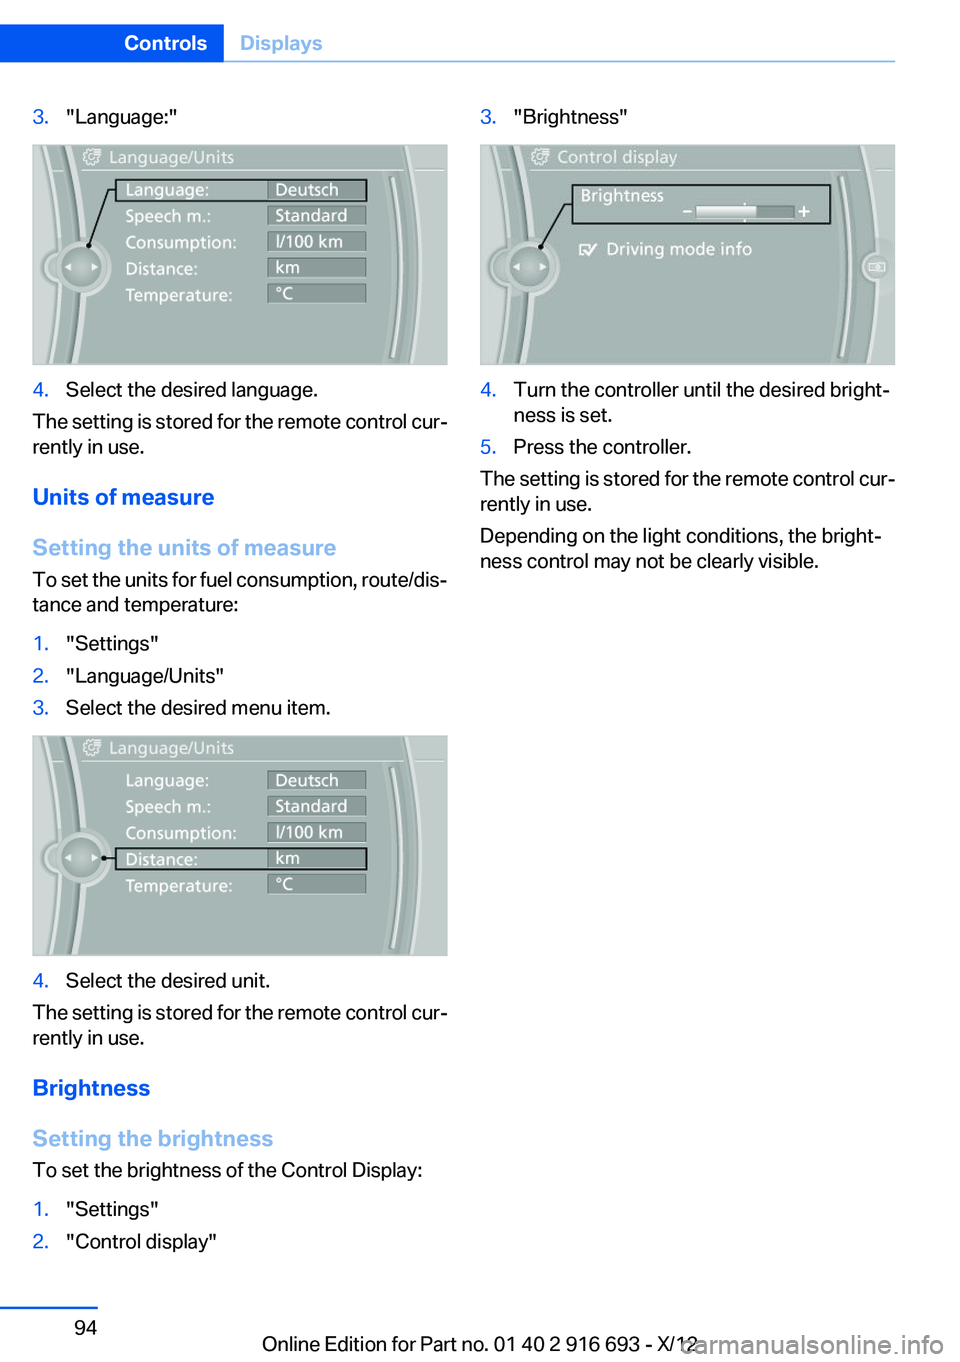
3."Language:"4.Select the desired language.
The setting is stored for the remote control cur‐
rently in use.
Units of measure
Setting the units of measure
To set the units for fuel consumption, route/dis‐
tance and temperature:
1."Settings"2."Language/Units"3.Select the desired menu item.4.Select the desired unit.
The setting is stored for the remote control cur‐
rently in use.
Brightness
Setting the brightness
To set the brightness of the Control Display:
1."Settings"2."Control display"3."Brightness"4.Turn the controller until the desired bright‐
ness is set.5.Press the controller.
The setting is stored for the remote control cur‐
rently in use.
Depending on the light conditions, the bright‐
ness control may not be clearly visible.
Seite 94ControlsDisplays94
Online Edition for Part no. 01 40 2 916 693 - X/12
Page 236 of 243
High-beam Assistant 97
High beams 74
High beams/low beams, refer to High-beam Assistant 97
Hill Descent Control HDC 125
Hills 176
Hill start assistant, refer to Drive-off assistant 123
Hints 6
Holder for beverages 170
Homepage 6
Hood 202
Horn 12
Hotel function, trunk lid 40
Hot exhaust system 174
HUD Head-Up Display 151
Hydroplaning 175
I
Ice warning, refer to External temperature warning 86
Icy roads, refer to External temperature warning 86
Identification marks, tires 196
Identification number, refer to Important features in the en‐
gine compartment 202
iDrive 16
Ignition key, refer to Remote control 30
Ignition off 66
Ignition on 66
Indication of a flat tire 105 , 107
Individual air distribution 155
Individual settings, refer to Personal Profile 31
Inflation pressure, tires 191
Inflation pressure warning FTM, tires 104
Info display, refer to Com‐ puter 90
Initialization, Integral Active Steering 126 Initialize, Tire Pressure Moni‐
tor TPM 107
Initializing, Flat Tire Monitor FTM 105
Instrument cluster 79
Instrument cluster, electronic displays 80
Instrument display, multifunc‐ tional 80
Instrument lighting 98
Integral Active Steering 126
Integrated key 30
Integrated universal remote control 161
Intelligent Safety 109
Intensity, AUTO program 155
Interior equipment 161
Interior lamps 99
Interior lamps via remote con‐ trol 34
Interior motion sensor 43
Interior rearview mirror 60
Interior rearview mirror, auto‐ matic dimming feature 60
Internet page 6
Interval display, service re‐ quirements 87
J
Jacking points for the vehicle jack 215
Jack, refer to Vehicle jack 215
Joystick, automatic transmis‐ sion 77
Jump-starting 218
K
Key/remote control 30
Keyless Go, refer to Comfort Access 40
Key Memory, refer to Personal Profile 31
Kickdown, automatic trans‐ mission 77 Knee airbag 101
L
Lamp replacement 210
Lamp replacement, rear 213
Lamps 95
Lamps and bulbs 210
Lane departure warning 117
Lane margin, warning 117
Language on Control Dis‐ play 93
Lashing eyes, securing cargo 178
LATCH child restraint fixing system 63
Leather, care 223
LED front fog lamps, bulb re‐ placement 213
LED headlamps, Bulb replace‐ ment 212
LED light 212
LEDs, light-emitting di‐ odes 211
Length, vehicle 229
Letters and numbers, enter‐ ing 21
License plate lamp, bulb re‐ placement 213
Light-alloy wheels, care 224
Light control 97
Light-emitting diodes, LEDs 211
Lighter, rear 164
Lighting 95
Lighting, speaker 99
Lighting via remote control 34
Light Spot, refer to Night Vi‐ sion 114
Light switch 95
Load 177
Loading 177
Lock, door 36
Locking/unlocking from in‐ side 37 Seite 236ReferenceEverything from A to Z236
Online Edition for Part no. 01 40 2 916 693 - X/12