2013 BMW 650I XDRIVE GRAN COUPE power steering
[x] Cancel search: power steeringPage 12 of 232
CockpitVehicle equipment
All standard, country-specific and optional
equipment that is offered in the model series is
described in this chapter. Therefore, equipmentis also described that is not available in a vehicle,
e. g., because of the selected optional equip‐
ment or country variant. This also applies for
safety-related functions and systems.
All around the steering wheel
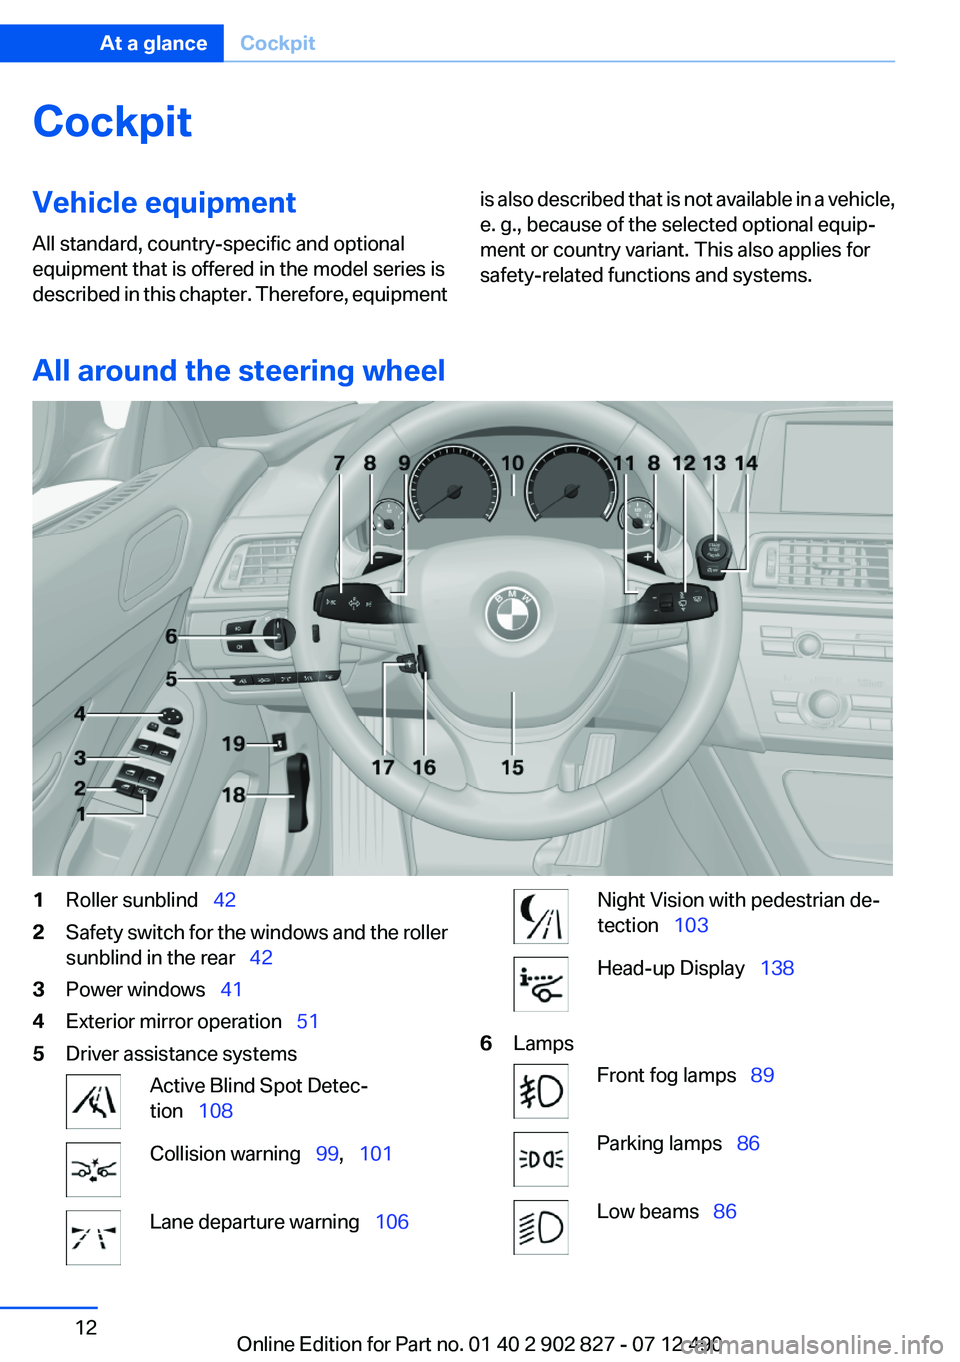
1Roller sunblind 422Safety switch for the windows and the roller
sunblind in the rear 423Power windows 414Exterior mirror operation 515Driver assistance systemsActive Blind Spot Detec‐
tion 108Collision warning 99, 101Lane departure warning 106Night Vision with pedestrian de‐
tection 103Head-up Display 1386LampsFront fog lamps 89Parking lamps 86Low beams 86Seite 12At a glanceCockpit12
Online Edition for Part no. 01 40 2 902 827 - 07 12 490
Page 35 of 232
Locking from the outside
Do not lock the vehicle from the outside if
there are people in it, as the vehicle cannot be
unlocked from inside without special knowl‐
edge.◀
Switching on interior lamps and
courtesy lamps
Press the button on the remote control
with the vehicle locked.
Panic mode
You can trigger the alarm system if you find
yourself in a dangerous situation.
Press the button on the remote control
for at least 3 seconds.
To switch off the alarm: press any button.
Switching on the headlamp courtesy
delay feature
Briefly press the button on the remote
control.
The duration can be set in the Control Display.
Opening the trunk lid Press the button on the remote control
for approx. 1 second.
The trunk lid opens, regardless of whether it was
previously locked or unlocked.
During opening, the trunk lid pivots back and up.
Ensure that adequate clearance is available be‐
fore opening.
In some vehicle equipment variants, the trunk lid
can only be opened using the remote control if
the vehicle was unlocked first.
To avoid locking yourself out of the vehicle, do
not place the remote control into the cargo area.
The trunk lid is locked again as soon as it is
pushed closed.Confirmation signals from the vehicle1."Settings"2."Door locks"3.Deactivate or activate the desired confirma‐
tion signals.▷"Acoustic sig. lock/unlock"▷"Flash when lock/unlock"
Retrieving the seat, mirror, and
steering wheel settings
The driver's seat, exterior mirror, and steering
wheel positions selected last are stored for the
currently used remote control.
When the vehicle is unlocked, these positions
are automatically retrieved if this function was
activated.
Pinch hazard when moving back the seat
If this function is used, first make sure that
the footwell behind the driver's seat is empty.
Otherwise, people can be injured or objects
damaged when the seat is moved back.◀
The adjustment procedure is interrupted:
▷When a seat position switch is pressed.▷When a button of the seat, mirror, and steer‐
ing wheel memory is pressed briefly.
Activating the setting
1."Settings"2."Door locks"3."Last seat position auto."
Malfunction
If the vehicle can no longer be locked or un‐
locked with the remote control, the battery may
be discharged or there may be interference from
external sources such as mobile phones, metal
objects, overhead power lines, transmission
towers, etc.
If this occurs, unlock or lock the vehicle at the
door lock using the integrated key.
Seite 35Opening and closingControls35
Online Edition for Part no. 01 40 2 902 827 - 07 12 490
Page 51 of 232
Seat, mirror, and steering
wheel memory
General information
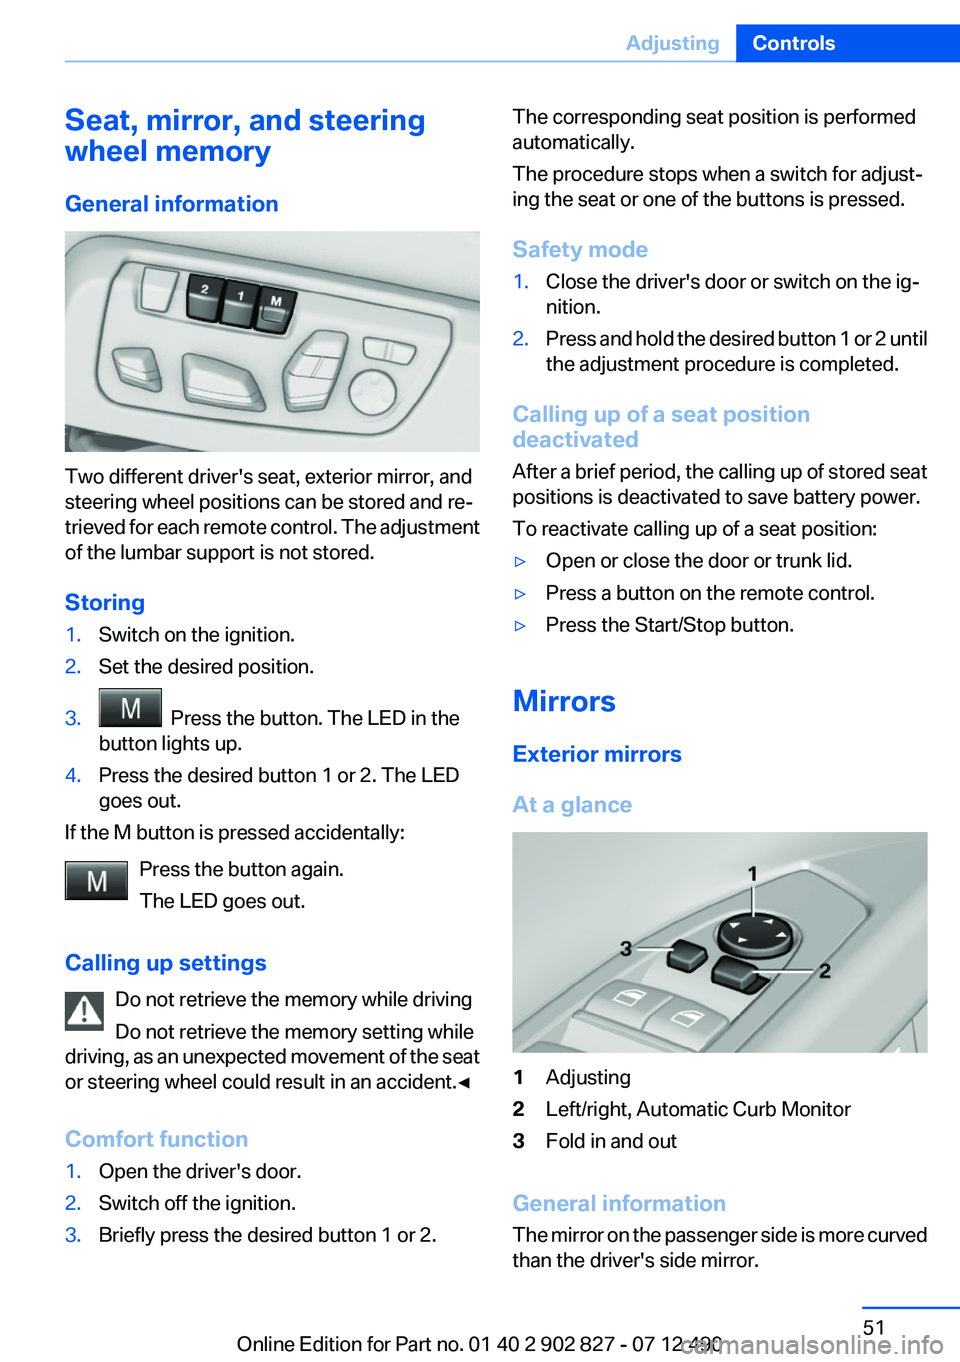
Two different driver's seat, exterior mirror, and
steering wheel positions can be stored and re‐
trieved for each remote control. The adjustment
of the lumbar support is not stored.
Storing
1.Switch on the ignition.2.Set the desired position.3. Press the button. The LED in the
button lights up.4.Press the desired button 1 or 2. The LED
goes out.
If the M button is pressed accidentally:
Press the button again.
The LED goes out.
Calling up settings Do not retrieve the memory while driving
Do not retrieve the memory setting while
driving, as an unexpected movement of the seat
or steering wheel could result in an accident.◀
Comfort function
1.Open the driver's door.2.Switch off the ignition.3.Briefly press the desired button 1 or 2.The corresponding seat position is performed
automatically.
The procedure stops when a switch for adjust‐
ing the seat or one of the buttons is pressed.
Safety mode1.Close the driver's door or switch on the ig‐
nition.2.Press and hold the desired button 1 or 2 until
the adjustment procedure is completed.
Calling up of a seat position
deactivated
After a brief period, the calling up of stored seat
positions is deactivated to save battery power.
To reactivate calling up of a seat position:
▷Open or close the door or trunk lid.▷Press a button on the remote control.▷Press the Start/Stop button.
Mirrors
Exterior mirrors
At a glance
1Adjusting2Left/right, Automatic Curb Monitor3Fold in and out
General information
The mirror on the passenger side is more curved
than the driver's side mirror.
Seite 51AdjustingControls51
Online Edition for Part no. 01 40 2 902 827 - 07 12 490
Page 59 of 232
▷When the ignition is switched off: press ON/
OFF button on the radio.▷When the engine is running: press the Start/
Stop button.
Some electronic systems/power consumers re‐
main ready for operation.
Radio ready state switches off automatically:
▷After approx. 8 minutes.▷When the vehicle is locked using the central
locking system.▷Shortly before the battery is discharged
completely, so that the engine can still be
started.
Starting the engine
General information Enclosed areas
Do not let the engine run in enclosed
areas; otherwise, breathing of exhaust fumes
may lead to loss of consciousness and death.
The exhaust gases contain carbon monoxide, an
odorless and colorless but highly toxic gas.◀
Unattended vehicle
Do not leave the vehicle unattended with
the engine running; doing so poses a risk of dan‐
ger.
Before leaving the vehicle with the engine run‐
ning, set the parking brake and place the trans‐
mission in position P or neutral to prevent the
vehicle from moving.◀
Repeated starting in quick succession
Avoid repeated unsuccessful attempts to
start the vehicle or starting the vehicle several
times in quick succession. Otherwise, the fuel is
not burned or is inadequately burned, posing a
risk of overheating and damage to the catalytic
converter.◀
Do not wait for the engine to warm up while the
vehicle remains stationary. Start driving at mod‐
erate engine speeds.
Automatic transmission
Starting the engine1.Depress the brake pedal.2.Press the Start/Stop button.
The ignition is activated automatically for a cer‐
tain time and is stopped as soon as the engine
starts.
Engine stop
General information Take the remote control with you
Take the remote control with you when
leaving the vehicle so that children, for example,
cannot start the engine.◀
Set the parking brake and further secure
the vehicle as required
Set the parking brake firmly when parking; oth‐
erwise, the vehicle could roll. On steep upward
and downward inclines, further secure the vehi‐
cle, for example, by turning the steering wheel in
the direction of the curb. ◀
Before driving into a car wash
In order for the vehicle to be able to roll into a car
wash, heed the information regarding Washing
in automatic car washes, refer to page 203.
Automatic transmission
Switching off the engine
1.Engage transmission position P with the ve‐
hicle stopped.2.Press the Start/Stop button.
The engine is switched off.
The radio ready state is switched on.Seite 59DrivingControls59
Online Edition for Part no. 01 40 2 902 827 - 07 12 490
Page 118 of 232
Driving comfortVehicle equipment
All standard, country-specific and optional
equipment that is offered in the model series is
described in this chapter. Therefore, equipment
is also described that is not available in a vehicle,
e. g., because of the selected optional equip‐
ment or country variant. This also applies for
safety-related functions and systems.
Active Cruise Control with
Stop & Go function, ACC
The concept
This system can be used to select a desired
speed that the vehicle will maintain automati‐
cally on clear roads.
To the extent possible, the system automatically
adjusts the speed to a slower vehicle ahead of
you.
The distance that the vehicle maintains to the
vehicle ahead of you can be varied.
For safety reasons, it depends on the speed.
To maintain a certain distance, the system au‐
tomatically decelerates, applies the brakes
lightly, or accelerates again if the vehicle ahead
begins moving faster.
If the vehicle ahead of you brakes to a halt, the
system is able to detect this within the given
system limits. If the vehicle ahead of your drives
away again from a halt, your vehicle is able to
accelerate if operated accordingly.
Even if some time passes before the vehicle
drives away again, the BMW can still be accel‐
erated automatically and simply.
As soon as the road is clear, it accelerates to the
desired speed.
The speed is also maintained on downhill gra‐
dients, but may not be maintained on uphill
slopes if engine power is insufficient.General information
When ECO PRO is activated, cruise control is
also set to a driving style that saves on fuel con‐
sumption.
Notes Personal responsibility
The system does not relieve the driver of
the responsibility to adapt his or her speed, dis‐
tance and driving style to the traffic conditions.
You should drive attentively and intervene ac‐
tively when necessary, e.g. by braking or making
an evasive maneuver, otherwise, there is danger
of an accident.◀
At a glance
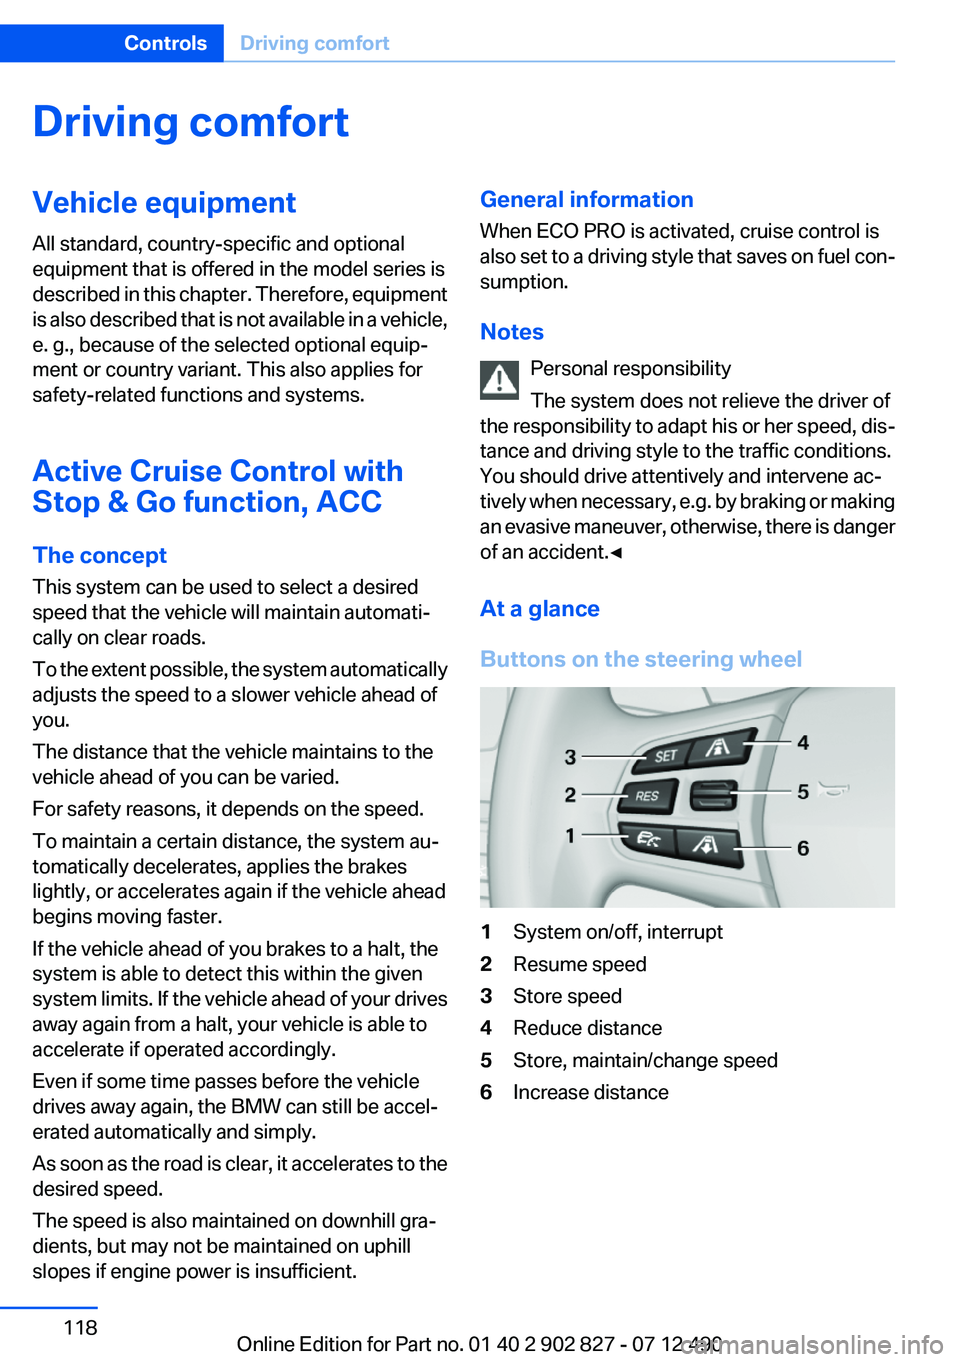
Buttons on the steering wheel1System on/off, interrupt2Resume speed3Store speed4Reduce distance5Store, maintain/change speed6Increase distanceSeite 118ControlsDriving comfort118
Online Edition for Part no. 01 40 2 902 827 - 07 12 490
Page 196 of 232
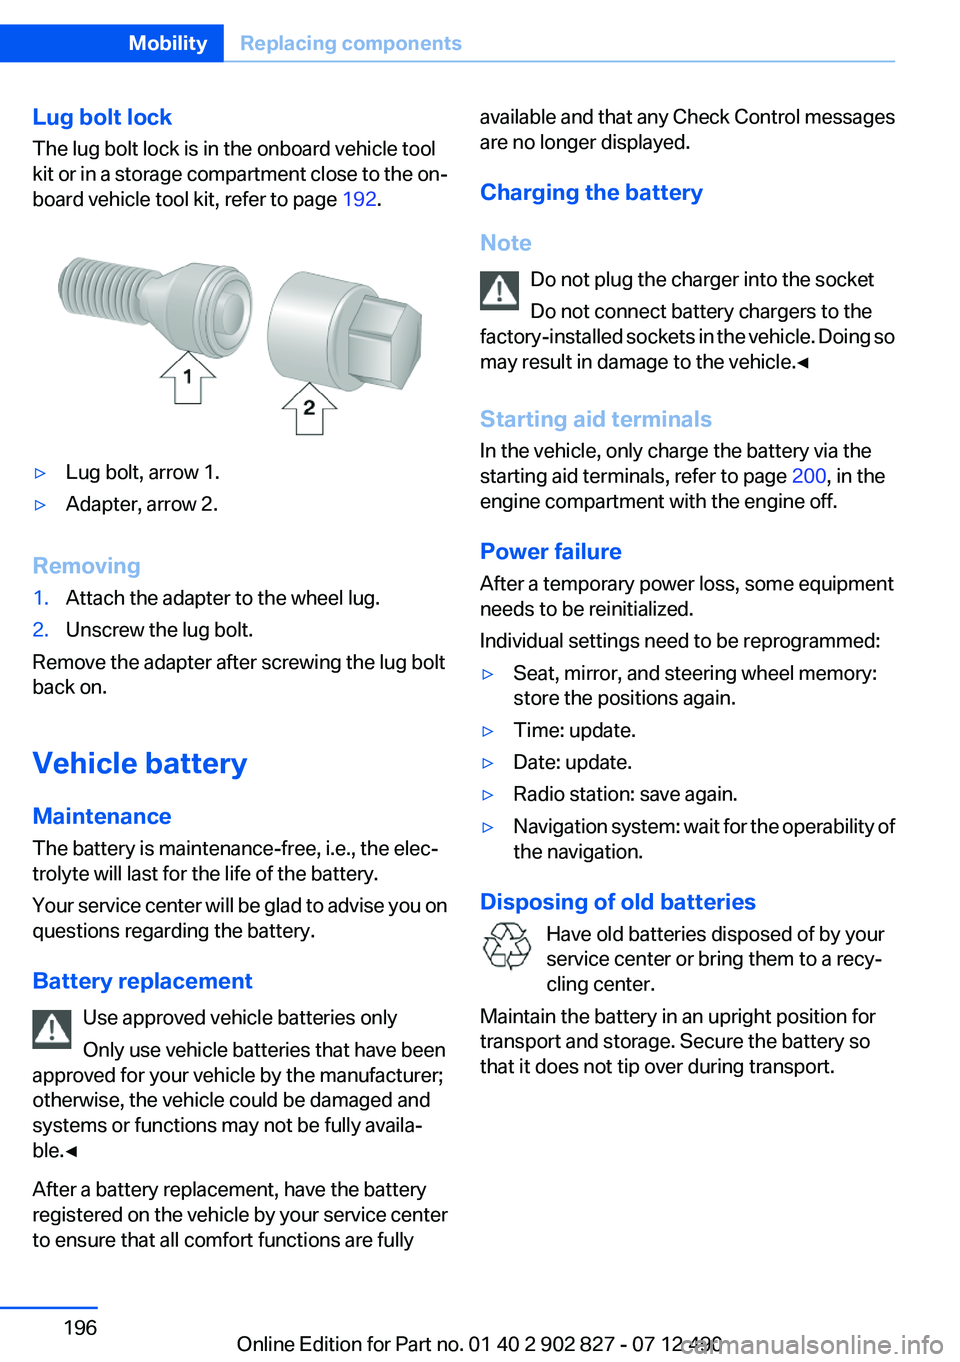
Lug bolt lock
The lug bolt lock is in the onboard vehicle tool
kit or in a storage compartment close to the on‐
board vehicle tool kit, refer to page 192.▷Lug bolt, arrow 1.▷Adapter, arrow 2.
Removing
1.Attach the adapter to the wheel lug.2.Unscrew the lug bolt.
Remove the adapter after screwing the lug bolt
back on.
Vehicle battery
Maintenance
The battery is maintenance-free, i.e., the elec‐
trolyte will last for the life of the battery.
Your service center will be glad to advise you on
questions regarding the battery.
Battery replacement Use approved vehicle batteries only
Only use vehicle batteries that have been
approved for your vehicle by the manufacturer;
otherwise, the vehicle could be damaged and
systems or functions may not be fully availa‐
ble.◀
After a battery replacement, have the battery
registered on the vehicle by your service center
to ensure that all comfort functions are fully
available and that any Check Control messages
are no longer displayed.
Charging the battery
Note Do not plug the charger into the socket
Do not connect battery chargers to the
factory-installed sockets in the vehicle. Doing so
may result in damage to the vehicle.◀
Starting aid terminals
In the vehicle, only charge the battery via the
starting aid terminals, refer to page 200, in the
engine compartment with the engine off.
Power failure
After a temporary power loss, some equipment
needs to be reinitialized.
Individual settings need to be reprogrammed:▷Seat, mirror, and steering wheel memory:
store the positions again.▷Time: update.▷Date: update.▷Radio station: save again.▷Navigation system: wait for the operability of
the navigation.
Disposing of old batteries
Have old batteries disposed of by your
service center or bring them to a recy‐
cling center.
Maintain the battery in an upright position for
transport and storage. Secure the battery so
that it does not tip over during transport.
Seite 196MobilityReplacing components196
Online Edition for Part no. 01 40 2 902 827 - 07 12 490
Page 226 of 232
Initialization, Integral ActiveSteering 114
Initialize, Tire Pressure Moni‐ tor TPM 95
Initializing, Flat Tire Monitor FTM 98
Instrument cluster 70
Instrument cluster, electronic displays 71
Instrument display, multifunc‐ tional 71
Instrument lighting 89
Integral Active Steering 113
Integrated key 30
Integrated universal remote control 145
Intensity, AUTO program 141
Interior equipment 145
Interior lamps 90
Interior lamps via remote con‐ trol 35
Interior motion sensor 41
Interior rearview mirror, auto‐ matic dimming feature 53
Internet page 6
Interval display, service re‐ quirements 78
J
Jacking points for the vehicle jack 195
Jack, refer to Vehicle jack 195
Joystick, automatic transmis‐ sion 68
Jump-starting 199
K
Key/remote control 30
Keyless Go, refer to Comfort Access 38
Key Memory, refer to Personal Profile 31
Kickdown, automatic trans‐ mission 68 Knee airbag 92
L
Lamp replacement 192
Lamp replacement, front 0
Lamp replacement, rear 194
Lamps 86
Lamps and bulbs 192
Lane departure warning 106
Lane margin, warning 106
Language on Control Dis‐ play 84
Lashing eyes, securing cargo 162
LATCH child restraint fixing system 55
Leather, care 204
LED headlamps, Bulb replace‐ ment 194
LED light 194
LEDs, light-emitting di‐ odes 193
Length, vehicle 211
Letters and numbers, enter‐ ing 21
License plate lamp, bulb re‐ placement 194
Light-alloy wheels, care 205
Light control 88
Light-emitting diodes, LEDs 193
Lighting 86
Lighting, speaker 90
Lighting via remote control 35
Light switch 86
Load 161
Loading 161
Lock, door 36
Locking/unlocking from in‐ side 37
Locking/unlocking via door lock 36
Locking/unlocking with re‐ mote control 34
Locking, automatic 37 Locking, central 33
Locking via trunk lid 38
Lock, power window 42
Locks, doors, and win‐ dows 57
Low beams 86
Low beams, automatic, refer to High-beam Assistant 88
Lower back support 46
Lug bolt lock 196
Lumbar support 46
M
Maintenance 189
Maintenance require‐ ments 189
Maintenance, service require‐ ments 78
Maintenance system, BMW 189
Malfunction displays, refer to Check Control 74
Manual air distribution 141
Manual air flow 141
Manual brake, refer to Parking brake 62
Manual mode, transmis‐ sion 68
Manual operation, backup camera 129
Manual operation, door lock 36
Manual operation, exterior mir‐ rors 52
Manual operation, fuel filler flap 170
Manual operation, Park Dis‐ tance Control PDC 127
Manual operation, Side View 133
Manual operation, Top View 132
Marking on approved tires 180
Marking, run-flat tires 181 Seite 226ReferenceEverything from A to Z226
Online Edition for Part no. 01 40 2 902 827 - 07 12 490
Page 227 of 232
Massage seat, front 47
Master key, refer to Remote control 30
Maximum cooling 141
Maximum speed, display 79
Maximum speed, winter tires 181
Measure, units of 85
Medical kit 199
Memory for seat, mirrors, steering wheel 51
Menu, EfficientDynamics 165
Menu in instrument cluster 81
Menus, operating, iDrive 16
Menus, refer to iDrive operat‐ ing concept 17
Messages, refer to Check Control 74
Microfilter 143
Minimum tread, tires 179
Mirror 51
Mirror memory 51
Mobile communication devi‐ ces in the vehicle 159
Modifications, technical, refer to Safety 7
Moisture in headlamp 193
Monitor, refer to Control Dis‐ play 16
Mounting of child restraint fix‐ ing systems 54
Multifunctional instrument display 71
Multifunction steering wheel, buttons 12
N
Navigation, see user's manual for Navigation, Entertain‐
ment and Communication
Neck restraints, front, refer to Head restraints 50
New wheels and tires 180
Night Vision with pedestrian detection 103 No Passing Information 79
Nylon rope for tow-starting/ towing 201
O
OBD Onboard Diagnos‐ tics 190
Obstacle marking, backup camera 130
Octane rating, refer to Gaso‐ line quality 172
Odometer 77
Office, see user's manual for Navigation, Entertainment
and Communication
Oil 186
Oil, adding 187
Oil additives 187
Oil change 187
Oil change interval, service re‐ quirements 78
Oil filler neck 187
Oil types, alternative 187
Oil types, approved 187
Old batteries, disposal 196
Onboard Diagnostics OBD 190
Onboard monitor, refer to Control Display 16
Onboard vehicle tool kit 192
Opening/closing from in‐ side 37
Opening/closing via door lock 36
Opening/closing with remote control 34
Operating concept, iDrive 16
Optional equipment, standard equipment 6
Outside air, refer to Automatic recirculated-air control 142
Overheating of engine, refer to Coolant temperature 77
Overtaking prohibitions 79 P
Paint, vehicle 204
Panic mode 35
Parallel parking assistant 134
Park Distance Control PDC 126
Parked-car ventilation 144
Parked vehicle, condensa‐ tion 160
Parking aid, refer to PDC 126
Parking assistant 134
Parking brake 62
Parking lamps 86
Parking lamps and roadside parking lamps, refer to Light-
emitting diodes, LEDs 193
Parking with Auto Hold 63
Passenger side mirror, tilting downward 52
Pathway lines, backup cam‐ era 130
PDC Park Distance Con‐ trol 126
Pedestrian detection, refer to Night Vision 103
People detection, refer to Night Vision 103
Personal Profile 31
Pinch protection system, glass sunroof 44
Pinch protection system, win‐ dows 42
Plastic, care 205
Power failure 196
Power sunroof, glass 43
Power windows 41
Pressure, tire air pres‐ sure 173
Pressure warning FTM, tires 97
Profile, refer to Personal Pro‐ file 31
Programmable memory but‐ tons, iDrive 20 Seite 227Everything from A to ZReference227
Online Edition for Part no. 01 40 2 902 827 - 07 12 490