2013 BMW 650I XDRIVE CONVERTIBLE lock
[x] Cancel search: lockPage 201 of 240
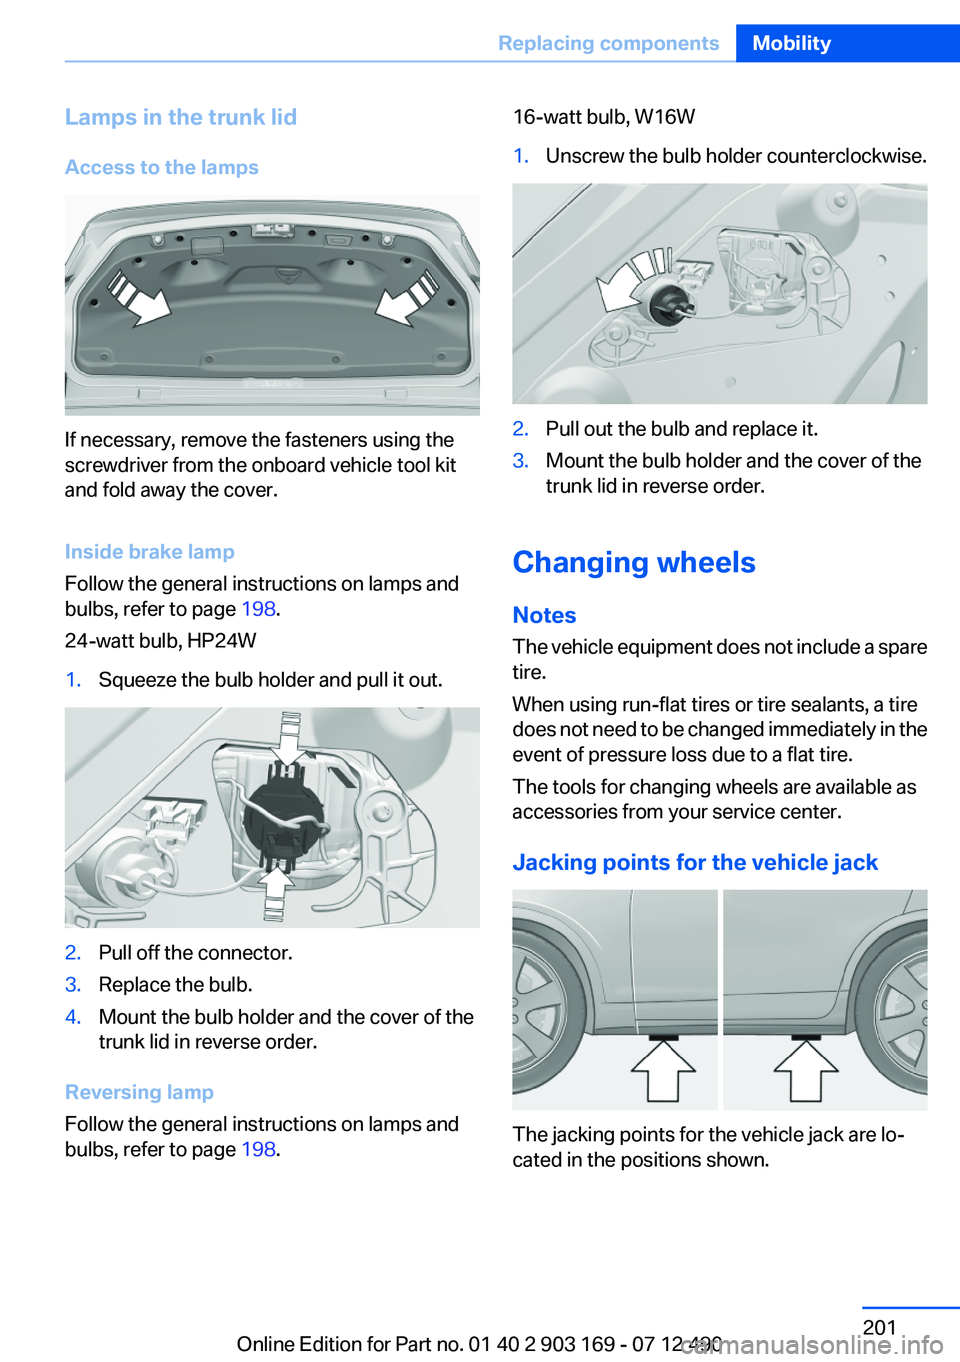
Lamps in the trunk lid
Access to the lamps
If necessary, remove the fasteners using the
screwdriver from the onboard vehicle tool kit
and fold away the cover.
Inside brake lamp
Follow the general instructions on lamps and
bulbs, refer to page 198.
24-watt bulb, HP24W
1.Squeeze the bulb holder and pull it out.2.Pull off the connector.3.Replace the bulb.4.Mount the bulb holder and the cover of the
trunk lid in reverse order.
Reversing lamp
Follow the general instructions on lamps and
bulbs, refer to page 198.
16-watt bulb, W16W1.Unscrew the bulb holder counterclockwise.2.Pull out the bulb and replace it.3.Mount the bulb holder and the cover of the
trunk lid in reverse order.
Changing wheels
Notes
The vehicle equipment does not include a spare
tire.
When using run-flat tires or tire sealants, a tire
does not need to be changed immediately in the
event of pressure loss due to a flat tire.
The tools for changing wheels are available as
accessories from your service center.
Jacking points for the vehicle jack
The jacking points for the vehicle jack are lo‐
cated in the positions shown.
Seite 201Replacing componentsMobility201
Online Edition for Part no. 01 40 2 903 169 - 07 12 490
Page 202 of 240
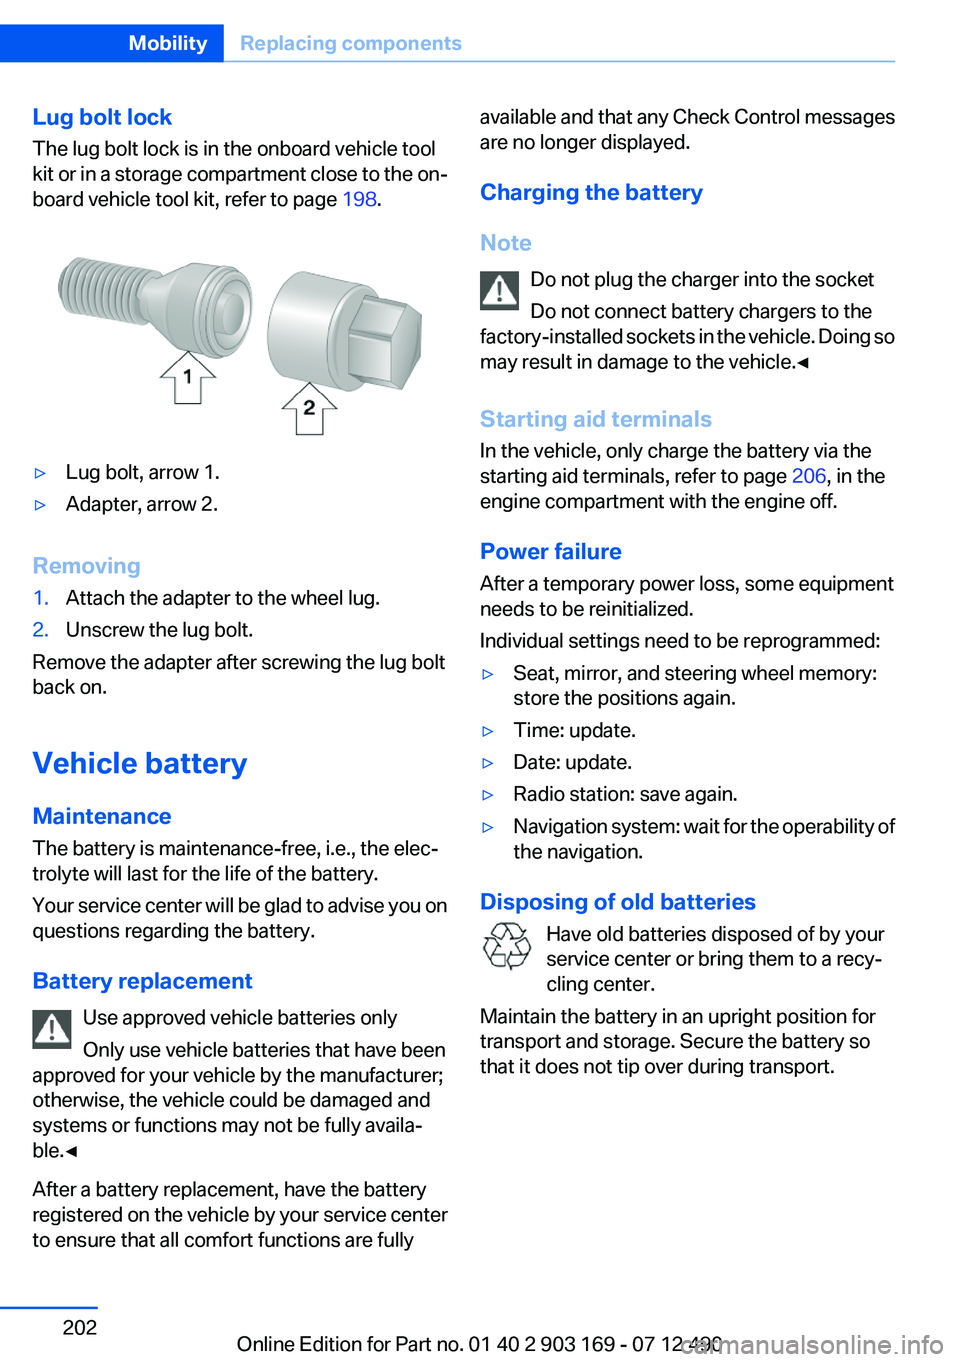
Lug bolt lock
The lug bolt lock is in the onboard vehicle tool
kit or in a storage compartment close to the on‐
board vehicle tool kit, refer to page 198.▷Lug bolt, arrow 1.▷Adapter, arrow 2.
Removing
1.Attach the adapter to the wheel lug.2.Unscrew the lug bolt.
Remove the adapter after screwing the lug bolt
back on.
Vehicle battery
Maintenance
The battery is maintenance-free, i.e., the elec‐
trolyte will last for the life of the battery.
Your service center will be glad to advise you on
questions regarding the battery.
Battery replacement Use approved vehicle batteries only
Only use vehicle batteries that have been
approved for your vehicle by the manufacturer;
otherwise, the vehicle could be damaged and
systems or functions may not be fully availa‐
ble.◀
After a battery replacement, have the battery
registered on the vehicle by your service center
to ensure that all comfort functions are fully
available and that any Check Control messages
are no longer displayed.
Charging the battery
Note Do not plug the charger into the socket
Do not connect battery chargers to the
factory-installed sockets in the vehicle. Doing so
may result in damage to the vehicle.◀
Starting aid terminals
In the vehicle, only charge the battery via the
starting aid terminals, refer to page 206, in the
engine compartment with the engine off.
Power failure
After a temporary power loss, some equipment
needs to be reinitialized.
Individual settings need to be reprogrammed:▷Seat, mirror, and steering wheel memory:
store the positions again.▷Time: update.▷Date: update.▷Radio station: save again.▷Navigation system: wait for the operability of
the navigation.
Disposing of old batteries
Have old batteries disposed of by your
service center or bring them to a recy‐
cling center.
Maintain the battery in an upright position for
transport and storage. Secure the battery so
that it does not tip over during transport.
Seite 202MobilityReplacing components202
Online Edition for Part no. 01 40 2 903 169 - 07 12 490
Page 205 of 240
Assist Response Center contacts you and
takes further steps to help you.
Even if you are unable to respond, the BMW
Assist Response Center can take further
steps to help you under certain circumstan‐
ces.
For this purpose, data that are used to de‐
termine the necessary rescue measures,
such as the current position of the vehicle if
it can be established, are transmitted to the
BMW Assist Response Center.▷If the LED is flashing but the BMW Assist
Response Center cannot be heard on the
hands-free system, the hands-free system
may be malfunctioning. However, the BMW
Assist Response Center may still be able to
hear you.
Initiating an Emergency Request
automatically
Under certain conditions, an Emergency Re‐
quest is automatically initiated immediately after
a severe accident. Automatic Collision Notifica‐
tion is not affected by pressing the SOS button.
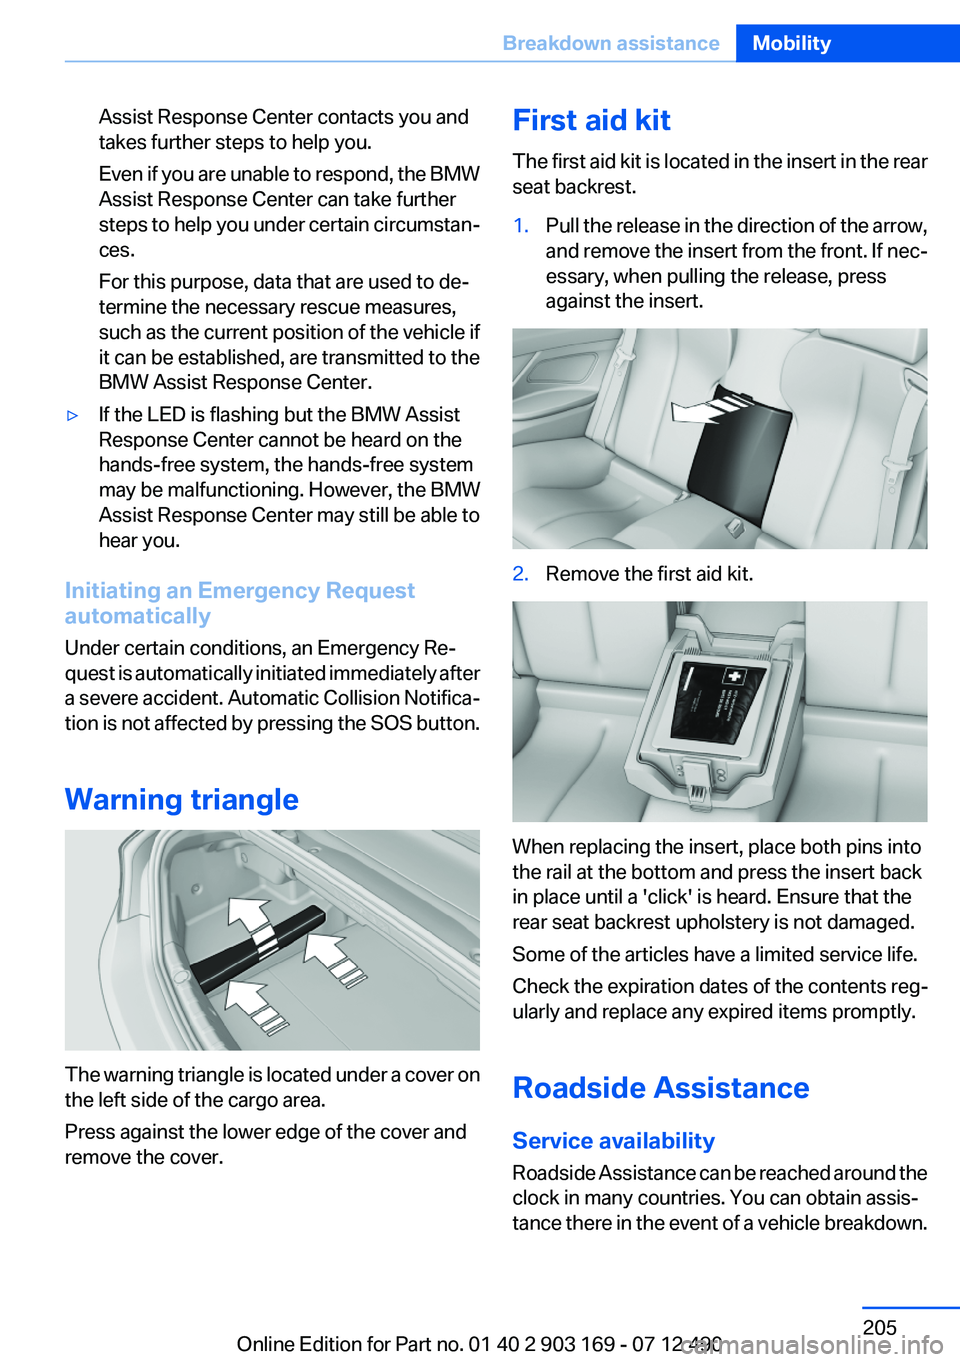
Warning triangle
The warning triangle is located under a cover on
the left side of the cargo area.
Press against the lower edge of the cover and
remove the cover.
First aid kit
The first aid kit is located in the insert in the rear
seat backrest.1.Pull the release in the direction of the arrow,
and remove the insert from the front. If nec‐
essary, when pulling the release, press
against the insert.2.Remove the first aid kit.
When replacing the insert, place both pins into
the rail at the bottom and press the insert back
in place until a 'click' is heard. Ensure that the
rear seat backrest upholstery is not damaged.
Some of the articles have a limited service life.
Check the expiration dates of the contents reg‐
ularly and replace any expired items promptly.
Roadside Assistance
Service availability
Roadside Assistance can be reached around the
clock in many countries. You can obtain assis‐
tance there in the event of a vehicle breakdown.
Seite 205Breakdown assistanceMobility205
Online Edition for Part no. 01 40 2 903 169 - 07 12 490
Page 207 of 240
Starting the engine
Never use spray fluids to start the engine.1.Start the engine of the assisting vehicle and
let it run for several minutes at an increased
idle speed.2.Start the engine of the vehicle being started
in the usual way.
If the first starting attempt is not successful,
wait a few minutes before making another
attempt in order to allow the discharged bat‐
tery to recharge.3.Let both engines run for several minutes.4.Disconnect the jumper cables in the reverse
order.
Check the battery and recharge if necessary.
Tow-starting and towing
Manual transmission
Observe before towing your vehicle
Gearshift lever in neutral position.
Towing When the parking brake is blocked
The parking brake cannot be released
manually.
Do not tow the vehicle with the parking brake
blocked, or the vehicle can be damaged.
Contact your service center.◀
Follow the towing instructions
Follow all towing instructions; otherwise,
vehicle damage or accidents may occur.◀
▷Make sure that the ignition is switched on;
otherwise, the low beams, tail lamps, turn
signals, and windshield wipers may be un‐
available.▷Do not tow the vehicle with the rear axle
tilted, as the front wheels could turn.▷When the engine is stopped, there is no
power assist. Consequently, more force
needs to be applied when braking and steer‐
ing.▷Larger steering wheel movements are re‐
quired.▷The towing vehicle must not be lighter than
the vehicle being towed; otherwise, it will not
be possible to control the vehicle response.
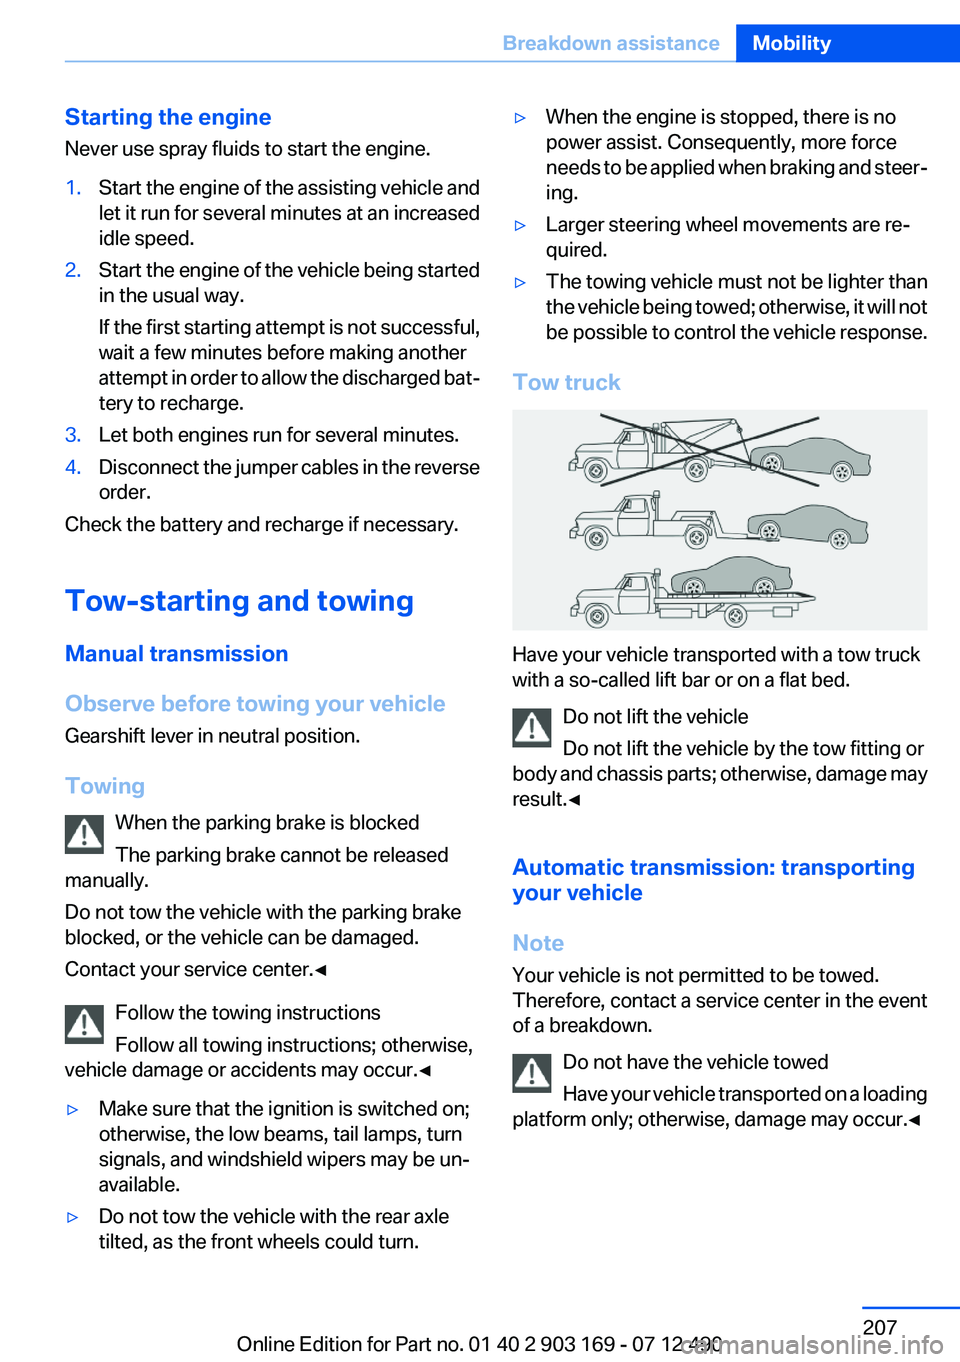
Tow truck
Have your vehicle transported with a tow truck
with a so-called lift bar or on a flat bed.
Do not lift the vehicle
Do not lift the vehicle by the tow fitting or
body and chassis parts; otherwise, damage may
result.◀
Automatic transmission: transporting
your vehicle
Note
Your vehicle is not permitted to be towed.
Therefore, contact a service center in the event
of a breakdown.
Do not have the vehicle towed
Have your vehicle transported on a loading
platform only; otherwise, damage may occur.◀
Seite 207Breakdown assistanceMobility207
Online Edition for Part no. 01 40 2 903 169 - 07 12 490
Page 211 of 240
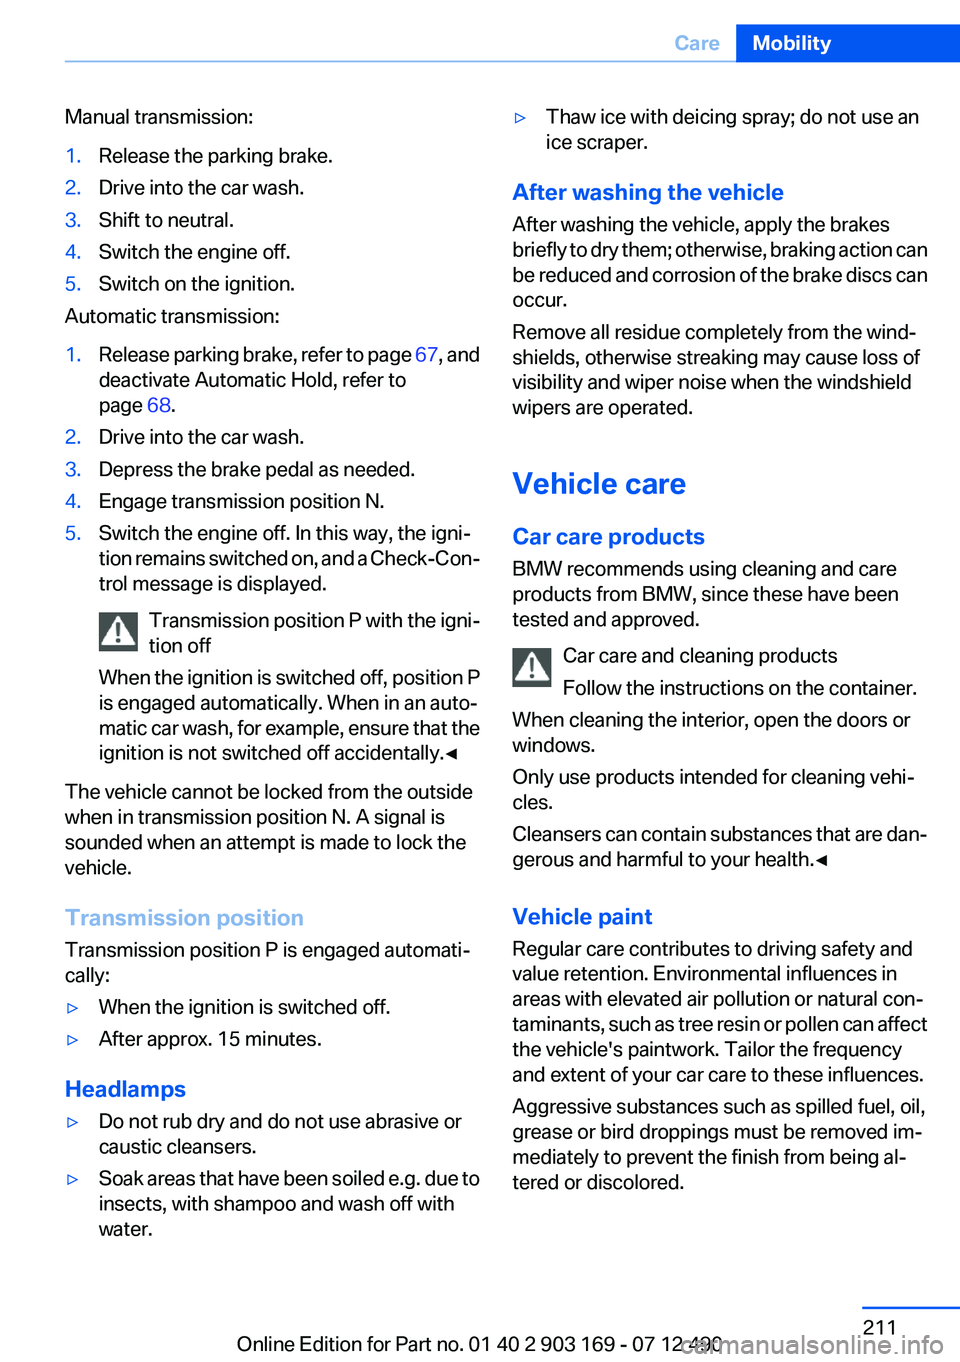
Manual transmission:1.Release the parking brake.2.Drive into the car wash.3.Shift to neutral.4.Switch the engine off.5.Switch on the ignition.
Automatic transmission:
1.Release parking brake, refer to page 67, and
deactivate Automatic Hold, refer to
page 68.2.Drive into the car wash.3.Depress the brake pedal as needed.4.Engage transmission position N.5.Switch the engine off. In this way, the igni‐
tion remains switched on, and a Check-Con‐
trol message is displayed.
Transmission position P with the igni‐
tion off
When the ignition is switched off, position P
is engaged automatically. When in an auto‐
matic car wash, for example, ensure that the
ignition is not switched off accidentally.◀
The vehicle cannot be locked from the outside
when in transmission position N. A signal is
sounded when an attempt is made to lock the
vehicle.
Transmission position
Transmission position P is engaged automati‐
cally:
▷When the ignition is switched off.▷After approx. 15 minutes.
Headlamps
▷Do not rub dry and do not use abrasive or
caustic cleansers.▷Soak areas that have been soiled e.g. due to
insects, with shampoo and wash off with
water.▷Thaw ice with deicing spray; do not use an
ice scraper.
After washing the vehicle
After washing the vehicle, apply the brakes
briefly to dry them; otherwise, braking action can
be reduced and corrosion of the brake discs can
occur.
Remove all residue completely from the wind‐
shields, otherwise streaking may cause loss of
visibility and wiper noise when the windshield
wipers are operated.
Vehicle care
Car care products
BMW recommends using cleaning and care
products from BMW, since these have been
tested and approved.
Car care and cleaning products
Follow the instructions on the container.
When cleaning the interior, open the doors or
windows.
Only use products intended for cleaning vehi‐
cles.
Cleansers can contain substances that are dan‐
gerous and harmful to your health.◀
Vehicle paint
Regular care contributes to driving safety and
value retention. Environmental influences in
areas with elevated air pollution or natural con‐
taminants, such as tree resin or pollen can affect
the vehicle's paintwork. Tailor the frequency
and extent of your car care to these influences.
Aggressive substances such as spilled fuel, oil,
grease or bird droppings must be removed im‐
mediately to prevent the finish from being al‐
tered or discolored.
Seite 211CareMobility211
Online Edition for Part no. 01 40 2 903 169 - 07 12 490
Page 221 of 240
Short commands of the voice act. systemVehicle equipment
All standard, country-specific and optional
equipment that is offered in the model series is
described in this chapter. Therefore, equipment
is also described that is not available in a vehicle,
e. g., because of the selected optional equip‐
ment or country variant. This also applies for
safety-related functions and systems.
General information
Instructions for voice activation system, refer to
page 22.To have the available spoken instructions read
out loud: ›Voice commands‹
The following short commands are valid for ve‐
hicles with voice activation system. They do not
work in equipment packages with which only the
mobile phone can be operated by voice activa‐
tion.
Adjusting
Vehicle
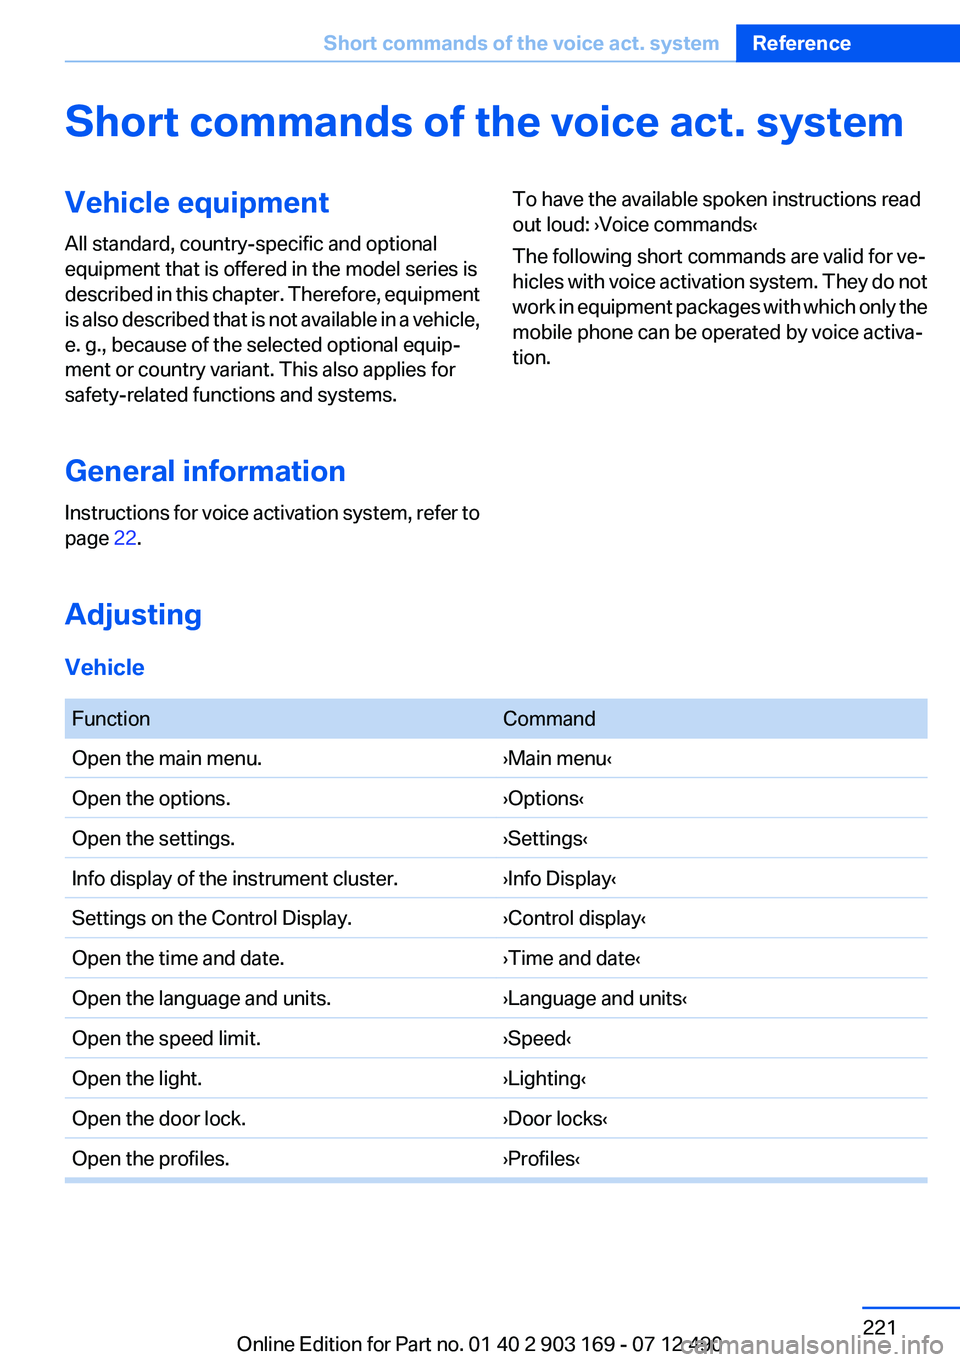
FunctionCommandOpen the main menu.›Main menu‹Open the options.›Options‹Open the settings.›Settings‹Info display of the instrument cluster.›Info Display‹Settings on the Control Display.›Control display‹Open the time and date.›Time and date‹Open the language and units.›Language and units‹Open the speed limit.›Speed‹Open the light.›Lighting‹Open the door lock.›Door locks‹Open the profiles.›Profiles‹Seite 221Short commands of the voice act. systemReference221
Online Edition for Part no. 01 40 2 903 169 - 07 12 490
Page 230 of 240
Everything from A to Z
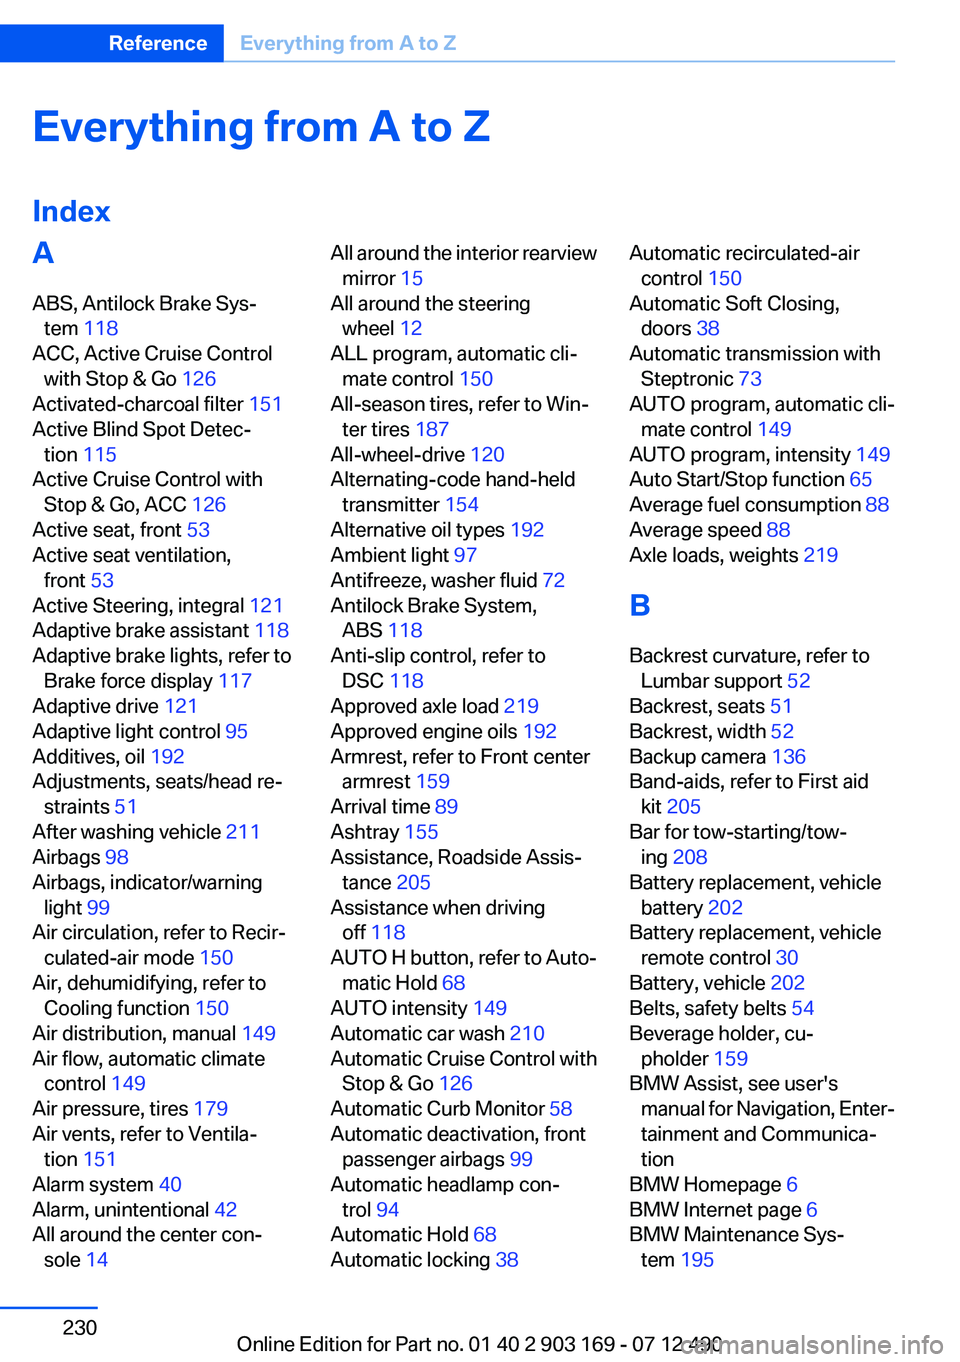
IndexA
ABS, Antilock Brake Sys‐ tem 118
ACC, Active Cruise Control with Stop & Go 126
Activated-charcoal filter 151
Active Blind Spot Detec‐ tion 115
Active Cruise Control with Stop & Go, ACC 126
Active seat, front 53
Active seat ventilation, front 53
Active Steering, integral 121
Adaptive brake assistant 118
Adaptive brake lights, refer to Brake force display 117
Adaptive drive 121
Adaptive light control 95
Additives, oil 192
Adjustments, seats/head re‐ straints 51
After washing vehicle 211
Airbags 98
Airbags, indicator/warning light 99
Air circulation, refer to Recir‐ culated-air mode 150
Air, dehumidifying, refer to Cooling function 150
Air distribution, manual 149
Air flow, automatic climate control 149
Air pressure, tires 179
Air vents, refer to Ventila‐ tion 151
Alarm system 40
Alarm, unintentional 42
All around the center con‐ sole 14 All around the interior rearview
mirror 15
All around the steering wheel 12
ALL program, automatic cli‐ mate control 150
All-season tires, refer to Win‐ ter tires 187
All-wheel-drive 120
Alternating-code hand-held transmitter 154
Alternative oil types 192
Ambient light 97
Antifreeze, washer fluid 72
Antilock Brake System, ABS 118
Anti-slip control, refer to DSC 118
Approved axle load 219
Approved engine oils 192
Armrest, refer to Front center armrest 159
Arrival time 89
Ashtray 155
Assistance, Roadside Assis‐ tance 205
Assistance when driving off 118
AUTO H button, refer to Auto‐ matic Hold 68
AUTO intensity 149
Automatic car wash 210
Automatic Cruise Control with Stop & Go 126
Automatic Curb Monitor 58
Automatic deactivation, front passenger airbags 99
Automatic headlamp con‐ trol 94
Automatic Hold 68
Automatic locking 38 Automatic recirculated-air
control 150
Automatic Soft Closing, doors 38
Automatic transmission with Steptronic 73
AUTO program, automatic cli‐ mate control 149
AUTO program, intensity 149
Auto Start/Stop function 65
Average fuel consumption 88
Average speed 88
Axle loads, weights 219
B
Backrest curvature, refer to Lumbar support 52
Backrest, seats 51
Backrest, width 52
Backup camera 136
Band-aids, refer to First aid kit 205
Bar for tow-starting/tow‐ ing 208
Battery replacement, vehicle battery 202
Battery replacement, vehicle remote control 30
Battery, vehicle 202
Belts, safety belts 54
Beverage holder, cu‐ pholder 159
BMW Assist, see user's manual for Navigation, Enter‐
tainment and Communica‐
tion
BMW Homepage 6
BMW Internet page 6
BMW Maintenance Sys‐ tem 195 Seite 230ReferenceEverything from A to Z230
Online Edition for Part no. 01 40 2 903 169 - 07 12 490
Page 231 of 240

Bottle holder, refer to Cu‐pholder 159
Brake assistant 118
Brake assistant, adaptive 118
Brake discs, breaking in 164
Brake force display 117
Brake lamps, brake force dis‐ play 117
Brake lamps, bulb replace‐ ment 200
Brake lights, adaptive 117
Brake pads, breaking in 164
Braking, notes 165
Breakdown assis‐ tance 204, 205
Breaking in 164
Brightness of Control Dis‐ play 91
Bulb replacement 198
Bulb replacement, front 0
Bulb replacement, rear 200
Bulbs and lamps 198
Button, RES 128
Button, Start/Stop 63
Bypassing, refer to Jump- starting 206
C
California Proposition 65 Warning 7
Camera, backup camera 137
Camera, care 214
Camera, Side View 141
Camera, Top View 139
Can holder, refer to Cu‐ pholder 159
Car battery 202
Car care products 211
Care, displays 214
Care, vehicle 211
Cargo 167
Cargo area lid 38
Cargo area partition 46
Cargo area, storage compart‐ ments 160 Cargo straps, securing
cargo 168
Car key, refer to Remote con‐ trol 30
Carpet, care 213
Car wash 210
Catalytic converter, refer to Hot exhaust system 165
CBS Condition Based Serv‐ ice 195
CD/Multimedia, see user's manual for Navigation, Enter‐
tainment and Communica‐
tion
Center console 14
Central locking system 33
Central screen, refer to Control Display 16
Changes, technical, refer to Safety 7
Changing parts 198
Changing wheels 201
Changing wheels/tires 186
Check Control 80
Children, seating position 60
Children, transporting safely 60
Child restraint fixing sys‐ tem 60
Child restraint fixing system LATCH 61
Child restraint fixing systems, mounting 60
Child seat, mounting 60
Child seats 60
Chrome parts, care 213
Cigarette lighter 155
Cleaning, displays 214
Climate control 148
Climate control wind‐ shield 165
Clock 83
Closing/opening from in‐ side 37
Closing/opening via door lock 37 Closing/opening with remote
control 34
Collision warning 107, 109
Combination switch, refer to Turn signals 69
Combination switch, refer to Wiper system 70
COMFORT+ program, Driving Experience Switch 124
Comfort Access 39
COMFORT program, Driving Experience Switch 124
Computer 87
Condensation on win‐ dows 149
Condensation under the vehi‐ cle 166
Condition Based Service CBS 195
Configure driving mode 124
Confirmation signal 36
ConnectedDrive, see user's manual for Navigation, Enter‐
tainment and Communica‐
tion
Control Display 16
Control Display, settings 90
Controller 16
Control systems, driving sta‐ bility 118
Convenient closing 35
Convenient opening 35
Convertible, convertible top 43
Convertible mode, automatic climate control 149
Convertible program, auto‐ matic climate control 149
Convertible top 43
Convertible top, care 212
Convertible top, cargo area partition 46
Convertible top, emergency operation 46
Convertible top, rollover pro‐ tection system 101 Seite 231Everything from A to ZReference231
Online Edition for Part no. 01 40 2 903 169 - 07 12 490