2013 BMW 650I GRAN COUPE climate settings
[x] Cancel search: climate settingsPage 33 of 232

4.Open "Guest".5.Adjust the settings.
Note: the guest profile cannot be renamed.
Display profile list during start
The profile list can be displayed during each
start for selecting the desired profile.
1."Settings"2."Profiles"3.Open "Options".4."Display user list at startup"
Personal Profile settings
The following functions and settings can be
stored in a profile.
More information on the settings can be found
under:
▷Active Cruise Control: collision warning.▷Collision warning: warning time, last setting
on/off.▷Exterior mirror position.▷CD/Multimedia: audio source listened to
last.▷Driving Experience Switch: sport program.▷Driver's seat position: automatic retrieval af‐
ter unlocking.▷Programmable memory buttons: assign‐
ment.▷Head-up Display: selection, brightness, po‐
sition and rotation of the display.▷Headlamp courtesy delay feature: time set‐
ting.▷Tone: tone settings.▷Automatic climate control: settings.▷Steering wheel position.▷Navigation: map views, route criteria, voice
output on/off.▷Night Vision with pedestrian detection: se‐
lection of functions and type of display.▷Park Distance Control PDC: adjusting the
signal tone volume.▷Radio: stored stations, station listened to
last, special settings.▷Backup camera: selection of functions and
type of display.▷Side View: selection of the display type.▷Language on the Control Display.▷Lane departure warning: last setting, on/off.▷Active Blind Spot Detection: last setting, on/
off.▷Daytime running lights: current setting.▷Triple turn signal activation.▷Locking the vehicle: after a brief period or
after starting to drive.
Central locking system
The concept
The central locking system becomes active
when the driver's door is closed.
The system simultaneously engages and re‐
leases the locks on the following:
▷Doors.▷Trunk lid.▷Fuel filler flap.
Operating from the outside
▷Via the remote control.▷Via the driver's door lock.▷Via the door handles.▷Via the button in the trunk lid.
The following takes place simultaneously when
locking/unlocking the vehicle via the remote
control:
▷Depending on how the vehicle is equipped,
the theft protection is activated/deactivated.
Theft protection prevents the doors from
being unlocked using the lock buttons or the
door opener.Seite 33Opening and closingControls33
Online Edition for Part no. 01 40 2 902 827 - 07 12 490
Page 141 of 232
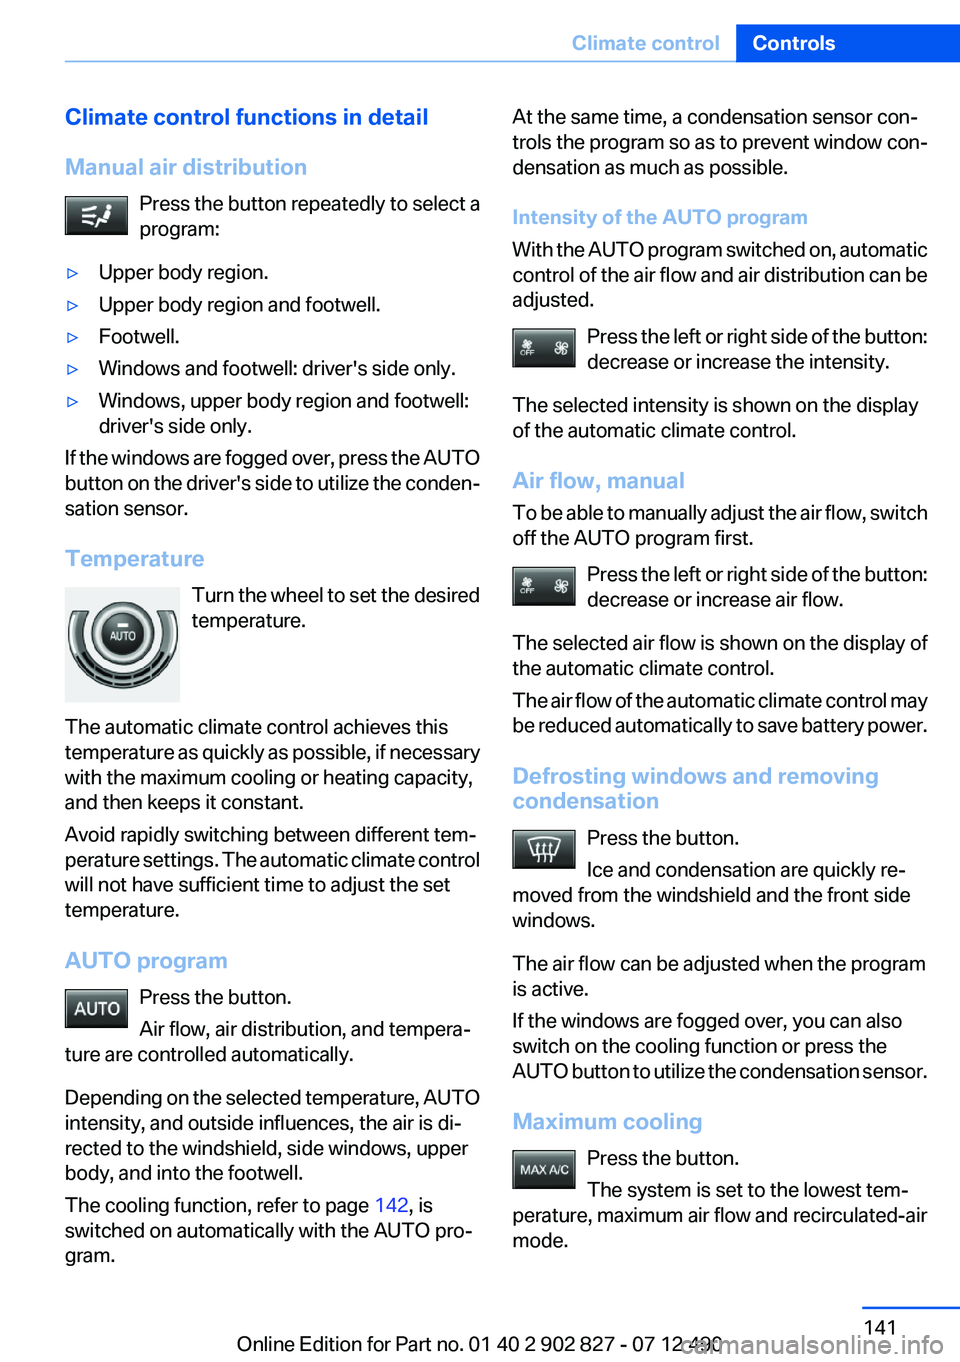
Climate control functions in detail
Manual air distribution Press the button repeatedly to select a
program:▷Upper body region.▷Upper body region and footwell.▷Footwell.▷Windows and footwell: driver's side only.▷Windows, upper body region and footwell:
driver's side only.
If the windows are fogged over, press the AUTO
button on the driver's side to utilize the conden‐
sation sensor.
Temperature Turn the wheel to set the desired
temperature.
The automatic climate control achieves this
temperature as quickly as possible, if necessary
with the maximum cooling or heating capacity,
and then keeps it constant.
Avoid rapidly switching between different tem‐
perature settings. The automatic climate control
will not have sufficient time to adjust the set
temperature.
AUTO program Press the button.
Air flow, air distribution, and tempera‐
ture are controlled automatically.
Depending on the selected temperature, AUTO
intensity, and outside influences, the air is di‐
rected to the windshield, side windows, upper
body, and into the footwell.
The cooling function, refer to page 142, is
switched on automatically with the AUTO pro‐
gram.
At the same time, a condensation sensor con‐
trols the program so as to prevent window con‐
densation as much as possible.
Intensity of the AUTO program
With the AUTO program switched on, automatic
control of the air flow and air distribution can be
adjusted.
Press the left or right side of the button:
decrease or increase the intensity.
The selected intensity is shown on the display
of the automatic climate control.
Air flow, manual
To be able to manually adjust the air flow, switch
off the AUTO program first.
Press the left or right side of the button:
decrease or increase air flow.
The selected air flow is shown on the display of
the automatic climate control.
The air flow of the automatic climate control may
be reduced automatically to save battery power.
Defrosting windows and removing
condensation
Press the button.
Ice and condensation are quickly re‐
moved from the windshield and the front side
windows.
The air flow can be adjusted when the program
is active.
If the windows are fogged over, you can also
switch on the cooling function or press the
AUTO button to utilize the condensation sensor.
Maximum cooling Press the button.
The system is set to the lowest tem‐
perature, maximum air flow and recirculated-air
mode.Seite 141Climate controlControls141
Online Edition for Part no. 01 40 2 902 827 - 07 12 490
Page 142 of 232
Air flows out of the vents for the upper body re‐
gion. Open them for this purpose.
Air is cooled as quickly as possible:
▷At an external temperature of approx.
32 ℉/0 ℃.
▷When the engine is running.
The air flow can be adjusted when the program
is active.
Automatic recirculated-air control/
recirculated-air mode
You can respond to unpleasant odors or pollu‐
tants in the immediate environment by tempo‐
rarily suspending the supply of outside air. The
system then recirculates the air currently within
the vehicle.
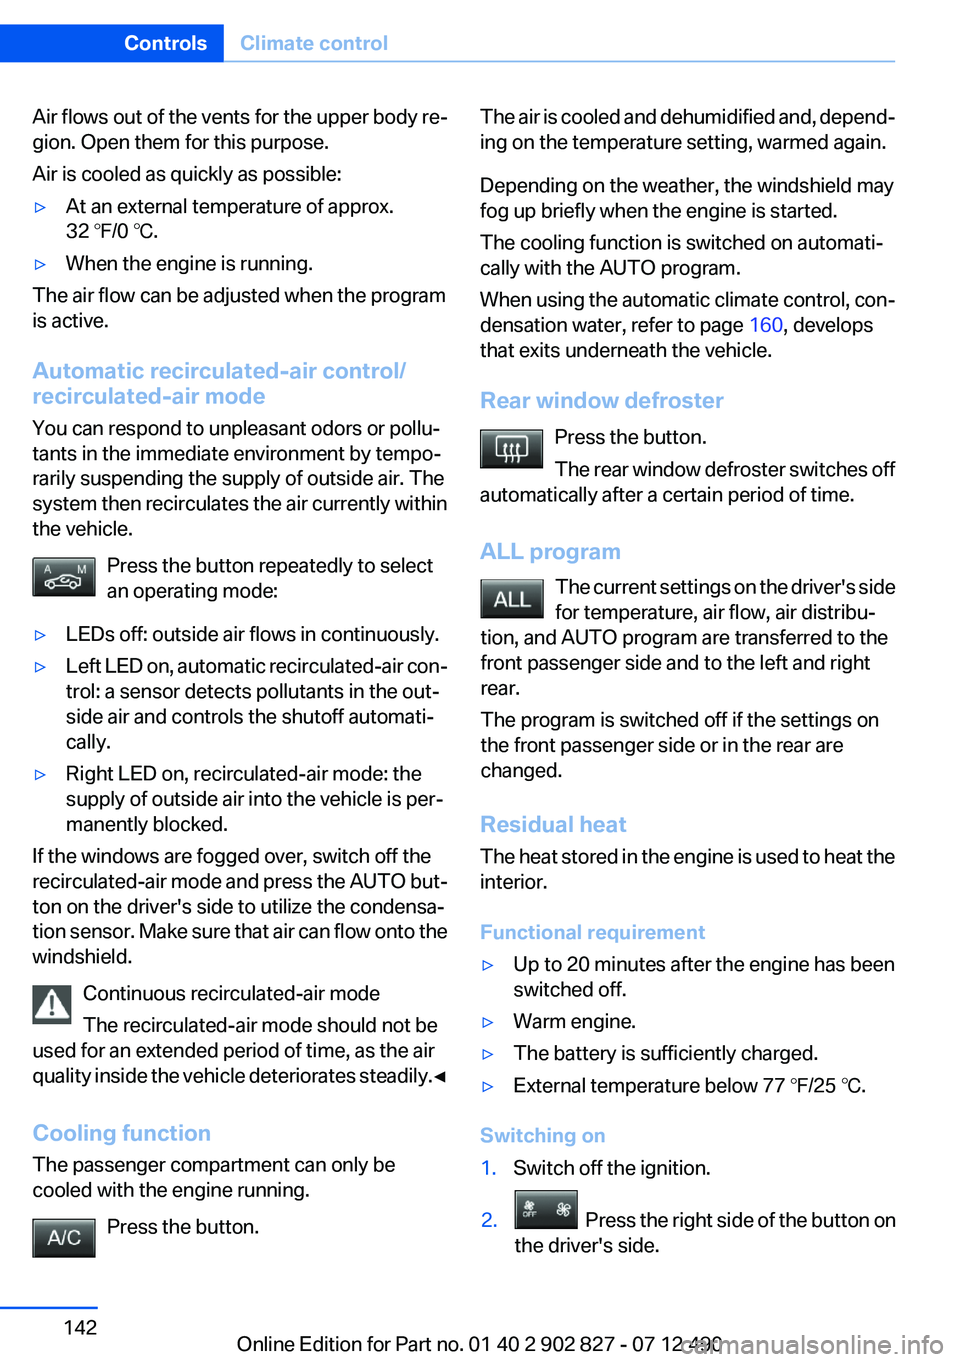
Press the button repeatedly to select
an operating mode:
▷LEDs off: outside air flows in continuously.▷Left LED on, automatic recirculated-air con‐
trol: a sensor detects pollutants in the out‐
side air and controls the shutoff automati‐
cally.
▷Right LED on, recirculated-air mode: the
supply of outside air into the vehicle is per‐
manently blocked.
If the windows are fogged over, switch off the
recirculated-air mode and press the AUTO but‐
ton on the driver's side to utilize the condensa‐
tion sensor. Make sure that air can flow onto the
windshield.
Continuous recirculated-air mode
The recirculated-air mode should not be
used for an extended period of time, as the air
quality inside the vehicle deteriorates steadily.◀
Cooling function
The passenger compartment can only be
cooled with the engine running.
Press the button.
The air is cooled and dehumidified and, depend‐
ing on the temperature setting, warmed again.
Depending on the weather, the windshield may
fog up briefly when the engine is started.
The cooling function is switched on automati‐
cally with the AUTO program.
When using the automatic climate control, con‐
densation water, refer to page 160, develops
that exits underneath the vehicle.
Rear window defroster
Press the button.
The rear window defroster switches off
automatically after a certain period of time.
ALL program
Residual heat
The heat stored in the engine is used to heat the
interior.
Functional requirement
▷Up to 20 minutes after the engine has been
switched off.
▷Warm engine.▷The battery is sufficiently charged.▷External temperature below 77 ℉/25 ℃.
Switching on
1.Switch off the ignition.Seite 142ControlsClimate control142
Online Edition for Part no. 01 40 2 902 827 - 07 12 490
The current settings on the driver's side
for temperature, air flow, air distribu‐
tion, and AUTO program are transferred to the
front passenger side and to the left and right
rear.
The program is switched off if the settings on
the front passenger side or in the rear are
changed.
2. Press the right side of the button on
the driver's side.
Page 144 of 232
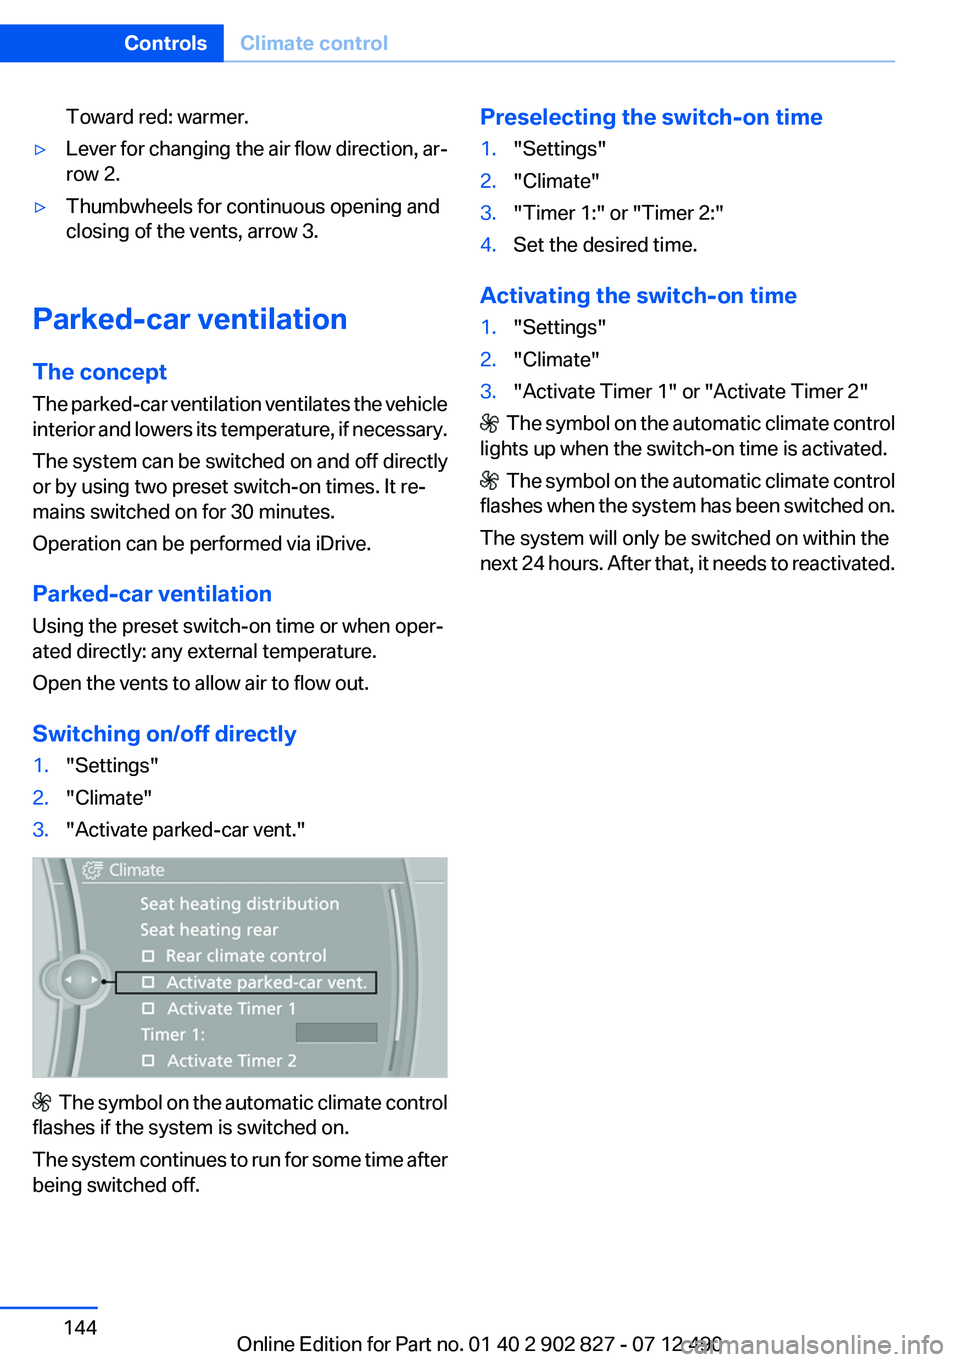
Toward red: warmer.▷Lever for changing the air flow direction, ar‐
row 2.▷Thumbwheels for continuous opening and
closing of the vents, arrow 3.
Parked-car ventilation
The concept
The parked-car ventilation ventilates the vehicle
interior and lowers its temperature, if necessary.
The system can be switched on and off directly
or by using two preset switch-on times. It re‐
mains switched on for 30 minutes.
Operation can be performed via iDrive.
Parked-car ventilation
Using the preset switch-on time or when oper‐
ated directly: any external temperature.
Open the vents to allow air to flow out.
Switching on/off directly
1."Settings"2."Climate"3."Activate parked-car vent."
The symbol on the automatic climate control
flashes if the system is switched on.
The system continues to run for some time after
being switched off.
Preselecting the switch-on time1."Settings"2."Climate"3."Timer 1:" or "Timer 2:"4.Set the desired time.
Activating the switch-on time
1."Settings"2."Climate"3."Activate Timer 1" or "Activate Timer 2"
The symbol on the automatic climate control
lights up when the switch-on time is activated.
The symbol on the automatic climate control
flashes when the system has been switched on.
The system will only be switched on within the
next 24 hours. After that, it needs to reactivated.
Seite 144ControlsClimate control144
Online Edition for Part no. 01 40 2 902 827 - 07 12 490
Page 165 of 232
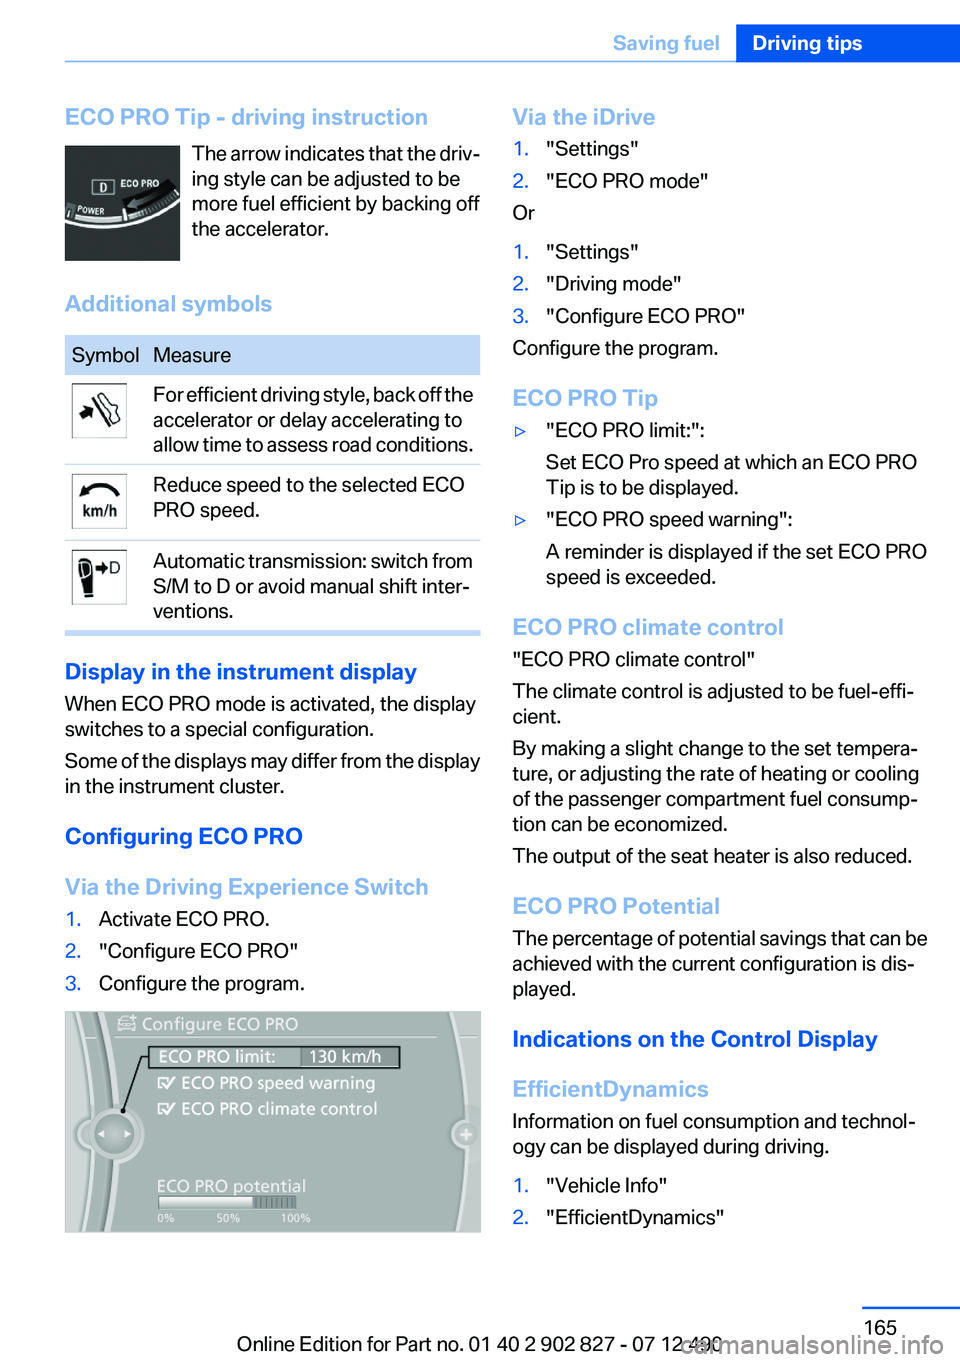
ECO PRO Tip - driving instructionThe arrow indicates that the driv‐
ing style can be adjusted to be
more fuel efficient by backing off
the accelerator.
Additional symbolsSymbolMeasureFor efficient driving style, back off the
accelerator or delay accelerating to
allow time to assess road conditions.Reduce speed to the selected ECO
PRO speed.Automatic transmission: switch from
S/M to D or avoid manual shift inter‐
ventions.
Display in the instrument display
When ECO PRO mode is activated, the display
switches to a special configuration.
Some of the displays may differ from the display
in the instrument cluster.
Configuring ECO PRO
Via the Driving Experience Switch
1.Activate ECO PRO.2."Configure ECO PRO"3.Configure the program.Via the iDrive1."Settings"2."ECO PRO mode"
Or
1."Settings"2."Driving mode"3."Configure ECO PRO"
Configure the program.
ECO PRO Tip
▷"ECO PRO limit:":
Set ECO Pro speed at which an ECO PRO
Tip is to be displayed.▷"ECO PRO speed warning":
A reminder is displayed if the set ECO PRO
speed is exceeded.
ECO PRO climate control
"ECO PRO climate control"
The climate control is adjusted to be fuel-effi‐
cient.
By making a slight change to the set tempera‐
ture, or adjusting the rate of heating or cooling
of the passenger compartment fuel consump‐
tion can be economized.
The output of the seat heater is also reduced.
ECO PRO Potential
The percentage of potential savings that can be
achieved with the current configuration is dis‐
played.
Indications on the Control Display
EfficientDynamics
Information on fuel consumption and technol‐
ogy can be displayed during driving.
1."Vehicle Info"2."EfficientDynamics"Seite 165Saving fuelDriving tips165
Online Edition for Part no. 01 40 2 902 827 - 07 12 490
Page 214 of 232
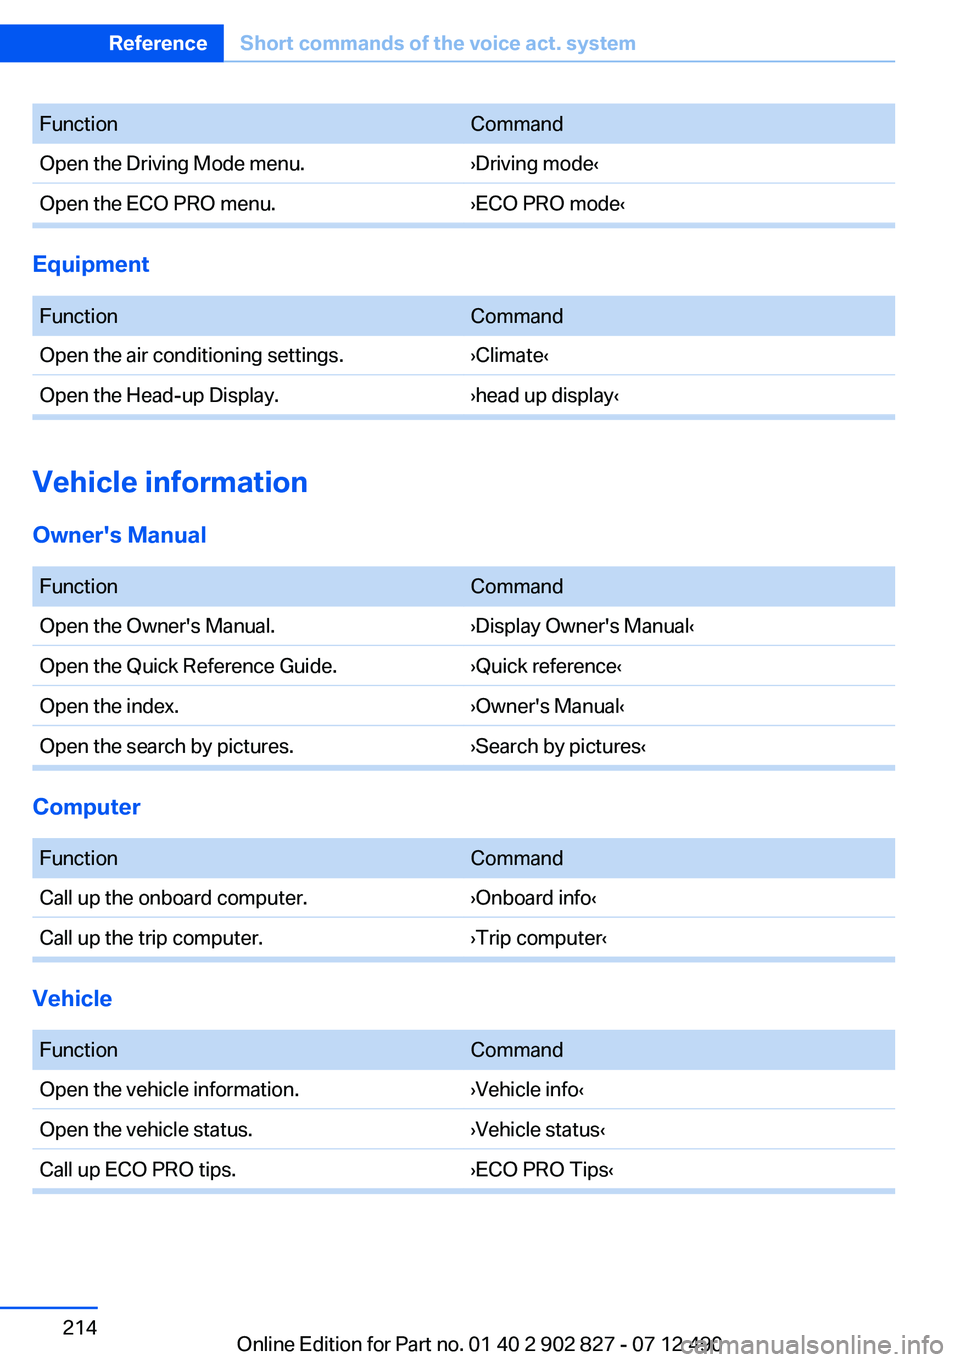
FunctionCommandOpen the Driving Mode menu.›Driving mode‹Open the ECO PRO menu.›ECO PRO mode‹
Equipment
FunctionCommandOpen the air conditioning settings.›Climate‹Open the Head-up Display.›head up display‹
Vehicle information
Owner's Manual
FunctionCommandOpen the Owner's Manual.›Display Owner's Manual‹Open the Quick Reference Guide.›Quick reference‹Open the index.›Owner's Manual‹Open the search by pictures.›Search by pictures‹
Computer
FunctionCommandCall up the onboard computer.›Onboard info‹Call up the trip computer.›Trip computer‹
Vehicle
FunctionCommandOpen the vehicle information.›Vehicle info‹Open the vehicle status.›Vehicle status‹Call up ECO PRO tips.›ECO PRO Tips‹Seite 214ReferenceShort commands of the voice act. system214
Online Edition for Part no. 01 40 2 902 827 - 07 12 490
Page 223 of 232
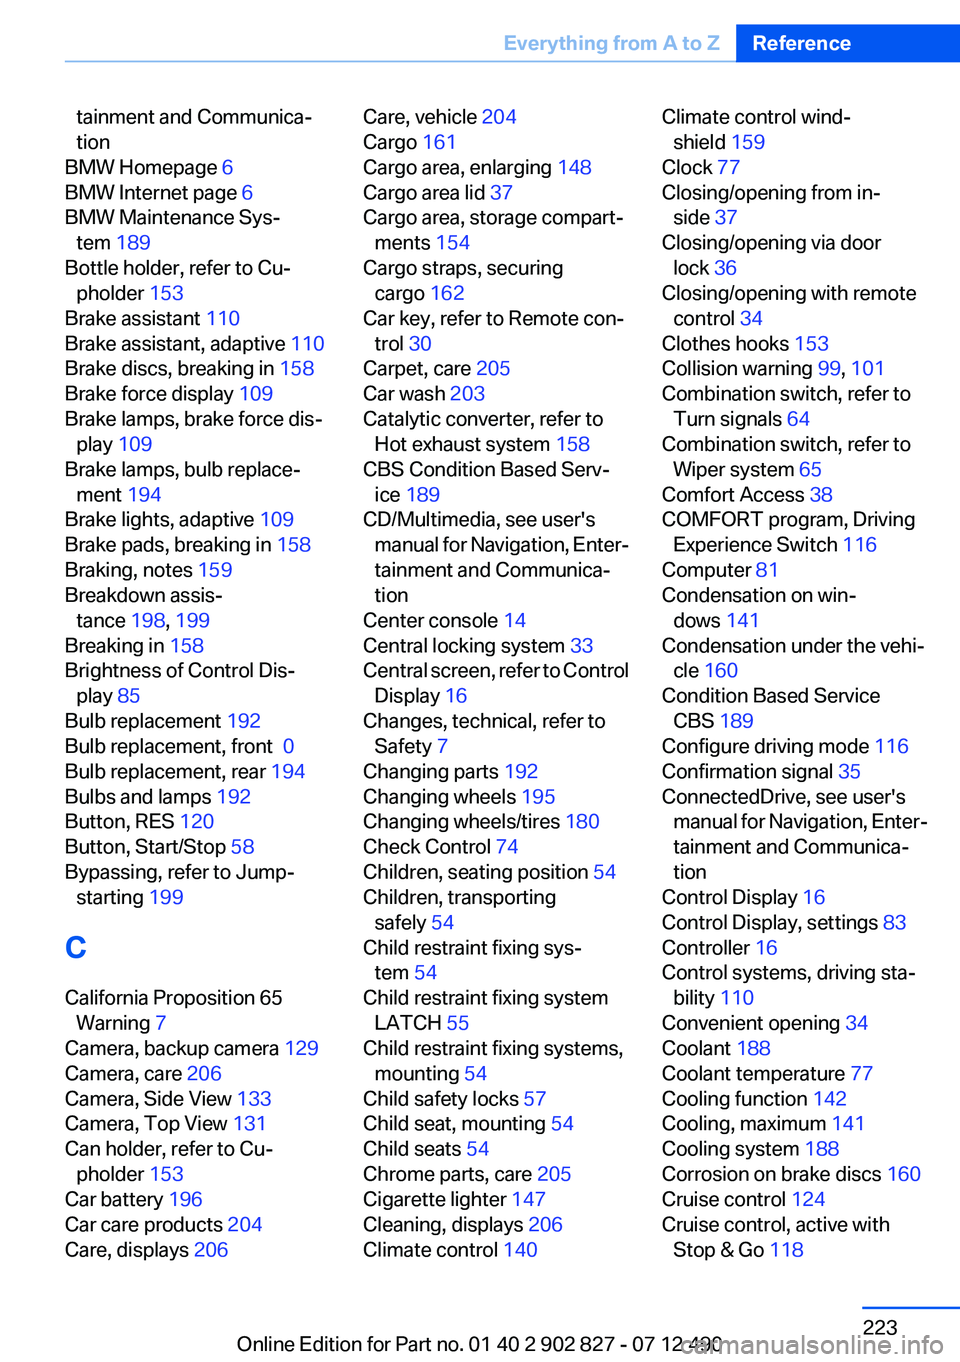
tainment and Communica‐
tion
BMW Homepage 6
BMW Internet page 6
BMW Maintenance Sys‐ tem 189
Bottle holder, refer to Cu‐ pholder 153
Brake assistant 110
Brake assistant, adaptive 110
Brake discs, breaking in 158
Brake force display 109
Brake lamps, brake force dis‐ play 109
Brake lamps, bulb replace‐ ment 194
Brake lights, adaptive 109
Brake pads, breaking in 158
Braking, notes 159
Breakdown assis‐ tance 198, 199
Breaking in 158
Brightness of Control Dis‐ play 85
Bulb replacement 192
Bulb replacement, front 0
Bulb replacement, rear 194
Bulbs and lamps 192
Button, RES 120
Button, Start/Stop 58
Bypassing, refer to Jump- starting 199
C
California Proposition 65 Warning 7
Camera, backup camera 129
Camera, care 206
Camera, Side View 133
Camera, Top View 131
Can holder, refer to Cu‐ pholder 153
Car battery 196
Car care products 204
Care, displays 206 Care, vehicle 204
Cargo 161
Cargo area, enlarging 148
Cargo area lid 37
Cargo area, storage compart‐ ments 154
Cargo straps, securing cargo 162
Car key, refer to Remote con‐ trol 30
Carpet, care 205
Car wash 203
Catalytic converter, refer to Hot exhaust system 158
CBS Condition Based Serv‐ ice 189
CD/Multimedia, see user's manual for Navigation, Enter‐
tainment and Communica‐
tion
Center console 14
Central locking system 33
Central screen, refer to Control Display 16
Changes, technical, refer to Safety 7
Changing parts 192
Changing wheels 195
Changing wheels/tires 180
Check Control 74
Children, seating position 54
Children, transporting safely 54
Child restraint fixing sys‐ tem 54
Child restraint fixing system LATCH 55
Child restraint fixing systems, mounting 54
Child safety locks 57
Child seat, mounting 54
Child seats 54
Chrome parts, care 205
Cigarette lighter 147
Cleaning, displays 206
Climate control 140 Climate control wind‐
shield 159
Clock 77
Closing/opening from in‐ side 37
Closing/opening via door lock 36
Closing/opening with remote control 34
Clothes hooks 153
Collision warning 99, 101
Combination switch, refer to Turn signals 64
Combination switch, refer to Wiper system 65
Comfort Access 38
COMFORT program, Driving Experience Switch 116
Computer 81
Condensation on win‐ dows 141
Condensation under the vehi‐ cle 160
Condition Based Service CBS 189
Configure driving mode 116
Confirmation signal 35
ConnectedDrive, see user's manual for Navigation, Enter‐
tainment and Communica‐
tion
Control Display 16
Control Display, settings 83
Controller 16
Control systems, driving sta‐ bility 110
Convenient opening 34
Coolant 188
Coolant temperature 77
Cooling function 142
Cooling, maximum 141
Cooling system 188
Corrosion on brake discs 160
Cruise control 124
Cruise control, active with Stop & Go 118 Seite 223Everything from A to ZReference223
Online Edition for Part no. 01 40 2 902 827 - 07 12 490