2013 BMW 650I GRAN COUPE radio
[x] Cancel search: radioPage 95 of 232

A change in the tire inflation pressure during
driving is taken into account.
A correction is only necessary if this is indicated
by the TPM
Wheels, green
The tire inflation pressure is equal to the target
state.
One wheel is yellow
A flat tire or major drop in inflation pressure in
the indicated tire.
All wheels are yellow▷A flat tire or major drop in inflation pressure
in several tires.▷The system was not reset after a wheel
change and thus warns based on the infla‐
tion pressures initialized last.▷A flat tire in one or more tires while the sys‐
tem is being reset.
Wheels, gray
The system cannot detect a flat tire. Reasons for
this may be:
▷TPM is being reset.▷Disturbance by systems or devices with the
same radio frequency.▷Malfunction.
For Canadian models: additional
information
The status display additionally shows the cur‐
rent tire inflation pressures and tire tempera‐
tures.
When correcting the tire inflation pressures,
note the following:
The tire pressure increases as the tire temper‐
ature increases.
Therefore, only correct the tire inflation pres‐
sure when the tire is at the ambient temperature.
Compare the displayed tire temperature with
the external temperature in the instrument clus‐
ter.
Resetting the system
Reset the system after each correction of the
tire inflation pressure and after every tire or
wheel change.1."Vehicle Info"2."Vehicle status"3. "Reset"4.Start the engine - do not drive away.5.Reset the tire pressure using "Reset".6.Drive away.
The tires are shown in gray and "Resetting
TPM..." is displayed.
After driving for a few minutes, the set tire infla‐
tion pressures are applied as set values. The re‐
setting process is completed automatically dur‐
ing driving. The tires are shown in green and
"TPM active" is shown on the Control Display.
The trip can be interrupted at any time. If you
drive away again, the process resumes auto‐
matically.
If a flat tire is detected during a reset, all tires are
displayed in yellow.
Low tire pressure message The yellow warning lamp lights up. A
Check Control message is displayed.
▷There is a flat tire or a major loss in
tire inflation pressure.▷The system was not reset after a wheel
change and thus warns based on the infla‐
tion pressures initialized last.1.Reduce your speed and stop cautiously.
Avoid sudden braking and steering maneu‐
vers.2.Check whether the vehicle is fitted with reg‐
ular tires or run-flat tires.Seite 95SafetyControls95
Online Edition for Part no. 01 40 2 902 827 - 07 12 490
Page 97 of 232
Message when the system was not
reset
A Check Control message is displayed.
The system detected a wheel change but was
not reset.
Warnings regarding the current tire inflation
pressure are not reliable.
Check the tire inflation pressure and reset the
system.
Malfunction The yellow warning lamp flashes and
then lights up continuously. A Check
Control message is displayed. No flat
tire can be detected.
Display in the following situations:▷A wheel without TPM electronics is fitted:
have the service center check it if necessary.▷Malfunction: have the system checked by
your service center.▷TPM could not be fully reset. Reset the sys‐
tem again.▷Disturbance by systems or devices with the
same radio frequency: after leaving the area
of the disturbance, the system automatically
becomes active again.
Declaration according to NHTSA/
FMVSS 138 Tire Pressure Monitoring
System
Each tire, including the spare (if provided)
should be checked monthly when cold and in‐
flated to the inflation pressure recommended by
the vehicle manufacturer on the vehicle placard
or tire inflation pressure label. (If your vehicle has
tires of a different size than the size indicated on
the vehicle placard or tire inflation pressure la‐
bel, you should determine the proper tire infla‐
tion pressure for those tires.) As an added safety
feature, your vehicle has been equipped with a
tire pressure monitoring system (TPMS) that il‐
luminates a low tire pressure telltale when one
or more of your tires is significantly under-in‐
flated. Accordingly, when the low tire pressure
telltale illuminates, you should stop and check
your tires as soon as possible, and inflate them
to the proper pressure. Driving on a significantly
under-inflated tire causes the tire to overheat
and can lead to tire failure. Under-inflation also
reduces fuel efficiency and tire tread life, and
may affect the vehicle's handling and stopping
ability. Please note that the TPMS is not a sub‐
stitute for proper tire maintenance, and it is the
driver's responsibility to maintain correct tire
pressure, even if under-inflation has not reached
the level to trigger illumination of the TPMS low
tire pressure telltale. Your vehicle has also been
equipped with a TPMS malfunction indicator to
indicate when the system is not operating prop‐
erly. The TPMS malfunction indicator is com‐
bined with the low tire pressure telltale. When
the system detects a malfunction, the telltale will
flash for approximately one minute and then re‐
main continuously illuminated. This sequence
will continue upon subsequent vehicle start-ups
as long as the malfunction exists. When the mal‐
function indicator is illuminated, the system may
not be able to detect or signal low tire pressure
as intended. TPMS malfunctions may occur for
a variety of reasons, including the installation of
replacement or alternate tires or wheels on the
vehicle that prevent the TPMS from functioning
properly. Always check the TPMS malfunction
telltale after replacing one or more tires or
wheels on your vehicle to ensure that the re‐
placement or alternate tires and wheels allow
the TPMS to continue to function properly.
FTM Flat Tire Monitor
The concept
The system does not measure the actual infla‐
tion pressure in the tires.
It detects a pressure loss in a tire by comparing
the rotational speeds of the individual wheels
while moving.Seite 97SafetyControls97
Online Edition for Part no. 01 40 2 902 827 - 07 12 490
Page 196 of 232
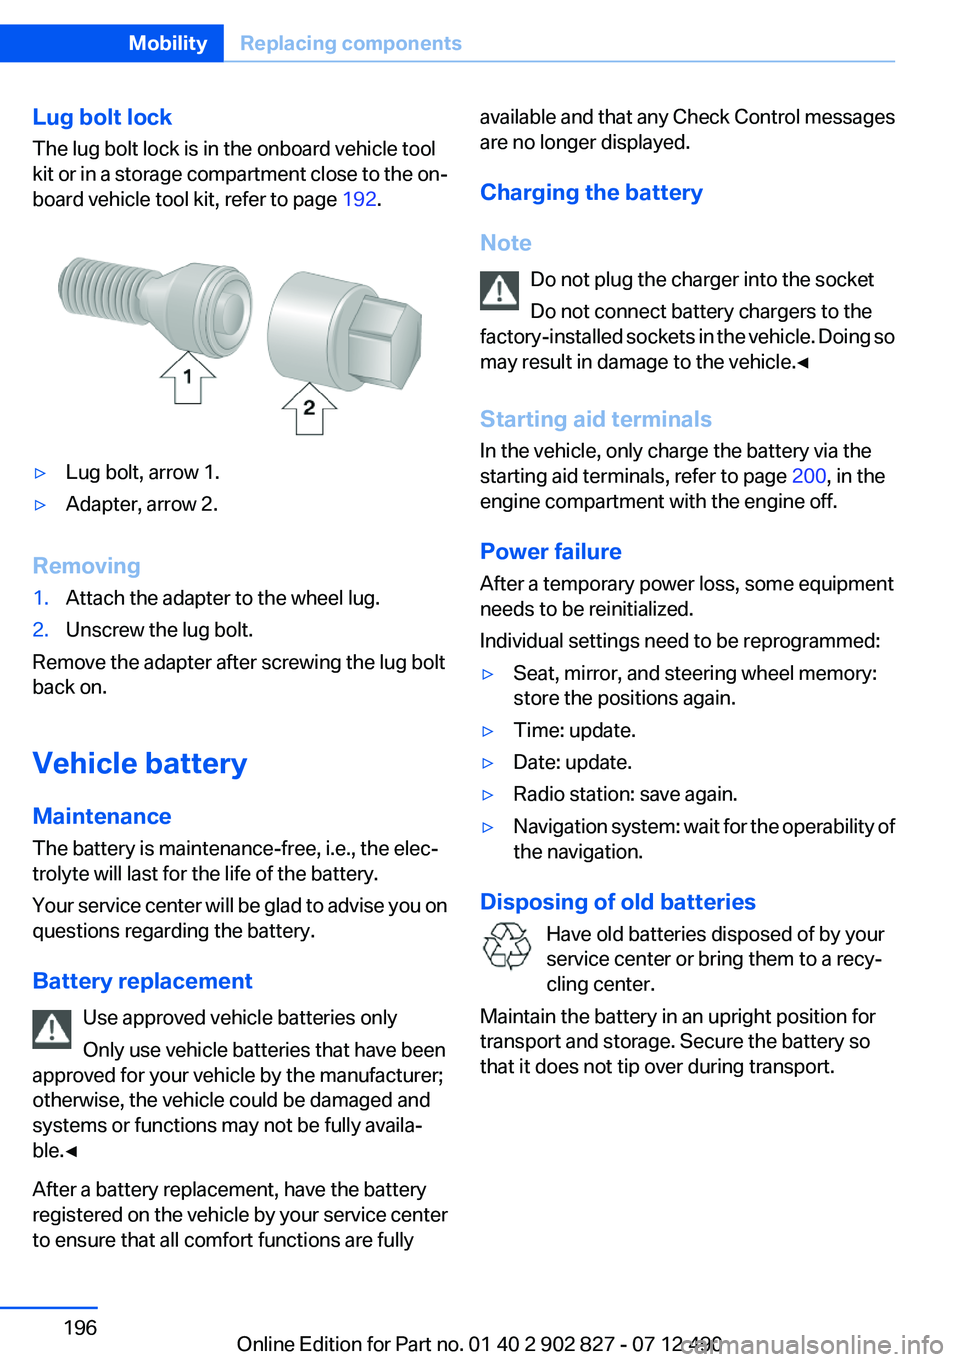
Lug bolt lock
The lug bolt lock is in the onboard vehicle tool
kit or in a storage compartment close to the on‐
board vehicle tool kit, refer to page 192.▷Lug bolt, arrow 1.▷Adapter, arrow 2.
Removing
1.Attach the adapter to the wheel lug.2.Unscrew the lug bolt.
Remove the adapter after screwing the lug bolt
back on.
Vehicle battery
Maintenance
The battery is maintenance-free, i.e., the elec‐
trolyte will last for the life of the battery.
Your service center will be glad to advise you on
questions regarding the battery.
Battery replacement Use approved vehicle batteries only
Only use vehicle batteries that have been
approved for your vehicle by the manufacturer;
otherwise, the vehicle could be damaged and
systems or functions may not be fully availa‐
ble.◀
After a battery replacement, have the battery
registered on the vehicle by your service center
to ensure that all comfort functions are fully
available and that any Check Control messages
are no longer displayed.
Charging the battery
Note Do not plug the charger into the socket
Do not connect battery chargers to the
factory-installed sockets in the vehicle. Doing so
may result in damage to the vehicle.◀
Starting aid terminals
In the vehicle, only charge the battery via the
starting aid terminals, refer to page 200, in the
engine compartment with the engine off.
Power failure
After a temporary power loss, some equipment
needs to be reinitialized.
Individual settings need to be reprogrammed:▷Seat, mirror, and steering wheel memory:
store the positions again.▷Time: update.▷Date: update.▷Radio station: save again.▷Navigation system: wait for the operability of
the navigation.
Disposing of old batteries
Have old batteries disposed of by your
service center or bring them to a recy‐
cling center.
Maintain the battery in an upright position for
transport and storage. Secure the battery so
that it does not tip over during transport.
Seite 196MobilityReplacing components196
Online Edition for Part no. 01 40 2 902 827 - 07 12 490
Page 198 of 232
Breakdown assistanceVehicle equipment
All standard, country-specific and optional
equipment that is offered in the model series is
described in this chapter. Therefore, equipment
is also described that is not available in a vehicle,
e. g., because of the selected optional equip‐
ment or country variant. This also applies for
safety-related functions and systems.
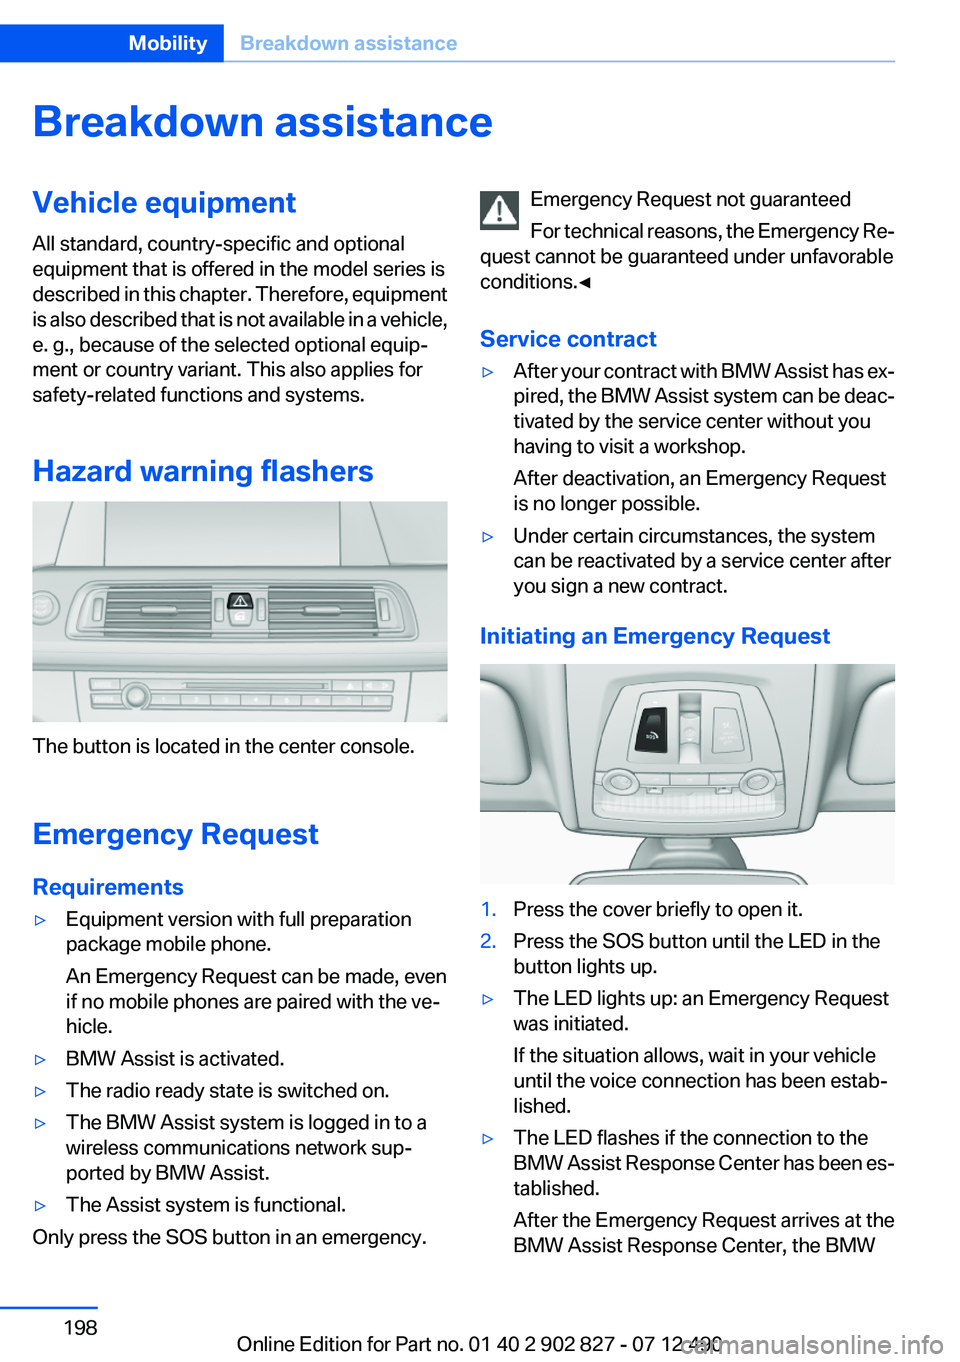
Hazard warning flashers
The button is located in the center console.
Emergency Request
Requirements
▷Equipment version with full preparation
package mobile phone.
An Emergency Request can be made, even
if no mobile phones are paired with the ve‐
hicle.▷BMW Assist is activated.▷The radio ready state is switched on.▷The BMW Assist system is logged in to a
wireless communications network sup‐
ported by BMW Assist.▷The Assist system is functional.
Only press the SOS button in an emergency.
Emergency Request not guaranteed
For technical reasons, the Emergency Re‐
quest cannot be guaranteed under unfavorable
conditions.◀
Service contract▷After your contract with BMW Assist has ex‐
pired, the BMW Assist system can be deac‐
tivated by the service center without you
having to visit a workshop.
After deactivation, an Emergency Request
is no longer possible.▷Under certain circumstances, the system
can be reactivated by a service center after
you sign a new contract.
Initiating an Emergency Request
1.Press the cover briefly to open it.2.Press the SOS button until the LED in the
button lights up.▷The LED lights up: an Emergency Request
was initiated.
If the situation allows, wait in your vehicle
until the voice connection has been estab‐
lished.▷The LED flashes if the connection to the
BMW Assist Response Center has been es‐
tablished.
After the Emergency Request arrives at the
BMW Assist Response Center, the BMWSeite 198MobilityBreakdown assistance198
Online Edition for Part no. 01 40 2 902 827 - 07 12 490
Page 217 of 232
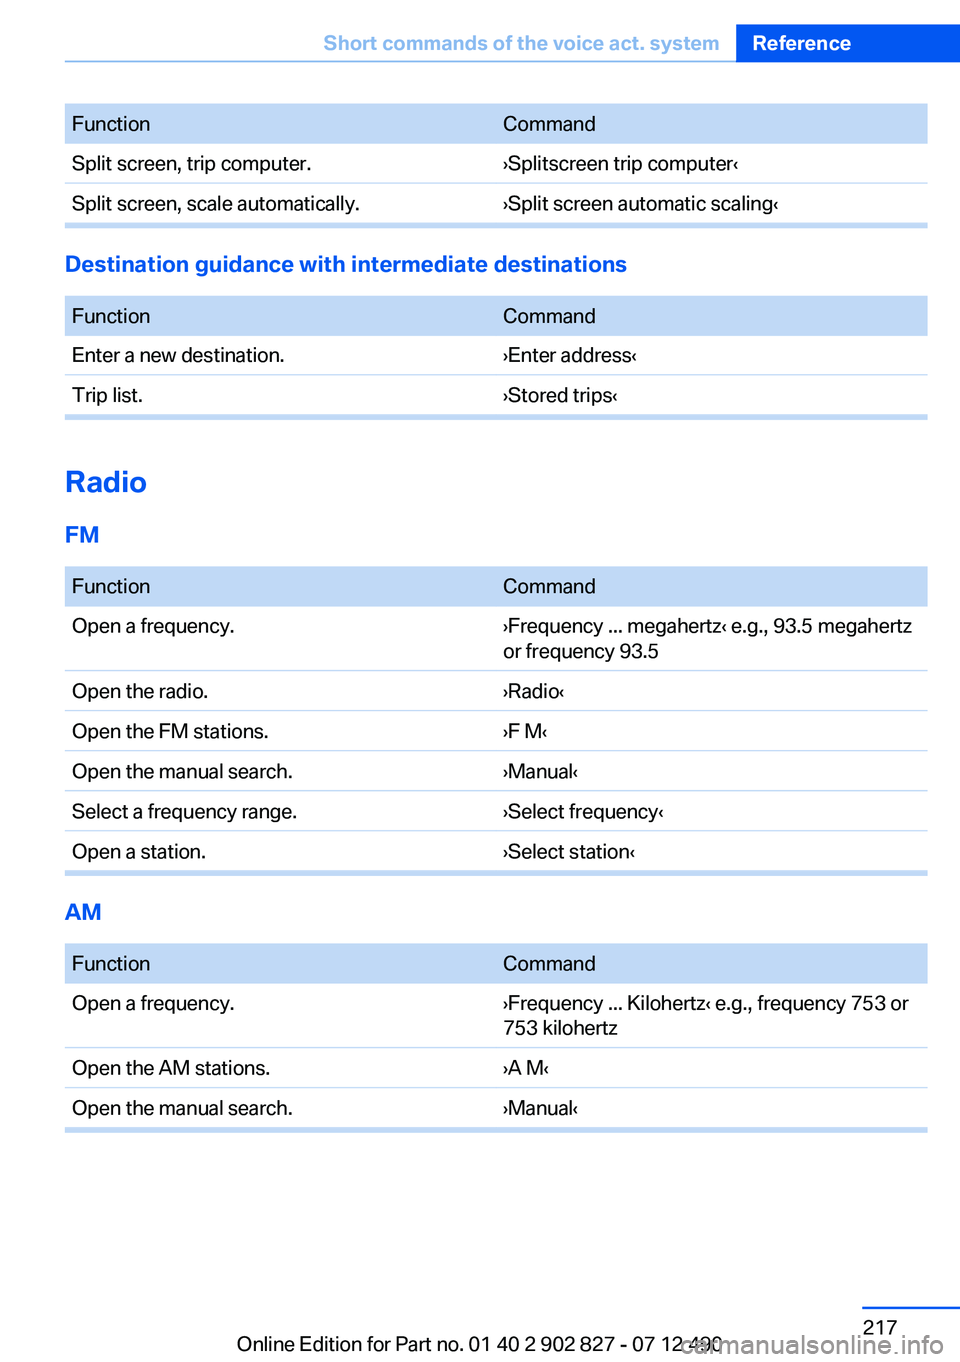
FunctionCommandSplit screen, trip computer.›Splitscreen trip computer‹Split screen, scale automatically.›Split screen automatic scaling‹
Destination guidance with intermediate destinations
FunctionCommandEnter a new destination.›Enter address‹Trip list.›Stored trips‹
Radio
FM
FunctionCommandOpen a frequency.›Frequency ... megahertz‹ e.g., 93.5 megahertz
or frequency 93.5Open the radio.›Radio‹Open the FM stations.›F M‹Open the manual search.›Manual‹Select a frequency range.›Select frequency‹Open a station.›Select station‹
AM
FunctionCommandOpen a frequency.›Frequency ... Kilohertz‹ e.g., frequency 753 or
753 kilohertzOpen the AM stations.›A M‹Open the manual search.›Manual‹Seite 217Short commands of the voice act. systemReference217
Online Edition for Part no. 01 40 2 902 827 - 07 12 490
Page 218 of 232
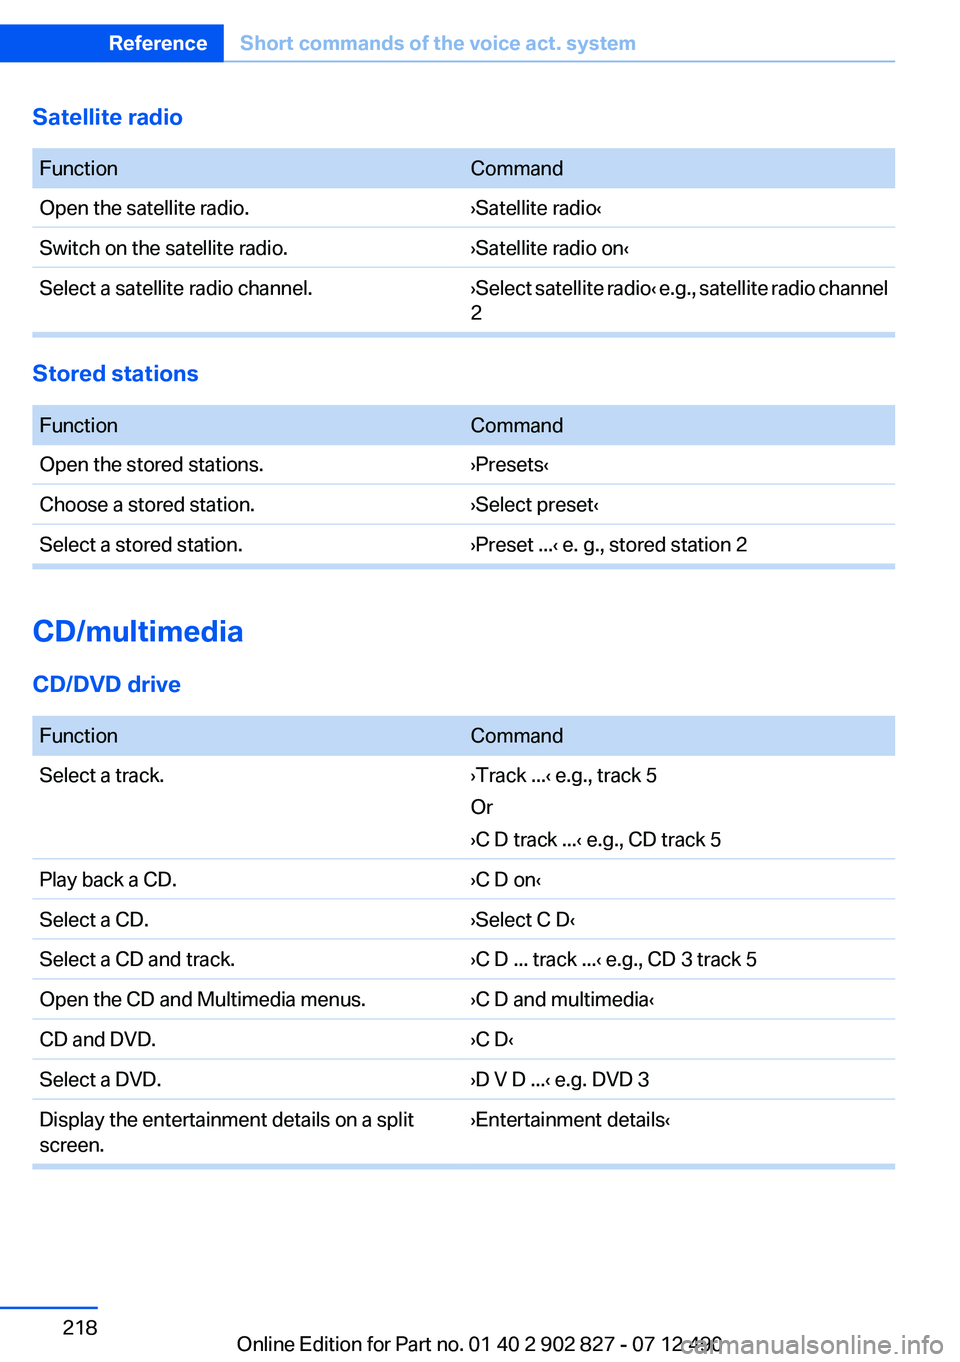
Satellite radio
FunctionCommandOpen the satellite radio.›Satellite radio‹Switch on the satellite radio.›Satellite radio on‹Select a satellite radio channel.› Select satellite radio ‹ e.g., satellite radio channel
2
Stored stations
FunctionCommandOpen the stored stations.›Presets‹Choose a stored station.›Select preset‹Select a stored station.›Preset ...‹ e. g., stored station 2
CD/multimedia
CD/DVD drive
FunctionCommandSelect a track.›Track ...‹ e.g., track 5
Or
›C D track ...‹ e.g., CD track 5Play back a CD.›C D on‹Select a CD.›Select C D‹Select a CD and track.›C D ... track ...‹ e.g., CD 3 track 5Open the CD and Multimedia menus.›C D and multimedia‹CD and DVD.›C D‹Select a DVD.›D V D ...‹ e.g. DVD 3Display the entertainment details on a split
screen.›Entertainment details‹Seite 218ReferenceShort commands of the voice act. system218
Online Edition for Part no. 01 40 2 902 827 - 07 12 490
Page 228 of 232

Protective function, glass sun‐roof 44
Protective function, win‐ dows 42
Push-and-turn switch, refer to Controller 16
R
Radiator fluid 188
Radio-operated key, refer to Remote control 30
Radio ready state 58
Radio, see user's manual for Navigation, Entertainment
and Communication
Rain sensor 66
Rear axle steering 113
Rear center armrest 152
Rear lamps 194
Rearview mirror 51
Rear window defroster 142
Recirculated-air mode 142
Recommended tire brands 180
Refueling 170
Remaining range 78
Remote control/key 30
Remote control, malfunc‐ tion 35
Remote control, universal 145
Replacement fuse 197
Replacing parts 192
Replacing wheels/tires 180
Reporting safety defects 8
RES button 120
Reserve warning, refer to Range 78
Reset, Tire Pressure Monitor TPM 95
Residual heat, automatic cli‐ mate control 142
Retaining straps, securing cargo 162
Retreaded tires 181 Reversing lamp, bulb replace‐
ment 195
Roadside parking lamps 87
Roller sunblinds 42
Roll stabilization, refer to Adaptive Drive 113
Roll stabilization, refer to Dy‐ namic Drive 113
RON gasoline quality 172
Rope for tow-starting/tow‐ ing 201
RSC Run Flat System Compo‐ nent, refer to Run-flat
tires 181
Rubber components, care 205
Run-flat tires 181
S
Safe braking 159
Safety 7
Safety belt reminder for driv‐ er's seat and front passenger
seat 49
Safety belts 49
Safety belts, care 205
Safety switch, windows 42
Safety systems, airbags 91
Saving fuel 0
Screen, refer to Control Dis‐ play 16
Screwdriver 192
Screw thread for tow fit‐ ting 202
Seat belts, refer to Safety belts 49
Seat heating, front 47
Seat heating, rear 48
Seating position for chil‐ dren 54
Seat, mirror, and steering wheel memory 51
Seats 45
Seat ventilation, front 48 Selection list in instrument
cluster 81
Selector lever, automatic transmission 68
Sensors, care 206
Service and warranty 7
Service requirements, Condi‐ tion Based Service CBS 189
Service requirements, dis‐ play 78
Service, Roadside Assis‐ tance 199
Settings on Control Dis‐ play 83
Settings, storing for seat, mir‐ rors, steering wheel 51
Shifting, automatic transmis‐ sion 67
Shift paddles on steering wheel 69
Short commands 213
Shoulder support 47
Side airbags 91
Side View 133
Signaling, horn 12
Signals when unlocking 35
Sitting safely 45
Size 210
Ski bag 149
Smallest turning circle 211
Smoker's package 147
Snow chains 182
Socket 148
Socket, OBD Onboard Diag‐ nostics 190
SOS button 198
Spare fuse 197
Speaker lighting 90
Specified engine oil types 187
Speed, average 82
Speed limit detection, on‐ board computer 82
Speed limiter, display 79
Speed Limit Information 79 Seite 228ReferenceEverything from A to Z228
Online Edition for Part no. 01 40 2 902 827 - 07 12 490