2013 BMW 640I GRAN COUPE belt
[x] Cancel search: beltPage 63 of 305
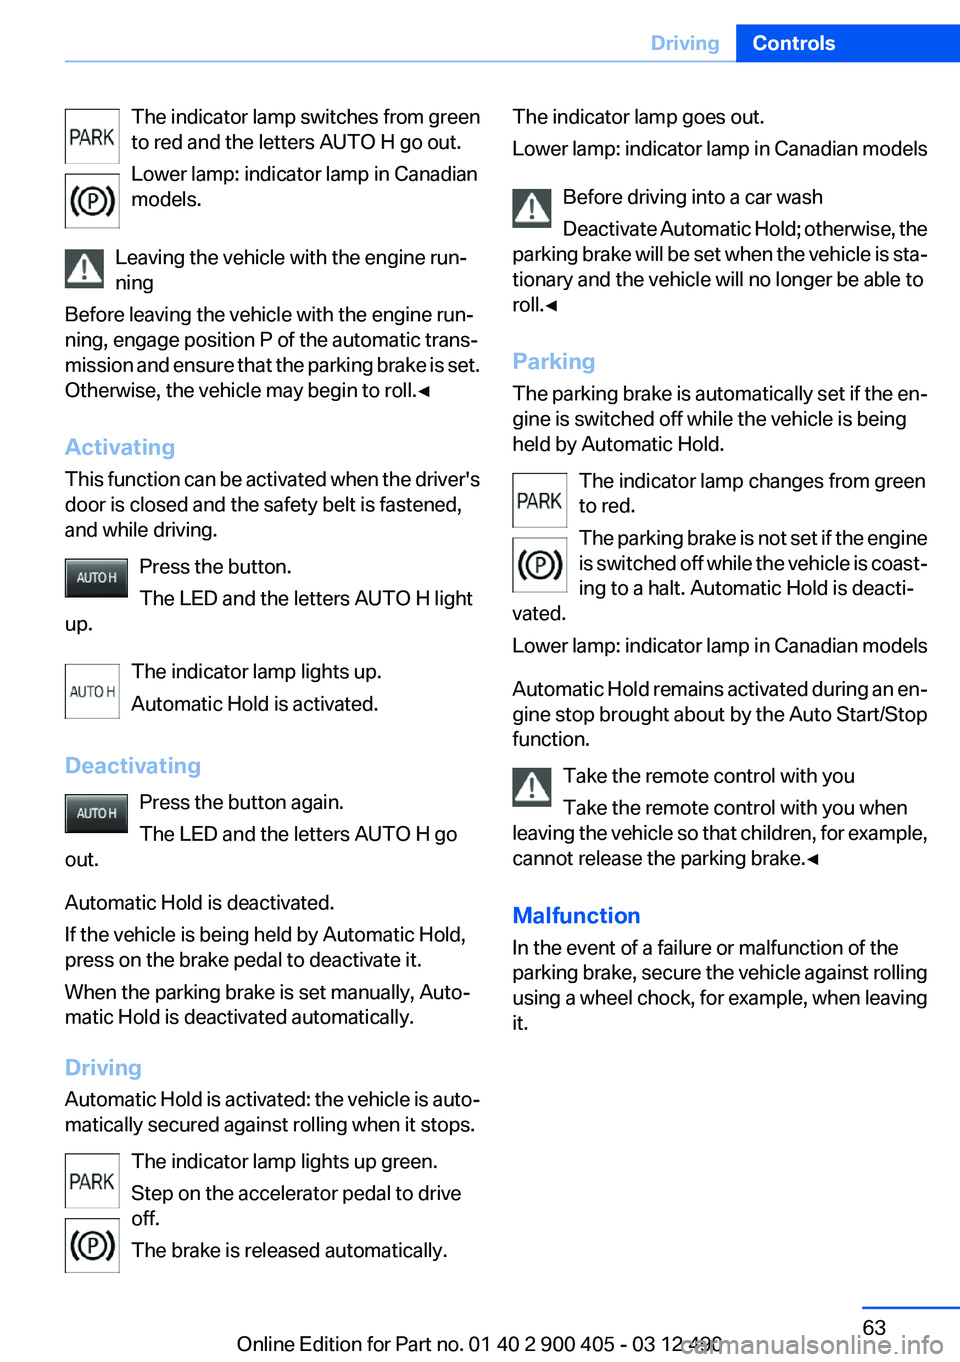
The indicator lamp switches from green
to red and the letters AUTO H go out.
Lower lamp: indicator lamp in Canadian
models.
Leaving the vehicle with the engine run‐
ning
Before leaving the vehicle with the engine run‐
ning, engage position P of the automatic trans‐
mission and ensure that the parking brake is set.
Otherwise, the vehicle may begin to roll.◀
Activating
This function can be activated when the driver's
door is closed and the safety belt is fastened,
and while driving.
Press the button.
The LED and the letters AUTO H light
up.
The indicator lamp lights up.
Automatic Hold is activated.
Deactivating Press the button again.
The LED and the letters AUTO H go
out.
Automatic Hold is deactivated.
If the vehicle is being held by Automatic Hold,
press on the brake pedal to deactivate it.
When the parking brake is set manually, Auto‐
matic Hold is deactivated automatically.
Driving
Automatic Hold is activated: the vehicle is auto‐
matically secured against rolling when it stops.
The indicator lamp lights up green.
Step on the accelerator pedal to drive
off.
The brake is released automatically.The indicator lamp goes out.
Lower lamp: indicator lamp in Canadian models
Before driving into a car wash
Deactivate Automatic Hold; otherwise, the
parking brake will be set when the vehicle is sta‐
tionary and the vehicle will no longer be able to
roll.◀
Parking
The parking brake is automatically set if the en‐
gine is switched off while the vehicle is being
held by Automatic Hold.
The indicator lamp changes from green
to red.
The parking brake is not set if the engine
is switched off while the vehicle is coast‐
ing to a halt. Automatic Hold is deacti‐
vated.
Lower lamp: indicator lamp in Canadian models
Automatic Hold remains activated during an en‐
gine stop brought about by the Auto Start/Stop
function.
Take the remote control with you
Take the remote control with you when
leaving the vehicle so that children, for example,
cannot release the parking brake.◀
Malfunction
In the event of a failure or malfunction of the
parking brake, secure the vehicle against rolling
using a wheel chock, for example, when leaving
it.Seite 63DrivingControls63
Online Edition for Part no. 01 40 2 900 405 - 03 12 490
Page 67 of 305
Automatic transmission with
Steptronic
Transmission positions
D Drive, automatic position
Position for normal vehicle operation. All for‐
ward gears are available.
R is Reverse
Select only when the vehicle is stationary.
N is Neutral
Use in automatic car washes, for example. The
vehicle can roll.
When the ignition is switched off, refer to
page 58, position P is engaged automatically.
P Park
Select only when the vehicle is stationary. The
drive wheels are blocked.
P is engaged automatically:▷After the engine is switched off, if the car is
in radio ready state, refer to page 58, or if the
ignition is switched off, refer to page 58, and
if position R or D is engaged.▷With the ignition is off, if position N is en‐
gaged.▷If the safety belt is unbuckled, the driver's
door is opened, and the brake pedal is not
pressed while the vehicle is stationary and
transmission position R or D is engaged.
Before exiting the vehicle, make sure that posi‐
tion P of the automatic transmission is engaged.
Otherwise, the vehicle may begin to roll.
Kickdown
Kickdown is used to achieve maximum driving
performance. Press on the gas pedal beyond the
resistance point at the full throttle position.
Engaging the transmission position▷Transmission position P can only be disen‐
gaged if the engine is running and the brake
pedal is pressed.▷With the vehicle stationary, press on the
brake pedal before shifting out of P or N;
otherwise, the shift command will not be
executed: shift lock.
Depress the brake until you start driv‐
ing
To prevent the vehicle from creeping after
you select a driving position, maintain pres‐
sure on the brake pedal until you are ready
to start.◀
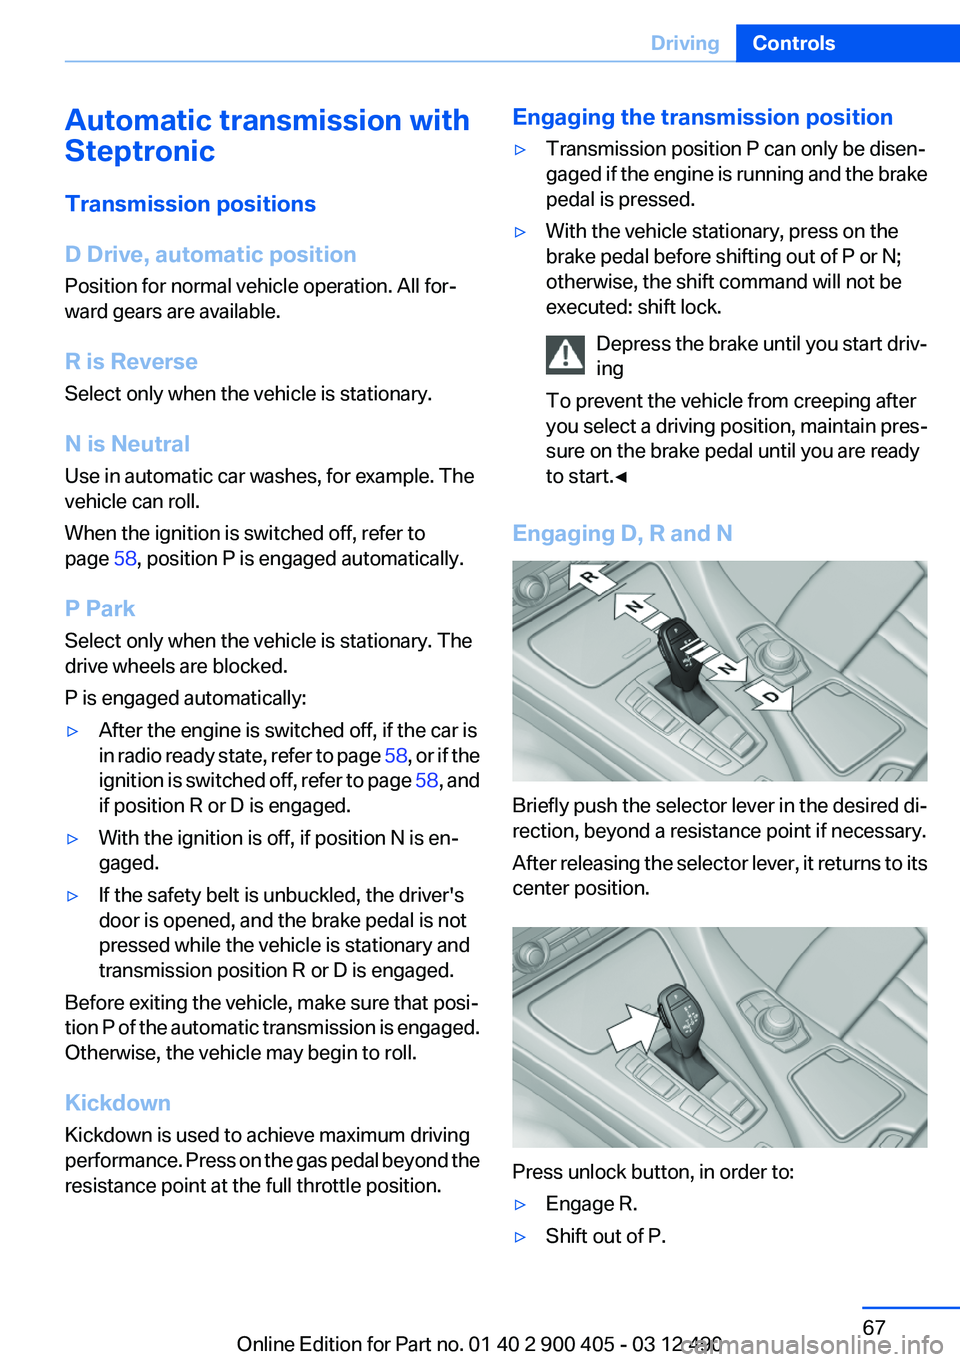
Engaging D, R and N
Briefly push the selector lever in the desired di‐
rection, beyond a resistance point if necessary.
After releasing the selector lever, it returns to its
center position.
Press unlock button, in order to:
▷Engage R.▷Shift out of P.Seite 67DrivingControls67
Online Edition for Part no. 01 40 2 900 405 - 03 12 490
Page 72 of 305
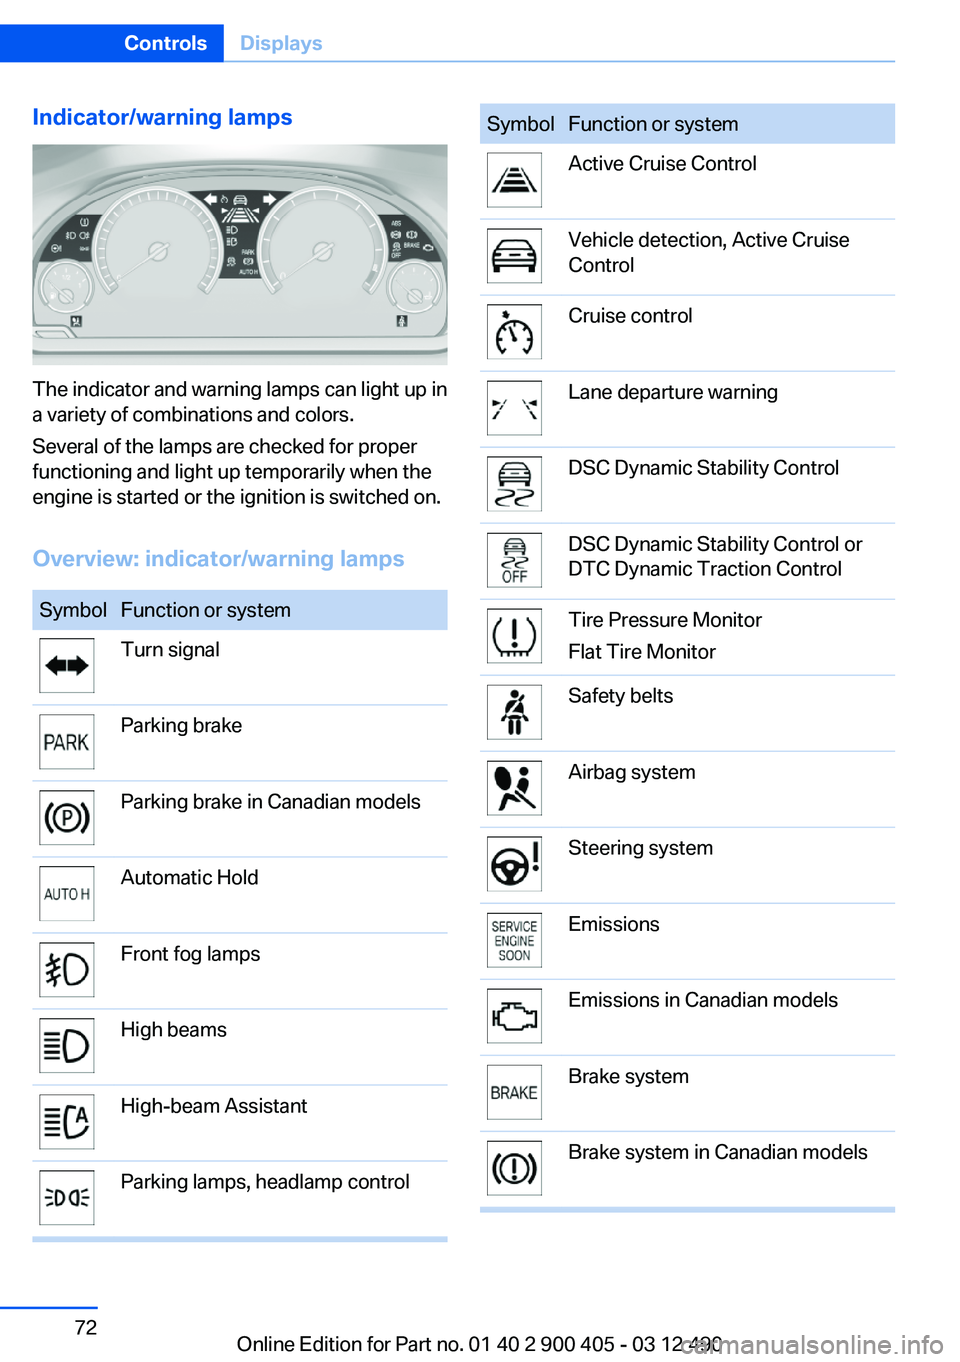
Indicator/warning lamps
The indicator and warning lamps can light up in
a variety of combinations and colors.
Several of the lamps are checked for proper
functioning and light up temporarily when the
engine is started or the ignition is switched on.
Overview: indicator/warning lamps
SymbolFunction or systemTurn signalParking brakeParking brake in Canadian modelsAutomatic HoldFront fog lampsHigh beamsHigh-beam AssistantParking lamps, headlamp controlSymbolFunction or systemActive Cruise ControlVehicle detection, Active Cruise
ControlCruise controlLane departure warningDSC Dynamic Stability ControlDSC Dynamic Stability Control or
DTC Dynamic Traction ControlTire Pressure Monitor
Flat Tire MonitorSafety beltsAirbag systemSteering systemEmissionsEmissions in Canadian modelsBrake systemBrake system in Canadian modelsSeite 72ControlsDisplays72
Online Edition for Part no. 01 40 2 900 405 - 03 12 490
Page 87 of 305
SafetyVehicle equipment
All standard, country-specific and optional
equipment that is offered in the model series is
described in this chapter. Therefore, equipmentis also described that is not available in a vehicle,
e. g., because of the selected optional equip‐
ment or country variant. This also applies for
safety-related functions and systems.
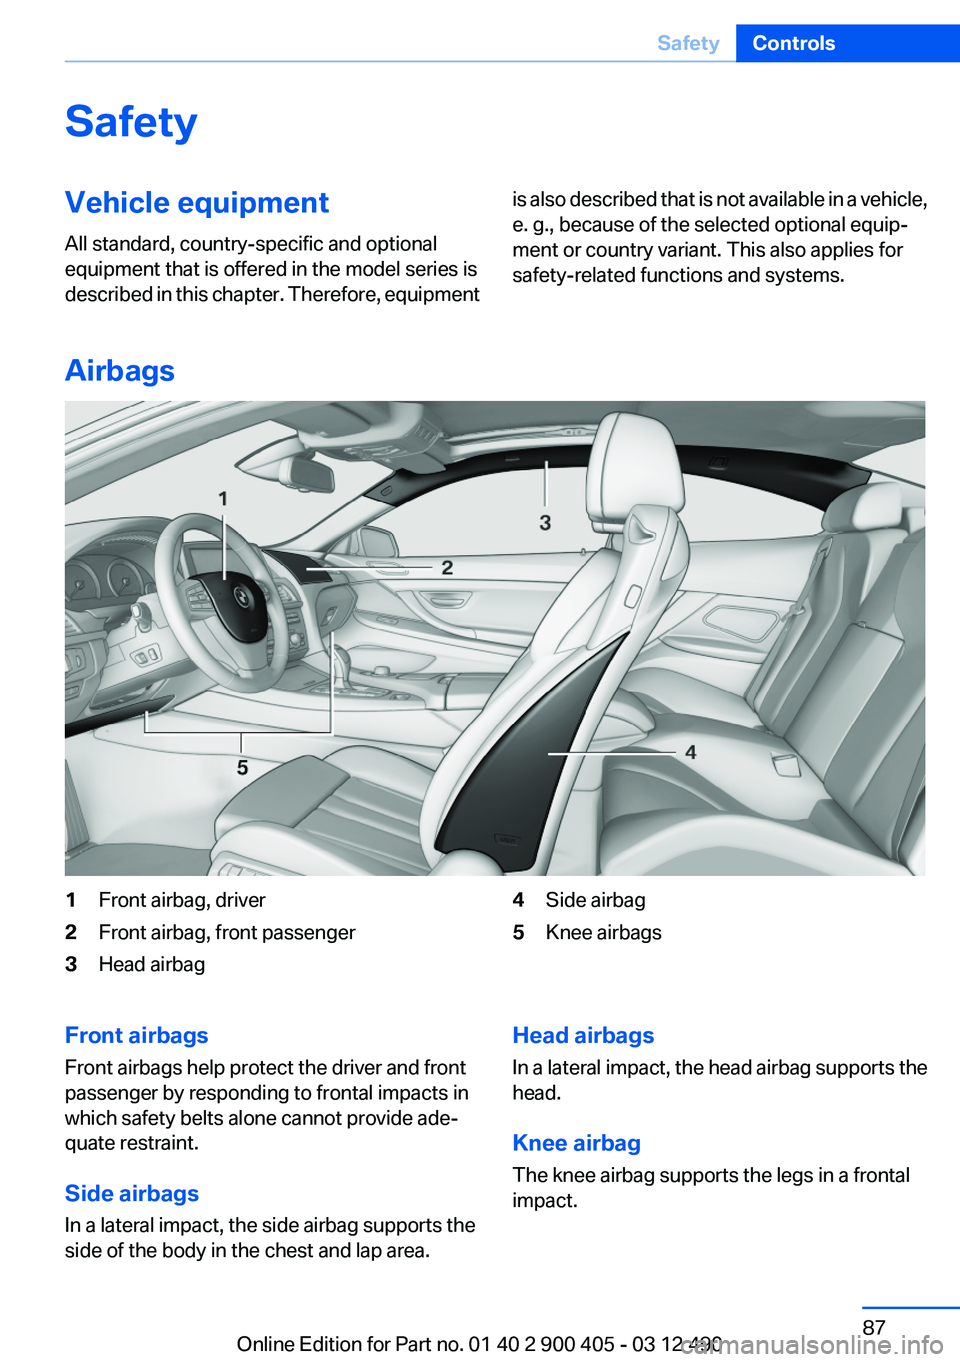
Airbags
1Front airbag, driver2Front airbag, front passenger3Head airbag4Side airbag5Knee airbagsFront airbags
Front airbags help protect the driver and front
passenger by responding to frontal impacts in
which safety belts alone cannot provide ade‐
quate restraint.
Side airbags
In a lateral impact, the side airbag supports the
side of the body in the chest and lap area.Head airbags
In a lateral impact, the head airbag supports the
head.
Knee airbag
The knee airbag supports the legs in a frontal
impact.Seite 87SafetyControls87
Online Edition for Part no. 01 40 2 900 405 - 03 12 490
Page 88 of 305

Protective action
Airbags are not triggered in every impact situa‐
tion, e.g., in less severe accidents or rear-end
collisions.
Information on how to ensure the optimal
protective effect of the airbags▷Keep at a distance from the airbags.▷Always grasp the steering wheel on the
steering wheel rim, holding your hands at
the 3 o'clock and 9 o'clock positions, to keep
the danger of injury to your hands or arms as
low as possible if the airbag is triggered.▷There should be no people, animals, or ob‐
jects between an airbag and a person.▷Do not use the cover of the front airbag on
the front passenger side as a storage area.▷Keep the dashboard and window on the
front passenger side clear, i.e., do not cover
with adhesive labels or coverings, and do not
attach holders such as for navigation instru‐
ments and mobile phones.▷Make sure that the front passenger is sitting
correctly, i.e., keeps his or her feet and legs
in the footwell; otherwise, leg injuries can
occur if the front airbag is triggered.▷Do not place slip covers, seat cushions or
other objects on the front passenger seat
that are not approved specifically for seats
with integrated side airbags.▷Do not hang pieces of clothing, such as jack‐
ets, over the backrests.▷Make sure that occupants keep their heads
away from the side airbag and do not rest
against the head airbag; otherwise, injuries
can occur if the airbags are triggered.▷Do not remove the airbag restraint system.▷Do not remove the steering wheel.▷Do not apply adhesive materials to the air‐
bag cover panels, cover them or modify
them in any way.▷Never modify either the individual compo‐
nents or the wiring in the airbag system. This
also applies to steering wheel covers, the
dashboard, the seats, the roof pillars and the
sides of the headliner.◀
Even when all instructions are followed closely,
injury from contact with the airbags cannot be
ruled out in certain situations.
The ignition and inflation noise may lead to
short-term and, in most cases, temporary hear‐
ing impairment in sensitive individuals.
In the case of a malfunction, deactivation
and after triggering of the airbags
Do not touch the individual components imme‐
diately after the system has been triggered; oth‐
erwise, there is the danger of burns.
Only have the airbags checked, repaired or dis‐
mantled and the airbag generator scrapped by
your service center or a workshop that has the
necessary authorization for handling explosives.
Non-professional attempts to service the sys‐
tem could lead to failure in an emergency or un‐
desired triggering of the airbag, either of which
could result in injury.◀
Warnings and information on the airbags are
also found on the sun visors.
Functional readiness of the airbag
system
When the ignition is switch on, the warn‐
ing lamp in the instrument cluster lights
up briefly and thereby indicates the op‐
erational readiness of the entire airbag system
and the belt tensioner.
Airbag system malfunctioning
▷Warning lamp does not come on when the
ignition is turned on.▷The warning lamp lights up continuously.Seite 88ControlsSafety88
Online Edition for Part no. 01 40 2 900 405 - 03 12 490
Page 106 of 305
▷If active: press twice.▷If interrupted: press once.
The displays go out. The stored desired speed
and distance are deleted.
Interrupting the system When active, press the button.
If interrupting the system while stationary, press
on the brake pedal at the same time.
The system is automatically interrupted if:
▷The brakes are applied.▷Transmission position D is disengaged.▷DTC Dynamic Traction Control is activated
or DSC is deactivated.▷DSC is actively controlling stability.▷The safety belt and the driver's door are
opened when the vehicle is standing.▷The system has not detected objects for an
extended period, e.g., on a road with very lit‐
tle traffic without road edge line markings.▷Radar sensor is soiled.
Maintaining/storing the speed
Press the button.
or:
Press the rocker switch while the system is in‐
terrupted.
When the system is switched on, the current
speed is maintained and stored as the desired
speed.
It is displayed in the speedometer and briefly
displayed in the instrument cluster, Displays in
the instrument cluster, refer to page 107.
When cruise control is maintained or stored,
DSC Dynamic Stability Control is switched on, if
necessary.
Changing, maintaining, and storing the
speed
The rocker switch can be pressed while the sys‐
tem is interrupted to maintain and store the cur‐
rent speed. DSC Dynamic Stability Control is
switched on, if necessary.
Adapting the desired speed
Adapt the desired speed to the road con‐
ditions and be ready to brake at all times; other‐
wise, there is the danger of an accident occur‐
ring.◀
Speed differences
Large differences in speed relative to ve‐
hicles ahead of the vehicle cannot be compen‐
sated by the system, for example when:▷Catching up rapidly with a truck.▷Another vehicle suddenly swerves into the
wrong lane.◀
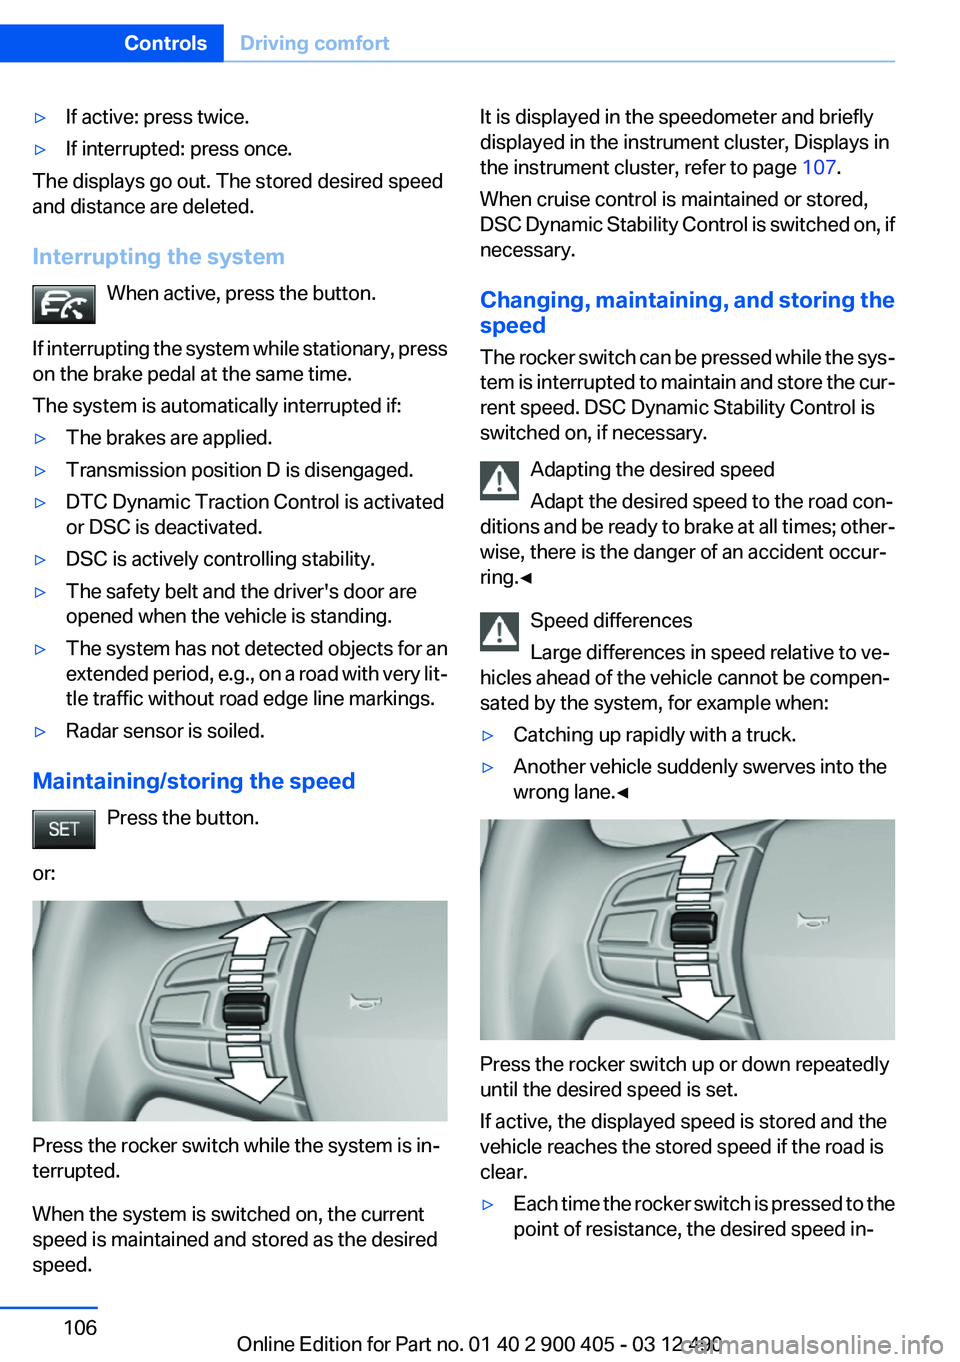
Press the rocker switch up or down repeatedly
until the desired speed is set.
If active, the displayed speed is stored and the
vehicle reaches the stored speed if the road is
clear.
▷Each time the rocker switch is pressed to the
point of resistance, the desired speed in‐Seite 106ControlsDriving comfort106
Online Edition for Part no. 01 40 2 900 405 - 03 12 490
Page 140 of 305
rear seat backrests. Otherwise, injury or damage
may result.◀
Locking the backrest
Before driving with passengers in the rear
of the vehicle, make sure that the backrests are
engaged and thus locked in place. Otherwise,
the restraining effect of the safety belts may be
limited in an accident.◀
Preventing indentations
When folding down the rear seats, ensure
that the safety belt buckles are located in the
recesses provided form them in the seat. Oth‐
erwise they can create indentations in the back‐
rest.◀
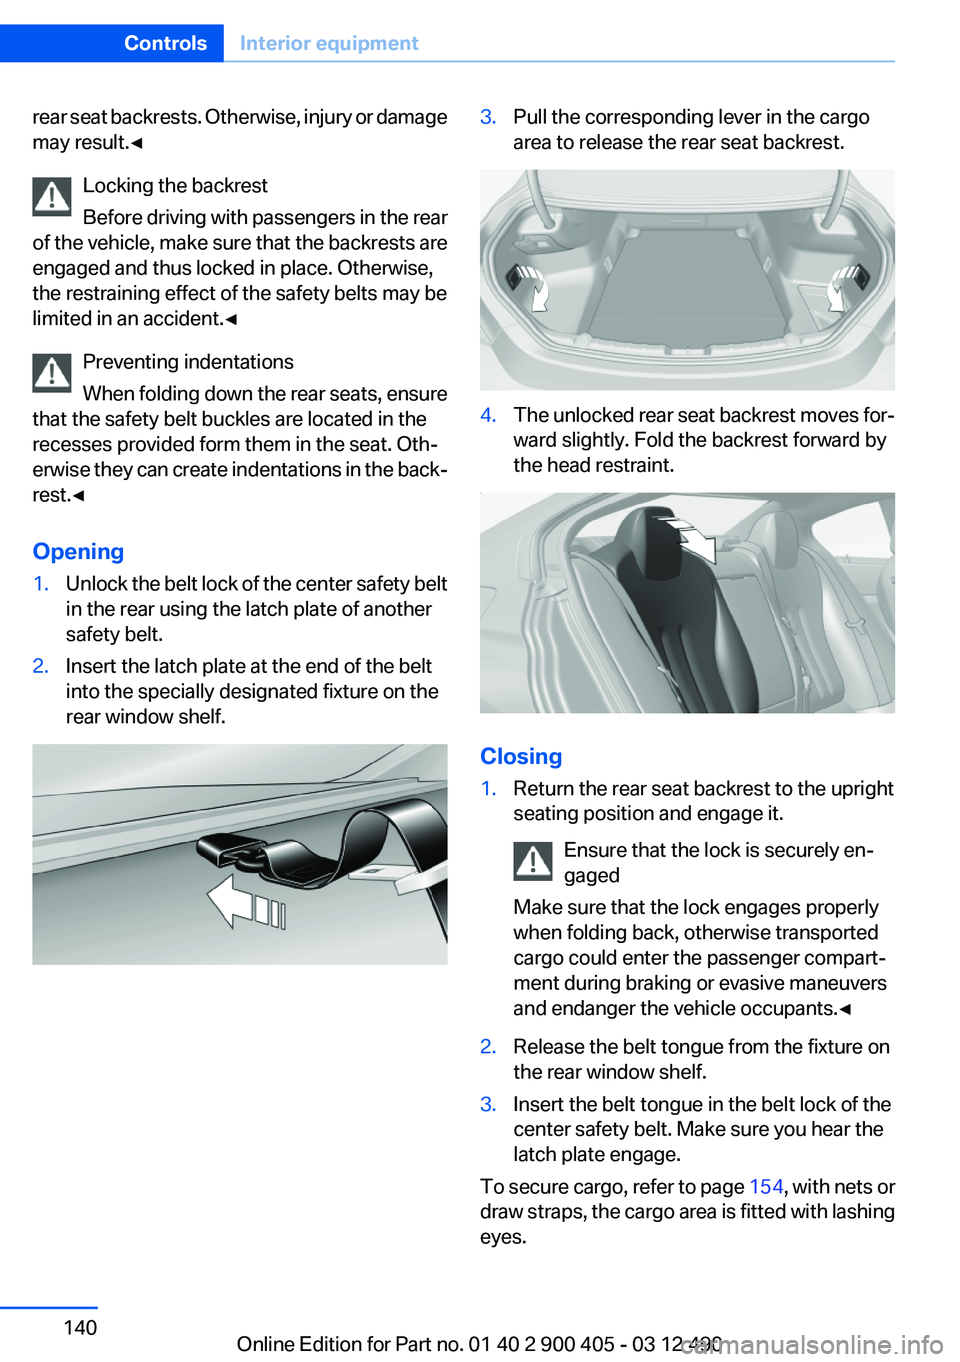
Opening1.Unlock the belt lock of the center safety belt
in the rear using the latch plate of another
safety belt.2.Insert the latch plate at the end of the belt
into the specially designated fixture on the
rear window shelf.3.Pull the corresponding lever in the cargo
area to release the rear seat backrest.4.The unlocked rear seat backrest moves for‐
ward slightly. Fold the backrest forward by
the head restraint.
Closing
1.Return the rear seat backrest to the upright
seating position and engage it.
Ensure that the lock is securely en‐
gaged
Make sure that the lock engages properly
when folding back, otherwise transported
cargo could enter the passenger compart‐
ment during braking or evasive maneuvers
and endanger the vehicle occupants.◀2.Release the belt tongue from the fixture on
the rear window shelf.3.Insert the belt tongue in the belt lock of the
center safety belt. Make sure you hear the
latch plate engage.
To secure cargo, refer to page 154, with nets or
draw straps, the cargo area is fitted with lashing
eyes.
Seite 140ControlsInterior equipment140
Online Edition for Part no. 01 40 2 900 405 - 03 12 490
Page 141 of 305
Ski bag
Capacity
The ski bag can be used to transport up to four
pairs of skis with a length of up to 6 ft/2.10 m or,
depending on the binding, up to two snow‐
boards with a length of up to 5 ft/1.60 m.
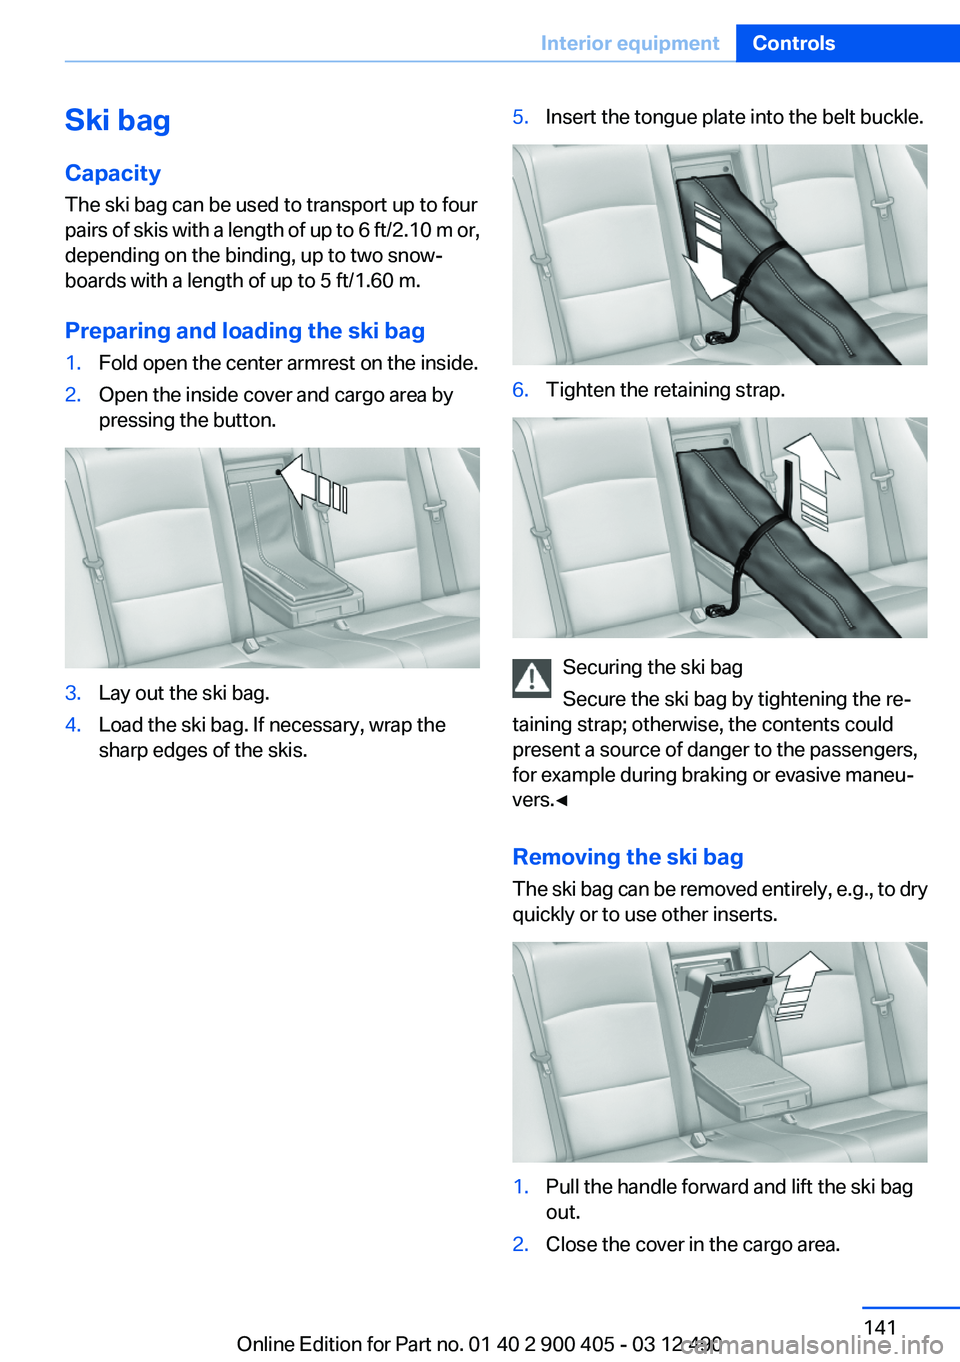
Preparing and loading the ski bag1.Fold open the center armrest on the inside.2.Open the inside cover and cargo area by
pressing the button.3.Lay out the ski bag.4.Load the ski bag. If necessary, wrap the
sharp edges of the skis.5.Insert the tongue plate into the belt buckle.6.Tighten the retaining strap.
Securing the ski bag
Secure the ski bag by tightening the re‐
taining strap; otherwise, the contents could
present a source of danger to the passengers,
for example during braking or evasive maneu‐
vers.◀
Removing the ski bag
The ski bag can be removed entirely, e.g., to dry
quickly or to use other inserts.
1.Pull the handle forward and lift the ski bag
out.2.Close the cover in the cargo area.Seite 141Interior equipmentControls141
Online Edition for Part no. 01 40 2 900 405 - 03 12 490