2013 BMW 640I COUPE wheel
[x] Cancel search: wheelPage 181 of 232

Retreaded tires
Possibly substantial variations in the de‐
sign and age of the tire casing structures can
limit service life and have a negative impact on
road safety.◀
Winter tires
The manufacturer of your vehicle recommends
winter tires for winter roads or at temperatures
below +45 ℉/+7 ℃.
Although so-called all-season M+S tires do pro‐
vide better winter traction than summer tires,
they do not provide the same level of perform‐
ance as winter tires.
Maximum speed of winter tires
If the maximum speed of the vehicle is higher
than the permissible speed for the winter tires,
then display a corresponding sign in the field of
vision. You can obtain this sign from the tire spe‐
cialist or from your service center.
Maximum speed for winter tires
Do not exceed the maximum speed for the
winter tires; otherwise, tire damage and acci‐
dents can occur.◀
Run-flat tires
If you are already using run-flat tires, for your
own safety you should replace them only with
the same kind. No spare tire is available in the
case of a flat tire. Your service center will be glad
to advise you.
Rotating wheels between axles
The manufacturer of your vehicle advises
against swapping wheels between the front and
rear axles.
This can impair the handling characteristics.
Storage
Store wheels and tires in a cool, dry place with
as little exposure to light as possible.Always protect tires against all contact with oil,
grease and fuels.
Do not exceed the maximum tire inflation pres‐
sure indicated on the side wall of the tire.
Run-flat tires
Label
RSC label on the tire sidewall.
The wheels are composed of special rims and
tires that are self-supporting, to a limited de‐
gree.
The support of the sidewall allows the tire to re‐
main drivable to a restricted degree in the event
of a pressure loss.
Continued driving with a damaged tire, refer to
page 100.
Continued driving with a damaged tire, refer to
page 97.
Changing run-flat tires
For your own safety, only use run-flat tires. No
spare tire is available in the case of a flat tire. Your
service center will be glad to advise you.
Snow chains
Fine-link snow chains
Only certain types of fine-link snow chains have
been tested by the manufacturer of your vehicle,
classified as road-safe and recommended.
Seite 181Wheels and tiresMobility181
Online Edition for Part no. 01 40 2 903 329 - 07 12 490
Page 182 of 232

Consult your service center for more informa‐
tion.
Use
Use only in pairs on the rear wheels, equipped
with the tires of the following size:▷225/55 R 17.▷245/45 R 18.▷245/40 R 19
Follow the chain manufacturer's instructions.
Make sure that the snow chains are always suf‐
ficiently tight. Retighten as needed according to
the chain manufacturer's instructions.
Do not initialize the Flat Tire Monitor after
mounting snow chains, as doing so may result
in incorrect readings.
Do not initialize the Tire Pressure Monitor after
mounting snow chains, as doing so may result
in incorrect readings.
When driving with snow chains, briefly activate
Dynamic Traction Control if necessary.
Maximum speed with snow chains
Do not exceed a speed of 30 mph/50 km/h when
using snow chains.
Snow chain detection
The concept
When using snow chains, you should set
whether you are driving with or without snow
chains via the iDrive.
The snow chain detection system supports you
by automatically showing the detected state on
the Control Display.
When snow chains are in use, the rear axle steer‐
ing of the Integral Active Steering is deactivated
automatically.
At speeds above the maximum permitted speed
with snow chains of 30 mph/50 km/h, the rear
axle steering is activated again automatically.
Activating the status1."Settings"2."Tire chains"3."Tire chains installed"
Automatic detection
If functioning properly:
▷Snow chains are mounted. The setting is not
activated
.
After you drive a short distance, a Check
Control message is shown and the state is
activated automatically.
Confirm the automatic activation.
▷Snow chains are not mounted. The setting
is activated
.
At speeds above 30 mph/50 km/h, a Check
Control message is displayed. Deactivate
the status manually.
If not functioning properly:
▷Snow chains are mounted. The setting is not
activated
.
A Check Control message is not displayed.
The automatic detection system is malfunc‐
tioning. Activate the status manually.
Activating/deactivating rear axle
steering
If the status indicating that snow chains are in
use is activated, the rear axle steering is deacti‐
vated automatically.
At speeds above 30 mph/50 km/h, the rear axle
steering is activated again, even though snow
chains are in use.
Seite 182MobilityWheels and tires182
Online Edition for Part no. 01 40 2 903 329 - 07 12 490
Page 195 of 232

Lamps in the trunk lid
Access to the lamps
If necessary, remove the fasteners using the
screwdriver from the onboard vehicle tool kit
and fold away the cover.
Inside brake lamp
Follow the general instructions on lamps and
bulbs, refer to page 192.
24-watt bulb, HP24W
1.Squeeze the bulb holder and pull it out.2.Pull off the connector.3.Replace the bulb.4.Mount the bulb holder and the cover of the
trunk lid in reverse order.
Reversing lamp
Follow the general instructions on lamps and
bulbs, refer to page 192.
16-watt bulb, W16W1.Unscrew the bulb holder counterclockwise.2.Pull out the bulb and replace it.3.Mount the bulb holder and the cover of the
trunk lid in reverse order.
Changing wheels
Notes
The vehicle equipment does not include a spare
tire.
When using run-flat tires or tire sealants, a tire
does not need to be changed immediately in the
event of pressure loss due to a flat tire.
The tools for changing wheels are available as
accessories from your service center.
Jacking points for the vehicle jack
The jacking points for the vehicle jack are lo‐
cated in the positions shown.
Seite 195Replacing componentsMobility195
Online Edition for Part no. 01 40 2 903 329 - 07 12 490
Page 196 of 232

Vehicle battery
Maintenance
The battery is maintenance-free, i.e., the elec‐
trolyte will last for the life of the battery.
Your service center will be glad to advise you on
questions regarding the battery.
Battery replacement Use approved vehicle batteries only
Only use vehicle batteries that have been
approved for your vehicle by the manufacturer;
otherwise, the vehicle could be damaged and
systems or functions may not be fully availa‐
ble.◀
After a battery replacement, have the battery
registered on the vehicle by your service center
to ensure that all comfort functions are fully
available and that any Check Control messages
are no longer displayed.
Charging the battery
Note Do not plug the charger into the socket
Do not connect battery chargers to the
factory-installed sockets in the vehicle. Doing so
may result in damage to the vehicle.◀
Starting aid terminals
In the vehicle, only charge the battery via the
starting aid terminals, refer to page 200, in the
engine compartment with the engine off.
Power failure
After a temporary power loss, some equipment
needs to be reinitialized.
Individual settings need to be reprogrammed:▷Seat, mirror, and steering wheel memory:
store the positions again.▷Time: update.▷Date: update.▷Radio station: save again.▷Navigation system: wait for the operability of
the navigation.
Disposing of old batteries
Have old batteries disposed of by your
service center or bring them to a recy‐
cling center.
Maintain the battery in an upright position for
transport and storage. Secure the battery so
that it does not tip over during transport.
Fuses
Notes Replacing fuses
Never attempt to repair a blown fuse and
do not replace a defective fuse with a substitute
of another color or amperage rating; this could
lead to a circuit overload, ultimately resulting in
a fire in the vehicle.◀
Plastic tweezers and information on the fuse
types and locations are stored in the fuse box in
the cargo area.
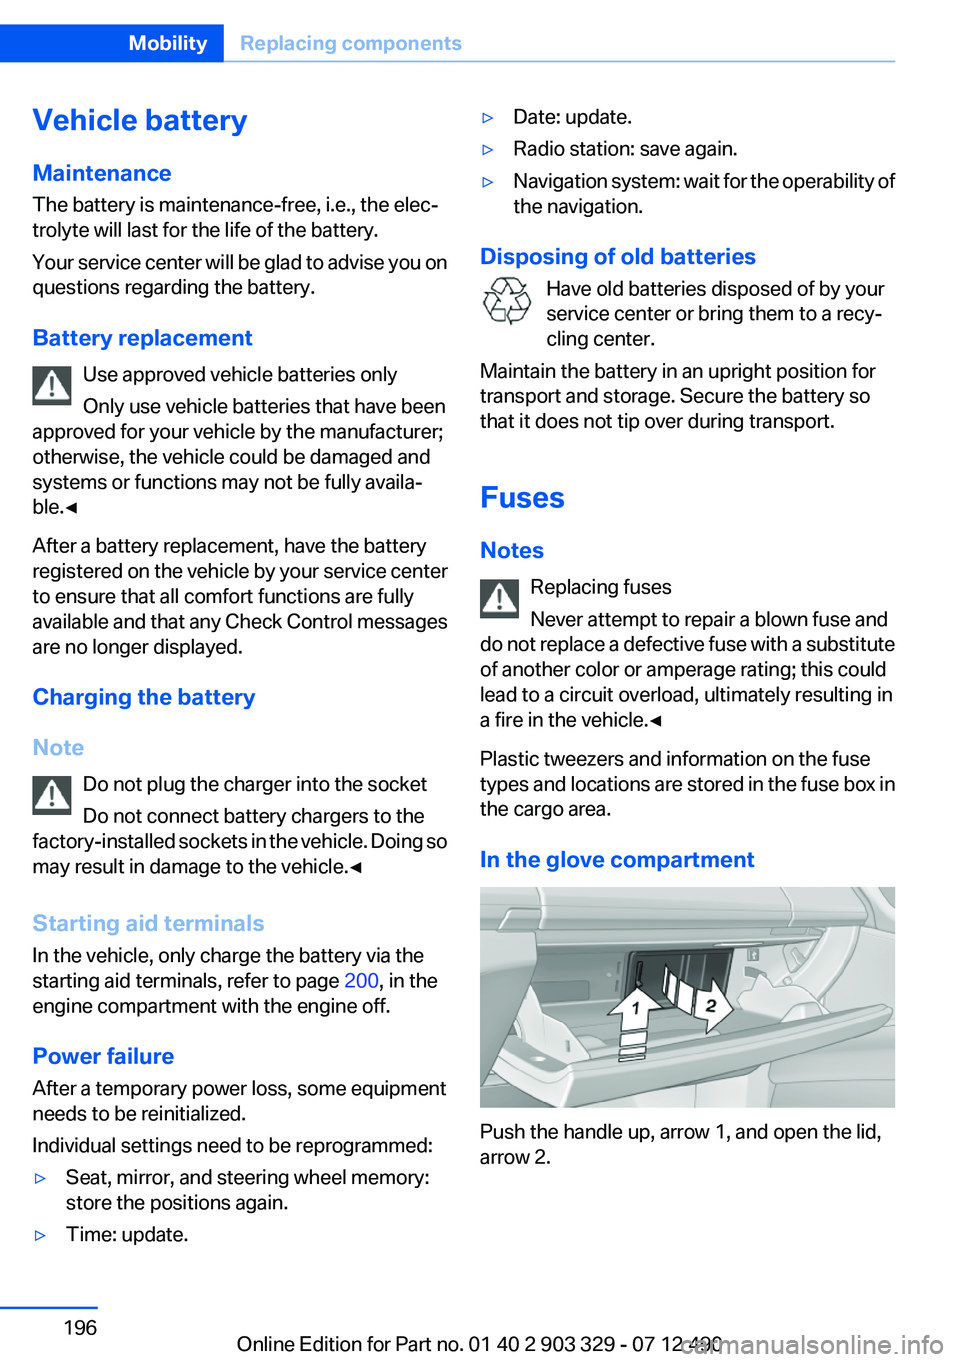
In the glove compartment
Push the handle up, arrow 1, and open the lid,
arrow 2.
Seite 196MobilityReplacing components196
Online Edition for Part no. 01 40 2 903 329 - 07 12 490
Page 201 of 232

Starting the engine
Never use spray fluids to start the engine.1.Start the engine of the assisting vehicle and
let it run for several minutes at an increased
idle speed.2.Start the engine of the vehicle being started
in the usual way.
If the first starting attempt is not successful,
wait a few minutes before making another
attempt in order to allow the discharged bat‐
tery to recharge.3.Let both engines run for several minutes.4.Disconnect the jumper cables in the reverse
order.
Check the battery and recharge if necessary.
Tow-starting and towing
Manual transmission
Observe before towing your vehicle
Gearshift lever in neutral position.
Towing When the parking brake is blocked
The parking brake cannot be released
manually.
Do not tow the vehicle with the parking brake
blocked, or the vehicle can be damaged.
Contact your service center.◀
Follow the towing instructions
Follow all towing instructions; otherwise,
vehicle damage or accidents may occur.◀
▷Make sure that the ignition is switched on;
otherwise, the low beams, tail lamps, turn
signals, and windshield wipers may be un‐
available.▷Do not tow the vehicle with the rear axle
tilted, as the front wheels could turn.▷When the engine is stopped, there is no
power assist. Consequently, more force
needs to be applied when braking and steer‐
ing.▷Larger steering wheel movements are re‐
quired.▷The towing vehicle must not be lighter than
the vehicle being towed; otherwise, it will not
be possible to control the vehicle response.
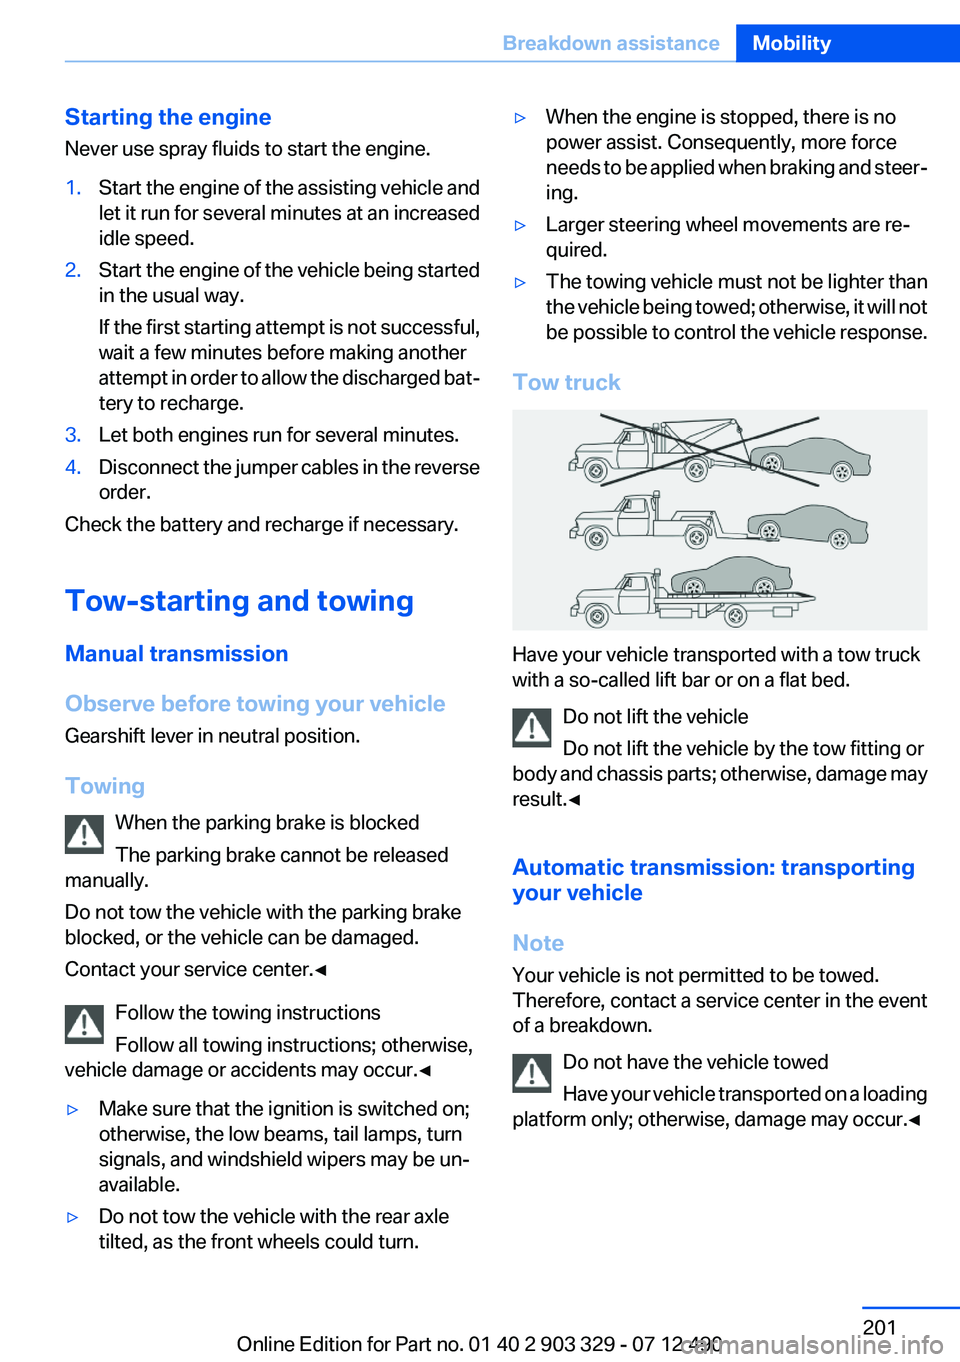
Tow truck
Have your vehicle transported with a tow truck
with a so-called lift bar or on a flat bed.
Do not lift the vehicle
Do not lift the vehicle by the tow fitting or
body and chassis parts; otherwise, damage may
result.◀
Automatic transmission: transporting
your vehicle
Note
Your vehicle is not permitted to be towed.
Therefore, contact a service center in the event
of a breakdown.
Do not have the vehicle towed
Have your vehicle transported on a loading
platform only; otherwise, damage may occur.◀
Seite 201Breakdown assistanceMobility201
Online Edition for Part no. 01 40 2 903 329 - 07 12 490
Page 204 of 232

CareVehicle equipment
All standard, country-specific and optional
equipment that is offered in the model series is
described in this chapter. Therefore, equipment
is also described that is not available in a vehicle,
e. g., because of the selected optional equip‐
ment or country variant. This also applies for
safety-related functions and systems.
Car washes
Notes Steam jets or high-pressure washers
When using steam jets or high-pressure
washers, hold them a sufficient distance away
and use a maximum temperature of
140 ℉/60 ℃.
Ensure that a distance of at least 31.5 in‐
ches/50 cm is maintained at all times. Holding
them too close or using excessively high pres‐
sures or temperatures can cause damage or
preliminary damage that may then lead to long-
term damage.
Follow the operating instructions for the high-
pressure washer.◀
Cleaning sensors/cameras with high-
pressure washers
When using high-pressure washers, do not
spray the exterior sensors and cameras, e.g.,
Park Distance Control, for extended periods of
time and only from a distance of at least
12 in/30 cm.◀
Wash your vehicle frequently, particularly in win‐
ter.
Intense soiling and road salt can damage the ve‐
hicle.Automatic car washes
Notes
Note the following:▷Give preference to cloth car washes or those
that use soft brushes in order to avoid paint
damage.▷Make sure that the wheels and tires are not
damaged by the transport mechanisms.▷Fold in the exterior mirrors; otherwise, they
may be damaged, depending on the width of
the vehicle.▷Deactivate the rain sensor, refer to
page 65,to avoid unintentional wiper activa‐
tion.▷In some cases, an unintentional alarm can be
triggered by the interior motion sensor of the
alarm system. Follow the instructions on
avoiding an unintentional alarm, refer to
page 41.
Guide rails in car washes
Avoid car washes with guide rails higher
than 4 in/10 cm; otherwise, the vehicle body
could be damaged.◀
Before driving into a car wash
In order to ensure that the vehicle can roll in a car
wash, take the following steps:
Manual transmission:
1.Release the parking brake.2.Drive into the car wash.3.Shift to neutral.4.Switch the engine off.5.Switch on the ignition.Seite 204MobilityCare204
Online Edition for Part no. 01 40 2 903 329 - 07 12 490
Page 206 of 232

Clean light-colored leather more frequently be‐
cause soiling on such surfaces is substantially
more visible.
Use leather care products; otherwise, dirt and
grease will gradually break down the protective
layer of the leather surface.
Suitable care products are available from the
service center.
Upholstery material care
Vacuum regularly with a vacuum cleaner.
If they are very dirty, e.g., beverage stains, use a
soft sponge or microfiber cloth with a suitable
interior cleaner.
Clean the upholstery down to the seams using
large sweeping motions. Avoid rubbing the ma‐
terial vigorously.
Damage from Velcro® fasteners
Open Velcro® fasteners on pants or other
articles of clothing can damage the seat covers.
Ensure that any Velcro® fasteners are closed. ◀
Caring for special components
Light-alloy wheels
Use wheel cleaner, particularly during the winter
months. Do not use aggressive, acidic, strongly
alkaline or abrasive cleaners, or steam jets
above 140 ℉/60 ℃; follow the manufacturer's
instructions.
Chrome surfaces
Carefully clean components such as the radiator
grille or door handles with an ample supply of
water, possibly with shampoo added, particu‐
larly when they have been exposed to road salt.
Rubber components
Aside from water, treat only with rubber cleans‐
ers.
When cleaning rubber seals, do not use any sil‐
icon-containing car care products in order to
avoid damage or reduced noise damping.Fine wood parts
Clean fine wood facing and fine wood compo‐
nents only with a moist rag. Then dry with a soft
cloth.
Plastic components
These include:▷Imitation leather surfaces.▷Headliner.▷Lamp lenses.▷Instrument cluster cover.▷Matte black spray-coated components.▷Painted parts in the interior.
Clean with a microfiber cloth.
Lightly dampen the cloth with water.
Do not soak the headliner.
Do not use cleansers that contain alcohol
or solvents
Do not use cleansers that contain alcohol or sol‐
vents, such as lacquer thinners, heavy-duty
grease removers, fuel, or such; this could lead to
surface damage.◀
Safety belts
Dirty belt straps impede the reeling action and
thus have a negative impact on safety.
Chemical cleaning
Do not clean chemically; this can destroy
the webbing.◀
Use only a mild soapy solution, with the safety
belts clipped into their buckles.
Do not allow the reels to retract the safety belts
until they are dry.
Carpets and floor mats No objects in the area around the pedals
Keep floor mats, carpets, and any other
objects out of the area of motion of the pedals;
otherwise, the function of the pedals could be
impeded while driving
Seite 206MobilityCare206
Online Edition for Part no. 01 40 2 903 329 - 07 12 490
Page 211 of 232

Length, wheel base1Wheelbase: 112.4 inches/2,855 mm2Length: 192.8 inches/4,896 mm
Smallest turning circle
Dia.: 38.4 ft/11.7 m
Weights
640iApproved gross vehicle weightlbs/kg4,828/2,190Loadlbs/kg772/350Approved front axle loadlbs/kg2,425/1,100Approved rear axle loadlbs/kg2,668/1,210Cargo area capacitycu ft/l16.2/460Seite 211Technical dataReference211
Online Edition for Part no. 01 40 2 903 329 - 07 12 490