2013 BMW 640I COUPE display
[x] Cancel search: displayPage 144 of 232
is shown on the display of the automatic cli‐
mate control.
The interior temperature, air volume and air dis‐
tribution can be adjusted with the ignition
switched on.
Switching off
At the lowest fan speed, press the left side of the
button on the driver's side.
on the display of the automatic climate control
goes out.
Switching the system on/off
Switching off
▷Complete system: Press and hold the left button on
the driver's side until the control
clicks off.▷On the front passenger side:
Press and hold the left button on
the front passenger side.
Switching on
Press any button except:
▷ALL program.▷Rear window defroster.▷Left side of Air volume button.▷Seat heating.▷Seat ventilation.
Microfilter/activated-charcoal filter
The microfilter removes dust and pollen from
the incoming air.
The activated-charcoal filter removes gaseous
pollutants from the outside air that enters the
vehicle.
This combined filter should be replaced during
scheduled maintenance, refer to page 189, of
your vehicle.
Ventilation
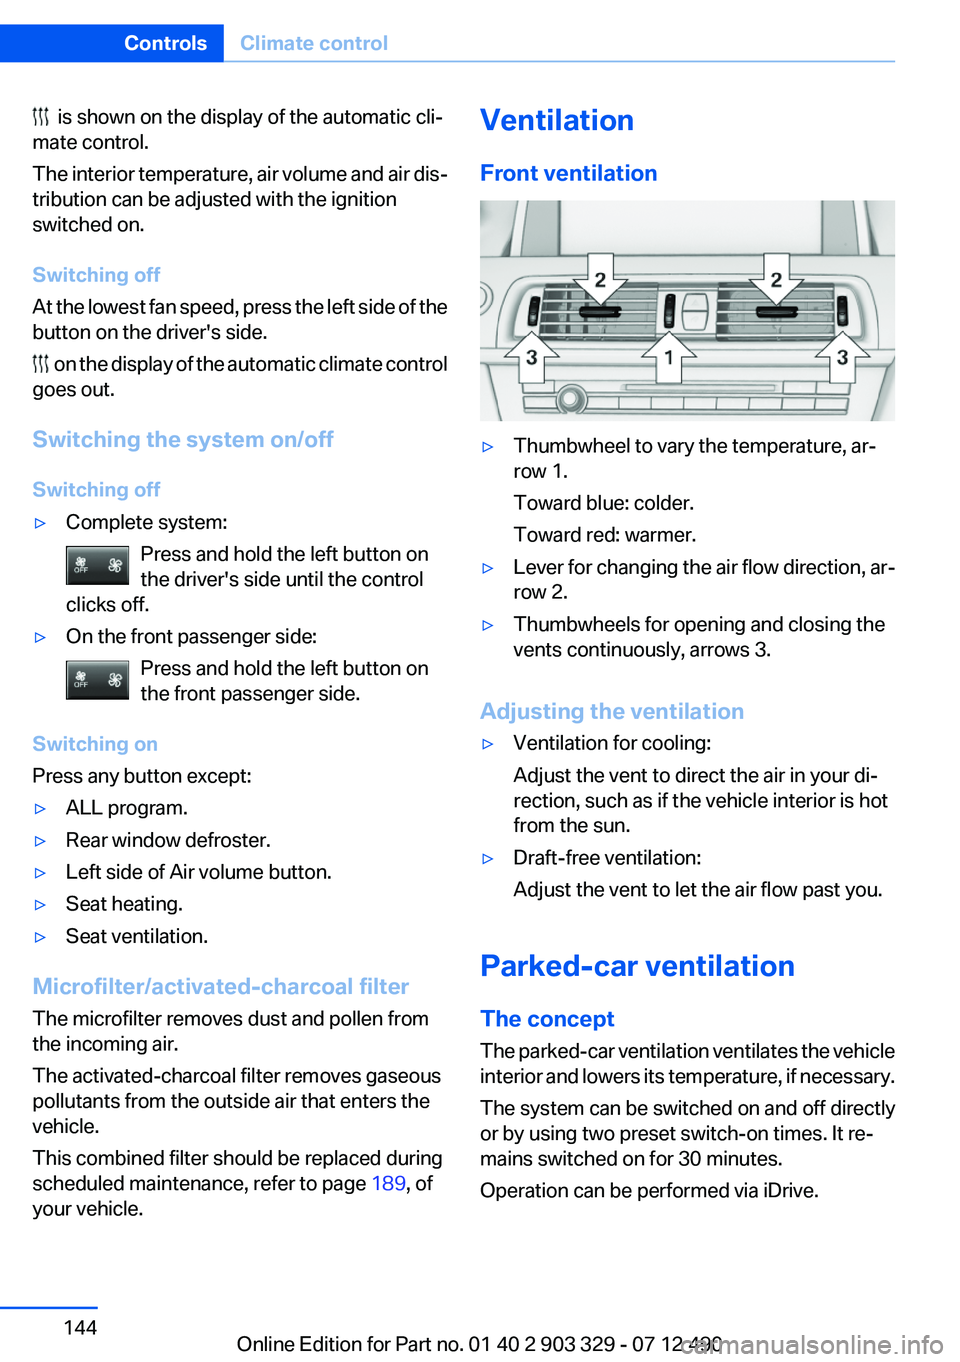
Front ventilation▷Thumbwheel to vary the temperature, ar‐
row 1.
Toward blue: colder.
Toward red: warmer.▷Lever for changing the air flow direction, ar‐
row 2.▷Thumbwheels for opening and closing the
vents continuously, arrows 3.
Adjusting the ventilation
▷Ventilation for cooling:
Adjust the vent to direct the air in your di‐
rection, such as if the vehicle interior is hot
from the sun.▷Draft-free ventilation:
Adjust the vent to let the air flow past you.
Parked-car ventilation
The concept
The parked-car ventilation ventilates the vehicle
interior and lowers its temperature, if necessary.
The system can be switched on and off directly
or by using two preset switch-on times. It re‐
mains switched on for 30 minutes.
Operation can be performed via iDrive.
Seite 144ControlsClimate control144
Online Edition for Part no. 01 40 2 903 329 - 07 12 490
Page 164 of 232
The gear shift indicator of your vehicle indicates
the most fuel efficient gear.
Use coasting conditions
When approaching a red light, take your foot off
the accelerator and let the vehicle coast to a halt.
On a downhill gradient, take your foot off the ac‐
celerator and let the vehicle roll.
The flow of fuel is interrupted while coasting.
Switch off the engine during
longer stops
Switch off the engine during longer stops, e.g.,
at traffic lights, railroad crossings or in traffic
congestion.
Auto Start/Stop function
The Auto Start/Stop function of your vehicle au‐
tomatically switches off the engine during a
stop.
If the engine is switched off and then restarted
rather than leaving the engine running con‐
stantly, fuel consumption and emissions are re‐
duced. Savings can begin within a few seconds
of switching off the engine.
Using this system can cause certain compo‐
nents of the vehicle to become worn prema‐
turely.
Iin addition, fuel consumption is also determined
by other factors, such as driving style, road con‐
ditions, maintenance or environmental factors.
Switch off any functions that
are not currently needed
Functions such as seat heating and the rear win‐
dow defroster require a lot of energy and con‐
sume additional fuel, especially in city and stop-
and-go traffic.Therefore, switch off these functions if they are
not actually needed.
Have maintenance carried out
Have vehicles maintained regularly to achieve
optimal vehicle economy and operating life.
Have the maintenance carried out by your serv‐
ice center.
Please also note the BMW Maintenance Sys‐
tem, refer to page 189.
ECO PRO
The concept
ECO PRO supports a driving style that saves on
fuel consumption. For this purpose, the engine
control and comfort functions, e. g. the climate
control output, are adjusted.
In addition, context-sensitive instructions can
be displayed that assist in driving in a manner
that optimizes fuel consumption.
The extension of the range that is achieved as a
result can be displayed in the instrument cluster.
Activating ECO PRO Press button repeatedly until ECO PRO
is displayed in the instrument cluster.
Display in the instrument cluster
ECO PRO bonus range An extension of the range can be
achieved by an adjusted driving
style.
This may be displayed as the bo‐
nus range in the instrument clus‐
ter.Seite 164Driving tipsSaving fuel164
Online Edition for Part no. 01 40 2 903 329 - 07 12 490
Page 165 of 232
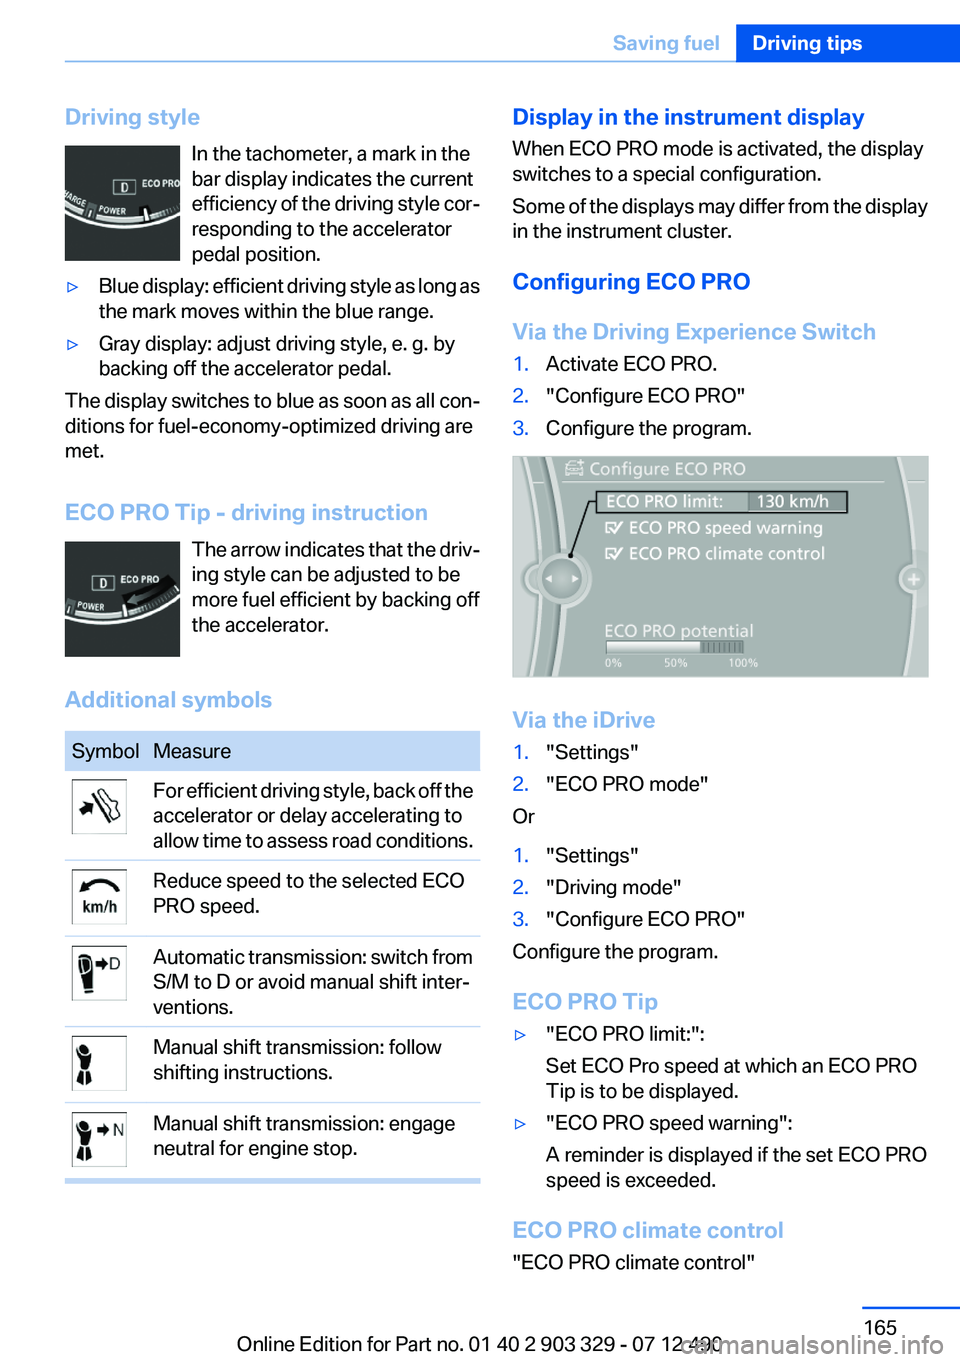
Driving styleIn the tachometer, a mark in the
bar display indicates the current
efficiency of the driving style cor‐
responding to the accelerator
pedal position.▷Blue display: efficient driving style as long as
the mark moves within the blue range.▷Gray display: adjust driving style, e. g. by
backing off the accelerator pedal.
The display switches to blue as soon as all con‐
ditions for fuel-economy-optimized driving are
met.
ECO PRO Tip - driving instruction The arrow indicates that the driv‐
ing style can be adjusted to be
more fuel efficient by backing off
the accelerator.
Additional symbols
SymbolMeasureFor efficient driving style, back off the
accelerator or delay accelerating to
allow time to assess road conditions.Reduce speed to the selected ECO
PRO speed.Automatic transmission: switch from
S/M to D or avoid manual shift inter‐
ventions.Manual shift transmission: follow
shifting instructions.Manual shift transmission: engage
neutral for engine stop.Display in the instrument display
When ECO PRO mode is activated, the display
switches to a special configuration.
Some of the displays may differ from the display
in the instrument cluster.
Configuring ECO PRO
Via the Driving Experience Switch1.Activate ECO PRO.2."Configure ECO PRO"3.Configure the program.
Via the iDrive
1."Settings"2."ECO PRO mode"
Or
1."Settings"2."Driving mode"3."Configure ECO PRO"
Configure the program.
ECO PRO Tip
▷"ECO PRO limit:":
Set ECO Pro speed at which an ECO PRO
Tip is to be displayed.▷"ECO PRO speed warning":
A reminder is displayed if the set ECO PRO
speed is exceeded.
ECO PRO climate control
"ECO PRO climate control"
Seite 165Saving fuelDriving tips165
Online Edition for Part no. 01 40 2 903 329 - 07 12 490
Page 166 of 232
The climate control is adjusted to be fuel-effi‐
cient.
By making a slight change to the set tempera‐
ture, or adjusting the rate of heating or cooling
of the passenger compartment fuel consump‐
tion can be economized.
The output of the seat heater is also reduced.
ECO PRO Potential
The percentage of potential savings that can be
achieved with the current configuration is dis‐
played.
Indications on the Control Display
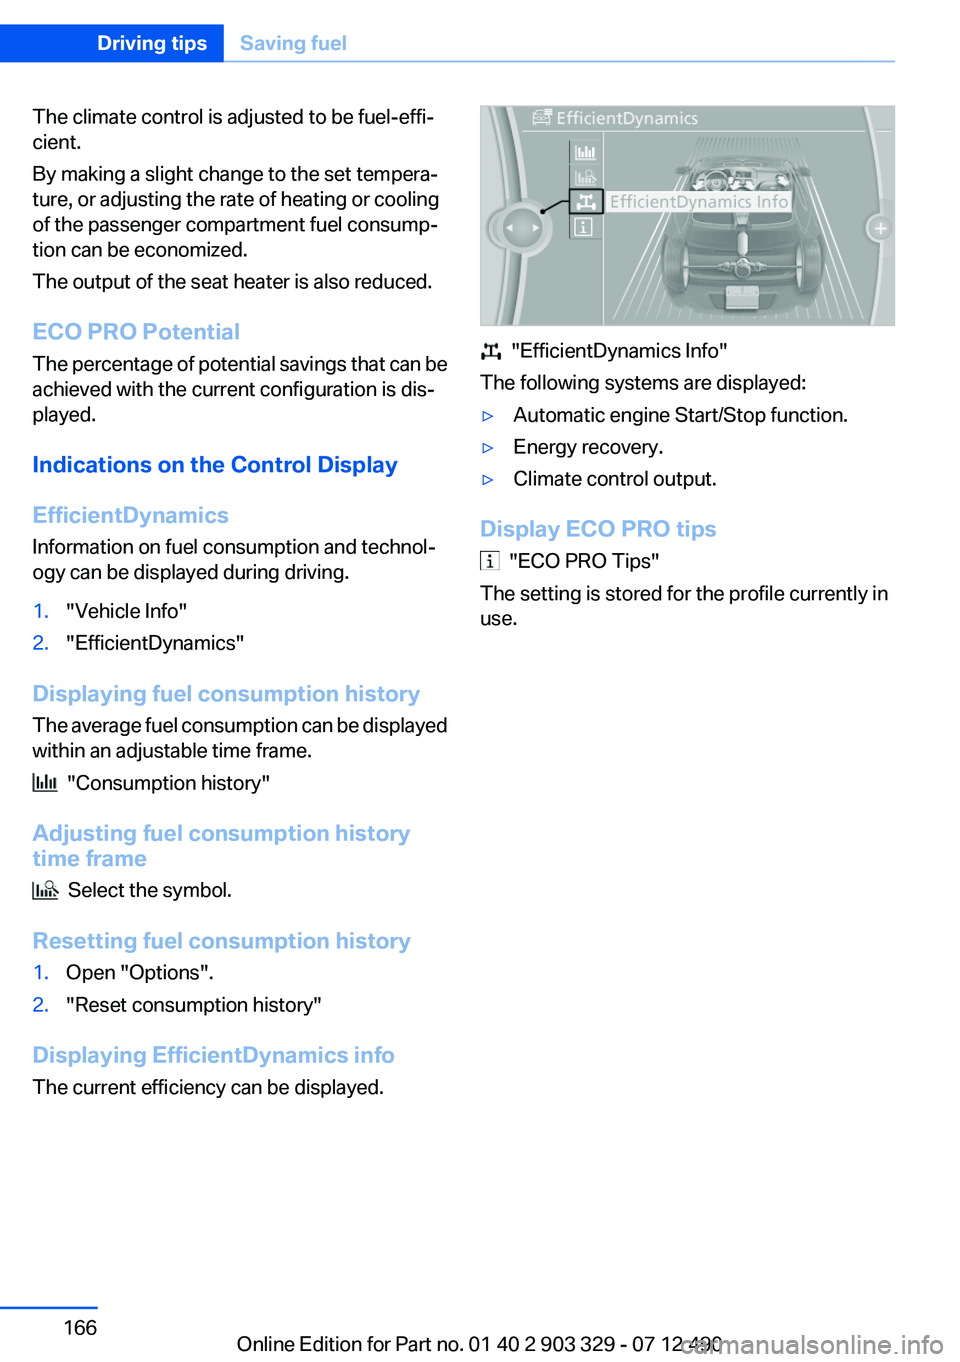
EfficientDynamics
Information on fuel consumption and technol‐
ogy can be displayed during driving.1."Vehicle Info"2."EfficientDynamics"
Displaying fuel consumption history
The average fuel consumption can be displayed
within an adjustable time frame.
"Consumption history"
Adjusting fuel consumption history
time frame
Select the symbol.
Resetting fuel consumption history
1.Open "Options".2."Reset consumption history"
Displaying EfficientDynamics info
The current efficiency can be displayed.
"EfficientDynamics Info"
The following systems are displayed:
▷Automatic engine Start/Stop function.▷Energy recovery.▷Climate control output.
Display ECO PRO tips
"ECO PRO Tips"
The setting is stored for the profile currently in
use.
Seite 166Driving tipsSaving fuel166
Online Edition for Part no. 01 40 2 903 329 - 07 12 490
Page 170 of 232
RefuelingVehicle equipment
All standard, country-specific and optional
equipment that is offered in the model series is
described in this chapter. Therefore, equipment
is also described that is not available in a vehicle,
e. g., because of the selected optional equip‐
ment or country variant. This also applies for
safety-related functions and systems.
General information Refuel promptly
Refuel no later than at a range of
30 miles/50 km, or operation of the engine is not
ensured and damage may occur.◀
Fuel cap
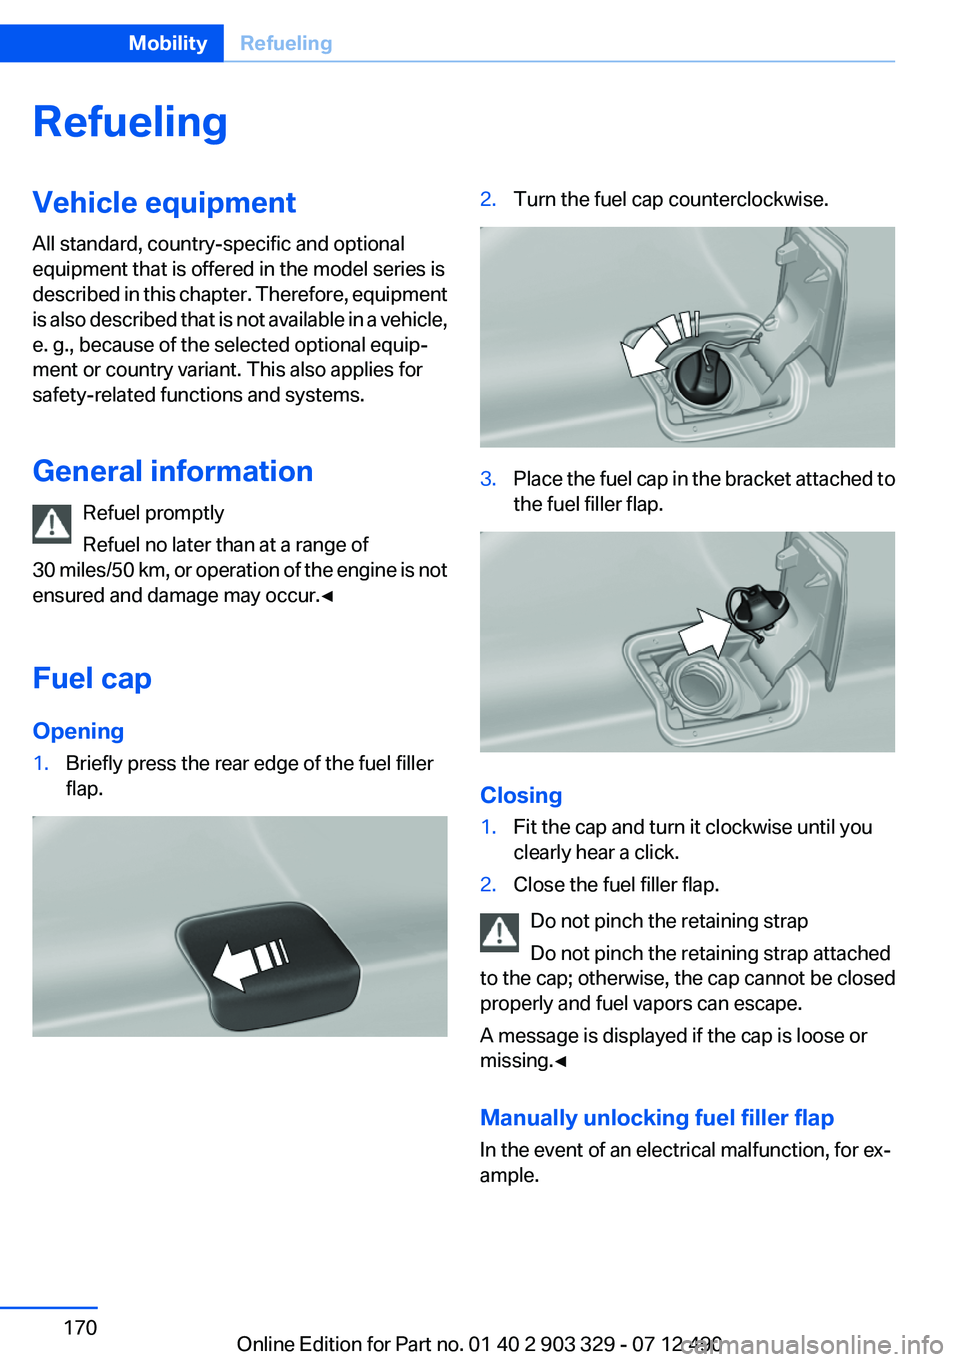
Opening1.Briefly press the rear edge of the fuel filler
flap.2.Turn the fuel cap counterclockwise.3.Place the fuel cap in the bracket attached to
the fuel filler flap.
Closing
1.Fit the cap and turn it clockwise until you
clearly hear a click.2.Close the fuel filler flap.
Do not pinch the retaining strap
Do not pinch the retaining strap attached
to the cap; otherwise, the cap cannot be closed
properly and fuel vapors can escape.
A message is displayed if the cap is loose or
missing.◀
Manually unlocking fuel filler flap
In the event of an electrical malfunction, for ex‐
ample.
Seite 170MobilityRefueling170
Online Edition for Part no. 01 40 2 903 329 - 07 12 490
Page 181 of 232

Retreaded tires
Possibly substantial variations in the de‐
sign and age of the tire casing structures can
limit service life and have a negative impact on
road safety.◀
Winter tires
The manufacturer of your vehicle recommends
winter tires for winter roads or at temperatures
below +45 ℉/+7 ℃.
Although so-called all-season M+S tires do pro‐
vide better winter traction than summer tires,
they do not provide the same level of perform‐
ance as winter tires.
Maximum speed of winter tires
If the maximum speed of the vehicle is higher
than the permissible speed for the winter tires,
then display a corresponding sign in the field of
vision. You can obtain this sign from the tire spe‐
cialist or from your service center.
Maximum speed for winter tires
Do not exceed the maximum speed for the
winter tires; otherwise, tire damage and acci‐
dents can occur.◀
Run-flat tires
If you are already using run-flat tires, for your
own safety you should replace them only with
the same kind. No spare tire is available in the
case of a flat tire. Your service center will be glad
to advise you.
Rotating wheels between axles
The manufacturer of your vehicle advises
against swapping wheels between the front and
rear axles.
This can impair the handling characteristics.
Storage
Store wheels and tires in a cool, dry place with
as little exposure to light as possible.Always protect tires against all contact with oil,
grease and fuels.
Do not exceed the maximum tire inflation pres‐
sure indicated on the side wall of the tire.
Run-flat tires
Label
RSC label on the tire sidewall.
The wheels are composed of special rims and
tires that are self-supporting, to a limited de‐
gree.
The support of the sidewall allows the tire to re‐
main drivable to a restricted degree in the event
of a pressure loss.
Continued driving with a damaged tire, refer to
page 100.
Continued driving with a damaged tire, refer to
page 97.
Changing run-flat tires
For your own safety, only use run-flat tires. No
spare tire is available in the case of a flat tire. Your
service center will be glad to advise you.
Snow chains
Fine-link snow chains
Only certain types of fine-link snow chains have
been tested by the manufacturer of your vehicle,
classified as road-safe and recommended.
Seite 181Wheels and tiresMobility181
Online Edition for Part no. 01 40 2 903 329 - 07 12 490
Page 182 of 232

Consult your service center for more informa‐
tion.
Use
Use only in pairs on the rear wheels, equipped
with the tires of the following size:▷225/55 R 17.▷245/45 R 18.▷245/40 R 19
Follow the chain manufacturer's instructions.
Make sure that the snow chains are always suf‐
ficiently tight. Retighten as needed according to
the chain manufacturer's instructions.
Do not initialize the Flat Tire Monitor after
mounting snow chains, as doing so may result
in incorrect readings.
Do not initialize the Tire Pressure Monitor after
mounting snow chains, as doing so may result
in incorrect readings.
When driving with snow chains, briefly activate
Dynamic Traction Control if necessary.
Maximum speed with snow chains
Do not exceed a speed of 30 mph/50 km/h when
using snow chains.
Snow chain detection
The concept
When using snow chains, you should set
whether you are driving with or without snow
chains via the iDrive.
The snow chain detection system supports you
by automatically showing the detected state on
the Control Display.
When snow chains are in use, the rear axle steer‐
ing of the Integral Active Steering is deactivated
automatically.
At speeds above the maximum permitted speed
with snow chains of 30 mph/50 km/h, the rear
axle steering is activated again automatically.
Activating the status1."Settings"2."Tire chains"3."Tire chains installed"
Automatic detection
If functioning properly:
▷Snow chains are mounted. The setting is not
activated
.
After you drive a short distance, a Check
Control message is shown and the state is
activated automatically.
Confirm the automatic activation.
▷Snow chains are not mounted. The setting
is activated
.
At speeds above 30 mph/50 km/h, a Check
Control message is displayed. Deactivate
the status manually.
If not functioning properly:
▷Snow chains are mounted. The setting is not
activated
.
A Check Control message is not displayed.
The automatic detection system is malfunc‐
tioning. Activate the status manually.
Activating/deactivating rear axle
steering
If the status indicating that snow chains are in
use is activated, the rear axle steering is deacti‐
vated automatically.
At speeds above 30 mph/50 km/h, the rear axle
steering is activated again, even though snow
chains are in use.
Seite 182MobilityWheels and tires182
Online Edition for Part no. 01 40 2 903 329 - 07 12 490
Page 185 of 232
Engine oilVehicle equipment
All standard, country-specific and optional
equipment that is offered in the model series is
described in this chapter. Therefore, equipment
is also described that is not available in a vehicle,
e. g., because of the selected optional equip‐
ment or country variant. This also applies for
safety-related functions and systems.
General information
Engine oil consumption depends on driving
style and driving conditions, e.g., if your driving
style is very sporty engine oil consumption will
be considerably greater.
Therefore, regularly check the engine oil level
after refueling.
Checking the oil level
electronically
Status display
The concept
The oil level is monitored electronically during
driving and shown on the Control Display.
If the oil level reaches the minimum level, a
check control message is displayed.
Requirements
Depending on the previous displays, the status
display appears when the engine is running or
after the vehicle has been driven for at least 30
minutes.
Displaying the oil level1."Vehicle Info"2."Vehicle status"3. "Engine oil level"
Oil level display messages
Different messages appear on the display de‐
pending on the oil level. Pay attention to these
messages.
If oil level is too low, immediately add 1 US
quart/liter of oil.
Take care not to add too much engine oil.
Too much engine oil
Have the vehicle checked immediately;
otherwise, surplus oil can lead to engine dam‐
age.◀
Detailed measurement
The concept
In the detailed measurement the oil level is
checked and displayed via a scale.
During the measurement, the idle speed is in‐
creased somewhat.
General information
A detailed measurement is only possible with
certain engines.
Requirements
▷Manual transmission: shift lever in neutral
position, clutch and accelerator pedals not
depressed.▷Automatic transmission: selector lever in
transmission position N or P and accelerator
not depressed.▷Vehicle is on a level road and the engine is
running at operating temperature.Seite 185Engine oilMobility185
Online Edition for Part no. 01 40 2 903 329 - 07 12 490