2013 BMW 6 SERIES GRAN COUPE ECO mode
[x] Cancel search: ECO modePage 126 of 247
Automatic program change
The system may automatically switch to COM‐
FORT in the following situations:▷Failure of Integral Active Steering.▷Failure of Dynamic Damping Control.▷The vehicle has a flat tire.
DSC OFF
Driving stability is limited during acceleration
and when driving in bends.
Stabilizing interventions by the Integral Active
Steering system are only performed by the
rear axle steering.
To increase vehicle stability, activate DSC
again as soon as possible.
Deactivating DSC: DSC OFF Press and hold the button, but not lon‐
ger than approx. 10 seconds, until the
indicator lamp for DSC OFF lights up in the in‐
strument cluster and DSC OFF is displayed in
the tachometer.
The DSC system is switched off.
Activating DSC Press the button.
DSC OFF and the DSC OFF indicator
lamp go out.
Indicator/warning lamps
When DSC OFF is activated, DSC OFF is dis‐
played in the tachometer.
The indicator lamp lights up: DSC OFF
is activated.
TRACTION Maximum traction on loose road surfaces. DTC
Dynamic Traction Control is switched on. Driv‐
ing stability is limited during acceleration and
when driving in bends.
Activating TRACTION
Press the button.
TRACTION is displayed in the tach‐
ometer.
The DSC indicator lamp in the instrument clus‐
ter lights up.
Deactivating TRACTION Press the button again.
TRACTION and the DSC indicator
lamp go out.
Indicator/warning lamps
When TRACTION is activated, TRACTION is
displayed in the tachometer.
The indicator lamp lights up: TRAC‐
TION is activated.
SPORT+
Sporty driving with optimized chassis and
adapted engine control with limited driving sta‐
bilization.
Dynamic Traction Control is switched on. The driver handles several of the stabilization
tasks.
Activating SPORT+ Press the button repeatedly until
SPORT+ appears in the tachometer
and the DSC OFF indicator lamp lights up in
the instrument cluster.
Automatic program change
When switching on the adjustable speed limit
or activating cruise control, the program auto‐
matically switches to SPORT mode.
Indicator/warning lamps SPORT+ is displayed in the instrument cluster.Seite 122ControlsDriving stability control systems122
Online Edition for Part no. 01 40 2 909 877 - VI/13
Page 127 of 247
The DSC OFF indicator lamp lights up:
Dynamic Traction Control is activated.
SPORT Consistently sporty tuning of the suspension
and engine control for greater driving agility
with maximum driving stabilization.
The program can be configured to individual
specifications.
The configuration is stored for the remote con‐
trol currently in use.
Activating SPORT Press the button repeatedly untilSPORT appears in the tachometer.
Configuring SPORT When the display is activated on the Control
Display, refer to page 124, the SPORT driving
mode can be set.
After the SPORT driving mode is activated, se‐
lect "Configure SPORT" on the displayed
panel and configure the program.
SPORT can also be configured before it is acti‐
vated:1."Settings"2."SPORT mode" or: "Driving mode"3.Configure driving mode.
This configuration is retrieved when the
SPORT driving mode is activated.
COMFORT For a balanced tuning with maximum driving
stabilization.
Activating COMFORT Press the button repeatedly until the
program display in the tachometer
goes out.
In certain situations, the system automatically
changes to the NORMAL program, automatic
program change, refer to page 122.
COMFORT+
Comfort-oriented tuning of the shock absorb‐
ers and adapted engine control for optimal
traveling comfort with maximum driving stabili‐
zation.
Activating COMFORT+ Press the button repeatedly untilCOMFORT+ appears in the tachome‐
ter.
ECO PRO
ECO PRO, refer to page 180, provides consis‐
tent tuning to minimize fuel consumption for
maximum range with maximum driving stabili‐
zation.
Comfort functions and the engine controller
are adjusted.
The program can be configured to individual
specifications.
Activating ECO PRO Press button repeatedly until ECO
PRO is displayed in the instrument
cluster.
Configuring ECO PRO1.Activate ECO PRO.2."Configure ECO PRO"
Make the desired settings.
Configure driving mode
Settings can be made for the following driving
modes in Driving mode:
▷SPORT mode, refer to page 123.▷ECO PRO mode, refer to page 180.Seite 123Driving stability control systemsControls123
Online Edition for Part no. 01 40 2 909 877 - VI/13
Page 129 of 247
Driving comfortVehicle equipment
All standard, country-specific and optional
equipment that is offered in the model series is
described in this chapter. Therefore, equip‐
ment is also described that is not available in a
vehicle, e. g., because of the selected optional
equipment or country variant. This also applies
for safety-related functions and systems.
Active Cruise Control with Stop & Go function, ACC
The conceptThis system can be used to select a desired
speed that the vehicle will maintain automati‐
cally on clear roads.
To the extent possible, the system automati‐
cally adjusts the speed to a slower vehicle
ahead of you.
The distance that the vehicle maintains to the
vehicle ahead of you can be varied.
For safety reasons, it depends on the speed.
To maintain a certain distance, the system au‐
tomatically decelerates, applies the brakes
lightly, or accelerates again if the vehicle ahead
begins moving faster.
If the vehicle ahead of you brakes to a halt, the
system is able to detect this within the given
system limits. If the vehicle ahead of your
drives away again from a halt, your vehicle is
able to accelerate if operated accordingly.
Even if some time passes before the vehicle
drives away again, the BMW can still be accel‐
erated automatically and simply.
As soon as the road is clear, it accelerates to
the desired speed.
The speed is also maintained on downhill gra‐
dients, but may not be maintained on uphill
slopes if engine power is insufficient.General information
When ECO PRO is activated, cruise control is
also set to a driving style that saves on fuel
consumption.
Notes Personal responsibility
The system does not relieve the driver of
the responsibility to adapt his or her speed,
distance and driving style to the traffic condi‐
tions. Drive attentively, and react to the current
traffic events. Intervene actively when neces‐
sary, e.g., by braking, steering or making an
evasive maneuver, otherwise, there is danger
of an accident.◀
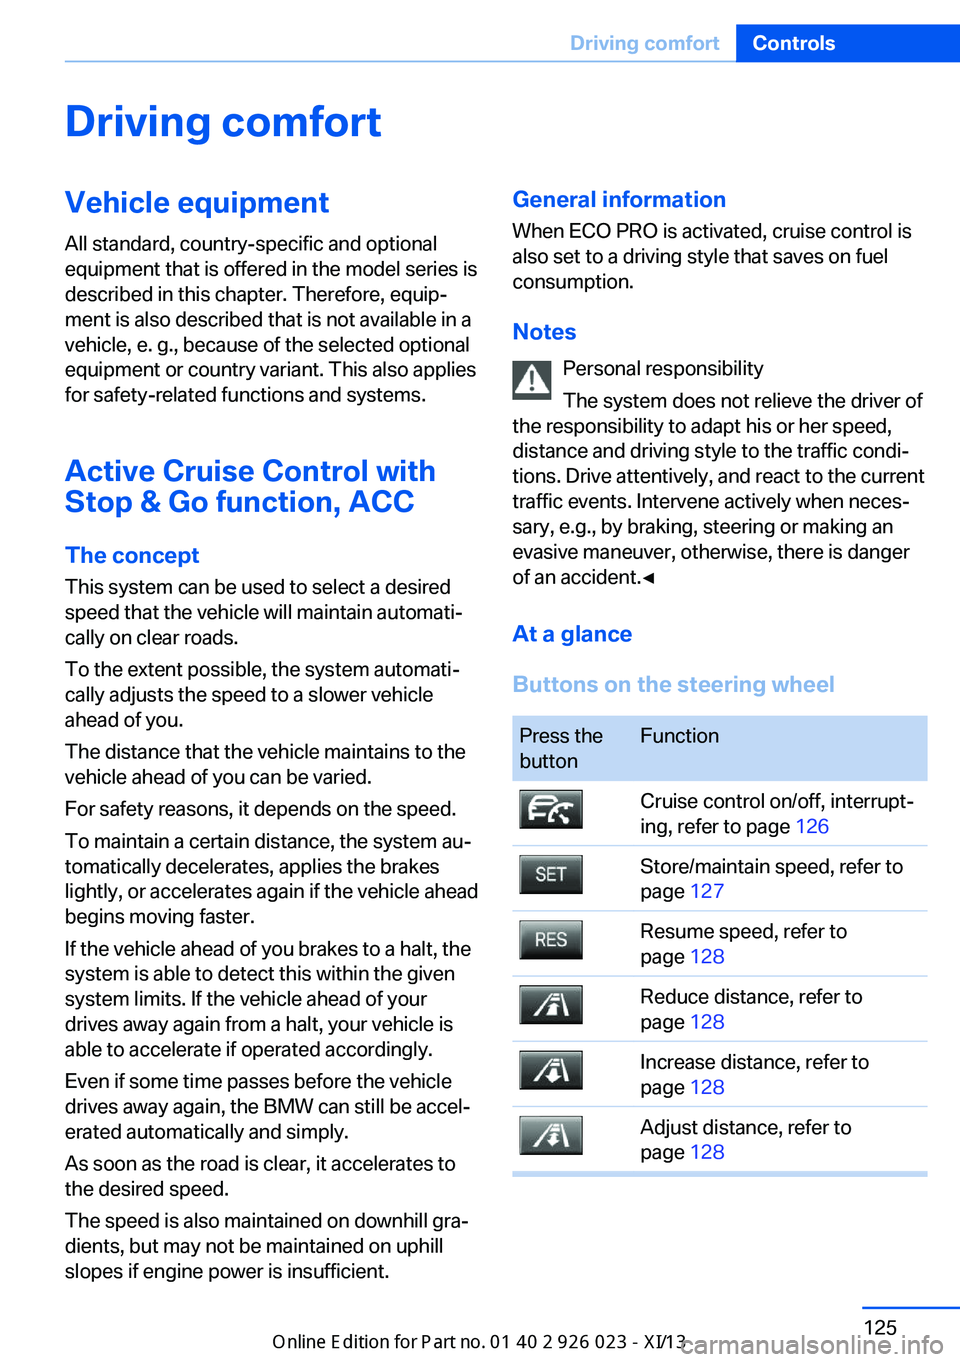
At a glance
Buttons on the steering wheelPress the
buttonFunctionCruise control on/off, interrupt‐
ing, refer to page 126Store/maintain speed, refer to
page 127Resume speed, refer to
page 128Reduce distance, refer to
page 128Increase distance, refer to
page 128Adjust distance, refer to
page 128Seite 125Driving comfortControls125
Online Edition for Part no. 01 40 2 909 877 - VI/13
Page 164 of 247
Interior equipmentVehicle equipmentAll standard, country-specific and optional
equipment that is offered in the model series is
described in this chapter. Therefore, equip‐
ment is also described that is not available in a
vehicle, e. g., because of the selected optional
equipment or country variant. This also applies
for safety-related functions and systems.
Integrated universal remote
control
The conceptThe integrated universal remote control can
operate up to 3 functions of remote-controlled
systems such as garage door drives or lighting
systems. The integrated universal remote con‐
trol replaces up to 3 different hand-held trans‐
mitters. To operate the remote control, the
buttons on the interior rearview mirror must be
programmed with the desired functions. The
hand-held transmitter for the particular system
is required in order to program the remote con‐
trol.
During programming
During programming and before activat‐
ing a device using the integrated universal re‐
mote control, ensure that there are no people,
animals, or objects in the range of movement
of the remote-controlled device; otherwise,
there is a risk of injury or damage.
Also follow the safety instructions of the hand-
held transmitter.◀
Before selling the vehicle, delete the stored
functions for the sake of security.Compatibility
If this symbol is printed on the packag‐
ing or in the instructions of the system
to be controlled, the system is gener‐
ally compatible with the integrated universal
remote control.
If you have any questions, please contact:▷Your service center.▷www.homelink.com on the Internet.
HomeLink is a registered trademark of John‐
son Controls, Inc.
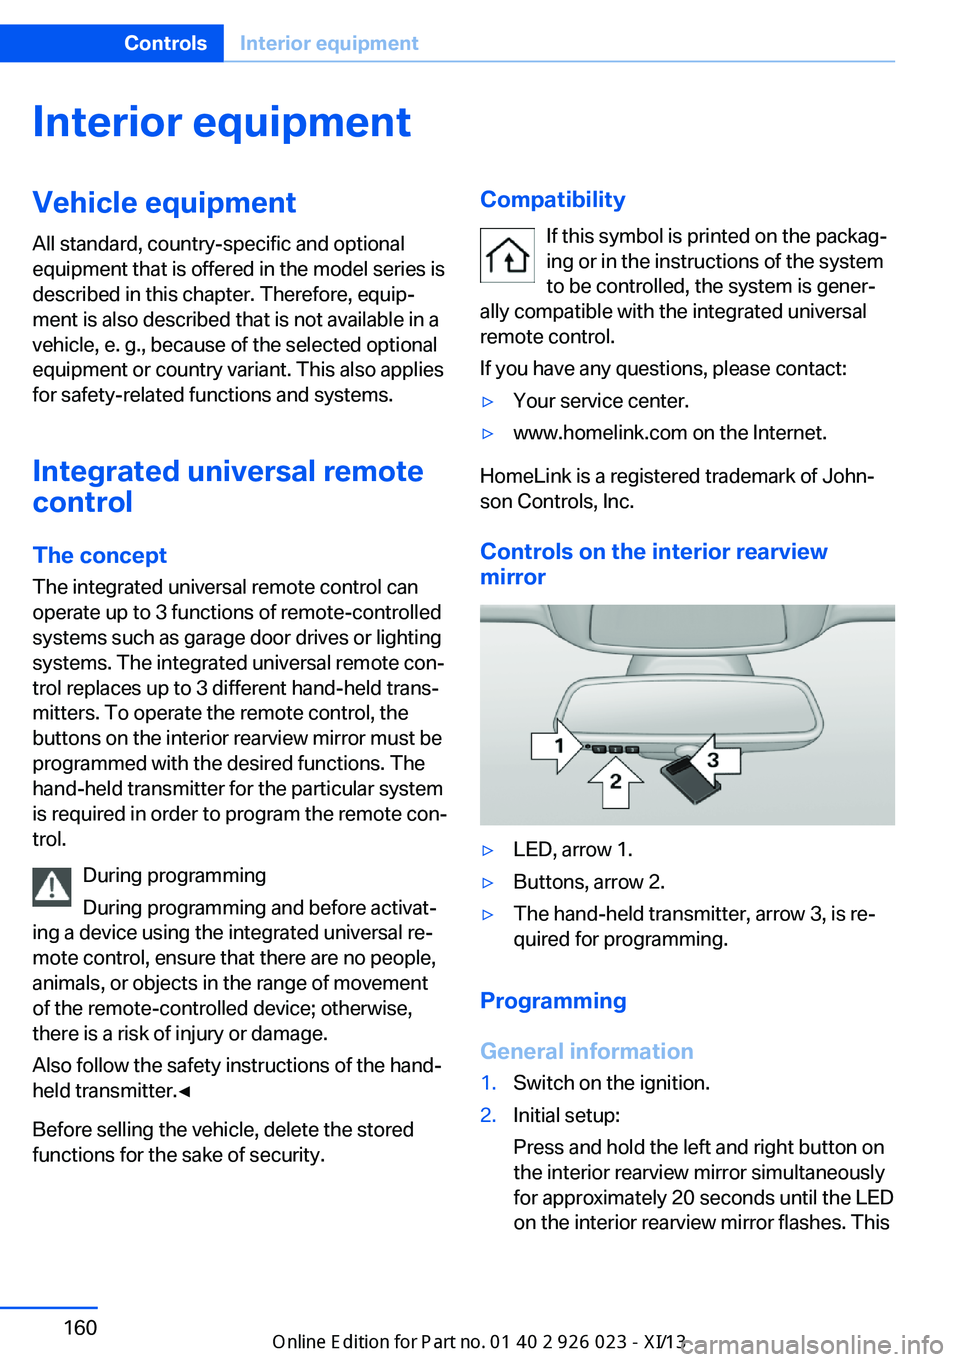
Controls on the interior rearview
mirror
▷LED, arrow 1.▷Buttons, arrow 2.▷The hand-held transmitter, arrow 3, is re‐
quired for programming.
Programming
General information
1.Switch on the ignition.2.Initial setup:
Press and hold the left and right button on
the interior rearview mirror simultaneously
for approximately 20 seconds until the LED
on the interior rearview mirror flashes. ThisSeite 160ControlsInterior equipment160
Online Edition for Part no. 01 40 2 909 877 - VI/13
Page 178 of 247

Things to remember when drivingVehicle equipment
All standard, country-specific and optional
equipment that is offered in the model series is
described in this chapter. Therefore, equip‐
ment is also described that is not available in a
vehicle, e. g., because of the selected optional
equipment or country variant. This also applies
for safety-related functions and systems.
Breaking-in period General information Moving parts need to be broken in to adjust to
each other.
The following instructions will help achieve a
long vehicle life and good economy.
Engine and differential Always obey the official speed limit.
Up to 1,200 miles/2,000 km
Do not exceed the maximum engine and road
speed:▷For gasoline engine 4,500 rpm and
100 mph/160 km/h.
Avoid full load or kickdown under all circum‐
stances.
From 1,200 miles/2,000 km The engine and vehicle speed can gradually be
increased.
Tires
Due to technical factors associated with their
manufacture, tires do not achieve their full
traction potential until after an initial breaking-
in period.
Drive conservatively for the first
200 miles/300 km.
Brake system
Brakes require an initial break-in period of ap‐
prox. 300 miles/500 km to achieve optimized
contact and wear patterns between brake
discs and brake pads. Drive moderately during
this break-in period.
Following part replacement
The same breaking in procedures should be
observed if any of the components mentioned
above have to be renewed in the course of the
vehicle's operating life.
General driving notes
Closing the trunk lid Drive with the trunk lid closed
Only drive with the tailgate closed; other‐
wise, in the event of an accident or braking and
evasive maneuvers, passengers and other road
users may be injured, and the vehicle may be
damaged. In addition, exhaust fumes may en‐
ter the passenger compartment.◀
If driving with the tailgate open cannot be
avoided:▷Close all windows and the glass sunroof.▷Greatly increase the blower speed.▷Drive moderately.
Hot exhaust system
Hot exhaust system
High temperatures are generated in the
exhaust system.
Do not remove the heat shields installed and
never apply undercoating to them. Make sure
that flammable materials, e. g. hay, leaves,
grass, etc. do not come in contact with the hot
exhaust system during driving, while in idle po‐
Seite 174Driving tipsThings to remember when driving174
Online Edition for Part no. 01 40 2 909 877 - VI/13
Page 185 of 247

Via the iDrive1."Settings"2."ECO PRO mode"
Or
1."Settings"2."Driving mode"3."Configure ECO PRO"
Configure the program.
ECO PRO Tip
▷"Tip at:":
Set ECO Pro speed at which an ECO PRO
Tip is to be displayed.▷"ECO PRO speed warning":
A reminder is displayed if the set ECO PRO
speed is exceeded.
ECO PRO climate control
"ECO PRO climate control"
The climate control is adjusted to be fuel-effi‐
cient.
By making a slight change to the set tempera‐
ture, or slowly adjusting the rate of heating or
cooling of the passenger compartment, fuel
consumption can be economized.
The outputs of the seat heater and the exterior
mirror heating are also reduced.
The exterior mirror heating is made available
when outside temperatures are very cold.
ECO PRO potentialThe percentage of potential savings that can
be achieved with the current configuration is
displayed.
Display in the instrument cluster
Display in the instrument display
When ECO PRO mode is activated, the display
switches to a special configuration.
Some of the displays may differ from the dis‐
play in the instrument cluster.
ECO PRO bonus range An extension of the range can
be achieved by an adjusted driv‐
ing style.
This may be displayed as the
bonus range in the instrument
cluster.
The bonus range is shown in the range display.
The bonus range is automatically reset every
time the vehicle is refueled.
Driving style
In the tachometer, a mark in the bar display in‐
dicates the current efficiency of the driving
style.
Mark in the CHARGE area, arrow 1: display for
energy recovered by coasting or when braking.
Mark in the POWER area, arrow 2: display
when accelerating.
The efficiency of the driving style is shown by
the color of the bar:
▷Blue display: efficient driving style as long
as the mark moves within the blue range.▷Gray display: adjust driving style, e. g. by
backing off the accelerator pedal.
The display switches to blue as soon as all
conditions for fuel-economy-optimized driving
are met.
Seite 181Saving fuelDriving tips181
Online Edition for Part no. 01 40 2 909 877 - VI/13
Page 186 of 247

ECO PRO Tip - driving instructionThe arrow indicates that the
driving style can be adjusted to
be more fuel efficient by backing
off the accelerator for instance.
Note The driving style display and ECO PRO tips in
the instrument cluster appear when the ECO
PRO display is activated.
Activating driving style and ECO PRO tips:1."Settings"2."Info display"3."ECO PRO Info"
In the instrument display:
1."Settings"2."Info display"3."Driving mode view"
ECO PRO tip - Symbols An additional symbol and a text instruction are
displayed.
SymbolMeasureFor efficient driving style, back off
the accelerator or delay accelerating
to allow time to assess road condi‐
tions.Reduce speed to the selected ECO
PRO speed.Automatic transmission: switch
from M/S to D and avoid manual
shift interventions.Indications on the Control Display
EfficientDynamics Information on fuel consumption and technol‐
ogy can be displayed during driving.1."Vehicle Info"2."EfficientDynamics"
Displaying fuel consumption history
The average fuel consumption can be dis‐
played within an adjustable time frame.
Vertical bars show consumption for the se‐
lected time frame.
Trip interruptions are represented below the
bar on the time axis.
"Consumption history"
Adjusting fuel consumption history time frame
Select the symbol.
Resetting fuel consumption history
1.Open "Options".2."Reset consumption history"
Displaying EfficientDynamics info
The current efficiency can be displayed.
"EfficientDynamics info"
The following systems are displayed:
▷Automatic engine start-stop function.▷Energy recovery.▷Climate control output.▷Coasting.
Display ECO PRO tips
"ECO PRO Tips"
The setting is stored for the profile currently in
use.
Seite 182Driving tipsSaving fuel182
Online Edition for Part no. 01 40 2 909 877 - VI/13
Page 187 of 247
Coasting
The concept The system helps to conserve fuel.
To do this, under certain conditions the engine
is automatically decoupled from the transmis‐
sion when transmission position D is engaged.
The vehicle continues traveling with the engine
idling to reduce fuel consumption. Transmis‐
sion position D remains engaged.
This driving condition is referred to as coast‐
ing.
As soon as the brake or accelerator pedal is depressed, the engine is automatically coupled
to the transmission again.
Hints
Coasting is a component of the ECO PRO, re‐
fer to page 180, driving mode.
The function is available in a certain speed
range.
A forward-looking driving style helps the driver
to use the function as often as possible and
supports the fuel-conserving effect of coast‐
ing.
Safety mode
The function is not available if one of the fol‐
lowing conditions is satisfied.▷DSC OFF or TRACTION activated.▷Driving in the dynamic limit range and on
steep uphill or downhill grades.▷Battery charge status temporarily too low
or vehicle electrical system drawing exces‐
sive current.▷Cruise control activated.
Functional requirements
In ECO PRO mode, this function is available in
a speed range from approximately 30 mph, ap‐
prox. 50 km/h to 100 mph, approx. 160 km/h, if
the following conditions are satisfied:
▷Accelerator pedal and brake pedal are not
operated.▷The selector lever is in transmission posi‐
tion D.▷Engine and transmission are at operating
temperature.
Display
Display in the instrument cluster The mark in the bar display be‐
low the tachometer is backlit in
blue and is located at the zero
point. The tachometer approxi‐
mately indicates idle speed.
The coasting point indicator is illuminated at
the zero point during coasting.
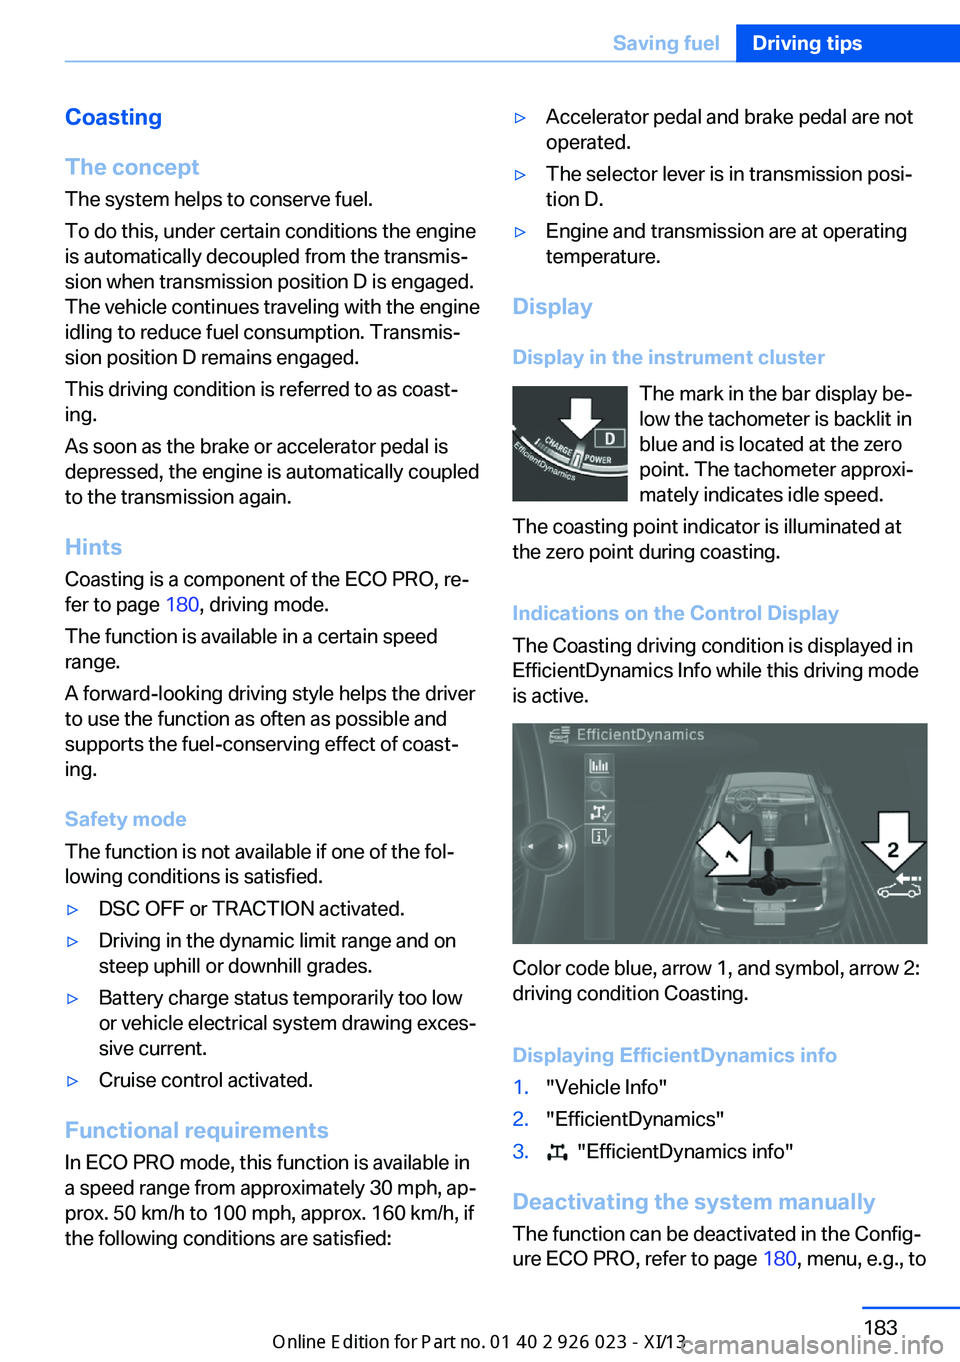
Indications on the Control Display
The Coasting driving condition is displayed in
EfficientDynamics Info while this driving mode
is active.
Color code blue, arrow 1, and symbol, arrow 2:
driving condition Coasting.
Displaying EfficientDynamics info
1."Vehicle Info"2."EfficientDynamics"3. "EfficientDynamics info"
Deactivating the system manually The function can be deactivated in the Config‐
ure ECO PRO, refer to page 180, menu, e.g., to
Seite 183Saving fuelDriving tips183
Online Edition for Part no. 01 40 2 909 877 - VI/13