2013 BMW 6 SERIES COUPE child restraint
[x] Cancel search: child restraintPage 58 of 241
Transporting children safelyVehicle equipmentAll standard, country-specific and optional
equipment that is offered in the model series is
described in this chapter. Therefore, equip‐
ment is also described that is not available in a
vehicle, e. g., because of the selected optional
equipment or country variant. This also applies
for safety-related functions and systems.
The right place for children Note Children in the vehicle
Do not leave children unattended in the
vehicle; otherwise, they could endanger them‐
selves and other persons, e.g., by opening the
doors.◀
Children should always be in the rear
Accident research shows that the safest place
for children is in the back seat.
Transporting children in the rear
Only transport children younger than
13 years of age or shorter than 5 ft/150 cm in
the rear in child restraint fixing systems pro‐
vided in accordance with the age, weight and
size of the child; otherwise, there is an in‐
creased risk of injury in an accident.
Children 13 years of age or older must wear a
safety belt as soon as a suitable child restraint
fixing system can no longer be used, due to
their age, weight and size.◀
Children on the front passenger seat
Should it ever be necessary to use a child re‐
straint fixing system in the front passenger
seat, make sure that the front, knee and side
airbags on the front passenger side are deacti‐vated. Automatic deactivation of front passen‐
ger side airbags, refer to page 93.
Note Deactivated front passenger airbags
If a child restraint fixing system is used in
the front passenger seat, the front passenger
airbags must be deactivated; otherwise, there
is an increased risk of injury to the child when
the airbags are triggered, even with a child re‐
straint fixing system.◀
Installing child restraint
fixing systems
Hints Manufacturer's information for child re‐
straint fixing systems
To select, mount and use child restraint fixing
systems, observe the information provided by
the system manufacturer; otherwise, the pro‐
tective effect can be impaired.◀
Lock the rear seat backrests in position
Before installing a child restraint system,
make sure that the rear seat backrests are
locked; otherwise, the protective effect is not
guaranteed and there is an increased risk of in‐
jury for the child in the event of an accident.◀
On the front passenger seat
Deactivating airbags
After installing a child restraint fixing system in
the front passenger seat, make sure that the
front, knee and side airbags on the front pas‐
senger side are deactivated.
Deactivate the front passenger airbags auto‐
matically, refer to page 93.Seite 54ControlsTransporting children safely54
Online Edition for Part no. 0140 2 910 771 - VI/13
Page 59 of 241
Deactivating the front passenger airbags
If a child restraint fixing system is used in
the front passenger seat, the front passenger
airbags must be deactivated; otherwise, there
is an increased risk of injury to the child when
the airbags are triggered, even with a child re‐
straint fixing system.◀
Seat position and height
Before installing a child restraint fixing system,
move the front passenger seat as far back as
possible and adjust its height to the highest
position to obtain the best possible position for
the belt and to offer optimal protection in the
event of an accident.
Do not change the seat position and height af‐
ter this.
Backrest width Adjustable backrest width: before installing a
child restraint fixing system in the front pas‐
senger seat, open the backrest width com‐
pletely. Do not change the backrest width
again and do not call up a memory position.
Backrest width for the child seat
Before installing a child restraint fixing
system in the front passenger seat, the back‐
rest width must be opened completely. Do not
change the adjustment after this; otherwise,
the stability of the child seat will be reduced.◀Child seat security
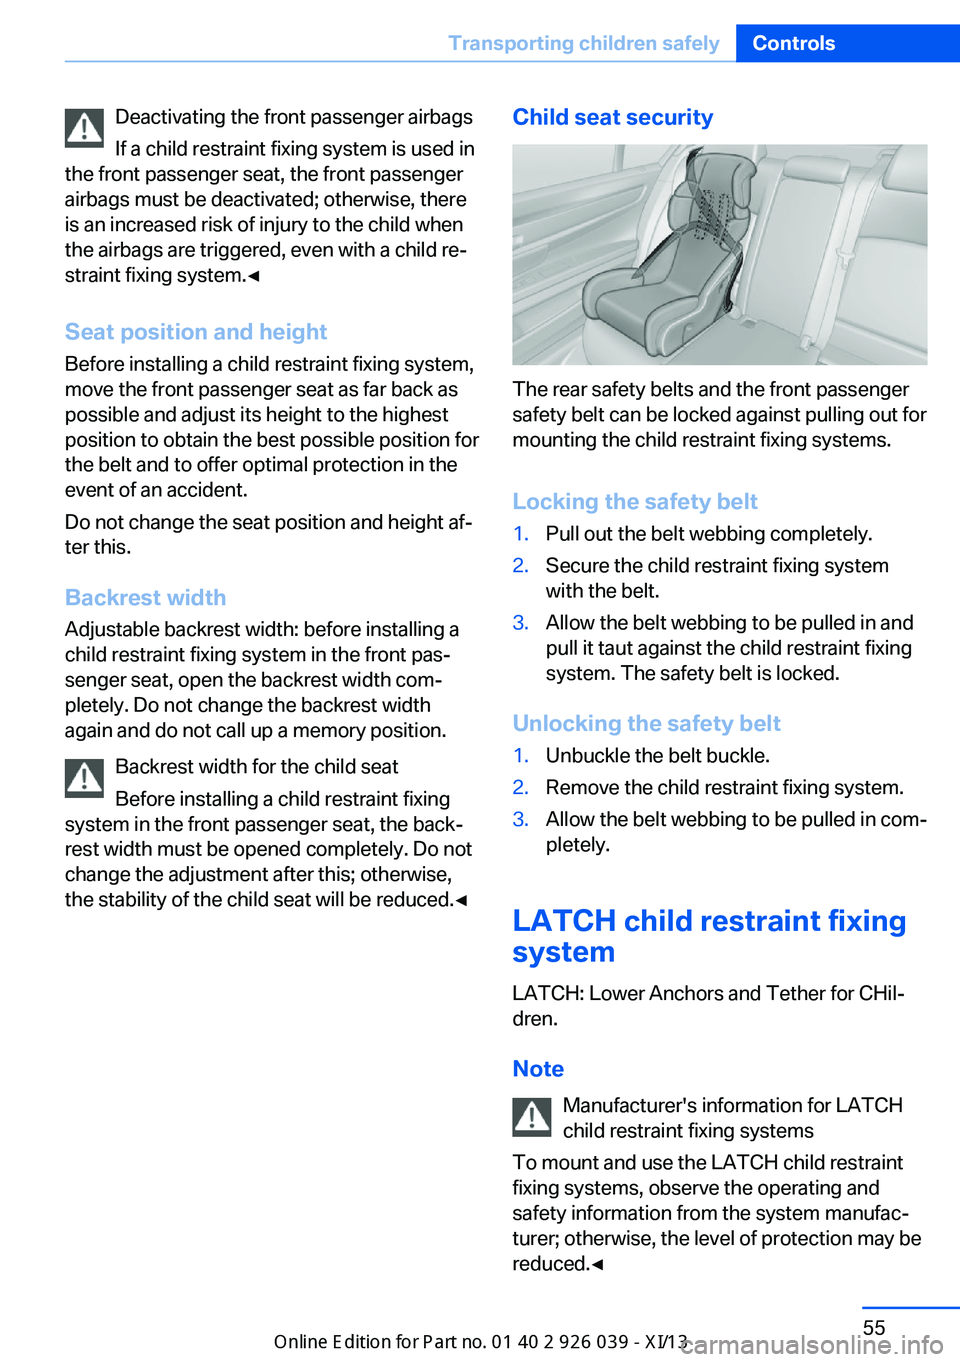
The rear safety belts and the front passenger
safety belt can be locked against pulling out for
mounting the child restraint fixing systems.
Locking the safety belt
1.Pull out the belt webbing completely.2.Secure the child restraint fixing system
with the belt.3.Allow the belt webbing to be pulled in and
pull it taut against the child restraint fixing
system. The safety belt is locked.
Unlocking the safety belt
1.Unbuckle the belt buckle.2.Remove the child restraint fixing system.3.Allow the belt webbing to be pulled in com‐
pletely.
LATCH child restraint fixing
system
LATCH: Lower Anchors and Tether for CHil‐dren.
Note Manufacturer's information for LATCH
child restraint fixing systems
To mount and use the LATCH child restraint
fixing systems, observe the operating and
safety information from the system manufac‐
turer; otherwise, the level of protection may be
reduced.◀
Seite 55Transporting children safelyControls55
Online Edition for Part no. 0140 2 910 771 - VI/13
Page 60 of 241
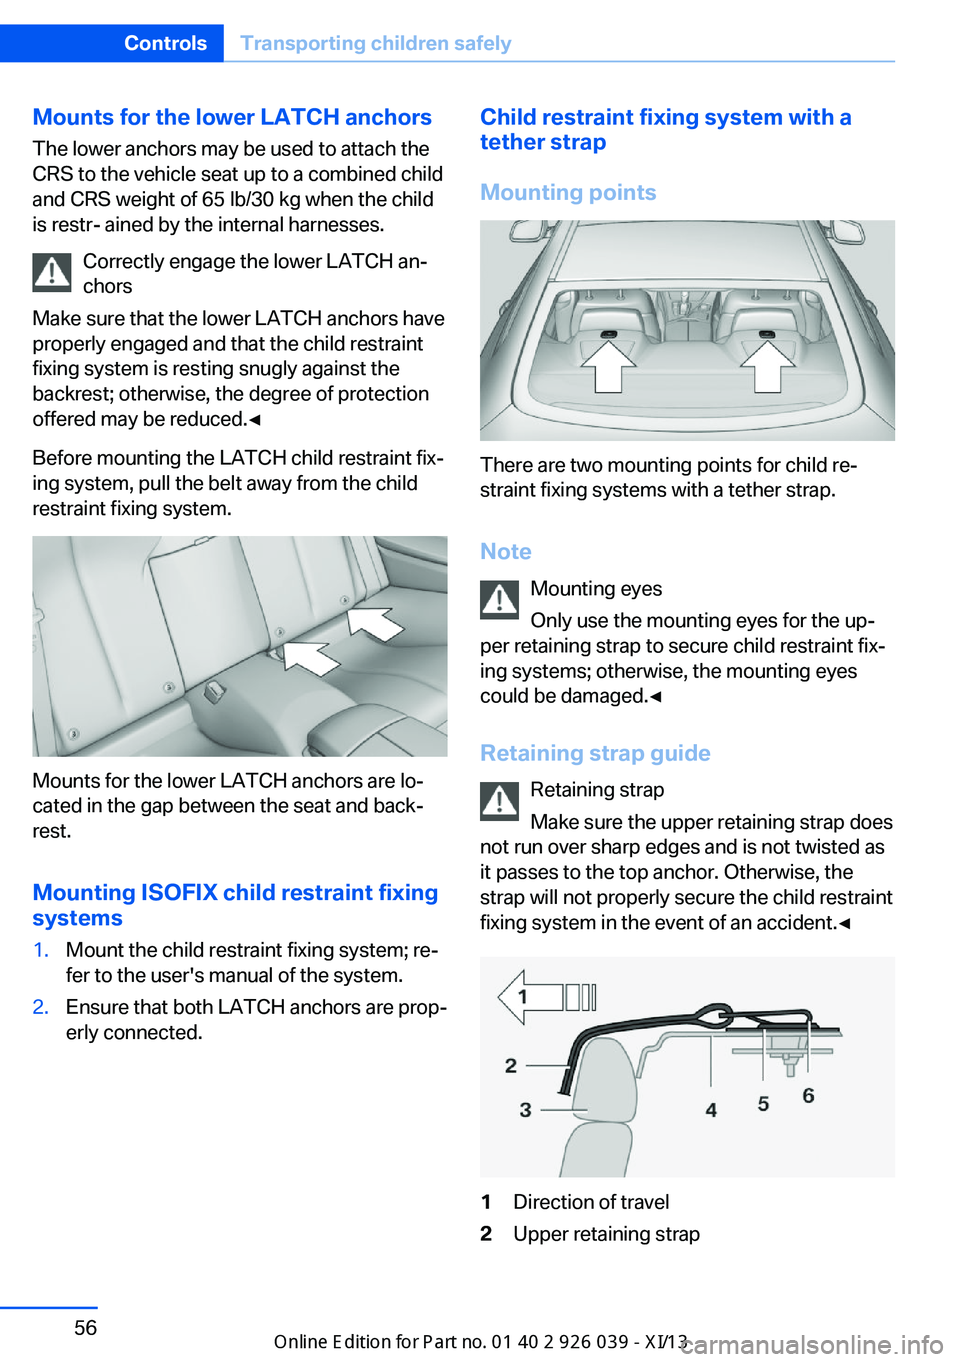
Mounts for the lower LATCH anchorsThe lower anchors may be used to attach the
CRS to the vehicle seat up to a combined child
and CRS weight of 65 lb/30 kg when the child
is restr- ained by the internal harnesses.
Correctly engage the lower LATCH an‐
chors
Make sure that the lower LATCH anchors have
properly engaged and that the child restraint
fixing system is resting snugly against the
backrest; otherwise, the degree of protection
offered may be reduced.◀
Before mounting the LATCH child restraint fix‐
ing system, pull the belt away from the child
restraint fixing system.
Mounts for the lower LATCH anchors are lo‐
cated in the gap between the seat and back‐
rest.
Mounting ISOFIX child restraint fixing systems
1.Mount the child restraint fixing system; re‐
fer to the user's manual of the system.2.Ensure that both LATCH anchors are prop‐
erly connected.Child restraint fixing system with a
tether strap
Mounting points
There are two mounting points for child re‐
straint fixing systems with a tether strap.
Note Mounting eyes
Only use the mounting eyes for the up‐
per retaining strap to secure child restraint fix‐
ing systems; otherwise, the mounting eyes
could be damaged.◀
Retaining strap guide Retaining strap
Make sure the upper retaining strap does
not run over sharp edges and is not twisted as
it passes to the top anchor. Otherwise, the
strap will not properly secure the child restraint
fixing system in the event of an accident.◀
1Direction of travel2Upper retaining strapSeite 56ControlsTransporting children safely56
Online Edition for Part no. 0140 2 910 771 - VI/13
Page 61 of 241
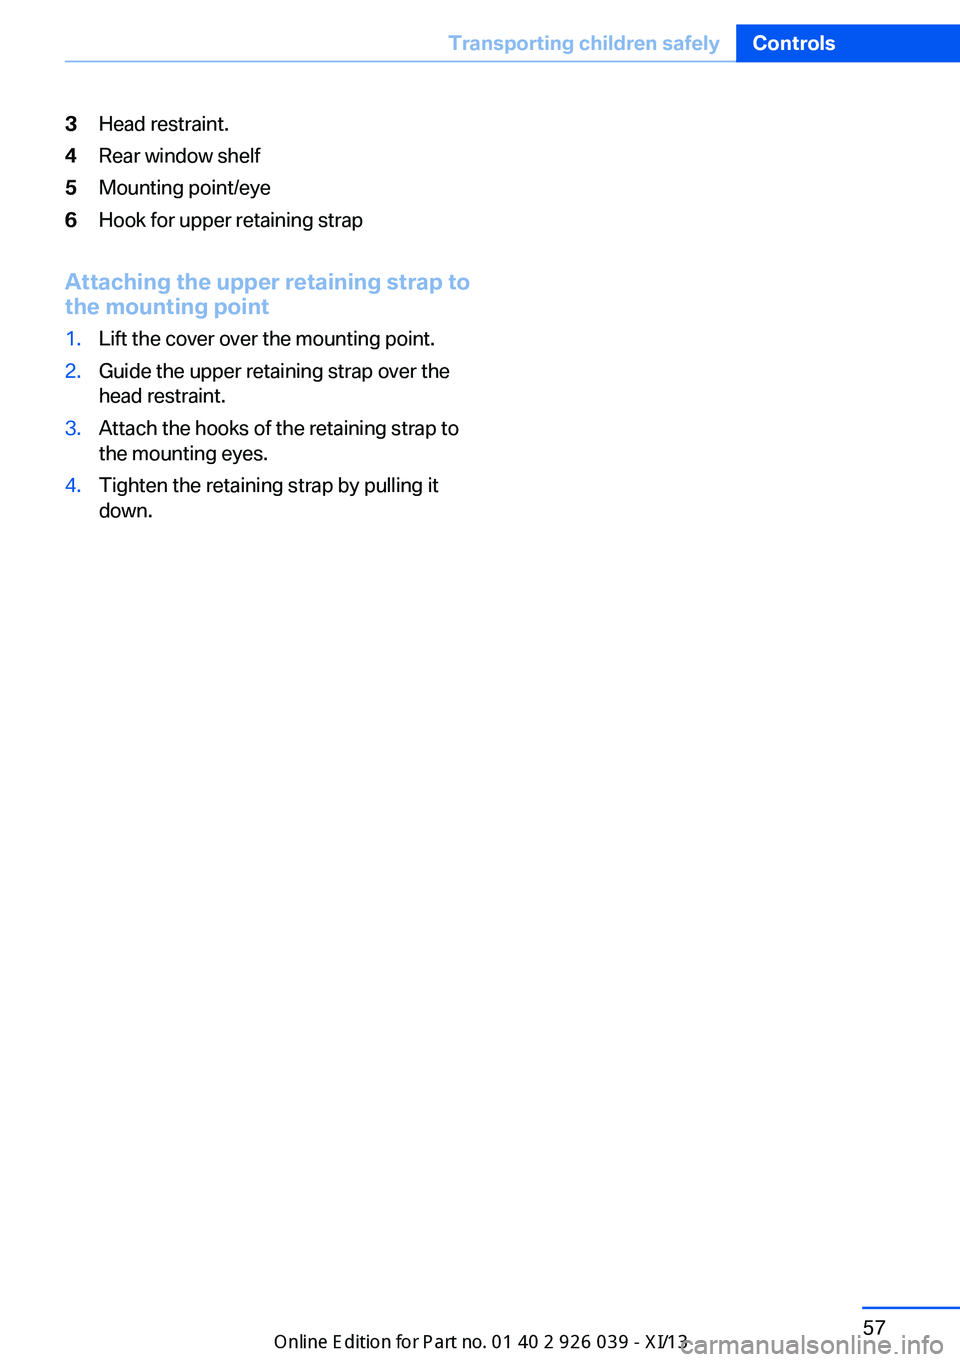
3Head restraint.4Rear window shelf5Mounting point/eye6Hook for upper retaining strap
Attaching the upper retaining strap to
the mounting point
1.Lift the cover over the mounting point.2.Guide the upper retaining strap over the
head restraint.3.Attach the hooks of the retaining strap to
the mounting eyes.4.Tighten the retaining strap by pulling it
down.Seite 57Transporting children safelyControls57
Online Edition for Part no. 0140 2 910 771 - VI/13
Page 97 of 241
When there is a malfunction, have the
airbag system checked immediately
When there is a malfunction, have the airbag
system checked immediately; otherwise, there
is a risk that the system does not function as
expected in the event of an accident despite
corresponding severity of the accident.◀
Automatic deactivation of the front passenger airbags
The system determines whether the front pas‐
senger seat is occupied by measuring the re‐
sistance of the human body.
The front, knee, and side airbag on the front passenger side are activated or deactivated
accordingly.
Leave feet in the footwell
Make sure that the front passenger
keeps his or her feet in the footwell; otherwise,
the front passenger airbags may not function properly.◀
Child restraint fixing system in the front
passenger seat
Before transporting a child on the front pas‐
senger seat, refer to the safety notes and in‐
structions under Children on the front passen‐
ger seat.◀
Malfunction of the automaticdeactivation system
When transporting older children and adults,
the front passenger airbags may be deacti‐
vated in certain sitting positions. In this case,
the indicator lamp for the front passenger air‐
bags lights up.
In this case, change the sitting position so that
the front passenger airbags are activated and
the indicator lamp goes out.
If it is not possible to activate the airbags, have
the person sit in the rear.
To make sure that the occupied seat cushion
can be evaluated correctly▷Do not attach covers, cushions, ball mats
or other items to the front passenger seat
unless they are specifically recommended
by the manufacturer of your vehicle.▷Do not place any electronic devices on the
passenger seat if a child restraint system is
to be installed on it.▷Do not place objects under the seat that
could press against the seat from below.
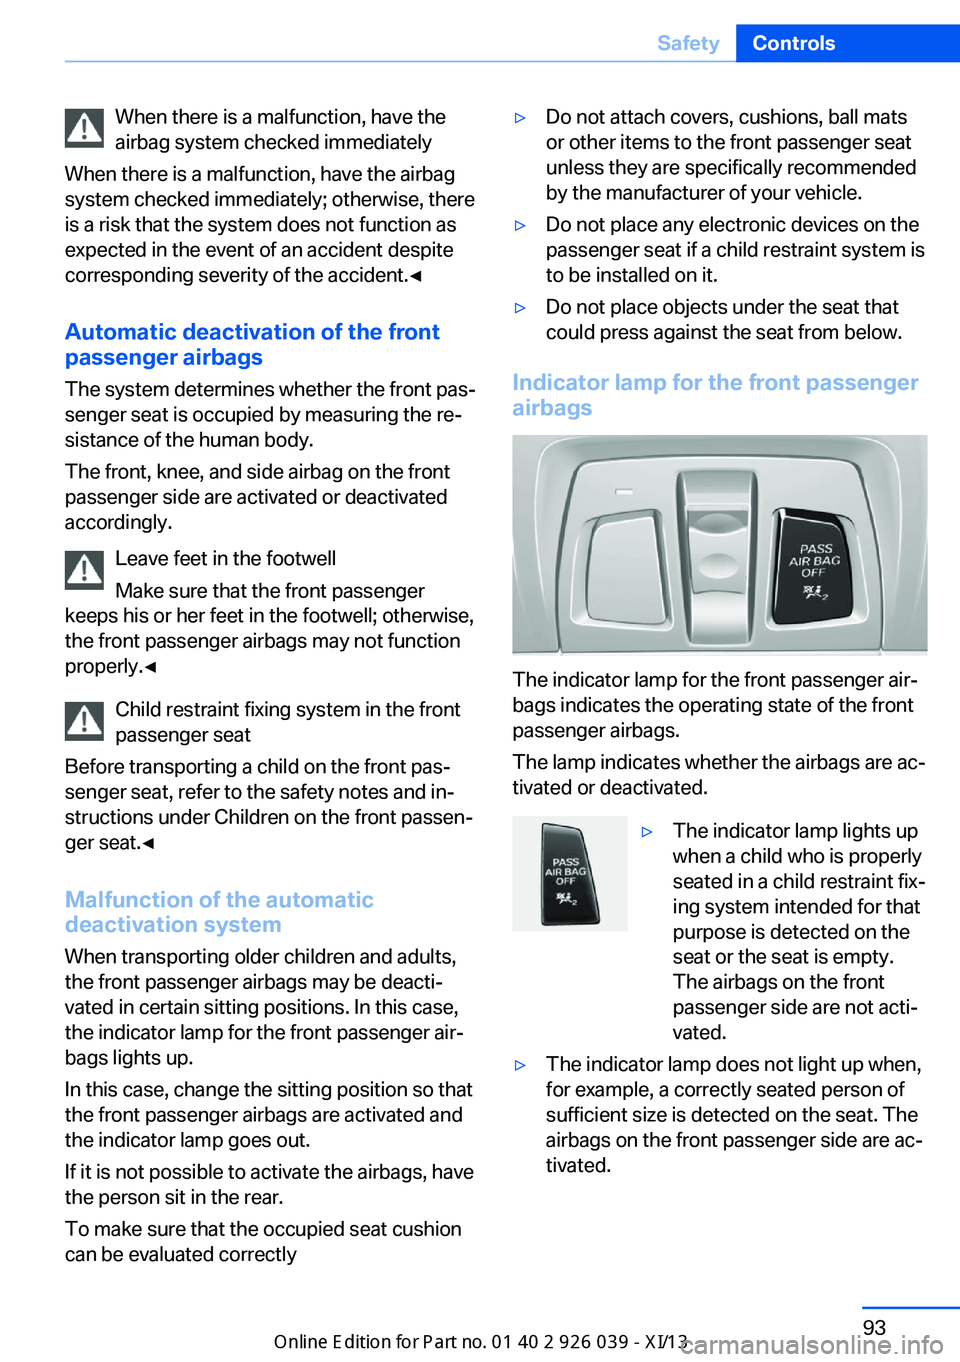
Indicator lamp for the front passenger
airbags
The indicator lamp for the front passenger air‐
bags indicates the operating state of the front
passenger airbags.
The lamp indicates whether the airbags are ac‐
tivated or deactivated.
▷The indicator lamp lights up
when a child who is properly
seated in a child restraint fix‐
ing system intended for that
purpose is detected on the
seat or the seat is empty.
The airbags on the front
passenger side are not acti‐
vated.▷The indicator lamp does not light up when,
for example, a correctly seated person of
sufficient size is detected on the seat. The
airbags on the front passenger side are ac‐
tivated.Seite 93SafetyControls93
Online Edition for Part no. 0140 2 910 771 - VI/13
Page 231 of 241

tertainment and Communi‐
cation
BMW Homepage 6
BMW Internet page 6
BMW maintenance sys‐ tem 202
Bonus range, ECO PRO 175
Bottle holder, refer to Cu‐ pholder 164
Brake assistant 116
Brake assistant, adaptive 116
Brake discs, breaking in 168
Brake force display 113
Brake lamps, brake force dis‐ play 113
Brake lamps, bulb replace‐ ment 206
Brake lights, adaptive 113
Brake pads, breaking in 168
Braking, hints 169
Breakdown assis‐ tance 210, 211
Breaking in 168
Brightness of Control Dis‐ play 85
Bulb replacement, front 204
Bulb replacement, rear 206
Button, RES 127
Button, Start/Stop 58
Bypassing, refer to Jump- starting 212
C
California Proposition 65 Warning 7
Calling up mirror adjust‐ ment 39
Calling up seat adjust‐ ment 39
Calling up steering wheel ad‐ justment 39
Camera, backup camera 138
Camera, care 218
Camera, Side View 143
Camera, Top View 141 Can holder, refer to Cu‐
pholder 164
Car battery 208
Car care products 216
Care, displays 218
Care, vehicle 216
Cargo 171
Cargo area lid 36
Cargo area, storage compart‐ ments 164
Cargo, securing 172
Cargo straps, securing cargo 172
Car key, refer to Remote con‐ trol 30
Carpet, care 218
Car wash 215
Catalytic converter, refer to Hot exhaust system 168
CBS Condition Based Serv‐ ice 202
CD/Multimedia, see user's manual for Navigation, En‐
tertainment and Communi‐
cation
Center console 14
Center-Lock, see button for central locking 33
Central locking system 33
Central screen, refer to Con‐ trol Display 16
Changes, technical, refer to Safety 7
Changing parts 204
Changing wheels 207
Changing wheels/tires 193
Check Control 75
Checking the oil level elec‐ tronically 199
Children, seating position 54
Children, transporting safely 54
Child restraint fixing sys‐ tem 54
Child restraint fixing system LATCH 55 Child restraint fixing systems,
mounting 54
Child seat, mounting 54
Child seats 54
Chrome parts, care 217
Cigarette lighter 159
Cleaning, displays 218
Climate control 151
Climate control laminated tinted safety glass 169
Climate control wind‐ shield 169
Clock 78
Closing/opening from in‐ side 36
Closing/opening via door lock 35
Closing/opening with remote control 34
Clothes hooks 164
Coasting 177
Coasting with engine decou‐ pled, coasting 177
Coasting with idling en‐ gine 177
Collision warning with braking function 100
Collision warning with City Braking function 103
Combination switch, refer to Turn signals 64
Combination switch, refer to Wiper system 65
COMFORT+ program, Driving Dynamics Control 122
Comfort Access 37
COMFORT program, Driving Dynamics Control 122
Computer 82
Condensation on win‐ dows 152
Condensation under the vehi‐ cle 170
Condition Based Service CBS 202
Configure driving mode 122 Seite 227Everything from A to ZReference227
Online Edition for Part no. 0140 2 910 771 - VI/13
Page 234 of 241

Heavy cargo, stowing 172
Height, seats 45
Height, vehicle 222
High-beam Assistant 88
High beams 65
High beams/low beams, refer to High-beam Assistant 88
Hill Descent Control HDC 118
Hills 170
Hill start assistant, refer to Drive-off assistant 116
Hints 6
Holder for beverages 164
Homepage 6
Hood 197
Horn 12
Hotel function, trunk lid 37
Hot exhaust system 168
HUD Head-Up Display 148
Hydroplaning 169
I Ice warning, refer to External temperature warning 78
Icy roads, refer to External temperature warning 78
Identification marks, tires 191
Identification number, refer to Important features in the en‐
gine compartment 197
iDrive 16
Ignition key, refer to Remote control 30
Ignition off 58
Ignition on 58
Indication of a flat tire 95, 98
Indicator and warning lamps 75
Individual air distribution 152
Individual settings, refer to Personal Profile 31
Inflation pressure, tires 185
Inflation pressure warning FTM, tires 97 Info display, refer to Com‐
puter 82
Initialization, Integral Active Steering 120
Initialize, Tire Pressure Moni‐ tor TPM 95
Initializing, Flat Tire Monitor FTM 98
Instrument cluster 71
Instrument cluster, electronic displays 72
Instrument display, multifunc‐ tional 72
Instrument lighting 89
Integral Active Steering 119
Integrated key 30
Integrated universal remote control 157
Intelligent Emergency Re‐ quest 210
Intelligent Safety 99
Intensity, AUTO pro‐ gram 152
Interior equipment 157
Interior lamps 89
Interior lamps via remote con‐ trol 34
Interior motion sensor 41
Interior rearview mirror, auto‐ matic dimming feature 52
Internet page 6
Interval display, service re‐ quirements 79
J Jacking points for the vehicle jack 207
Joystick, automatic transmis‐ sion 68
Jump-starting 212
K
Key/remote control 30 Keyless Go, refer to Comfort
Access 37
Key Memory, refer to Per‐ sonal Profile 31
Kickdown, automatic trans‐ mission 68
Knee airbag 91
L Lamp replacement, front 204
Lamp replacement, rear 206
Lamps 86
Lamps and bulbs 204
Lane departure warning 110
Lane margin, warning 110
Language on Control Dis‐ play 85
Lashing eyes, securing cargo 172
LATCH child restraint fixing system 55
Leather, care 216
LED headlamps, Bulb re‐ placement 206
LED light 206
LEDs, light-emitting di‐ odes 205
Length, vehicle 223
Letters and numbers, enter‐ ing 21
License plate lamp, bulb re‐ placement 206
Light alloy wheels, care 217
Light control 87
Light-emitting diodes, LEDs 205
Lighting 86
Lighting, speaker 90
Lighting via remote con‐ trol 34
Light switch 86
Load 171
Loading 171
Lock, door 35 Seite 230ReferenceEverything from A to Z230
Online Edition for Part no. 0140 2 910 771 - VI/13
Page 235 of 241

Locking/unlocking from in‐side 36
Locking/unlocking via door lock 35
Locking/unlocking with re‐ mote control 34
Locking, automatic 39
Locking, central 33
Locking, settings 39
Locking via trunk lid 37
Low beams 86
Low beams, automatic, refer to High-beam Assistant 88
Lower back support 46
Lumbar support 46
M
Maintenance 202
Maintenance require‐ ments 202
Maintenance, service require‐ ments 79
Maintenance system, BMW 202
Malfunction displays, refer to Check Control 75
Manual air distribution 152
Manual air flow 152
Manual brake, refer to Parking brake 62
Manual mode, transmis‐ sion 69
Manual operation, backup camera 139
Manual operation, door lock 36
Manual operation, exterior mirrors 52
Manual operation, fuel filler flap 182
Manual operation, Park Dis‐ tance Control PDC 136
Manual operation, Side View 143 Manual operation, Top
View 141
Marking on approved tires 194
Marking, run-flat tires 195
Massage seat, front 47
Master key, refer to Remote control 30
Maximum cooling 153
Maximum speed, display 80
Maximum speed, winter tires 194
Measure, units of 85
Medical kit 211
Memory for seat, mirrors, steering wheel 50
Menu, EfficientDynamics 176
Menu in instrument clus‐ ter 82
Menus, operating, iDrive 16
Menus, refer to iDrive operat‐ ing concept 17
Messages, refer to Check Control 75
Microfilter 154
Minimum tread, tires 193
Mirror 51
Mirror memory 50
Mobile communication devi‐ ces in the vehicle 169
Modifications, technical, refer to Safety 7
Moisture in headlamp 205
Monitor, refer to Control Dis‐ play 16
Mounting of child restraint fix‐ ing systems 54
Multifunctional instrument display 72
Multifunction steering wheel, buttons 12 N
Navigation, see user's manual for Navigation, Entertain‐
ment and Communication
Neck restraints, front, refer to Head restraints 49
Neutral cleaner, see wheel cleaner 217
New wheels and tires 193
Night Vision with pedestrian detection 107
No Passing Information 80
Nylon rope for tow-starting/ towing 214
O OBD Onboard Diagnosis 203
OBD, see OBD Onboard Di‐ agnosis 203
Obstacle marking, rearview camera 140
Octane rating, refer to Gaso‐ line quality 184
Odometer 78
Office, see user's manual for Navigation, Entertainment
and Communication
Oil 199
Oil, adding 200
Oil additives 200
Oil change 200
Oil change interval, service requirements 79
Oil filler neck 200
Oil types, alternative 200
Oil types, approved 200
Old batteries, disposal 208
Onboard monitor, refer to Control Display 16
Onboard vehicle tool kit 204
Opening and closing 30
Opening and closing, from in‐ side 36 Seite 231Everything from A to ZReference231
Online Edition for Part no. 0140 2 910 771 - VI/13