2013 BMW 550I XDRIVE ECU
[x] Cancel search: ECUPage 174 of 246
Pulsation of the brake pedal and sounds from
the hydraulic circuits indicate that ABS is in its
active mode.
Objects in the area around the pedals No objects in the area around the pedals
Keep floor mats, carpets, and any other
objects out of the area of motion of the pedals;
otherwise, the function of the pedals could be
impeded while driving
Do not place additional floor mats over existing
mats or other objects.
Only use floor mats that have been approved for
the vehicle and can be properly fixed in place.
Ensure that the floor mats are securely fastened
again after they were removed for cleaning, for
example.◀
Driving in wet conditions
When roads are wet or there is heavy rain, briefly
exert gentle pressure on the brake pedal every
few miles.
Ensure that this action does not endanger other
road users.
The heat generated in this process helps dry the
brake discs and pads.
In this way braking efficiency will be available
when you need it.
Hills
Drive long or steep downhill gradients in the gear
in which the least braking is required. Otherwise,
the brake system may overheat, resulting in a
reduction in the brake system efficiency.
You can increase the engine's braking effect by
shifting down, going all the way to first gear, if
necessary.
Avoid load on the brakes
Avoid placing excessive load on the brake
system. Light but consistent brake pressure can
lead to high temperatures, brake wear and pos‐
sibly even brake failure.◀Do not drive in neutral
Do not drive in neutral or with the engine
stopped, as doing so disables engine braking. In
addition, steering and brake assist is unavailable
with the engine stopped.◀
Brake disc corrosion
Corrosion on the brake discs and contamination
on the brake pads are furthered by:▷Low mileage.▷Extended periods when the vehicle is not
used at all.▷Infrequent use of the brakes.
Corrosion occurs when the minimum pressure
that must be exerted by the pads during brake
applications to clean the discs is not reached.
Should corrosion form on the brake discs, the
brakes will tend to respond with a pulsating ef‐
fect that generally cannot be corrected.
Condensation under the parked vehicle
When using the automatic climate control, con‐
densation water develops that exits underneath
the vehicle.
Traces of water under the vehicle like this are
normal.
Seite 174Driving tipsThings to remember when driving174
Online Edition for Part no. 01 40 2 917 522 - II/13
Page 176 of 246
Stowing cargo▷Cover sharp edges and corners on the
cargo.▷Heavy cargo: stow as far forward as possi‐
ble, directly behind and at the bottom of the
rear passenger seat backrests.▷Very heavy cargo: when the rear seat is not
occupied, secure each of the outer safety
belts in the opposite buckle.▷If necessary, fold down the rear backrests to
stow cargo.▷Do not stack cargo above the top edge of the
backrests.
Securing cargo
Lashing eyes in the cargo area
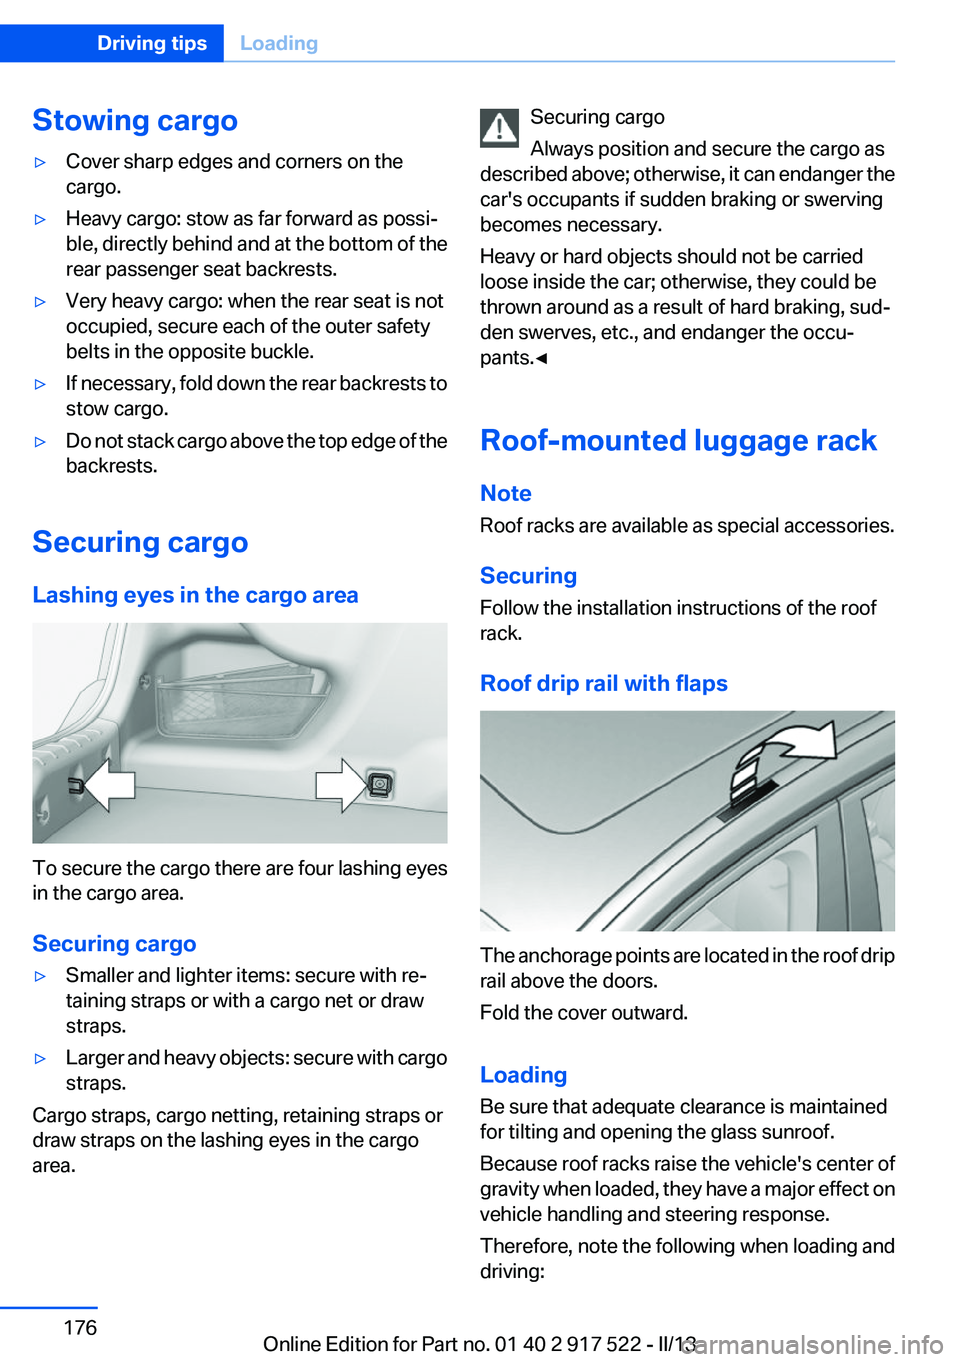
To secure the cargo there are four lashing eyes
in the cargo area.
Securing cargo
▷Smaller and lighter items: secure with re‐
taining straps or with a cargo net or draw
straps.▷Larger and heavy objects: secure with cargo
straps.
Cargo straps, cargo netting, retaining straps or
draw straps on the lashing eyes in the cargo
area.
Securing cargo
Always position and secure the cargo as
described above; otherwise, it can endanger the
car's occupants if sudden braking or swerving
becomes necessary.
Heavy or hard objects should not be carried
loose inside the car; otherwise, they could be
thrown around as a result of hard braking, sud‐
den swerves, etc., and endanger the occu‐
pants.◀
Roof-mounted luggage rack
Note
Roof racks are available as special accessories.
Securing
Follow the installation instructions of the roof
rack.
Roof drip rail with flaps
The anchorage points are located in the roof drip
rail above the doors.
Fold the cover outward.
Loading
Be sure that adequate clearance is maintained
for tilting and opening the glass sunroof.
Because roof racks raise the vehicle's center of
gravity when loaded, they have a major effect on
vehicle handling and steering response.
Therefore, note the following when loading and
driving:
Seite 176Driving tipsLoading176
Online Edition for Part no. 01 40 2 917 522 - II/13
Page 177 of 246
▷Do not exceed the approved roof/axle loads
and the approved gross vehicle weight.▷Distribute the roof load uniformly.▷The roof load should not be too large in area.▷Always place the heaviest pieces on the bot‐
tom.▷Secure the roof luggage firmly, e.g., tie with
ratchet straps.▷Do not let objects project into the opening
path of the trunk lid.▷Drive cautiously and avoid sudden acceler‐
ation and braking maneuvers. Take corners
gently.Seite 177LoadingDriving tips177
Online Edition for Part no. 01 40 2 917 522 - II/13
Page 205 of 246
Never reach into the engine compartment
Never reach into the intermediate spaces
or gaps in the engine compartment. Otherwise,
there is risk of injury, e.g. from rotating or hot
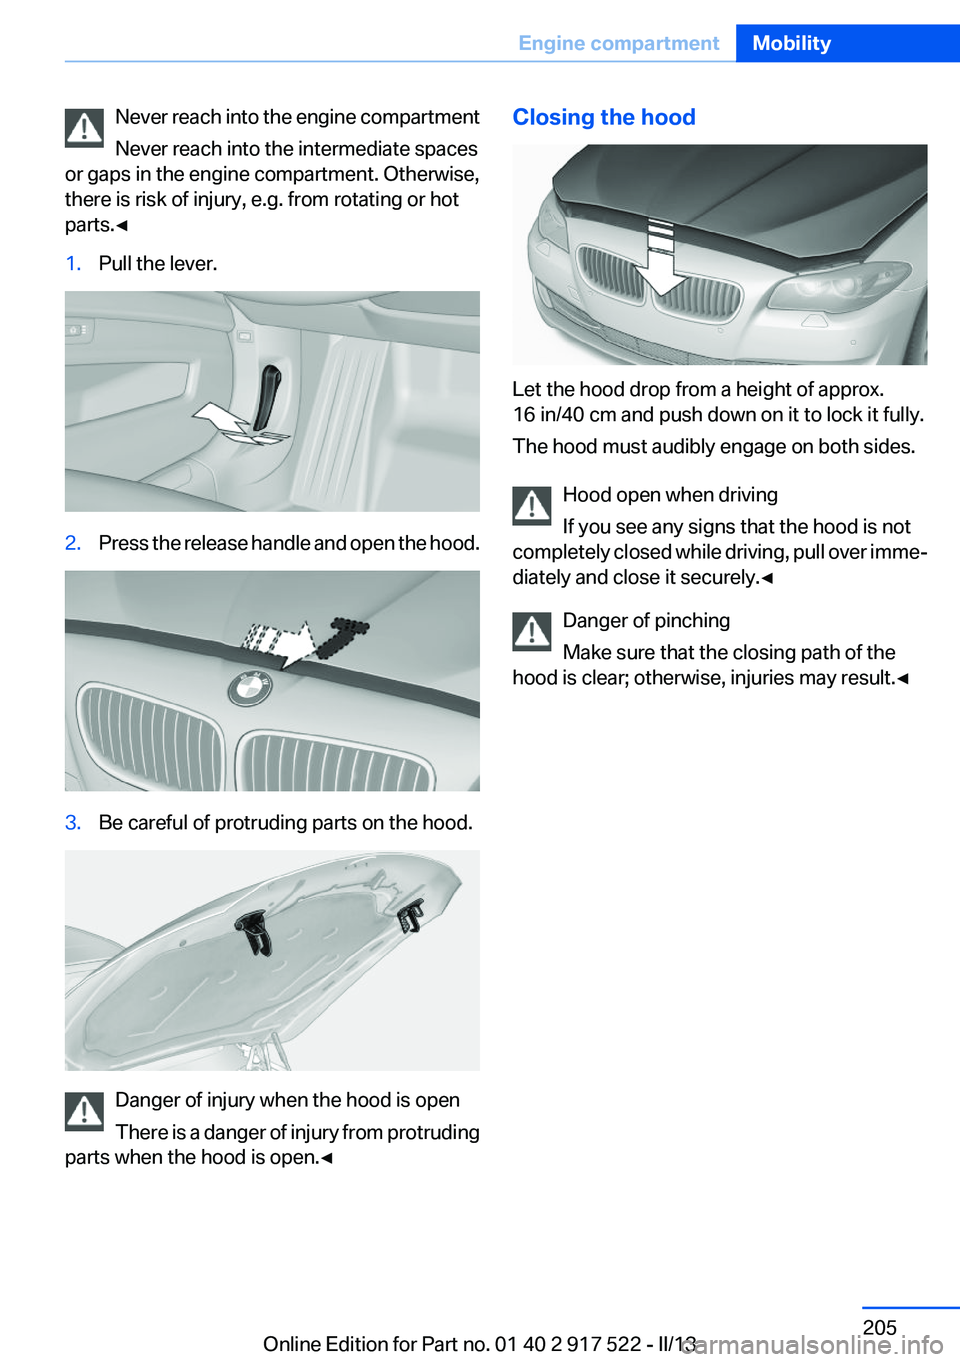
parts.◀1.Pull the lever.2.Press the release handle and open the hood.3.Be careful of protruding parts on the hood.
Danger of injury when the hood is open
There is a danger of injury from protruding
parts when the hood is open.◀
Closing the hood
Let the hood drop from a height of approx.
16 in/40 cm and push down on it to lock it fully.
The hood must audibly engage on both sides.
Hood open when driving
If you see any signs that the hood is not
completely closed while driving, pull over imme‐
diately and close it securely.◀
Danger of pinching
Make sure that the closing path of the
hood is clear; otherwise, injuries may result.◀
Seite 205Engine compartmentMobility205
Online Edition for Part no. 01 40 2 917 522 - II/13
Page 219 of 246
Starting aid terminals
In the vehicle, only charge the battery via the
starting aid terminals, refer to page 222, in the
engine compartment with the engine off.
Power failure
After a temporary power loss, some equipment
needs to be reinitialized.
Individual settings need to be reprogrammed:▷Seat, mirror, and steering wheel memory:
store the positions again.▷Time: update.▷Date: update.▷Radio station: save again.▷Navigation system: wait for the operability of
the navigation.
Disposing of old batteries
Have old batteries disposed of by your
service center or bring them to a recy‐
cling center.
Maintain the battery in an upright position for
transport and storage. Secure the battery so
that it does not tip over during transport.
Fuses
Notes Replacing fuses
Never attempt to repair a blown fuse and
do not replace a defective fuse with a substitute
of another color or amperage rating; this could
lead to a circuit overload, ultimately resulting in
a fire in the vehicle.◀
Plastic tweezers and information on the fuse
types and locations are stored in the fuse box in
the cargo area.
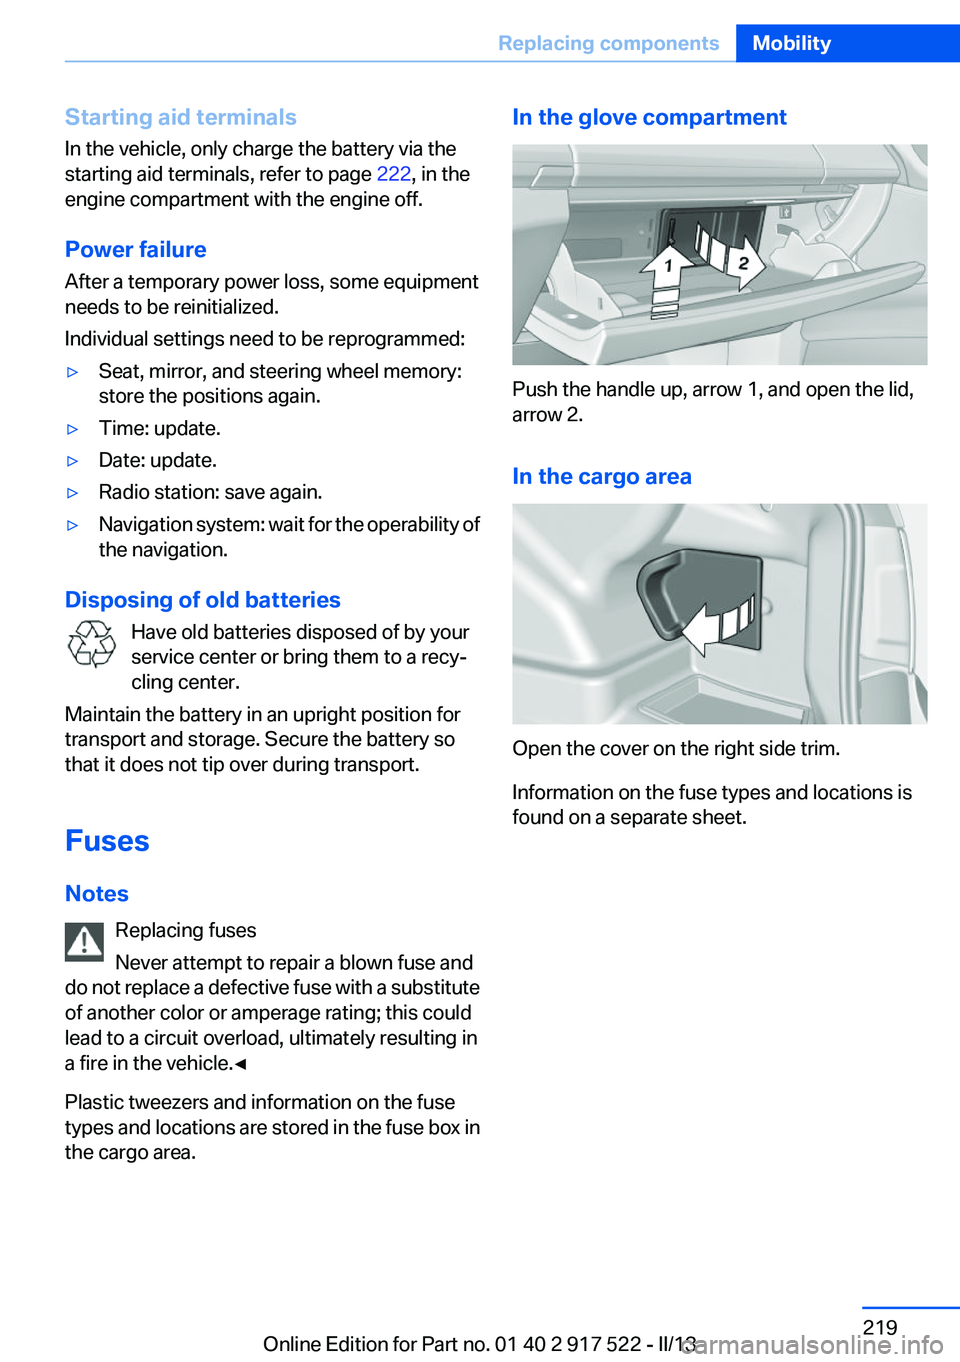
In the glove compartment
Push the handle up, arrow 1, and open the lid,
arrow 2.
In the cargo area
Open the cover on the right side trim.
Information on the fuse types and locations is
found on a separate sheet.
Seite 219Replacing componentsMobility219
Online Edition for Part no. 01 40 2 917 522 - II/13
Page 224 of 246
Do not lift the vehicle
Do not lift the vehicle by the tow fitting or
body and chassis parts; otherwise, damage may
result.◀
Towing other vehicles
General information Light towing vehicle
The towing vehicle must not be lighter
than the vehicle being towed; otherwise, it will
not be possible to control the vehicle re‐
sponse.◀
Attaching the tow bar/tow rope correctly
Attach the tow bar or tow rope to the tow
fitting; connecting it to other vehicle parts may
cause damage.◀▷Switch on the hazard warning system, de‐
pending on local regulations.▷If the electrical system has failed, clearly
identify the vehicle being towed by placing
a sign or a warning triangle in the rear win‐
dow.
Tow bar
The tow fittings used should be on the same
side on both vehicles.
Should it prove impossible to avoid mounting
the tow bar at an offset angle, please observe
the following:
▷Maneuvering capability is limited during cor‐
nering.▷The tow bar will generate lateral forces if it
is secured with an offset.
Tow rope
When starting to tow the vehicle, make sure that
the tow rope is taut.
To avoid jerking and the associated stresses on
the vehicle components when towing, always
use nylon ropes or nylon straps.
Attaching the tow rope correctly
Only secure the tow rope on the tow fit‐
ting; otherwise, damage can occur when it is se‐
cured on other parts of the vehicle.◀
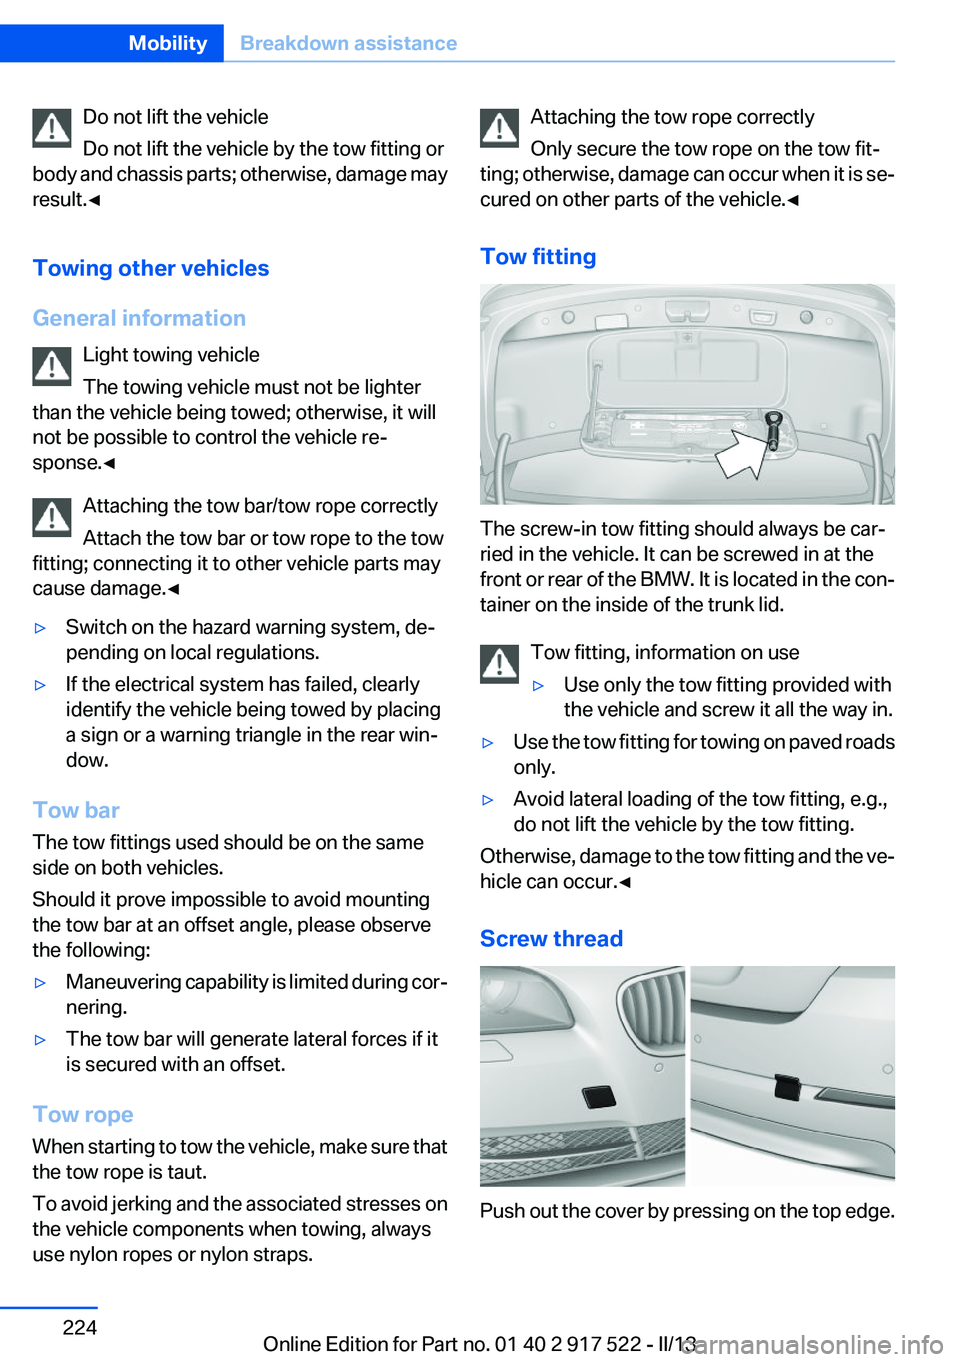
Tow fitting
The screw-in tow fitting should always be car‐
ried in the vehicle. It can be screwed in at the
front or rear of the BMW. It is located in the con‐
tainer on the inside of the trunk lid.
Tow fitting, information on use
▷Use only the tow fitting provided with
the vehicle and screw it all the way in.▷Use the tow fitting for towing on paved roads
only.▷Avoid lateral loading of the tow fitting, e.g.,
do not lift the vehicle by the tow fitting.
Otherwise, damage to the tow fitting and the ve‐
hicle can occur.◀
Screw thread
Push out the cover by pressing on the top edge.
Seite 224MobilityBreakdown assistance224
Online Edition for Part no. 01 40 2 917 522 - II/13
Page 229 of 246
Do not place additional floor mats over existing
mats or other objects.
Only use floor mats that have been approved for
the vehicle and can be properly fixed in place.
Ensure that the floor mats are securely fastened
again after they were removed for cleaning, for
example.◀
Floor mats can be removed from the passenger
compartment for cleaning.
If the floor carpets are very dirty, clean with a
microfiber cloth and water or a textile cleaner. To
prevent matting of the carpet, rub back and forth
in the direction of travel only.
Sensors/cameras
To clean sensors and cameras, use a cloth mois‐
tened with a small amount of glass cleaner.
Displays/screens
Clean the displays with an antistatic microfiber
cloth.
Cleaning displays
Do not use chemical or household cleans‐
ers.
Keep all fluids and moisture away from the unit.
Otherwise, they could affect or damage surfa‐
ces or electrical components.
Avoid pressing too hard when cleaning and do
not use abrasive materials; otherwise, damage
can result.◀
Long-term vehicle storage
Your service center can advise you on what to
consider when storing the vehicle for longer
than three months.Seite 229CareMobility229
Online Edition for Part no. 01 40 2 917 522 - II/13
Page 237 of 246
tainment and Communica‐
tion
BMW Homepage 6
BMW Internet page 6
BMW maintenance sys‐ tem 210
Bonus range, ECO PRO 180
Bottle holder, refer to Cu‐ pholder 166
Brake assistant 119
Brake assistant, adaptive 119
Brake discs, breaking in 172
Brake force display 117
Brake lamps, brake force dis‐ play 117
Brake lamps, bulb replace‐ ment 217
Brake lights, adaptive 117
Brake pads, breaking in 172
Braking, notes 173
Breakdown assis‐ tance 220, 221
Breaking in 172
Brightness of Control Dis‐ play 92
Bulb replacement 212
Bulb replacement, front 213
Bulb replacement, rear 216
Bulbs and lamps 212
Button, RES 128
Button, Start/Stop 62
Bypassing, refer to Jump- starting 221
C
California Proposition 65 Warning 7
Camera, backup camera 137
Camera, care 229
Camera, Side View 141
Camera, Top View 139
Can holder, refer to Cu‐ pholder 166
Car battery 218
Car care products 227 Care, displays 229
Care, vehicle 227
Cargo 175
Cargo area, enlarging 160
Cargo area lid 37
Cargo area, storage compart‐ ments 167
Cargo straps, securing cargo 176
Car key, refer to Remote con‐ trol 30
Carpet, care 228
Car wash 226
Catalytic converter, refer to Hot exhaust system 173
CBS Condition Based Serv‐ ice 210
CD/Multimedia, see user's manual for Navigation, Enter‐
tainment and Communica‐
tion
Center armrest 165
Center console 14
Central locking system 33
Central screen, refer to Control Display 16
Changes, technical, refer to Safety 7
Changing parts 212
Changing wheels 218
Changing wheels/tires 201
Check Control 81
Children, seating position 58
Children, transporting safely 58
Child restraint fixing sys‐ tem 58
Child restraint fixing system LATCH 59
Child restraint fixing systems, mounting 58
Child safety locks 61
Child seat, mounting 58
Child seats 58
Chrome parts, care 228
Cigarette lighter 157 Cleaning, displays 229
Climate control 148
Climate control wind‐ shield 173
Clock 84
Closing/opening from in‐ side 37
Closing/opening via door lock 36
Closing/opening with remote control 34
Clothes hooks 167
Collision warning 107, 109
Combination switch, refer to Turn signals 69
Combination switch, refer to Wiper system 69
COMFORT+ program, Driving Dynamics Control 124
Comfort Access 40
COMFORT program, Driving Dynamics Control 124
Computer 88
Condensation on win‐ dows 149
Condensation under the vehi‐ cle 174
Condition Based Service CBS 210
Configure driving mode 125
Confirmation signal 35
ConnectedDrive, see user's manual for Navigation, Enter‐
tainment and Communica‐
tion
Control Display 16
Control Display, settings 91
Controller 16
Control systems, driving sta‐ bility 119
Convenient opening 34
Coolant 209
Coolant temperature 84
Cooling function 150
Cooling, maximum 149
Cooling system 209 Seite 237Everything from A to ZReference237
Online Edition for Part no. 01 40 2 917 522 - II/13