2013 BMW 535I XDRIVE GRAN TURISMO trunk
[x] Cancel search: trunkPage 163 of 240
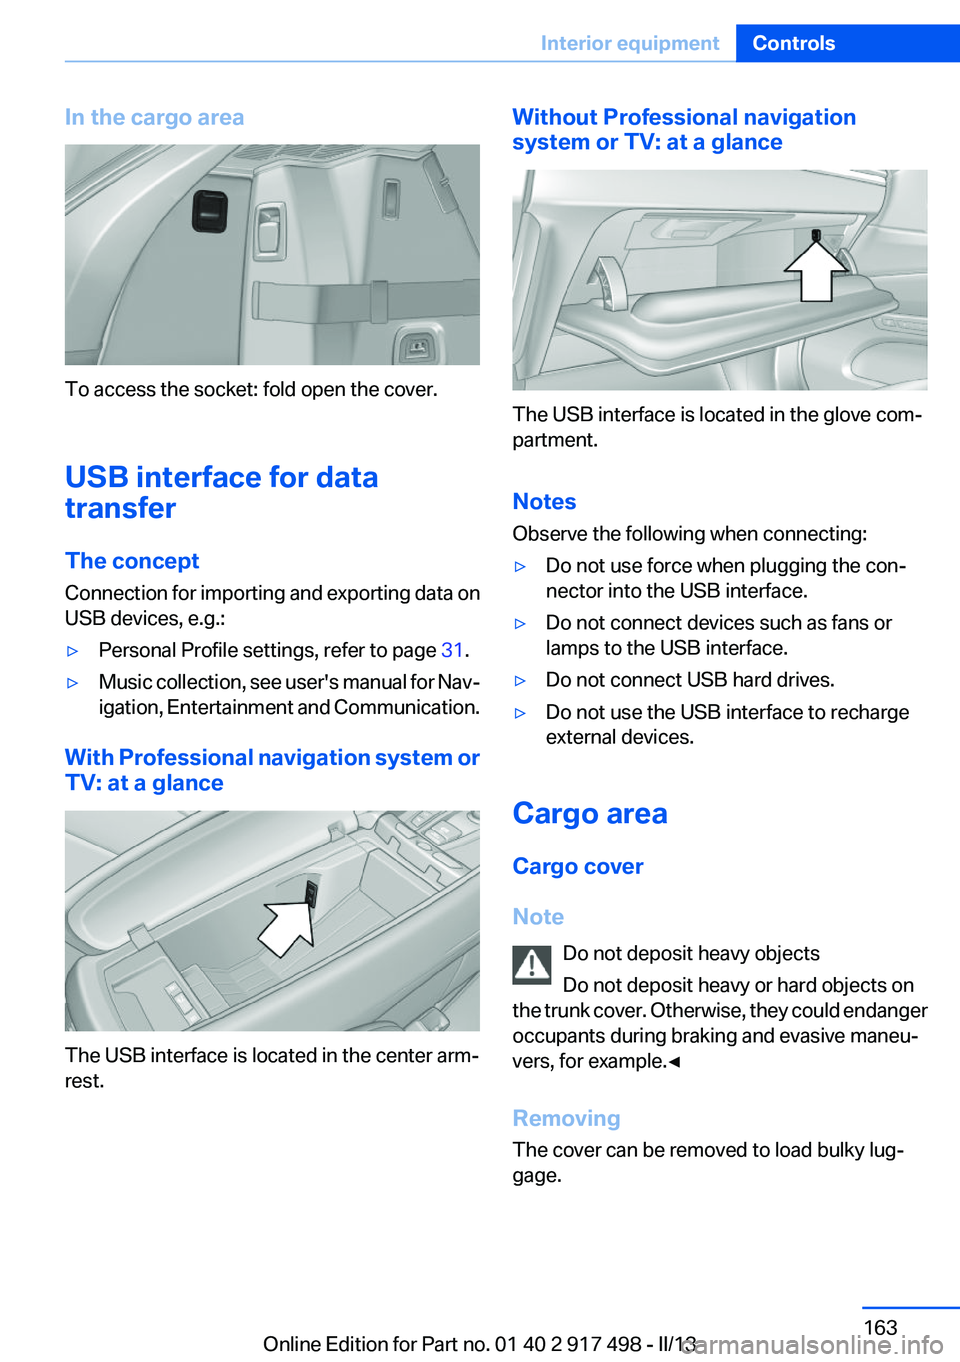
In the cargo area
To access the socket: fold open the cover.
USB interface for data
transfer
The concept
Connection for importing and exporting data on
USB devices, e.g.:
▷Personal Profile settings, refer to page 31.▷Music collection, see user's manual for Nav‐
igation, Entertainment and Communication.
With Professional navigation system or
TV: at a glance
The USB interface is located in the center arm‐
rest.
Without Professional navigation
system or TV: at a glance
The USB interface is located in the glove com‐
partment.
Notes
Observe the following when connecting:
▷Do not use force when plugging the con‐
nector into the USB interface.▷Do not connect devices such as fans or
lamps to the USB interface.▷Do not connect USB hard drives.▷Do not use the USB interface to recharge
external devices.
Cargo area
Cargo cover
Note Do not deposit heavy objects
Do not deposit heavy or hard objects on
the trunk cover. Otherwise, they could endanger
occupants during braking and evasive maneu‐
vers, for example.◀
Removing
The cover can be removed to load bulky lug‐
gage.
Seite 163Interior equipmentControls163
Online Edition for Part no. 01 40 2 917 498 - II/13
Page 165 of 240
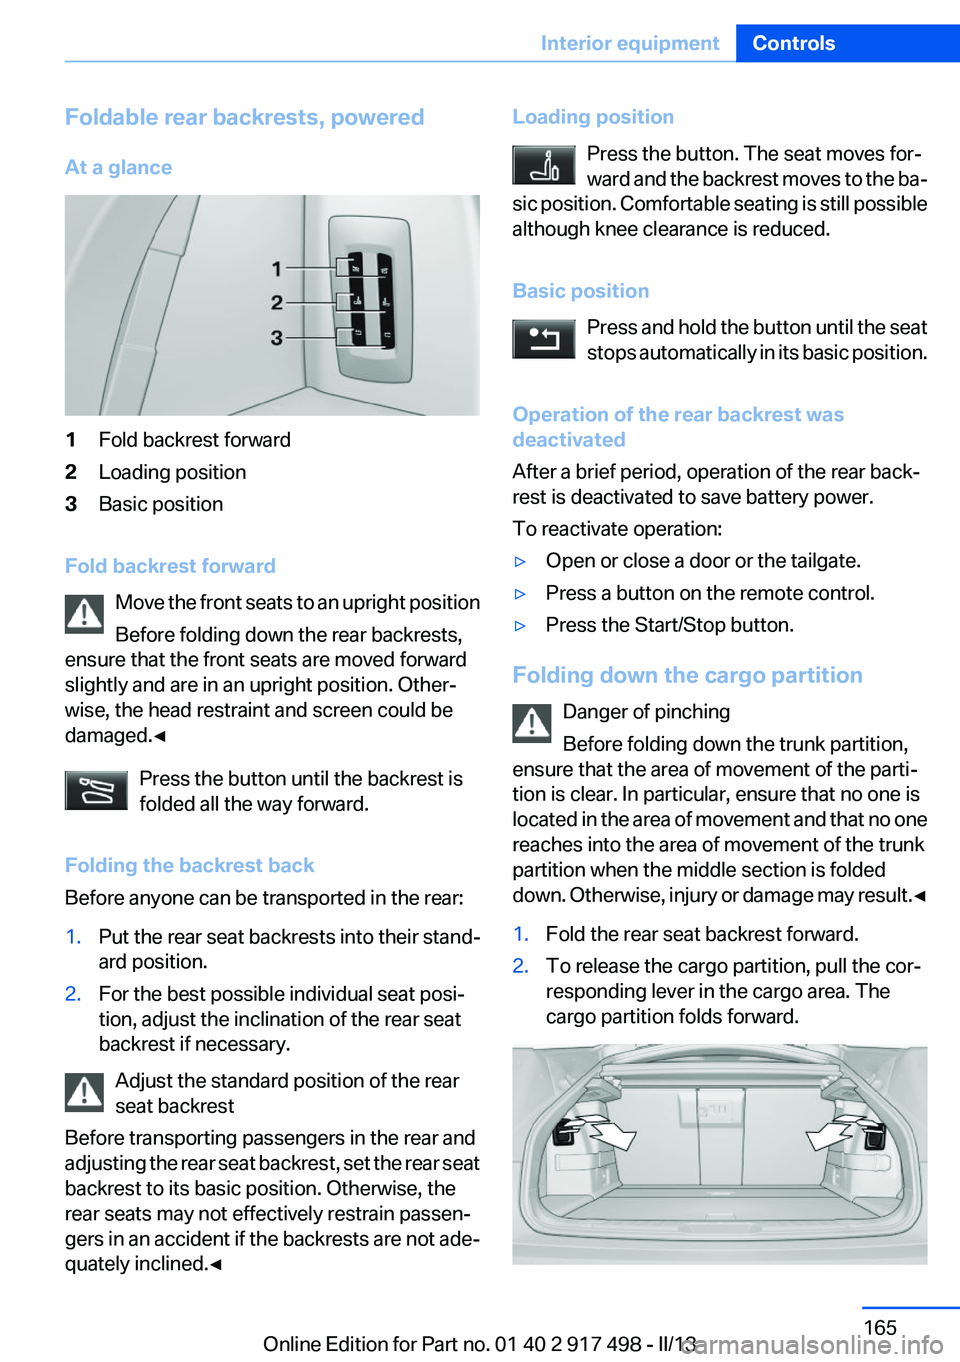
Foldable rear backrests, powered
At a glance1Fold backrest forward2Loading position3Basic position
Fold backrest forward Move the front seats to an upright position
Before folding down the rear backrests,
ensure that the front seats are moved forward
slightly and are in an upright position. Other‐
wise, the head restraint and screen could be
damaged.◀
Press the button until the backrest is
folded all the way forward.
Folding the backrest back
Before anyone can be transported in the rear:
1.Put the rear seat backrests into their stand‐
ard position.2.For the best possible individual seat posi‐
tion, adjust the inclination of the rear seat
backrest if necessary.
Adjust the standard position of the rear
seat backrest
Before transporting passengers in the rear and
adjusting the rear seat backrest, set the rear seat
backrest to its basic position. Otherwise, the
rear seats may not effectively restrain passen‐
gers in an accident if the backrests are not ade‐
quately inclined.◀
Loading position
Press the button. The seat moves for‐
ward and the backrest moves to the ba‐
sic position. Comfortable seating is still possible
although knee clearance is reduced.
Basic position Press and hold the button until the seat
stops automatically in its basic position.
Operation of the rear backrest was
deactivated
After a brief period, operation of the rear back‐
rest is deactivated to save battery power.
To reactivate operation:▷Open or close a door or the tailgate.▷Press a button on the remote control.▷Press the Start/Stop button.
Folding down the cargo partition
Danger of pinching
Before folding down the trunk partition,
ensure that the area of movement of the parti‐
tion is clear. In particular, ensure that no one is
located in the area of movement and that no one
reaches into the area of movement of the trunk
partition when the middle section is folded
down. Otherwise, injury or damage may result. ◀
1.Fold the rear seat backrest forward.2.To release the cargo partition, pull the cor‐
responding lever in the cargo area. The
cargo partition folds forward.Seite 165Interior equipmentControls165
Online Edition for Part no. 01 40 2 917 498 - II/13
Page 166 of 240
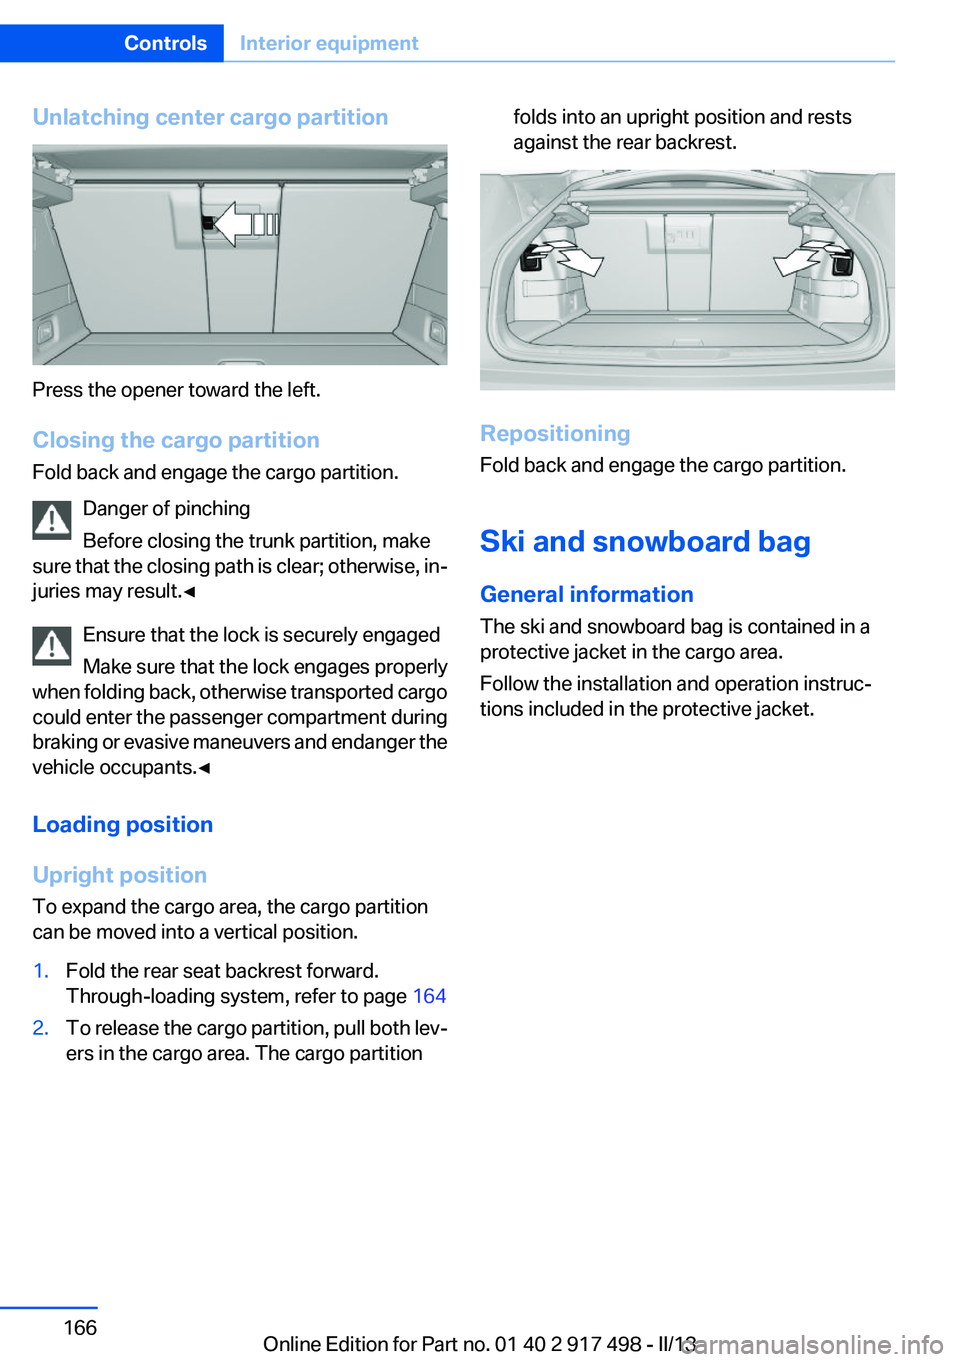
Unlatching center cargo partition
Press the opener toward the left.
Closing the cargo partition
Fold back and engage the cargo partition.
Danger of pinching
Before closing the trunk partition, make
sure that the closing path is clear; otherwise, in‐
juries may result.◀
Ensure that the lock is securely engaged
Make sure that the lock engages properly
when folding back, otherwise transported cargo
could enter the passenger compartment during
braking or evasive maneuvers and endanger the
vehicle occupants.◀
Loading position
Upright position
To expand the cargo area, the cargo partition
can be moved into a vertical position.
1.Fold the rear seat backrest forward.
Through-loading system, refer to page 1642.To release the cargo partition, pull both lev‐
ers in the cargo area. The cargo partitionfolds into an upright position and rests
against the rear backrest.
Repositioning
Fold back and engage the cargo partition.
Ski and snowboard bag
General information
The ski and snowboard bag is contained in a
protective jacket in the cargo area.
Follow the installation and operation instruc‐
tions included in the protective jacket.
Seite 166ControlsInterior equipment166
Online Edition for Part no. 01 40 2 917 498 - II/13
Page 170 of 240
Storage compartments in the
cargo area
Retaining straps
Retaining straps on the left and right side trim
for fastening small objects.
Multi-function hook
There are two multi-function hooks on the cargo
area walls.1.Open the holder by pressing on the button.2.Press the bag handle into the holder from
above.
Light and suitable objects only
Only hang light bags or suitable objects
from the holders. Otherwise, there is a danger of
objects flying about during braking and evasive
maneuvers.
Only transport heavy luggage in the trunk if it has
been appropriately secured.◀
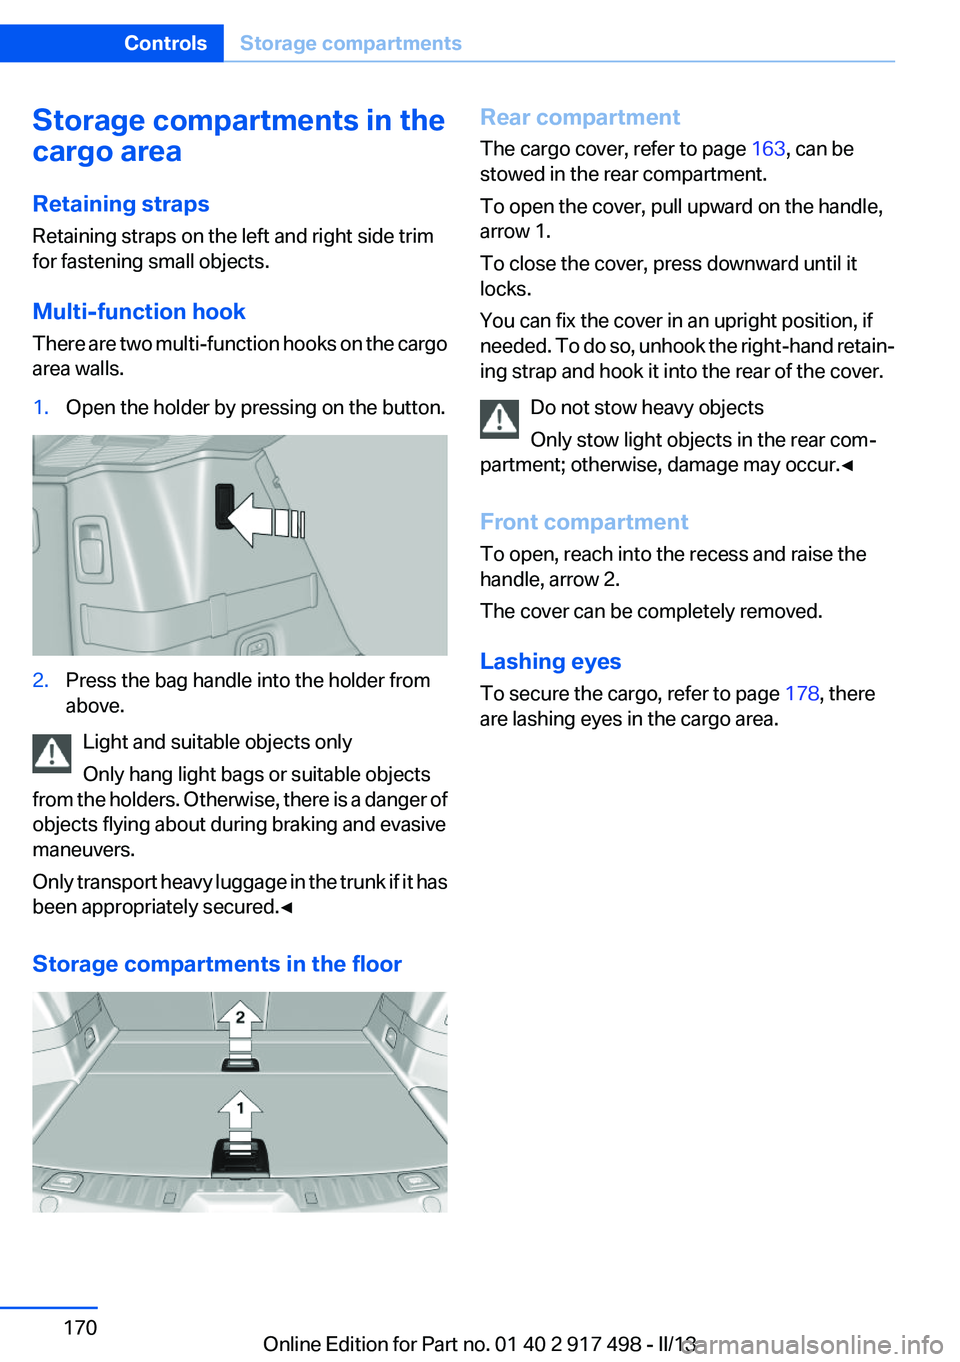
Storage compartments in the floor
Rear compartment
The cargo cover, refer to page 163, can be
stowed in the rear compartment.
To open the cover, pull upward on the handle,
arrow 1.
To close the cover, press downward until it
locks.
You can fix the cover in an upright position, if
needed. To do so, unhook the right-hand retain‐
ing strap and hook it into the rear of the cover.
Do not stow heavy objects
Only stow light objects in the rear com‐
partment; otherwise, damage may occur.◀
Front compartment
To open, reach into the recess and raise the
handle, arrow 2.
The cover can be completely removed.
Lashing eyes
To secure the cargo, refer to page 178, there
are lashing eyes in the cargo area.Seite 170ControlsStorage compartments170
Online Edition for Part no. 01 40 2 917 498 - II/13
Page 177 of 240
LoadingVehicle equipment
All standard, country-specific and optional
equipment that is offered in the model series is
described in this chapter. Therefore, equipment
is also described that is not available in a vehicle,
e. g., because of the selected optional equip‐
ment or country variant. This also applies for
safety-related functions and systems.
Hints Overloading the vehicle
To avoid exceeding the approved carrying
capacity of the tires, never overload the vehicle.
Overloading can lead to overheating and in‐
creases the rate at which damage develops in‐
side the tires. This could result in a sudden loss
of tire inflation pressure.◀
No fluids in the trunk
Make sure that fluids do not leak into the
trunk; otherwise, the vehicle may be damaged. ◀
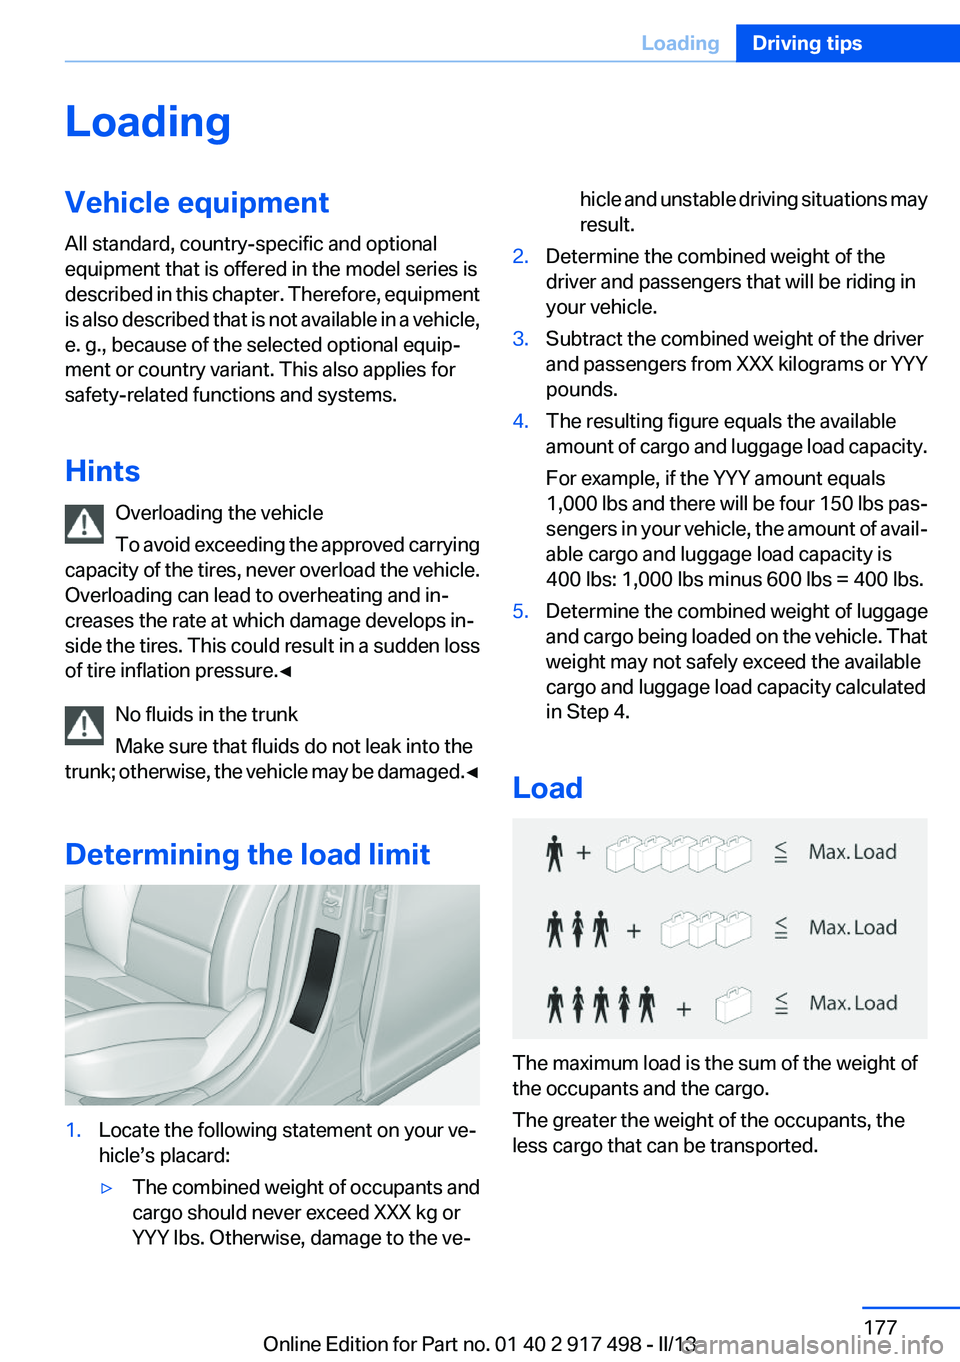
Determining the load limit1.Locate the following statement on your ve‐
hicle’s placard:▷The combined weight of occupants and
cargo should never exceed XXX kg or
YYY lbs. Otherwise, damage to the ve‐hicle and unstable driving situations may
result.2.Determine the combined weight of the
driver and passengers that will be riding in
your vehicle.3.Subtract the combined weight of the driver
and passengers from XXX kilograms or YYY
pounds.4.The resulting figure equals the available
amount of cargo and luggage load capacity.
For example, if the YYY amount equals
1,000 lbs and there will be four 150 lbs pas‐
sengers in your vehicle, the amount of avail‐
able cargo and luggage load capacity is
400 lbs: 1,000 lbs minus 600 lbs = 400 lbs.5.Determine the combined weight of luggage
and cargo being loaded on the vehicle. That
weight may not safely exceed the available
cargo and luggage load capacity calculated
in Step 4.
Load
The maximum load is the sum of the weight of
the occupants and the cargo.
The greater the weight of the occupants, the
less cargo that can be transported.
Seite 177LoadingDriving tips177
Online Edition for Part no. 01 40 2 917 498 - II/13
Page 235 of 240
Manual operation, exterior mir‐rors 60
Manual operation, fuel filler flap 188
Manual operation, Park Dis‐ tance Control PDC 139
Manual operation, parking brake 72
Manual operation, Side View 143
Manual operation, Top View 145
Marking on approved tires 197
Marking, run-flat tires 198
Massage seat, front 52
Master key, refer to Remote control 30
Maximum cooling 153
Maximum speed, display 90
Maximum speed, winter tires 198
Measure, units of 96
Medical kit 216
Memory for seat, mirrors, steering wheel 59
Menu, EfficientDynamics 183
Menu in instrument cluster 92
Menus, operating, iDrive 16
Menus, refer to iDrive operat‐ ing concept 17
Messages, refer to Check Control 85
Microfilter 155
Minimum tread, tires 196
Mirror 60
Mirror memory 59
Mobile communication devi‐ ces in the vehicle 175
Modifications, technical, refer to Safety 7
Moisture in headlamp 209
Monitor, refer to Control Dis‐ play 16
Mounting of child restraint fix‐ ing systems 63 Multifunctional instrument
display 82
Multi-function hook 170
Multifunction steering wheel, buttons 12
N
Navigation, see user's manual for Navigation, Entertain‐
ment and Communication
Neck restraints, front, refer to Head restraints 57
Neck restraints, rear, refer to Head restraints 58
New wheels and tires 197
Night Vision with pedestrian detection 114
No Passing Information 90
Nylon rope for tow-starting/ towing 219
O
OBD Onboard Diagnos‐ tics 207
Obstacle marking, backup camera 142
Octane rating, refer to Gaso‐ line quality 190
Odometer 88
Office, see user's manual for Navigation, Entertainment
and Communication
Oil 203
Oil, adding 204
Oil additives 204
Oil change 204
Oil change interval, service re‐ quirements 89
Oil filler neck 204
Oil types, alternative 204
Oil types, approved 204
Old batteries, disposal 213
Onboard Diagnostics OBD 207 Onboard monitor, refer to
Control Display 16
Onboard vehicle tool kit 208
Opening/closing from in‐ side 37
Opening/closing via door lock 36
Opening/closing with remote control 34
Opening the tailgate with no- touch activation 42
Opening the trunk lid with no- touch activation 42
Operating concept, iDrive 16
Optional equipment, standard equipment 6
Outside air, refer to Automatic recirculated-air control 154
Overheating of engine, refer to Coolant temperature 88
Overtaking prohibitions 90
P
Paint, vehicle 221
Panoramic glass sunroof 47
Parallel parking assistant 146
Park Distance Control PDC 138
Parked-car ventilation 157
Parked vehicle, condensa‐ tion 176
Parking aid, refer to PDC 138
Parking assistant 146
Parking brake 72
Parking lamps 97
Parking with Auto Hold 74
Passenger side mirror, tilting downward 60
Pathway lines, backup cam‐ era 142
PDC Park Distance Con‐ trol 138
Pedestrian detection, refer to Night Vision 114 Seite 235Everything from A to ZReference235
Online Edition for Part no. 01 40 2 917 498 - II/13
Page 238 of 240
Tools 208
Top View 144
Total vehicle weight 227
Tow fitting 219
Towing 218
Tow-starting 218
TPM Tire Pressure Moni‐ tor 107
Traction control 123
TRACTION program, Dynamic Driving Control 127
Transmission, automatic 78
Transporting children safely 63
Tread, tires 196
Trip computer 94
Triple turn signal activa‐ tion 75
Trip odometer 88
Trunk lid 38
Trunk lid, automatic 39
Trunk lid, emergency unlock‐ ing 41
Trunk lid, hotel function 41
Trunk lid via remote con‐ trol 35
Turning circle 227
Turning circle lines, backup camera 142
Turn signals, operation 75
Turn signals, rear, bulb re‐ placement 211
U
Unintentional alarm 44
Units of measure 96
Universal remote control 159
Unlock button, automatic transmission 79
Unlocking/locking from in‐ side 37
Unlocking/locking via door lock 36
Unlocking/locking with remote control 34 Updates made after the edito‐
rial deadline 7
Upholstery care 222
USB interface 163
V
Variable button assignment for remote control 30
Variable steering, Integral Ac‐ tive Steering 125
Vehicle battery 212
Vehicle battery, replacing 212
Vehicle, breaking in 174
Vehicle care 221
Vehicle equipment 6
Vehicle identification number, refer to Identification number
in the engine compart‐
ment 201
Vehicle jack 212
Vehicle paint 221
Vehicle storage 223
Vehicle wash 220
Ventilation 155
Ventilation, refer to Parked-car ventilation 157
Voice activation system 22
W
Warning messages, refer to Check Control 85
Warning triangle 216
Washer fluid 78
Washer fluid reservoir, ca‐ pacity 229
Washer nozzles, wind‐ shield 77
Washer system 76
Washing, vehicle 220
Water on roads 175
Weights 227
Welcome lamps 97
Wheel base, vehicle 227
Wheels, changing 197 Wheels, everything on wheels
and tires 191
Wheels, Flat Tire Monitor FTM 105
Wheels, Tire Pressure Monitor TPM 107
Width, vehicle 226
Window defroster, rear 154
Windows, powered 45
Windshield, climate con‐ trol 175
Windshield washer fluid 78
Windshield washer noz‐ zles 77
Windshield washer system 76
Windshield wiper 76
Windshield wipers, fold-out position 77
Winter storage, care 223
Winter tires, suitable tires 198
Winter tires, tread 196
Wiper blades, replacing 208
Wiper fluid 78
Wiper system 76
Wood, care 222
Word match concept, naviga‐ tion 21
Wrench 208
X
xDrive 124
Xenon headlamps, bulb re‐ placement 209 Seite 238ReferenceEverything from A to Z238
Online Edition for Part no. 01 40 2 917 498 - II/13