2013 BMW 528I XDRIVE child lock
[x] Cancel search: child lockPage 43 of 246

▷The indicator lamp flashes after locking:
The doors, hood or trunk lid is not closed
properly, but the rest of the vehicle is se‐
cured.
After 10 seconds, the indicator lamp flashes
continuously. Interior motion sensor and tilt
alarm sensor are not active.▷The indicator lamp goes out after unlocking:
The vehicle has not been tampered with.▷The indicator lamp flashes after unlocking
until the engine ignition is switched on, but
no longer than approx. 5 minutes:
An alarm has been triggered.
Tilt alarm sensor
The tilt of the vehicle is monitored.
The alarm system responds in situations such
as attempts to steal a wheel or when the car is
towed.
Interior motion sensor
The windows and glass sunroof must be closed
for the system to function properly.
Avoiding unintentional alarms
The tilt alarm sensor and interior motion sensor
can be switched off together, such as in the fol‐
lowing situations:
▷In automatic car washes.▷In duplex garages.▷During transport on car-carrying trains, at
sea or on a trailer.▷When animals are to remain in the vehicle.
Switching off the tilt alarm sensor and
interior motion sensor
Press the remote control button again
within 10 seconds as soon as the vehicle
is locked.
The indicator lamp lights up for approx. 2 sec‐
onds and then continues to flash.
The tilt alarm sensor and interior motion sensor
are switched off until the vehicle is locked again.
Power windows
General information Take the remote control with you
Take the remote control with you when
leaving the vehicle so that children, for example,
cannot operate the power windows and injure
themselves.◀
Opening
▷ Press the switch to the resistance
point.
The window opens while the switch is held.▷ Press the switch beyond the resist‐
ance point.
The window opens automatically.
Pressing again stops the motion.
Convenient opening, refer to page 34, via the
remote control.
Closing Keep the closing path clear
Monitor the closing process and make
sure that the closing path of the window is clear;
otherwise, injuries may result.◀
▷ Pull the switch to the resistance point.
Seite 43Opening and closingControls43
Online Edition for Part no. 01 40 2 917 522 - II/13
Page 44 of 246
The window closes while the switch is held.▷ Pull the switch beyond the resistance
point.
The window closes automatically.
Pressing the switch stops the motion.
Convenient operation, refer to page 34, via the
remote control.
Convenient closing, refer to page 41, with Com‐
fort Access.
Pinch protection system
If the closing force exceeds a specific value as a
window closes, the closing action is interrupted.
The window reopens slightly.
Danger of pinching even with pinch pro‐
tection
Even with the pinch protection system, check
that the window's closing path is clear; other‐
wise, the closing action may not stop in certain
situations, e.g., if thin objects are present.◀
No window accessories
Do not install any accessories in the range
of movement of the windows; otherwise, the
pinch protection system will be impaired.◀
Closing without the pinch protection
system
Keep the closing path clear
Monitor the closing process and make
sure that the closing path of the window is clear;
otherwise, injuries may result.◀
For example, if there is an external danger or if
ice on the windows prevents a window from
closing normally, proceed as follows:
1.Pull the switch past the resistance point and
hold it there.
Pinch protection is limited and the window
reopens slightly if the closing force exceeds
a certain value.2.Pull the switch past the resistance point
again within approx. 4 seconds and hold it
there.
The window closes without pinch protec‐
tion.
Safety switch
The safety switch in the driver's door can be
used to prevent children, for example, from
opening and closing the rear windows using the
switches in the rear.
Switching on and off Press the button.
The LED lights up if the safety function
is switched on.
Safety switch for rear operation
Press the safety switch when transporting
children in the rear; otherwise, injury may result
if the windows are closed without supervision. ◀
Roller sunblinds
General information
If you are no longer able to move the roller sun‐
blind for the rear window after having activated
it a number of times in a row, the system is
blocked for a limited time to prevent overheat‐
ing. Let the system cool.
The roller sunblind for the rear window cannot
be moved at low interior temperatures.
Seite 44ControlsOpening and closing44
Online Edition for Part no. 01 40 2 917 522 - II/13
Page 58 of 246
Transporting children safelyVehicle equipment
All standard, country-specific and optional
equipment that is offered in the model series is
described in this chapter. Therefore, equipment
is also described that is not available in a vehicle,
e. g., because of the selected optional equip‐
ment or country variant. This also applies for
safety-related functions and systems.
The right place for children
Note Children in the vehicle
Do not leave children unattended in the
vehicle; otherwise, they could endanger them‐
selves and other persons, e.g., by opening the
doors.◀
Children should always be in the rear
Accident research shows that the safest place
for children is in the back seat.
Transporting children in the rear
Only transport children younger than
13 years of age or shorter than 5 ft/150 cm in the
rear in child restraint fixing systems provided in
accordance with the age, weight and size of the
child; otherwise, there is an increased risk of in‐
jury in an accident.
Children 13 years of age or older must wear a
safety belt as soon as a suitable child restraint
fixing system can no longer be used, due to their
age, weight and size.◀
Children on the front passenger seat
Should it ever be necessary to use a child re‐
straint fixing system in the front passenger seat,
make sure that the front, knee and side airbags
on the front passenger side are deactivated. Au‐tomatic deactivation of front passenger airbags,
refer to page 101.
Note Deactivated front passenger airbags
If a child restraint fixing system is used in
the front passenger seat, the front passenger
airbags must be deactivated; otherwise, there is
an increased risk of injury to the child when the
airbags are triggered, even with a child restraint
fixing system.◀
Installing child restraint fixing
systems
Before mounting
If the rear seat backrests are adjustable or can
be folded down:
Lock the rear seat backrests in position
Before mounting child restraint fixing sys‐
tems, place the seat backrest as far as possible
at an angle at which the child seat is resting
firmly against the backrest and all backrests can
be locked securely in place. Otherwise, the child
seat will not be as stable as it should be, and
there is increased danger of injury due to unex‐
pected movement of the seat backrest.◀
Notes Manufacturer's information for child re‐
straint fixing systems
To select, mount and use child restraint fixing
systems, observe the information provided by
the system manufacturer; otherwise, the pro‐
tective effect can be impaired.◀Seite 58ControlsTransporting children safely58
Online Edition for Part no. 01 40 2 917 522 - II/13
Page 59 of 246
On the front passenger seat
Deactivating airbags
After installing a child restraint fixing system in
the front passenger seat, make sure that the
front, knee and side airbags on the front pas‐
senger side are deactivated.
Deactivate the front passenger airbags auto‐
matically, refer to page 101
Deactivating the front passenger airbags
If a child restraint fixing system is used in
the front passenger seat, the front passenger
airbags must be deactivated; otherwise, there is
an increased risk of injury to the child when the
airbags are triggered, even with a child restraint
fixing system.◀
Seat position and height
Before installing a child restraint fixing system,
move the front passenger seat as far back as
possible and bring it up to medium height to ob‐
tain the best possible position for the belt and to
offer optimal protection in the event of an acci‐
dent.
Do not change the seat position and height after
this.
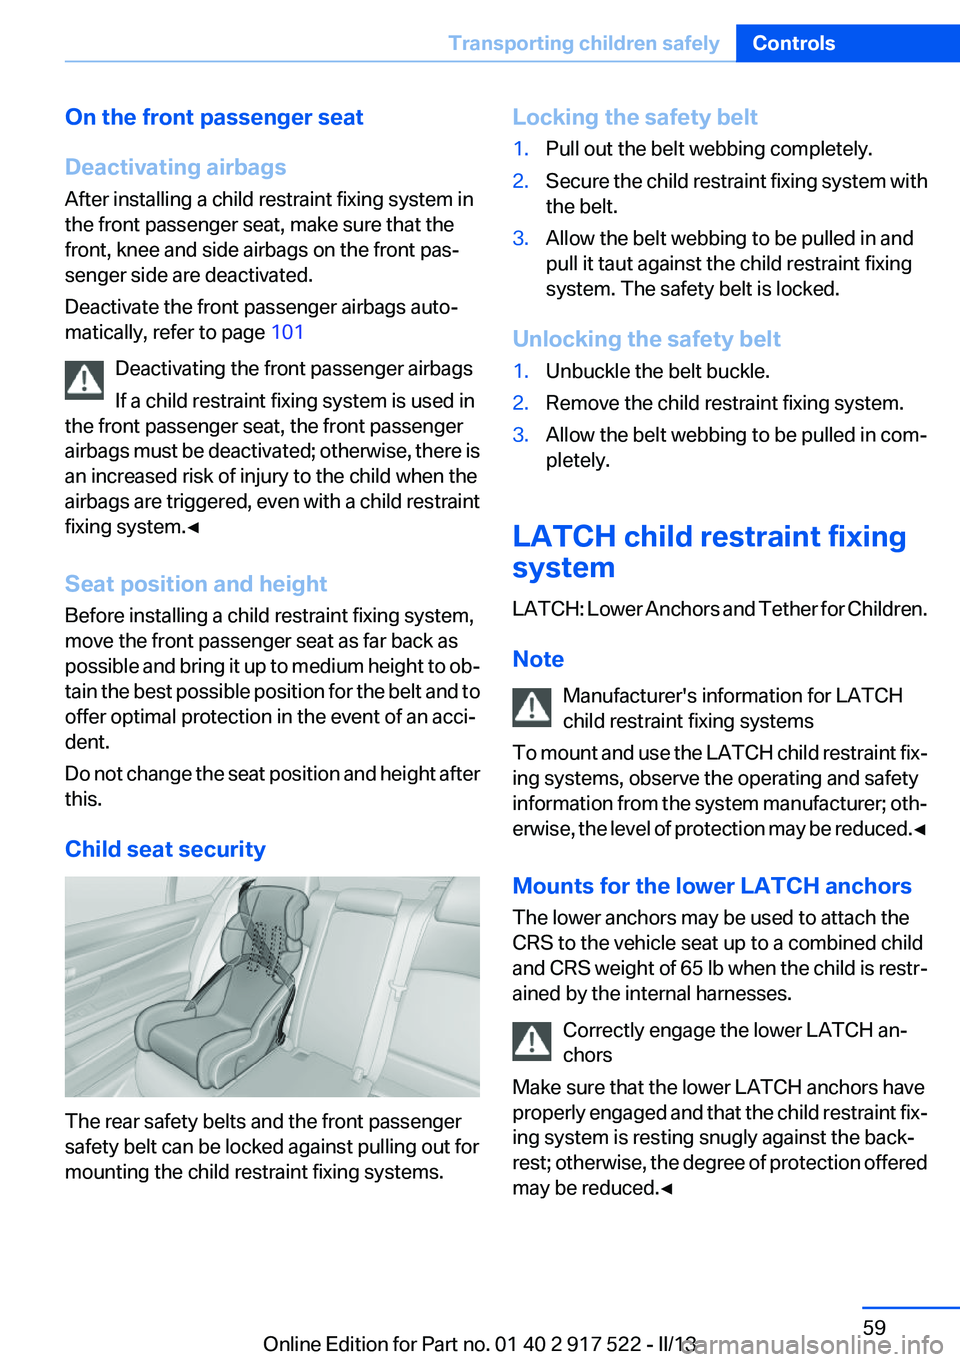
Child seat security
The rear safety belts and the front passenger
safety belt can be locked against pulling out for
mounting the child restraint fixing systems.
Locking the safety belt1.Pull out the belt webbing completely.2.Secure the child restraint fixing system with
the belt.3.Allow the belt webbing to be pulled in and
pull it taut against the child restraint fixing
system. The safety belt is locked.
Unlocking the safety belt
1.Unbuckle the belt buckle.2.Remove the child restraint fixing system.3.Allow the belt webbing to be pulled in com‐
pletely.
LATCH child restraint fixing
system
LATCH: Lower Anchors and Tether for Children.
Note Manufacturer's information for LATCH
child restraint fixing systems
To mount and use the LATCH child restraint fix‐
ing systems, observe the operating and safety
information from the system manufacturer; oth‐
erwise, the level of protection may be reduced. ◀
Mounts for the lower LATCH anchors
The lower anchors may be used to attach the
CRS to the vehicle seat up to a combined child
and CRS weight of 65 lb when the child is restr-
ained by the internal harnesses.
Correctly engage the lower LATCH an‐
chors
Make sure that the lower LATCH anchors have
properly engaged and that the child restraint fix‐
ing system is resting snugly against the back‐
rest; otherwise, the degree of protection offered
may be reduced.◀
Seite 59Transporting children safelyControls59
Online Edition for Part no. 01 40 2 917 522 - II/13
Page 61 of 246
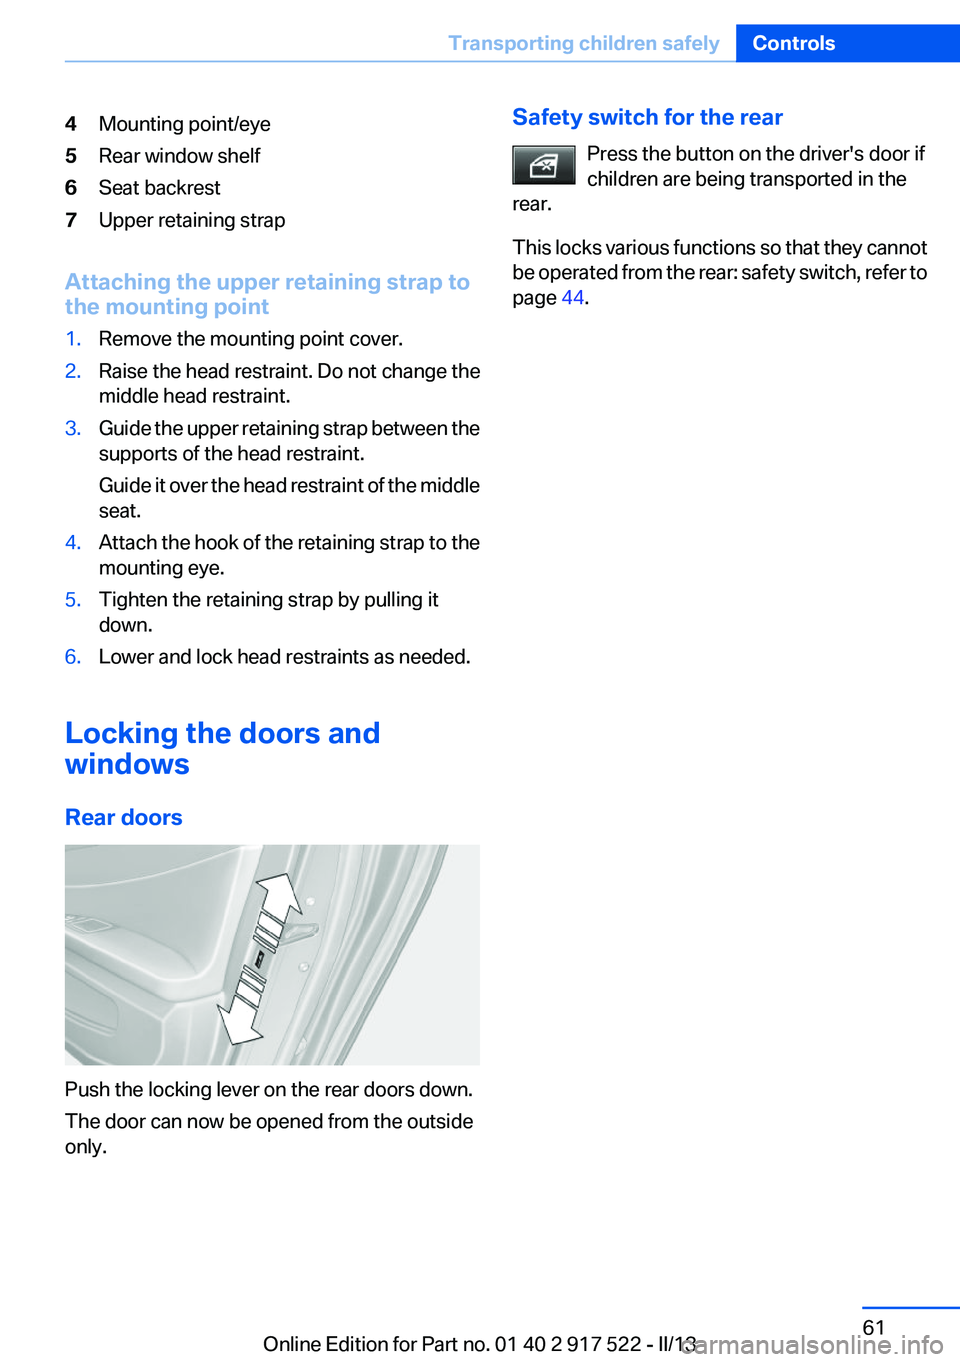
4Mounting point/eye5Rear window shelf6Seat backrest7Upper retaining strap
Attaching the upper retaining strap to
the mounting point
1.Remove the mounting point cover.2.Raise the head restraint. Do not change the
middle head restraint.3.Guide the upper retaining strap between the
supports of the head restraint.
Guide it over the head restraint of the middle
seat.4.Attach the hook of the retaining strap to the
mounting eye.5.Tighten the retaining strap by pulling it
down.6.Lower and lock head restraints as needed.
Locking the doors and
windows
Rear doors
Push the locking lever on the rear doors down.
The door can now be opened from the outside
only.
Safety switch for the rear
Press the button on the driver's door if
children are being transported in the
rear.
This locks various functions so that they cannot
be operated from the rear: safety switch, refer to
page 44.Seite 61Transporting children safelyControls61
Online Edition for Part no. 01 40 2 917 522 - II/13
Page 63 of 246
▷While the driver's seat belt is unbuckled, if
the driver's door is open and the low beams
are switched off.
When the ignition is switched off, by opening or
closing the driver's door or unbuckling the driv‐
er's seat belt, the radio ready state remains ac‐
tive.
Radio ready state
Activate radio ready state:
▷When the ignition is switched off: press ON/
OFF button on the radio.▷When the engine is running: press the Start/
Stop button.
Some electronic systems/power consumers re‐
main ready for operation.
Radio ready state switches off automatically:
▷After approx. 8 minutes.▷When the vehicle is locked using the central
locking system.▷Shortly before the battery is discharged
completely, so that the engine can still be
started.
Starting the engine
General information Enclosed areas
Do not let the engine run in enclosed
areas; otherwise, breathing of exhaust fumes
may lead to loss of consciousness and death.
The exhaust gases contain carbon monoxide, an
odorless and colorless but highly toxic gas.◀
Unattended vehicle
Do not leave the vehicle unattended with
the engine running; doing so poses a risk of dan‐
ger.
Before leaving the vehicle with the engine run‐
ning, set the parking brake and place the trans‐
mission in position P or neutral to prevent the
vehicle from moving.◀
Repeated starting in quick succession
Avoid repeated unsuccessful attempts to
start the vehicle or starting the vehicle several
times in quick succession. Otherwise, the fuel is
not burned or is inadequately burned, posing a
risk of overheating and damage to the catalytic
converter.◀
Do not wait for the engine to warm up while the
vehicle remains stationary. Start driving at mod‐
erate engine speeds.
Manual transmission
Starting the engine1.Depress the brake pedal.2.Press on the clutch pedal and shift to neu‐
tral.3.Press the Start/Stop button.
The ignition is activated automatically for a cer‐
tain time and is stopped as soon as the engine
starts.
Automatic transmission
Starting the engine
1.Depress the brake pedal.2.Press the Start/Stop button.
The ignition is activated automatically for a cer‐
tain time and is stopped as soon as the engine
starts.
Engine stop
General information Take the remote control with you
Take the remote control with you when
leaving the vehicle so that children, for example,
cannot start the engine.◀
Seite 63DrivingControls63
Online Edition for Part no. 01 40 2 917 522 - II/13
Page 161 of 246
middle section is folded down. Otherwise, injury
or damage may result.◀
Lock the rear seat backrests in position
Before mounting child restraint fixing sys‐
tems, place the seat backrest as far as possible
at an angle at which the child seat is resting
firmly against the backrest and all backrests can
be locked securely in place. Otherwise, the child
seat will not be as stable as it should be, and
there is increased danger of injury due to unex‐
pected movement of the seat backrest.◀
Opening Move the front seats to an upright position
Before folding down the rear backrests,
ensure that the front seats are moved forward
slightly and are in an upright position. Other‐
wise, the head restraint and screen could be
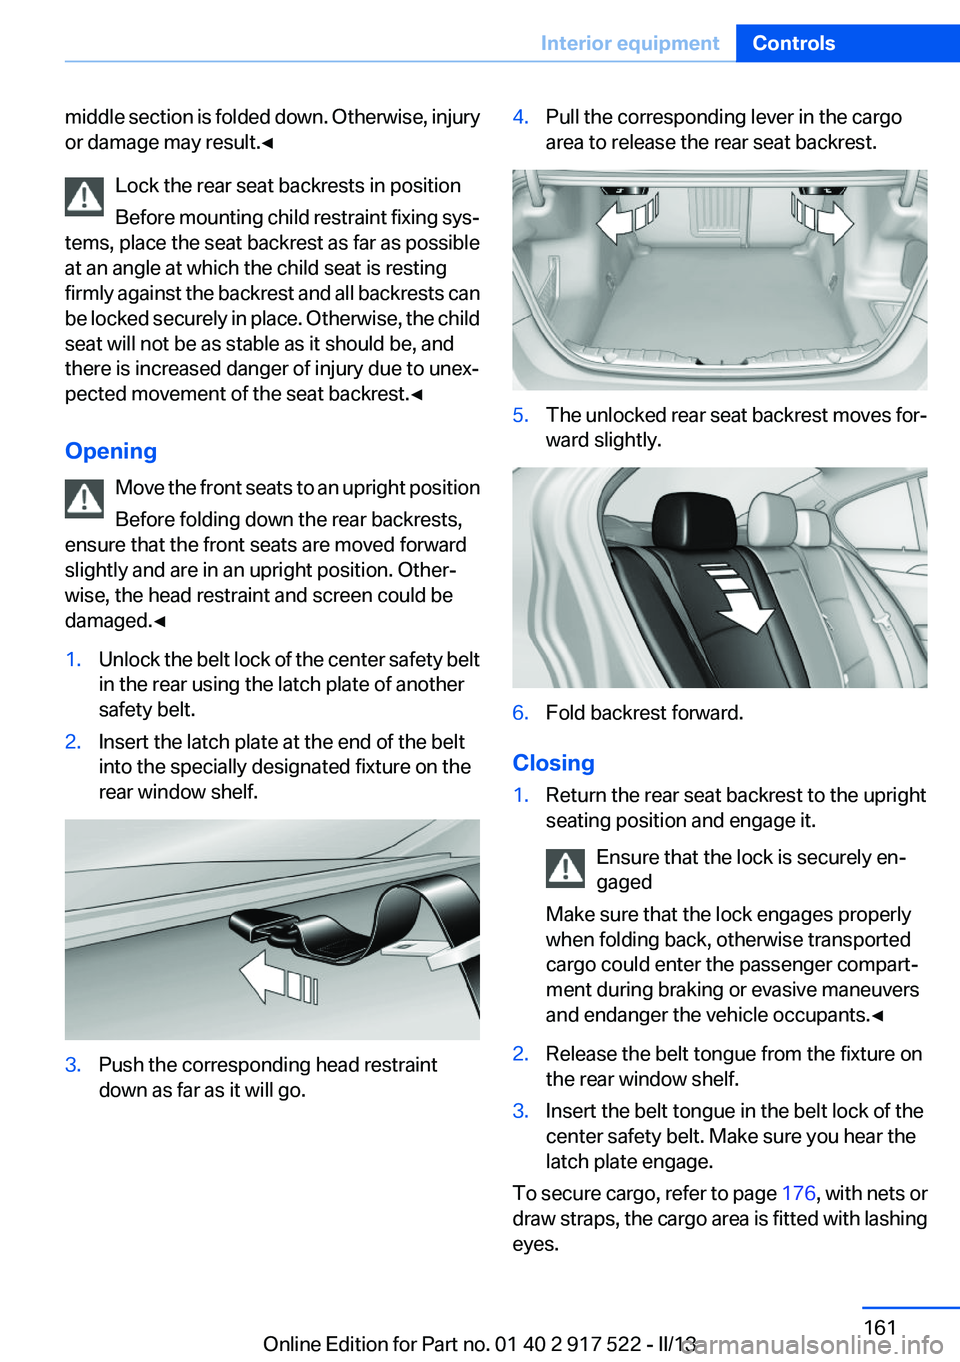
damaged.◀1.Unlock the belt lock of the center safety belt
in the rear using the latch plate of another
safety belt.2.Insert the latch plate at the end of the belt
into the specially designated fixture on the
rear window shelf.3.Push the corresponding head restraint
down as far as it will go.4.Pull the corresponding lever in the cargo
area to release the rear seat backrest.5.The unlocked rear seat backrest moves for‐
ward slightly.6.Fold backrest forward.
Closing
1.Return the rear seat backrest to the upright
seating position and engage it.
Ensure that the lock is securely en‐
gaged
Make sure that the lock engages properly
when folding back, otherwise transported
cargo could enter the passenger compart‐
ment during braking or evasive maneuvers
and endanger the vehicle occupants.◀2.Release the belt tongue from the fixture on
the rear window shelf.3.Insert the belt tongue in the belt lock of the
center safety belt. Make sure you hear the
latch plate engage.
To secure cargo, refer to page 176, with nets or
draw straps, the cargo area is fitted with lashing
eyes.
Seite 161Interior equipmentControls161
Online Edition for Part no. 01 40 2 917 522 - II/13
Page 237 of 246
tainment and Communica‐
tion
BMW Homepage 6
BMW Internet page 6
BMW maintenance sys‐ tem 210
Bonus range, ECO PRO 180
Bottle holder, refer to Cu‐ pholder 166
Brake assistant 119
Brake assistant, adaptive 119
Brake discs, breaking in 172
Brake force display 117
Brake lamps, brake force dis‐ play 117
Brake lamps, bulb replace‐ ment 217
Brake lights, adaptive 117
Brake pads, breaking in 172
Braking, notes 173
Breakdown assis‐ tance 220, 221
Breaking in 172
Brightness of Control Dis‐ play 92
Bulb replacement 212
Bulb replacement, front 213
Bulb replacement, rear 216
Bulbs and lamps 212
Button, RES 128
Button, Start/Stop 62
Bypassing, refer to Jump- starting 221
C
California Proposition 65 Warning 7
Camera, backup camera 137
Camera, care 229
Camera, Side View 141
Camera, Top View 139
Can holder, refer to Cu‐ pholder 166
Car battery 218
Car care products 227 Care, displays 229
Care, vehicle 227
Cargo 175
Cargo area, enlarging 160
Cargo area lid 37
Cargo area, storage compart‐ ments 167
Cargo straps, securing cargo 176
Car key, refer to Remote con‐ trol 30
Carpet, care 228
Car wash 226
Catalytic converter, refer to Hot exhaust system 173
CBS Condition Based Serv‐ ice 210
CD/Multimedia, see user's manual for Navigation, Enter‐
tainment and Communica‐
tion
Center armrest 165
Center console 14
Central locking system 33
Central screen, refer to Control Display 16
Changes, technical, refer to Safety 7
Changing parts 212
Changing wheels 218
Changing wheels/tires 201
Check Control 81
Children, seating position 58
Children, transporting safely 58
Child restraint fixing sys‐ tem 58
Child restraint fixing system LATCH 59
Child restraint fixing systems, mounting 58
Child safety locks 61
Child seat, mounting 58
Child seats 58
Chrome parts, care 228
Cigarette lighter 157 Cleaning, displays 229
Climate control 148
Climate control wind‐ shield 173
Clock 84
Closing/opening from in‐ side 37
Closing/opening via door lock 36
Closing/opening with remote control 34
Clothes hooks 167
Collision warning 107, 109
Combination switch, refer to Turn signals 69
Combination switch, refer to Wiper system 69
COMFORT+ program, Driving Dynamics Control 124
Comfort Access 40
COMFORT program, Driving Dynamics Control 124
Computer 88
Condensation on win‐ dows 149
Condensation under the vehi‐ cle 174
Condition Based Service CBS 210
Configure driving mode 125
Confirmation signal 35
ConnectedDrive, see user's manual for Navigation, Enter‐
tainment and Communica‐
tion
Control Display 16
Control Display, settings 91
Controller 16
Control systems, driving sta‐ bility 119
Convenient opening 34
Coolant 209
Coolant temperature 84
Cooling function 150
Cooling, maximum 149
Cooling system 209 Seite 237Everything from A to ZReference237
Online Edition for Part no. 01 40 2 917 522 - II/13