2013 BMW 528I steering wheel adjustment
[x] Cancel search: steering wheel adjustmentPage 13 of 246

Front fog lamps 97Parking lamps 94Low beams 94Automatic headlamp con‐
trol 95
Daytime running lights 95
Adaptive Light Control 96
High-beam Assistant 96Instrument lighting 988Steering column stalk, leftTurn signal 69High beams, head‐
lamp flasher 69High-beam Assistant 96Roadside parking lamps 95Computer 889Shift paddles 7410Steering wheel buttons, leftStore speed 132 126Resume speed 134 128Cruise control on/off, interrupt‐
ing 126Cruise control on/off, interrupt‐
ing 132Increase distance 128Reduce distance 128Cruise control rocker switch 133, 12711Instrument cluster 7512Steering wheel buttons, rightEntertainment sourceVolumeVoice activation 22Phone, see user's manual for Nav‐
igation, Entertainment and Com‐
munication.Thumbwheel for selection lists 8813Steering column stalk, rightWindshield wipers 69Rain sensor 70Clean the windshields and head‐
lamps 6914Start/stop the engine and switch
the ignition on/off 63Auto Start/Stop function 6415Horn16Steering wheel heating 5717Steering wheel adjustment 57Seite 13CockpitAt a glance13
Online Edition for Part no. 01 40 2 917 522 - II/13
Page 35 of 246

Press and hold the button on the re‐
mote control.
The windows and the glass sunroof open.
Releasing the button stops the motion.
Locking Press the button on the remote control.
Locking from the outside
Do not lock the vehicle from the outside if
there are people in it, as the vehicle cannot be
unlocked from inside without special knowl‐
edge.◀
Switching on interior lamps and
courtesy lamps
Press the button on the remote control
with the vehicle locked.
Panic mode
You can trigger the alarm system if you find
yourself in a dangerous situation.
Press the button on the remote control
for at least 3 seconds.
To switch off the alarm: press any button.
Switching on the headlamp courtesy
delay feature
Briefly press the button on the remote
control.
The duration can be set in the Control Display.
Opening the trunk lid Press the button on the remote control
for approx. 1 second.
The trunk lid opens, regardless of whether it was
previously locked or unlocked.During opening, the trunk lid pivots back and up.
Ensure that adequate clearance is available be‐
fore opening.
In some vehicle equipment variants, the trunk lid
can only be opened using the remote control if
the vehicle has been unlocked.
Do not place the remote control in the
cargo area
Take the remote control with you and do not
leave it in the cargo area; otherwise, the remote
control is locked inside the vehicle when the
trunk lid is closed.◀
The trunk lid is locked again as soon as it is
pushed closed.
Confirmation signals from the vehicle1."Settings"2."Doors/key"3.Deactivate or activate the desired confirma‐
tion signals.▷"Acoustic sig. lock/unlock"▷"Flash when lock/unlock"
Retrieving the seat, mirror, and
steering wheel settings
The driver's seat, exterior mirror, and steering
wheel positions selected last are stored for the
currently used remote control.
When the vehicle is unlocked, these positions
are automatically retrieved if this function was
activated.
Pinch hazard when moving back the seat
If this function is used, first make sure that
the footwell behind the driver's seat is empty.
Otherwise, people can be injured or objects
damaged when the seat is moved back.◀
The adjustment procedure is interrupted:
▷When a seat position switch is pressed.▷When a button of the seat, mirror, and steer‐
ing wheel memory is pressed briefly.Seite 35Opening and closingControls35
Online Edition for Part no. 01 40 2 917 522 - II/13
Page 54 of 246

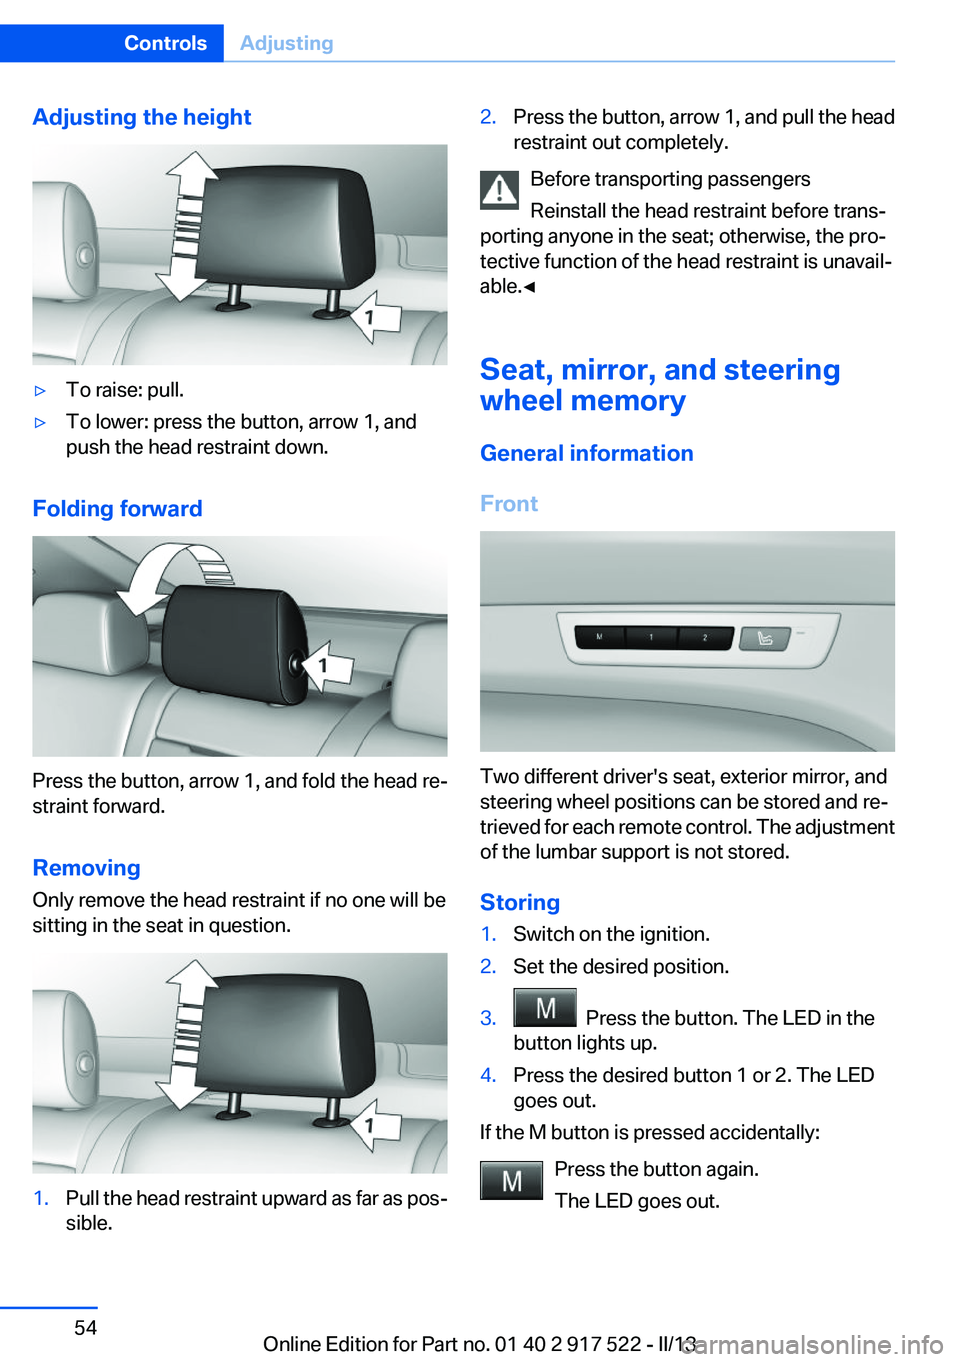
Adjusting the height▷To raise: pull.▷To lower: press the button, arrow 1, and
push the head restraint down.
Folding forward
Press the button, arrow 1, and fold the head re‐
straint forward.
Removing
Only remove the head restraint if no one will be
sitting in the seat in question.
1.Pull the head restraint upward as far as pos‐
sible.2.Press the button, arrow 1, and pull the head
restraint out completely.
Before transporting passengers
Reinstall the head restraint before trans‐
porting anyone in the seat; otherwise, the pro‐
tective function of the head restraint is unavail‐
able.◀
Seat, mirror, and steering
wheel memory
General information
Front
Two different driver's seat, exterior mirror, and
steering wheel positions can be stored and re‐
trieved for each remote control. The adjustment
of the lumbar support is not stored.
Storing
1.Switch on the ignition.2.Set the desired position.3. Press the button. The LED in the
button lights up.4.Press the desired button 1 or 2. The LED
goes out.
If the M button is pressed accidentally:
Press the button again.
The LED goes out.
Seite 54ControlsAdjusting54
Online Edition for Part no. 01 40 2 917 522 - II/13
Page 55 of 246

Calling up settingsDo not retrieve the memory while driving
Do not retrieve the memory setting while
driving, as an unexpected movement of the seat
or steering wheel could result in an accident.◀
Comfort function1.Open the driver's door.2.Switch off the ignition.3.Briefly press the desired button 1 or 2.
The corresponding seat position is performed
automatically.
The procedure stops when a switch for adjust‐
ing the seat or one of the buttons is pressed.
Safety mode
1.Close the driver's door or switch on the ig‐
nition.2.Press and hold the desired button 1 or 2 until
the adjustment procedure is completed.
Calling up of a seat position
deactivated
After a brief period, the calling up of stored seat
positions is deactivated to save battery power.
To reactivate calling up of a seat position:
▷Open or close the door or trunk lid.▷Press a button on the remote control.▷Press the Start/Stop button.Mirrors
Exterior mirrors
At a glance1Adjusting2Left/right, Automatic Curb Monitor3Fold in and out
General information
The mirror on the passenger side is more curved
than the driver's side mirror.
Estimating distances correctly
Objects reflected in the mirror are closer
than they appear. Do not estimate the distance
to the traffic behind you based on what you see
in the mirror, as this will increase your risk of an
accident.◀
Depending on how the vehicle is equipped, the
mirror setting is stored for the remote control in
use. When the vehicle is unlocked via the remote
control, the position is automatically retrieved if
the setting for this function is active.
Selecting a mirror To change over to the other mirror:
Slide the mirror changeover switch.
Adjusting electrically The setting corresponds to the direction
in which the button is pressed.
Seite 55AdjustingControls55
Online Edition for Part no. 01 40 2 917 522 - II/13
Page 57 of 246

Functional requirement
For proper operation:▷Keep the photocells clean.▷Do not cover the area between the inside
rearview mirror and the windshield.
Steering wheel
General information Do not adjust while driving
Do not adjust the steering wheel while
driving; otherwise, an unexpected movement
could result in an accident.◀
Manual steering wheel adjustment
1.Fold the lever down.2.Move the steering wheel to the preferred
height and angle to suit your seating posi‐
tion.3.Fold the lever back.Power steering wheel adjustment
The steering wheel can be adjusted in four di‐
rections.
Storing the position
Seat, mirror, and steering wheel memory, refer
to page 54.
Steering wheel heating
Switching on/off Press the button.
▷On: the LED lights up.▷Off: the LED goes out.Seite 57AdjustingControls57
Online Edition for Part no. 01 40 2 917 522 - II/13
Page 236 of 246

Everything from A to Z
IndexA
ABS, Antilock Brake Sys‐ tem 119
ACC, Active Cruise Control with Stop & Go 126
Activated-charcoal filter 151
Active Blind Spot Detec‐ tion 115
Active Cruise Control with Stop & Go, ACC 126
Active Protection 117
Active seat, front 49
Active seat ventilation, front 50
Active Steering, integral 122
Adaptive brake assistant 119
Adaptive brake lights, refer to Brake force display 117
Adaptive drive 122
Adaptive light control 96
Additives, oil 207
Adjustments, seats/head re‐ straints 47
After washing vehicle 227
Airbags 99
Airbags, indicator/warning light 100
Air circulation, refer to Recir‐ culated-air mode 150
Air, dehumidifying, refer to Cooling function 150
Air distribution, manual 149
Air flow, automatic climate control 149
Air pressure, tires 189
Air vents, refer to Ventila‐ tion 151
Alarm system 42
Alarm, unintentional 43 All around the center con‐
sole 14
All around the headliner 15
All around the steering wheel 12
ALL program, automatic cli‐ mate control 150
All-season tires, refer to Win‐ ter tires 201
All-wheel-drive 121
Alternating-code hand-held transmitter 156
Alternative oil types 207
Ambient light 98
Antifreeze, washer fluid 71
Antilock Brake System, ABS 119
Anti-slip control, refer to DSC 119
Approved axle load 233
Approved engine oils 207
Armrest, refer to Center arm‐ rest 165
Arrival time 90
Ashtray 157
Ashtray, front 157, 158
Ashtray, rear 158
Assistance, Roadside Assis‐ tance 221
Assistance when driving off 119
AUTO H button, refer to Auto‐ matic Hold 67
AUTO intensity 149
Automatic car wash 226
Automatic climate con‐ trol 148
Automatic Cruise Control with Stop & Go 126
Automatic Curb Monitor 56 Automatic deactivation, front
passenger airbags 101
Automatic headlamp con‐ trol 95
Automatic Hold 67
Automatic locking 37
Automatic recirculated-air control 150
Automatic Soft Closing, doors 37
Automatic tailgate 38
Automatic transmission with Steptronic 72
AUTO program, automatic cli‐ mate control 149
AUTO program, intensity 149
Auto Start/Stop function 64
Average fuel consumption 89
Average speed 89
Axle loads, weights 233
B
Backrest curvature, refer to Lumbar support 49
Backup camera 136
Band-aids, refer to First aid kit 221
Bar for tow-starting/tow‐ ing 224
Battery replacement, vehicle battery 218
Battery replacement, vehicle remote control 30
Battery, vehicle 218
Belts, safety belts 51
Beverage holder, cu‐ pholder 166
Blinds, sun protection 44
BMW Assist, see user's manual for Navigation, Enter‐Seite 236ReferenceEverything from A to Z236
Online Edition for Part no. 01 40 2 917 522 - II/13