2013 BMW 335IS COUPE trunk release
[x] Cancel search: trunk releasePage 32 of 308
31
Opening and closing
Controls
for two remote controls if Comfort Access is in
use.
Personal Profile settings
For more information on specific settings, refer
to the specified pages.
>
Assignment of programmable memory
keys, refer to page 23
> Response of the central locking system
when the car is unlocked, refer to page 32
> Automatic locking of the vehicle, refer to
page 34
> Automatic call-up of the driver's seat posi-
tion, refer to page 52
> Triple turn signal activation, refer to
page 70
> Settings for the display on the Control Dis-
play and in the instrument cluster:
>12h/24h format of the clock, refer to
page 88
> Date format, refer to page 89
> Brightness of the Co ntrol Display, refer
to page 92
> Language on the Control Display, refer
to page 92
> Units of measure, refer to page 85
> Show visual warning for Park Distance Con-
trol PDC, refer to page 95
> Light settings:
>Welcome lamps, refer to page 109
> Pathway lighting, refer to page 109
> Daytime running lights, refer to
page 109
> High-beam Assistant, refer to page 110
> Automatic climate control: activating/deac-
tivating AUTO program, cooling function
and automatic recirculated air control, set-
ting temperature, air volume and distribu-
tion, refer to page 115 ff >
Entertainment:
>Setting tone controls, refer to page 167
> Speed-dependent volume control, refer
to page 168
Central locking system
The concept
The central locking system functions when the
driver's door is closed.
The system simultaneously engages and
releases the locks on the following:
>Doors
> Trunk lid
> Fuel filler flap
> Convertible: glove compartment
Operating from outside
>Via the remote control
> Using the door lock
> In cars with Comfort Access, via the handles
on the driver's door and the front passenger
door
At the same time as locking and unlocking via
the remote control:
> Welcome lights, the interior light, and the
courtesy lighting are switched on and off.
> Alarm system, refer to page 36, is armed or
disarmed.
Operating from inside
By means of the button for central locking, refer
to page 34.
In the event of a sufficiently severe accident, the
central locking system un locks automatically. In
addition, the hazard warning flashers and inte-
rior lamps come on.
00320051004F004C00510048000300280047004C0057004C005200510003
Page 34 of 308
33
Opening and closing
Controls
You can also use this function to locate your
vehicle in parking garages etc.
Unlocking the trunk lid
Press the button for about 1 second and
then release it.
The trunk lid opens a short distance, regardless
of whether it was locked or unlocked.
The trunk lid swings back and up when
opened. Ensure that there is sufficient
clearance. To avoid locking yourself out by
accident, do not place the remote control in the
trunk. A previously locked trunk lid is locked
again after closing.
Before and after each trip, check that the trunk
lid has not been inadvertently unlocked. <
Convertible: Convenient loading
When you are close to the vehicle, the remote
control for Comfort Access can be used to par-
tially raise the open hardtop for more conve-
nient loading of the trunk.
1.Briefly press the button and, within one
second, press again and hold until the
retractable hardtop stops in an intermediate
position. The trunk lid opens slightly.
2. Open the trunk lid, press the trunk partition
upward and stow the cargo in the trunk.
3. Press down the trunk partition until it
engages on both sides and close the trunk
lid.
4. Press the button for a longer period to
fold the retractable hardtop back in.
Confirmation signals
You can activate or deactivate the confirmation
signals.
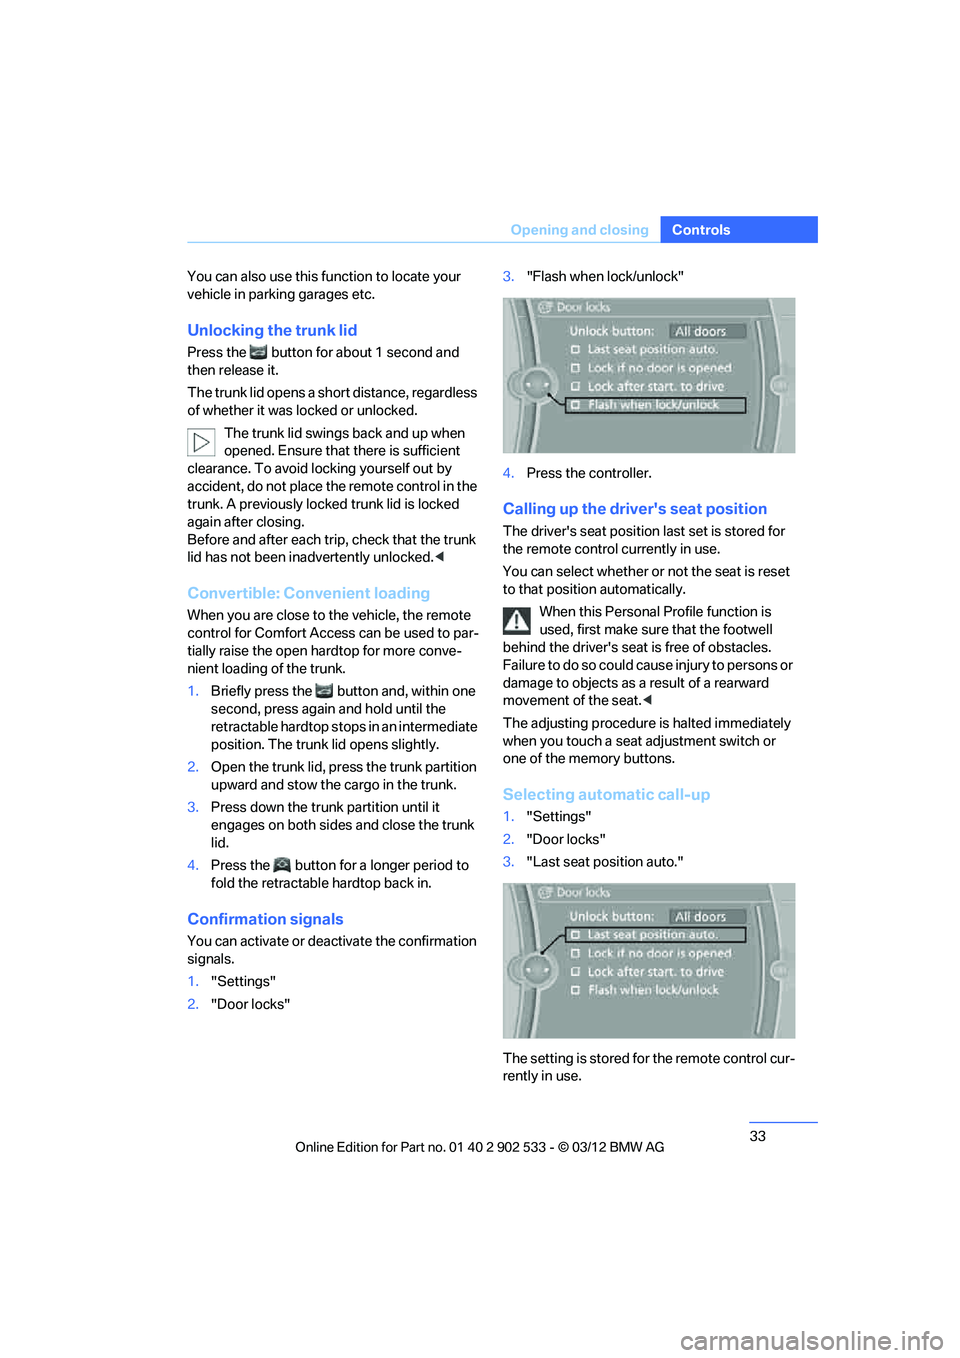
1."Settings"
2. "Door locks" 3.
"Flash when lock/unlock"
4. Press the controller.
Calling up the driver's seat position
The driver's seat position last set is stored for
the remote control currently in use.
You can select whether or not the seat is reset
to that position automatically.
When this Personal Profile function is
used, first make sure that the footwell
behind the driver's seat is free of obstacles.
Failure to do so could cause injury to persons or
damage to objects as a result of a rearward
movement of the seat. <
The adjusting procedure is halted immediately
when you touch a seat adjustment switch or
one of the memory buttons.
Selecting automatic call-up
1. "Settings"
2. "Door locks"
3. "Last seat position auto."
The setting is stored for the remote control cur-
rently in use.
00320051004F004C00510048000300280047004C0057004C005200510003
Page 37 of 308
36
ControlsOpening and closing
Coupe: locking or unlocking separately
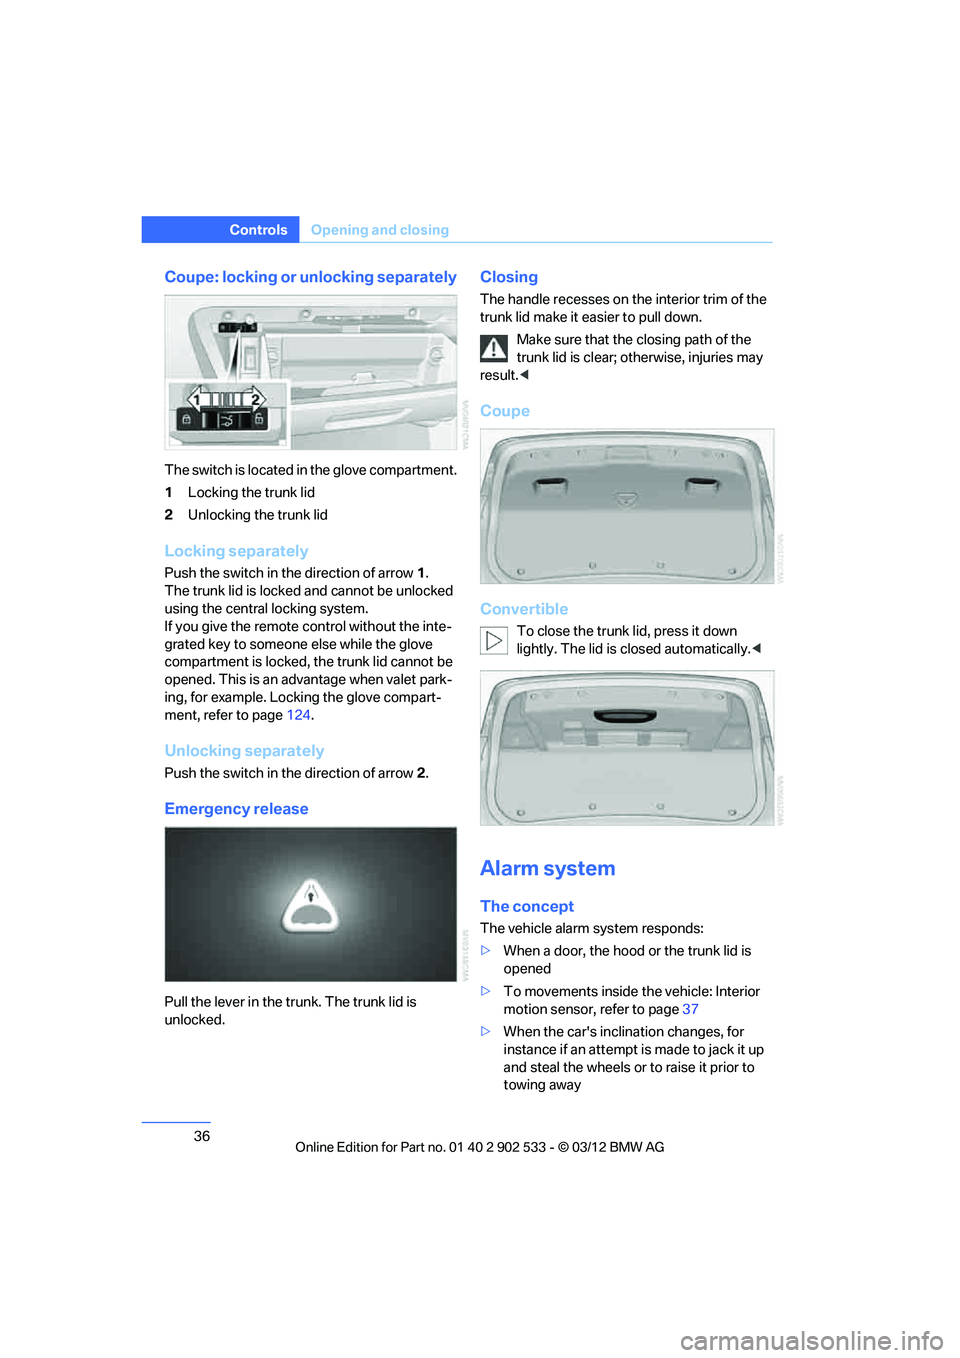
The switch is located in the glove compartment.
1Locking the trunk lid
2 Unlocking the trunk lid
Locking separately
Push the switch in the direction of arrow 1.
The trunk lid is locked and cannot be unlocked
using the central locking system.
If you give the remote control without the inte-
grated key to someone else while the glove
compartment is locked, the trunk lid cannot be
opened. This is an advantage when valet park-
ing, for example. Locking the glove compart-
ment, refer to page 124.
Unlocking separately
Push the switch in the direction of arrow 2.
Emergency release
Pull the lever in the trunk. The trunk lid is
unlocked.
Closing
The handle recesses on the interior trim of the
trunk lid make it easier to pull down.
Make sure that the closing path of the
trunk lid is clear; otherwise, injuries may
result. <
Coupe
Convertible
To close the trunk lid, press it down
lightly. The lid is closed automatically. <
Alarm system
The concept
The vehicle alarm system responds:
>When a door, the hood or the trunk lid is
opened
> To movements inside the vehicle: Interior
motion sensor, refer to page 37
> When the car's inclination changes, for
instance if an attempt is made to jack it up
and steal the wheels or to raise it prior to
towing away
00320051004F004C00510048000300280047004C0057004C005200510003
Page 44 of 308
43
Opening and closing
Controls
Before opening and closing
>
Comply with the safety precautions
described above.
> Ensure that the trunk partition is folded
down and engaged on both sides, refer to
page 128; otherwise, it will not be possible
to open the retractable hardtop.
> Do not place any objects next to or on the
trunk partition and close the storage com-
partment on the left side of the trunk.
> Do not exceed the maximum loading height
under the trunk partition; refer to the label in
the trunk showing a line indicating the max-
imum height.
> Ensure that the trunk lid is closed.
> The vehicle should be parked on fairly level
ground. Excessive angle is indicated by a
lamp.
Before moving the hardtop, make sure
that there are no objects on or next to the
trunk partition, the storage compartment on the
left side of the trunk is closed, and the maximum
loading height in the trunk has not been
exceeded; otherwise, damage may occur. <
Opening and closing
When the vehicle is stationary and at radio
readiness or beyond, refer to page60:
If possible, conserve the battery by only
operating the retractable hardtop when
the engine is running.
Before closing the retractable hardtop, remove
all foreign objects from the windshield frame as
these could prevent the hardtop from closing
properly. < 1
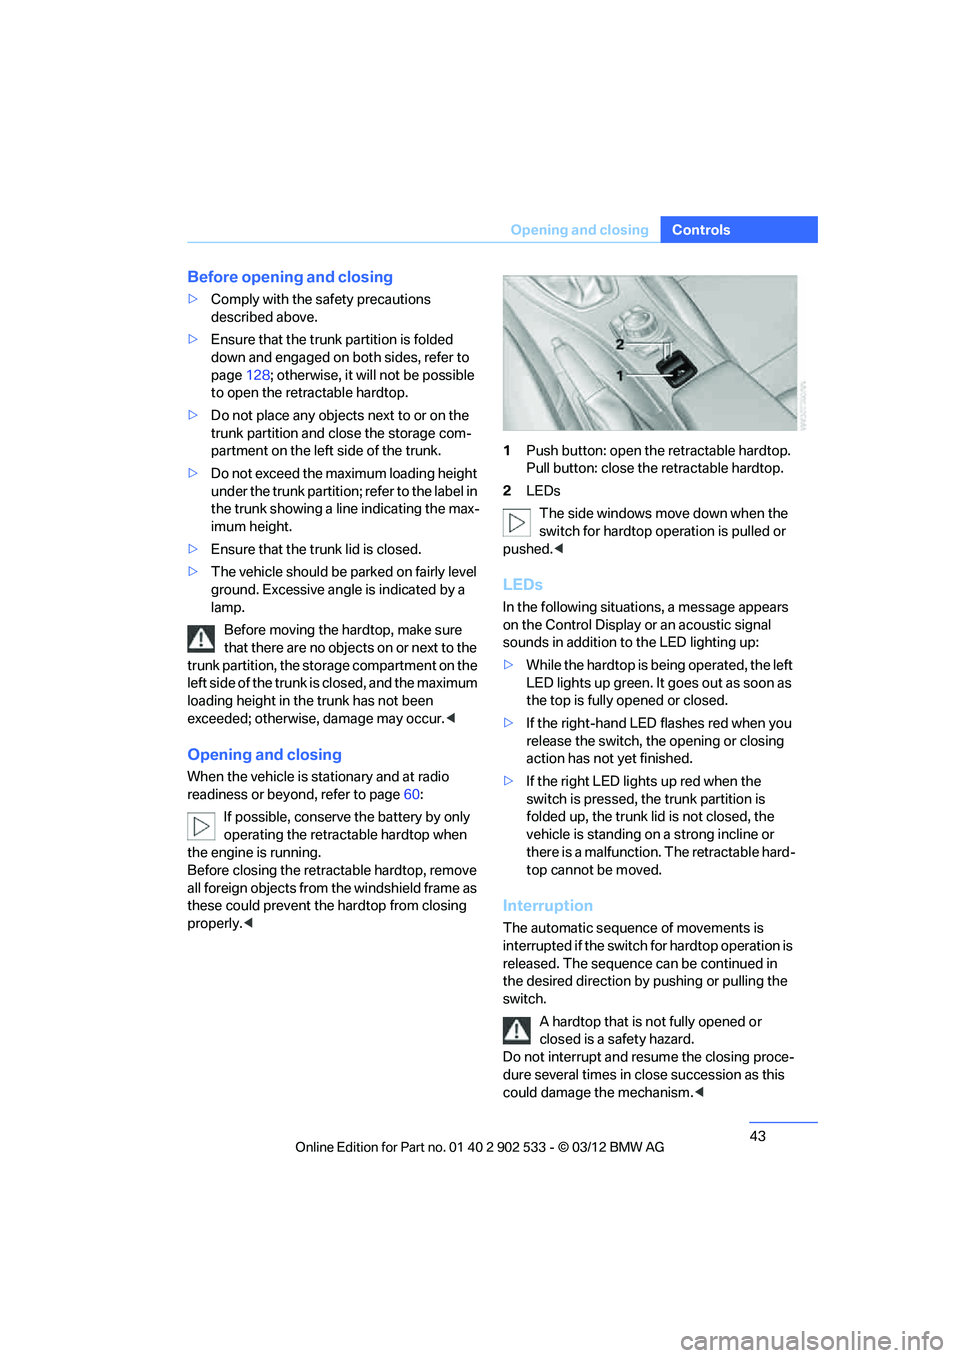
Push button: open the retractable hardtop.
Pull button: close the retractable hardtop.
2 LEDs
The side windows move down when the
switch for hardtop operation is pulled or
pushed. <
LEDs
In the following situations, a message appears
on the Control Display or an acoustic signal
sounds in addition to the LED lighting up:
>While the hardtop is being operated, the left
LED lights up green. It goes out as soon as
the top is fully opened or closed.
> If the right-hand LED flashes red when you
release the switch, the opening or closing
action has not yet finished.
> If the right LED lights up red when the
switch is pressed, the trunk partition is
folded up, the trunk lid is not closed, the
vehicle is standing on a strong incline or
there is a malfunction. The retractable hard-
top cannot be moved.
Interruption
The automatic sequence of movements is
interrupted if the switch for hardtop operation is
released. The sequence can be continued in
the desired direction by pushing or pulling the
switch.
A hardtop that is not fully opened or
closed is a safety hazard.
Do not interrupt and resume the closing proce-
dure several times in close succession as this
could damage the mechanism. <
00320051004F004C00510048000300280047004C0057004C005200510003
Page 129 of 308
128
ControlsPractical interior accessories
Coupe:
Through-loading system
Opening
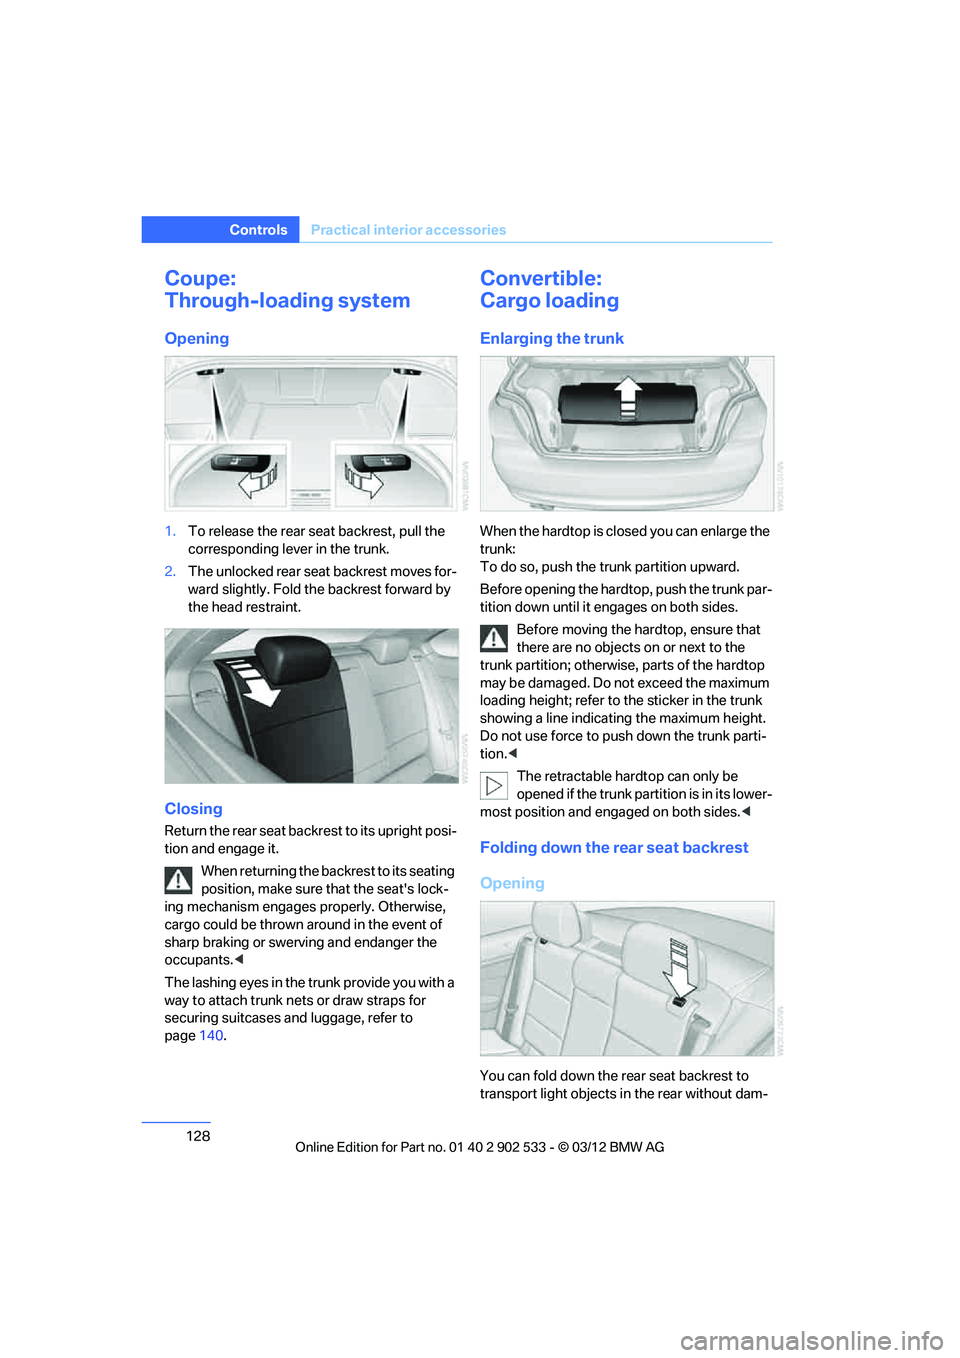
1.To release the rear seat backrest, pull the
corresponding lever in the trunk.
2. The unlocked rear seat backrest moves for-
ward slightly. Fold the backrest forward by
the head restraint.
Closing
Return the rear seat backrest to its upright posi-
tion and engage it.
When returning the backrest to its seating
position, make sure that the seat's lock-
ing mechanism engages properly. Otherwise,
cargo could be thrown around in the event of
sharp braking or swerving and endanger the
occupants. <
The lashing eyes in the trunk provide you with a
way to attach trunk nets or draw straps for
securing suitcases and luggage, refer to
page 140.
Convertible:
Cargo loading
Enlarging the trunk
When the hardtop is closed you can enlarge the
trunk:
To do so, push the trunk partition upward.
Before opening the hardtop, push the trunk par-
tition down until it engages on both sides.
Before moving the hardtop, ensure that
there are no objects on or next to the
trunk partition; otherwise, parts of the hardtop
may be damaged. Do not exceed the maximum
loading height; refer to the sticker in the trunk
showing a line indicating the maximum height.
Do not use force to push down the trunk parti-
tion. <
The retractable hardtop can only be
opened if the trunk partition is in its lower-
most position and engaged on both sides. <
Folding down the rear seat backrest
Opening
You can fold down the rear seat backrest to
transport light objects in the rear without dam-
00320051004F004C00510048000300280047004C0057004C005200510003
Page 234 of 308
233
Refueling
Mobility
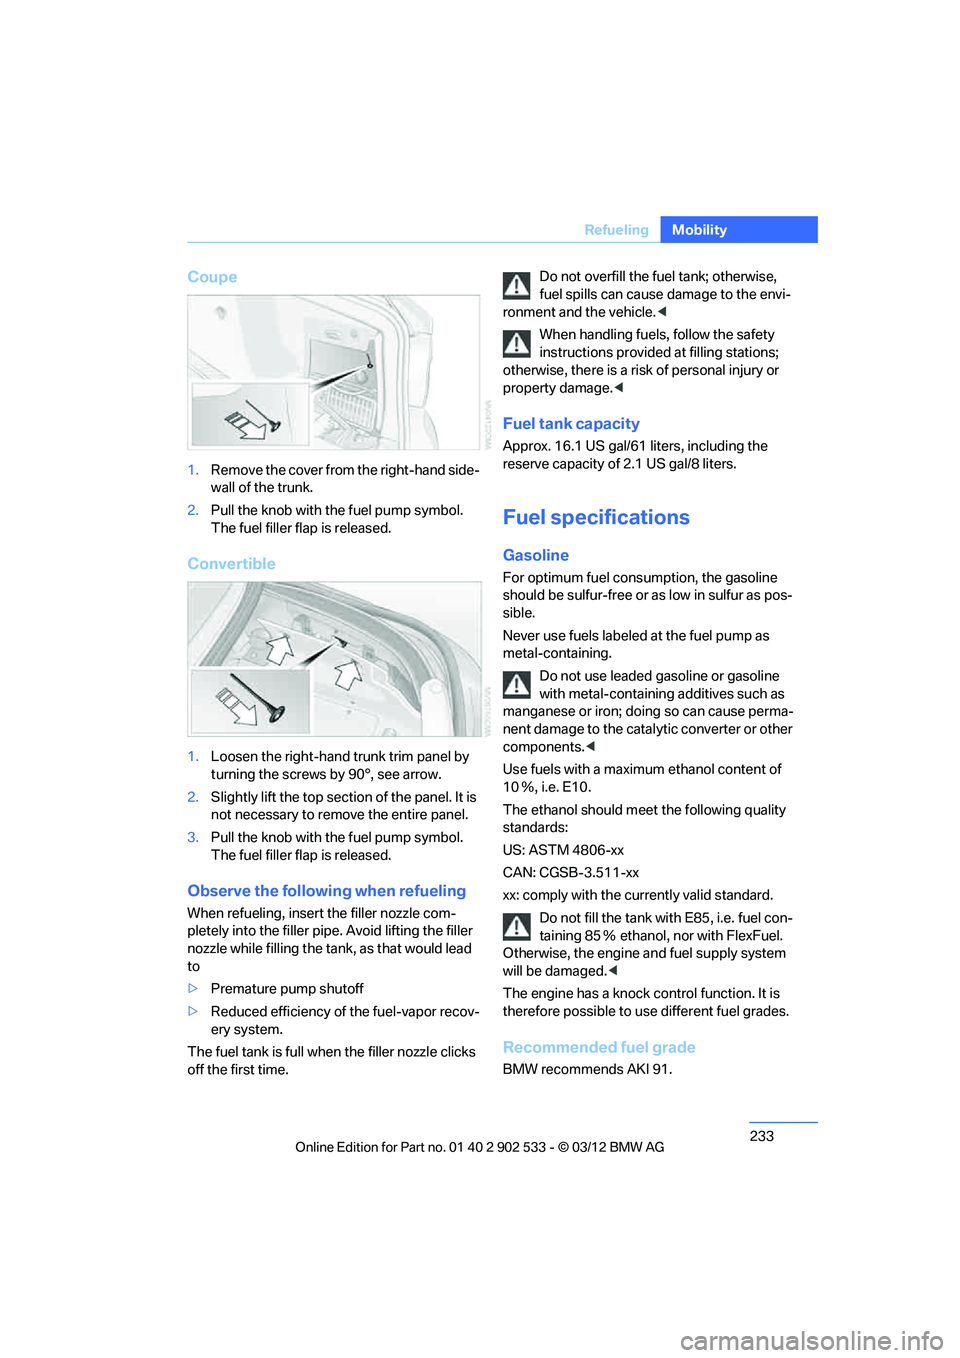
Coupe
1.
Remove the cover from the right-hand side-
wall of the trunk.
2. Pull the knob with the fuel pump symbol.
The fuel filler flap is released.
Convertible
1.Loosen the right-hand trunk trim panel by
turning the screws by 90°, see arrow.
2. Slightly lift the top section of the panel. It is
not necessary to remove the entire panel.
3. Pull the knob with the fuel pump symbol.
The fuel filler flap is released.
Observe the following when refueling
When refueling, insert the filler nozzle com-
pletely into the filler pipe. Avoid lifting the filler
nozzle while filling the tank, as that would lead
to
>Premature pump shutoff
> Reduced efficiency of the fuel-vapor recov-
ery system.
The fuel tank is full when the filler nozzle clicks
off the first time. Do not overfill the fuel tank; otherwise,
fuel spills can cause damage to the envi-
ronment and the vehicle. <
When handling fuels, follow the safety
instructions provided at filling stations;
otherwise, there is a risk of personal injury or
property damage. <
Fuel tank capacity
Approx. 16.1 US gal/61 liters, including the
reserve capacity of 2.1 US gal/8 liters.
Fuel specifications
Gasoline
For optimum fuel consumption, the gasoline
should be sulfur-free or as low in sulfur as pos-
sible.
Never use fuels labeled at the fuel pump as
metal-containing.
Do not use leaded gasoline or gasoline
with metal-containing additives such as
manganese or iron; doing so can cause perma-
nent damage to the catalytic converter or other
components. <
Use fuels with a maximum ethanol content of
10 Ξ, i.e. E10.
The ethanol should meet the following quality
standards:
US: ASTM 4806-xx
CAN: CGSB-3.511-xx
xx: comply with the currently valid standard. Do not fill the tank with E85, i.e. fuel con-
taining 85 Ξ ethanol, nor with FlexFuel.
Otherwise, the engine and fuel supply system
will be damaged. <
The engine has a knock control function. It is
therefore possible to use different fuel grades.
Recommended fuel grade
BMW recommends AKI 91.
00320051004F004C00510048000300280047004C0057004C005200510003
Page 264 of 308
263
Care
Mobility
Automatic transmission
Before driving into an automatic car wash, per-
form the following steps to ensure that the vehi-
cle can roll:
1.
Insert the remote control into the ignition
lock, even with Comfort Access.
2. Move the selector lever to position N.
3. Release the parking brake.
4. Switch off the engine.
5. Leave the remote control in the ignition lock
so that the vehicle can roll.
Sport automatic transmission with
double clutch
Before driving into an automatic car wash, per-
form the following steps to ensure that the vehi-
cle can roll:
1.Insert the remote control into the ignition
lock, even with Comfort Access.
2. Engage transmission position N.
3. Release the parking brake.
4. Switch off the engine.
5. Leave the remote control in the ignition lock
so that the vehicle can roll.
The transmission is switched into position P:
> automatically after approx. 30 minutes
> if you remove the infrared remote control
from the ignition lock
Steam jets/high-pressure washers
When using steam jets or high-pressure
washers, make sure to maintain sufficient
distance from the vehicle and do not exceed a
temperature of 140 7/60 6.
Insufficient clearance or excessive pressure or
temperature can lead to component damage or
water penetration. Follow the operating instruc-
tions of the high-pressure washer. <
When using high-pressure washers, do
not spray the sensors, e.g. of the Park
Distance Control, for an extended period and maintain a distance of at least 1 ft/30 cm from
them.
<
Manual car wash
When washing the vehicle by hand, use large
quantities of water and car shampoo if neces-
sary. Clean the vehicle with a sponge or wash-
ing brush, applying light pressure only.
Before cleaning the windshield, deacti-
vate the rain sensor or switch off the igni-
tion to prevent unintentional activation of the
wipers. <
Observe local regulations pertaining to
washing vehicles by hand. <
Headlamps
Do not rub them dry and do not use abrasive or
corrosive cleaning agents.
Loosen dirt, e.g. insects, with shampoo or
insect remover and wash away with copious
quantities of water.
Thaw ice with a windshield deicer and do not
use an ice scraper.
Windows
Clean the inside and outside surfaces of the
windows and the mirrors with window cleaner.
Do not clean the mirrors with cleaners
containing quartz. <
Convertible: retractable hardtop
Proceed as you would in a normal car wash.
When you open a wet hardtop, water
drops may run into the trunk. If necessary,
remove items from the trunk beforehand to
avoid water stains or soiling. <
Paintwork care
Regular care contributes to value retention and
protects the paintwork against the long-term
effects of damaging substances.
Environmental influences in regions with ele-
vated levels of air pollution or natural contami-
00320051004F004C00510048000300280047004C0057004C005200510003
Page 270 of 308
269
Replacin g components
Mobility
Backup lamp
If these lamps malfunction, please contact your
BMW center.
Turn signal, brake, license plate,
parking, and tail lamps
These lamps use LED technology for operation.
If they malfunction, please contact your BMW
center.
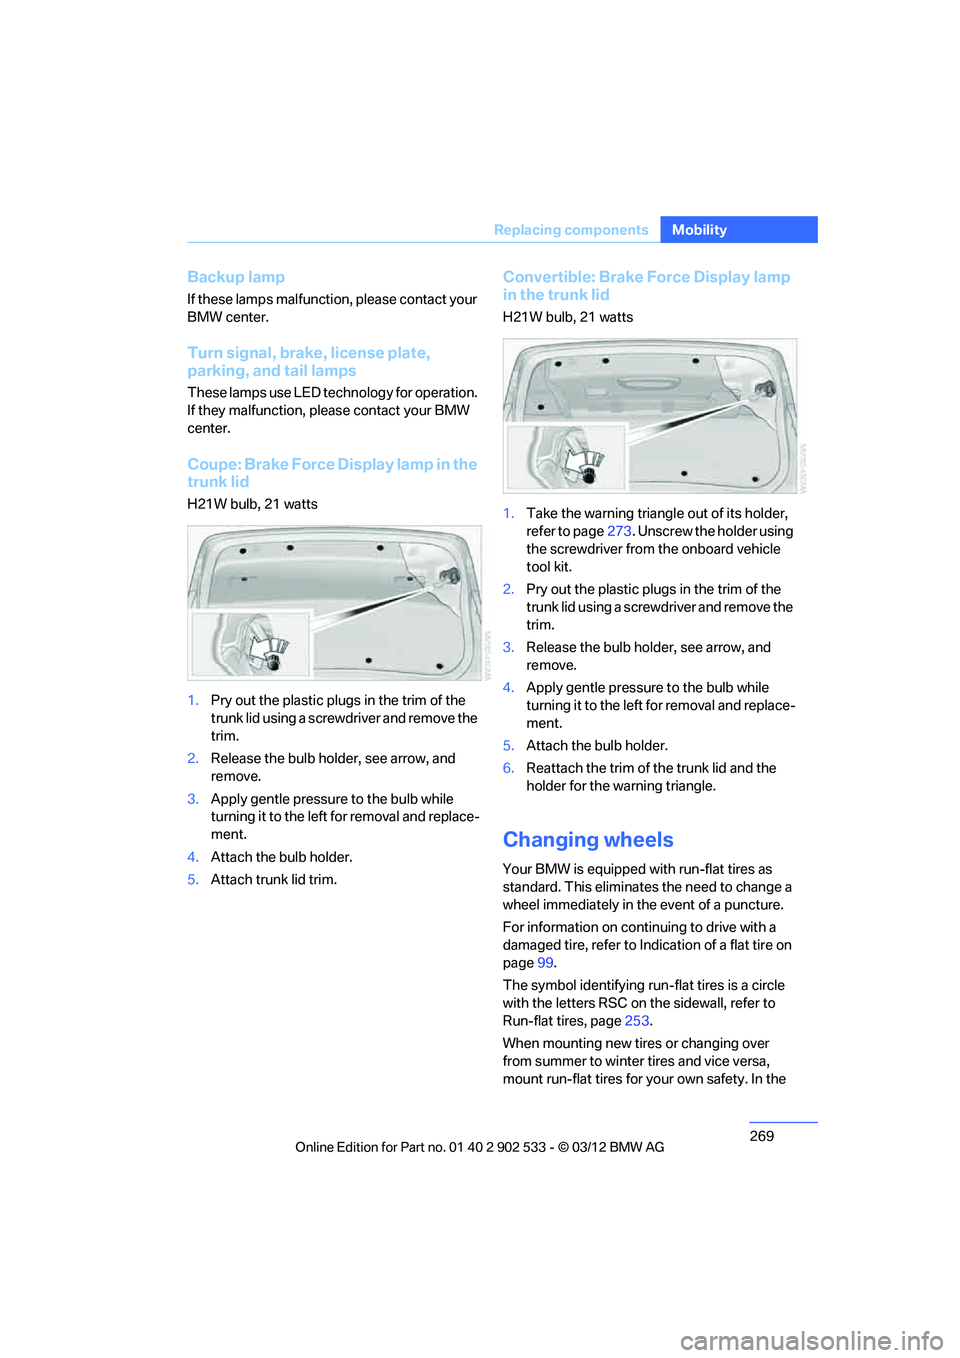
Coupe: Brake Force Display lamp in the
trunk lid
H21W bulb, 21 watts
1.
Pry out the plastic plugs in the trim of the
trunk lid using a screwdriver and remove the
trim.
2. Release the bulb holder, see arrow, and
remove.
3. Apply gentle pressure to the bulb while
turning it to the left for removal and replace-
ment.
4. Attach the bulb holder.
5. Attach trunk lid trim.
Convertible: Brake Force Display lamp
in the trunk lid
H21W bulb, 21 watts
1.Take the warning triangle out of its holder,
refer to page 273. Unscrew the holder using
the screwdriver from the onboard vehicle
tool kit.
2. Pry out the plastic plugs in the trim of the
trunk lid using a screwdriver and remove the
trim.
3. Release the bulb holder, see arrow, and
remove.
4. Apply gentle pressure to the bulb while
turning it to the left for removal and replace-
ment.
5. Attach the bulb holder.
6. Reattach the trim of the trunk lid and the
holder for the warning triangle.
Changing wheels
Your BMW is equipped with run-flat tires as
standard. This eliminates the need to change a
wheel immediately in the event of a puncture.
For information on continuing to drive with a
damaged tire, refer to Indication of a flat tire on
page 99.
The symbol identifying run-flat tires is a circle
with the letters RSC on the sidewall, refer to
Run-flat tires, page 253.
When mounting new tires or changing over
from summer to winter tires and vice versa,
mount run-flat tires for your own safety. In the
00320051004F004C00510048000300280047004C0057004C005200510003