2013 BMW 335IS CONVERTIBLE belt
[x] Cancel search: beltPage 105 of 308

104
ControlsTechnology for driving comfort and safety
Malfunction
The warning lamp lights up. A mes-
sage appears on the Control Display.
Servotronic is malfunctioning or has
failed. Steering response will be different. You
can continue your journey, but moderate your
speed and exercise due caution. Have the sys-
tem checked as soon as possible.
Brake Force Display
On the left: normal braking.
On the right: sharp braking.
Airbags
The following airbags are located under the
marked covers:
1 Front airbags
2 Coupe: head airbags
3 Side airbags in the seat backrests
4 Convertible: knee airbags
Protective action
Observe the adjustment instructions on
page 46 to ensure the best possible per-
sonal protection. <
The front airbags help protect the driver and
front passenger by responding to frontal
impacts in which safety belts alone cannot pro-
vide adequate restraint. When needed, the
head and side airbags help provide protection in
the event of side impact. The relevant side air- bag supports the side upper body area. The
head air bag supports the head.
The airbags have been designed to not be trig-
gered in every collision situation, e.g. not in
minor accidents or rear-end collisions.
Do not apply adhesive materials to the
cover panels of the airbags, cover them or
modify them in any other way.
Keep the dashboard and windows on the front
passenger side clear, i.e. do not cover with
adhesive labels or coverings, and do not attach
holders such as for navigation instruments or
mobile phones.
Do not attach seat covers, cushions or other
objects not specifically approved for seats with
integral side airbags to the front seats. Do not
hang items of clothing such as coats or jackets
over the backrests. Do not attempt to remove
00320051004F004C00510048000300280047004C0057004C005200510003
Page 107 of 308

106
ControlsTechnology for driving comfort and safety
The front and side airbags for the front pas-
senger are activated.
> The indicator lamp does not light up if the
seat is empty.
The front and side airbags for the front pas-
senger are not activated.
Operational readiness of airbag system
As of radio readiness, refer to page 60, the
warning lamp lights up briefly to indicate that
the entire airbag system and the belt tensioners
are operational.
Airbag system malfunction
> Warning lamp does not light up at radio
readiness or beyond.
> Warning lamp remains permanently on.
In the event of a fault in the airbag system,
have it checked without delay; otherwise,
there is the risk that the system will not function
as intended even if a sufficiently severe acci-
dent occurs. <
Convertible: rollover
protection system
The rollover protection system is activated
automatically in the event of an accident of suf-
ficient severity or an extreme tilt in the car's lon-
gitudinal axis. The protection bars behind the
rear head restraints deploy within fractions of a
second.
As a supplementary system to the reinforced
windshield frame, the rollover protection sys- tem increases the safety of the vehicle occu-
pants.
Always keep the area of movement of the
rollover protection system clear.
In minor accidents, you are protected by the
fastened safety belt and, depending on acci-
dent severity, by the safety belt tensioner and
multi-phase airbag retention system. <
Resetting
If the rollover protection system was not
impacted after being automatically activated, it
can be reset by lowering the protection bars to
their original positions. This does not require
tools.
1.Push the locking lever to one side and hold
it there.
2. Push the protection bar halfway down from
above.
3. Release the locking lever.
4. Push the protection bar down until it snaps
into place.
5. Repeat the procedure for the other protec-
tion bar.
00320051004F004C00510048000300280047004C0057004C005200510003
Page 133 of 308

132
ControlsPractical interior accessories
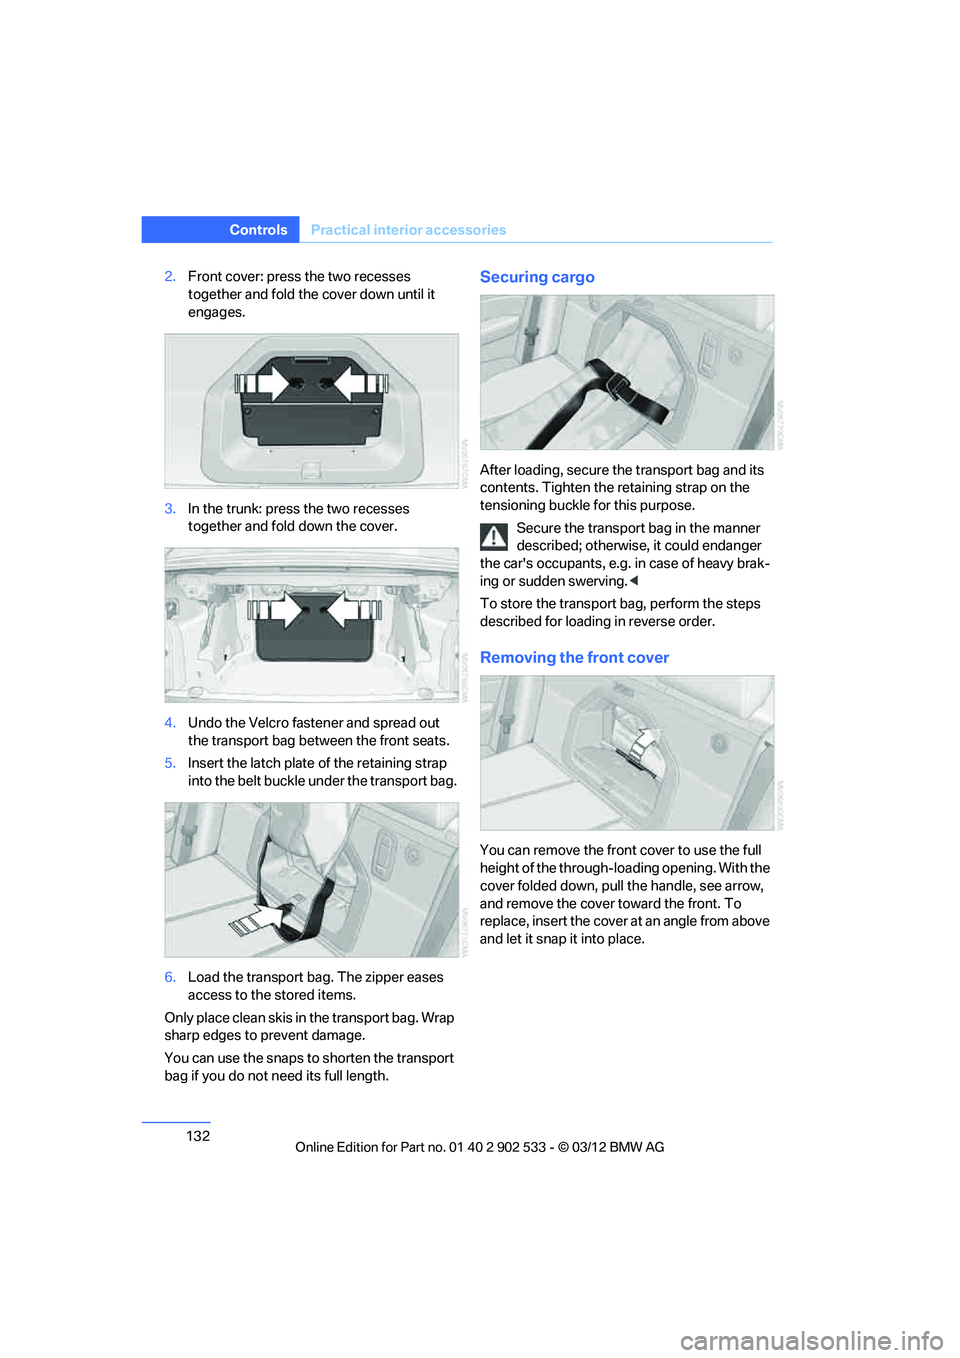
2.Front cover: press the two recesses
together and fold the cover down until it
engages.
3. In the trunk: press the two recesses
together and fold down the cover.
4. Undo the Velcro fastener and spread out
the transport bag between the front seats.
5. Insert the latch plate of the retaining strap
into the belt buckle under the transport bag.
6. Load the transport bag. The zipper eases
access to the stored items.
Only place clean skis in the transport bag. Wrap
sharp edges to prevent damage.
You can use the snaps to shorten the transport
bag if you do not need its full length.Securing cargo
After loading, secure the transport bag and its
contents. Tighten the retaining strap on the
tensioning buckle for this purpose. Secure the transport bag in the manner
described; otherwise, it could endanger
the car's occupants, e.g. in case of heavy brak-
ing or sudden swerving. <
To store the transport bag, perform the steps
described for loading in reverse order.
Removing the front cover
You can remove the front cover to use the full
height of the through-loading opening. With the
cover folded down, pull the handle, see arrow,
and remove the cover toward the front. To
replace, insert the cover at an angle from above
and let it snap it into place.
00320051004F004C00510048000300280047004C0057004C005200510003
Page 141 of 308

140
Driving tipsThings to remember when driving
4.The resulting figure equals the available
amount of cargo and luggage load capacity.
For example, if the YYY amount equals
1,400 lbs and there will be five 150-lb pas-
sengers in your vehicle, the amount of avail-
able cargo and luggage load capacity is
650 lbs:
1,400 lbs minus 750 lbs = 650 lbs.
5. Determine the combined weight of luggage
and cargo being loaded on the vehicle. That
weight may not safely exceed the available
cargo and luggage load capacity calculated
in step 4.
6. If your vehicle will be towing a trailer, part of
the load from your trailer will be transferred
to your vehicle. Consult the manual for
transporting a trailer to determine how this
may reduce the available cargo and luggage
load capacity of your vehicle.
Load
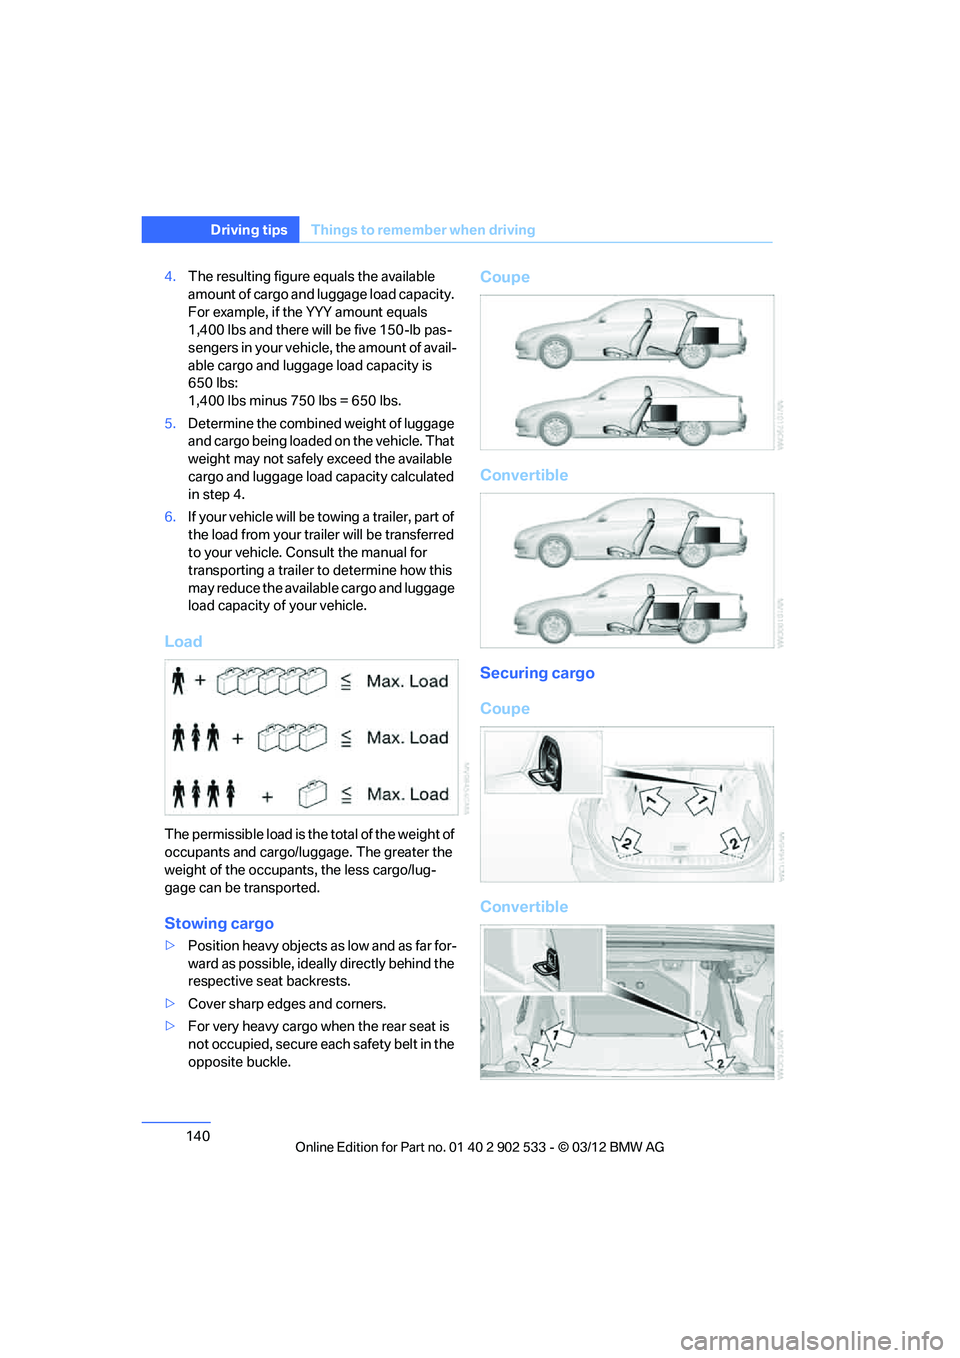
The permissible load is the total of the weight of
occupants and cargo/lu ggage. The greater the
weight of the occupants, the less cargo/lug-
gage can be transported.
Stowing cargo
> Position heavy objects as low and as far for-
ward as possible, ideally directly behind the
respective seat backrests.
> Cover sharp edges and corners.
> For very heavy cargo when the rear seat is
not occupied, secure each safety belt in the
opposite buckle.
Coupe
Convertible
Securing cargo
Coupe
Convertible
00320051004F004C00510048000300280047004C0057004C005200510003
Page 169 of 308

168
EntertainmentOn/off and tone
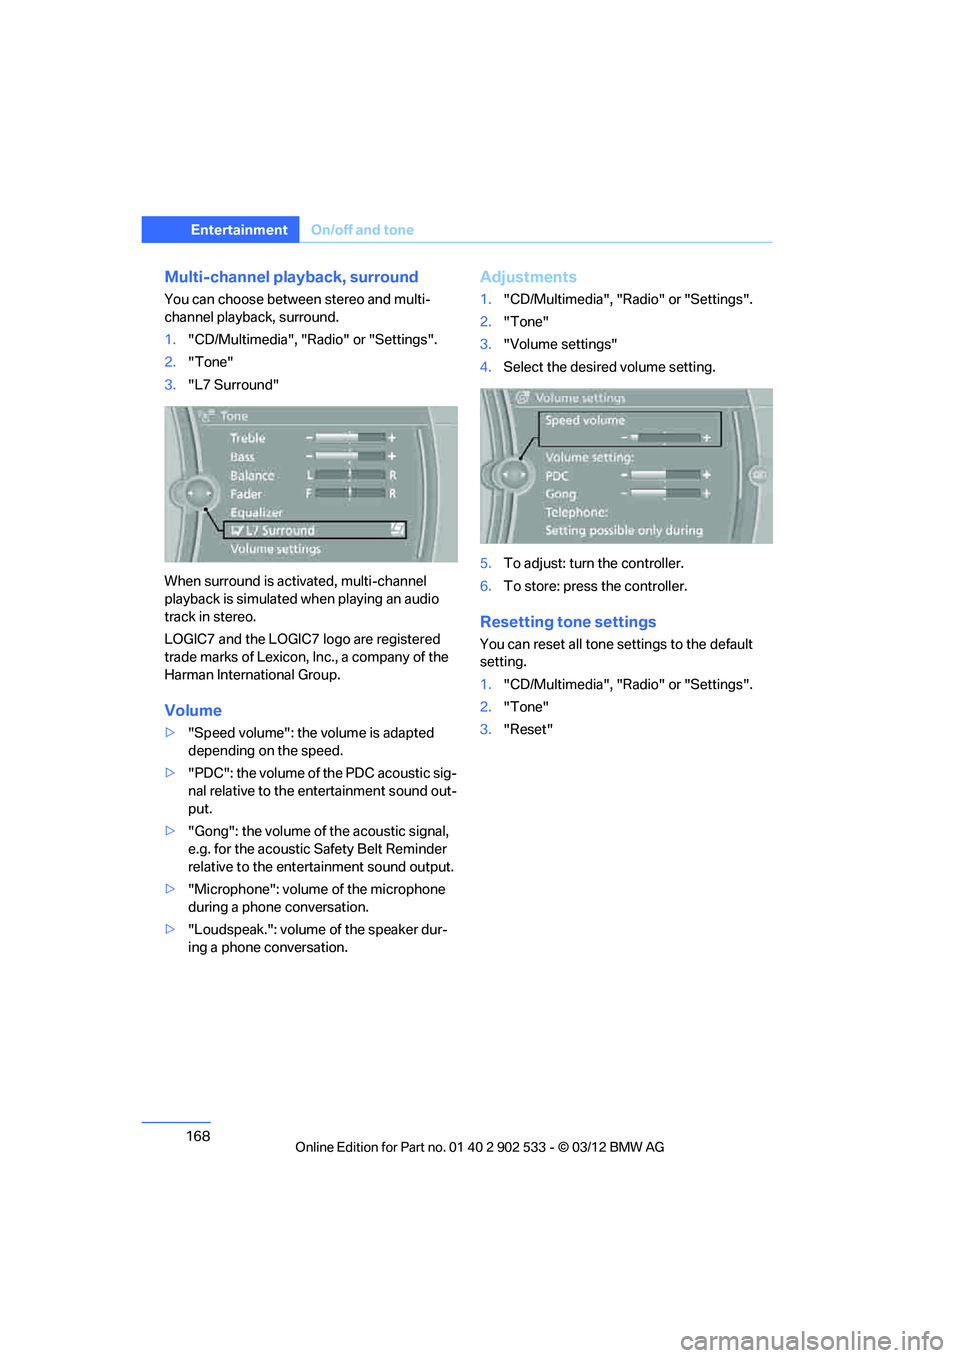
Multi-channel playback, surround
You can choose between stereo and multi-
channel playback, surround.
1."CD/Multimedia", "Radio" or "Settings".
2. "Tone"
3. "L7 Surround"
When surround is activated, multi-channel
playback is simulated when playing an audio
track in stereo.
LOGIC7 and the LOGIC7 logo are registered
trade marks of Lexicon, Inc., a company of the
Harman International Group.
Volume
> "Speed volume": the volume is adapted
depending on the speed.
> "PDC": the volume of the PDC acoustic sig-
nal relative to the entertainment sound out-
put.
> "Gong": the volume of the acoustic signal,
e.g. for the acoustic Safety Belt Reminder
relative to the entertainment sound output.
> "Microphone": volume of the microphone
during a phone conversation.
> "Loudspeak.": volume of the speaker dur-
ing a phone conversation.
Adjustments
1."CD/Multimedia", "Radio" or "Settings".
2. "Tone"
3. "Volume settings"
4. Select the desired volume setting.
5. To adjust: turn the controller.
6. To store: press the controller.
Resetting tone settings
You can reset all tone settings to the default
setting.
1."CD/Multimedia", "Radio" or "Settings".
2. "Tone"
3. "Reset"
00320051004F004C00510048000300280047004C0057004C005200510003
Page 252 of 308

251
Wheels and tires
Mobility
Tire identification marks
Knowledge of the labeling on the side of the tire
makes it easier to identify and choose the right
tires.
Tire size
Speed code letter
Q = up to 100 mph (160 km/h)
T = up to 118 mph or 190 km/h
H = up to 131 mph (210 km/h)
V = up to 150 mph (240 km/h)
W = up to 167 mph (270 km/h)
Y = up to 190 mph (300 km/h)
Tire Identification Number
Tires with DOT codes meet the guidelines of
the US Department of Transportation.
DOT code:
Tire age
The manufacturing date of tires is contained in
the tire coding: DOT … 1012 means that the
tire was manufactured in week 10 of 2012.
BMW recommends that you replace all tires
after 6 years at most, even if some tires may last
for 10 years.
Uniform Tire Quality Grading
Quality grades can be found where applicable
on the tire sidewall between tread shoulder and
maximum section width. For example:
Tread wear 200 Traction AA
Temperature A
DOT Quality Grades
Tread wear
Traction AA A B C
Temperature A B C
All passenger car tires must conform to
Federal Safety Requirements in addition
to these grades. <
Tread wear
The tread wear grade is a comparative rating
based on the wear rate of the tire when tested
under controlled conditions on a specified gov-
ernment test course. For example, a tire graded
150 would wear one and one-half (1 γ) times as
well on the government course as a tire graded
100. The relative performance of tires depends
upon the actual conditions of their use, how-
ever, and may depart significantly from the
norm due to variations in driving habits, service
practices and differences in road characteris-
tics and climate.
Traction
The traction grades, from highest to lowest, are
AA, A, B, and C.
Those grades represent the tire's ability to stop
on wet pavement as measured under controlled
conditions on specified government test sur-
faces of asphalt and concrete. A tire marked C
may have poor traction performance.
The traction grade assigned to this tire is
based on straight-ahead braking traction
tests, and does not include acceleration, cor-
nering, hydroplaning, or peak traction charac-
teristics. <
e.g.
Nominal width in mm
Aspect ratio in
Ξ
Radial belt construction
Rim diameter in inches
Load rating,
not on ZR tires
Speed code letter,
in front of the R on ZR tires
225/45 R1791 V
e.g.
Manufacturer's
code for tire make
Tire size and tire design
Tire ageDOT xxxx xxx 1012
00320051004F004C00510048000300280047004C0057004C005200510003
Page 266 of 308

265
Care
Mobility
Clean light-colored leather more frequently as
dust and dirt are more noticeable.
Treat the leather at least once every two
months using a leather lotion as dirt and grease
will gradually attack the leather's protective
layer.
Carpet and floor mats
Keep floor mats, carpet, and other objects
out of the movement range of the pedals;
otherwise, they may inhibit the function of the
pedals during driving.
Do not place additional floor mats onto an exist-
ing one or onto other objects.
Only use floor mats that have been approved for
the vehicle and can be appropriately fastened.
Make sure that the floor mats are securely fas-
tened again after they have been removed, e.g.
for cleaning. <
Interior plastic parts
>Imitation leather surfaces
> Lamp glasses
> Display pane of instrument cluster
> Matte parts
Clean with water and solvent-free plastic
cleaner if necessary.
Fine wood parts
Clean fine wood trim and fine wood parts with a
damp cloth. Wipe dry with a soft cloth.
Safety belts
Dirty belt straps impede the reeling action and
thus have a negative impact on safety. Do not clean chemically, as this may
destroy the webbing. <
Interior sensors/cameras
To clean interior sensors and cameras, e.g. of
the High-beam Assistant, use a lint-free cloth
moistened with glass cleaner.
Displays
Use an antistatic microfiber cloth to clean dis-
plays, e.g. of the radio or instrument cluster.
Avoid applying excessive pressure when
cleaning the displays; otherwise, damage
may occur. <
Do not use chemical or abrasive house-
hold cleaning agents. Keep all types of
fluid away from the device. Otherwise, surfaces
or electrical components may be corroded or
damaged. <
CD/DVD drives
Do not use a cleaning CD, as it may dam-
age parts of the drive. <
Vehicle storage
If you plan to park your vehicle for longer than
three months, your BMW center will be happy
to advise you.
00320051004F004C00510048000300280047004C0057004C005200510003
Page 294 of 308

293
Everything from A to Z
Reference
AUX-IN
– port
125
Available services 228
Average fuel consumption 82
– setting the units 85
Average speed 82
Avoid highways in
navigation 155
Avoiding unintentional alarms 38
Axle loads, refer to Weights 283
B
Backrest contour, refer to
Lumbar support 48
Backrests, refer to Seat adjustment 47
Backrest width adjustment 48
Back seats
– refer to Rear seats 50
Bag holder 129
Band-aids, refer to First aid pouch 273
Bar, refer to Towing methods 276
Base plate for telephone or
mobile phone
– refer to Snap-in adapter 211
– refer to Snap-in adapter in
the center armrest storage
compartment 124
Battery 270
– charging 270
– disposal 40,271
– jump-starting 274
– remote control 30
– replacing 270
– temporary power failure 270
Battery renewal
– remote control 40
– remote control for vehicle 39
Being towed 275
Belt hand-over 53
– pinch protection system 53
Belts, refer to Safety belts 52Belt tensioner, refer to Safety
belts 52
Beverage holders, refer to Cupholders 126
Black ice, refer to Outside temperature warning 80
Blinds, refer to Roller
sunblinds 124
Blower, refer to Air volume 116
Bluetooth, activating/ deactivating 201
BMW
– car shampoo 265
BMW Assist 224
– updating 228
BMW Homepage 4
BMW Info 218
BMW Maintenance
System 260
BMW Online 226
BMW webpage 4
Bottle holders, refer to Cupholders 126
Brake Assist, refer to Dynamic
Brake Control DBC 95
Brake fluid, refer to Service requirements 85
Brake Force Display 104
Brake lamps
– B ra
ke Force Display 104
Brake pads 136
– breaking in 136
Brake pedal, refer to Braking
safely 138
Brake rotors 139
– brakes 136
– breaking in 136
Brakes
– ABS 95
– BMW Maintenance System 260
– Brake Force Display 104
– breaking in 136
– parking brake 62
– service requirements 85Brakes, refer to Braking
safely 138
Brake system 136
– BMW Maintenance
System 260
– breaking in 136
– disc brakes 139
Breakdown services, refer to Roadside Assistance 273
Breaking in the clutch 136
Breaking in the differential, refer to Engine and
differential 136
Break-in period 136
Brightness of the Control Display 92
Bulb changing, refer to Lamps and bulbs 266
Button for starting the engine,
refer to Start/Stop button 60
Buttons on the steering wheel 11
C
Calendar 219
– displaying appointment 219
– selecting calendar day 219
California Proposition 65 warning 6
Call
– accepting 205
– ending 205
– muting the microphone 207
– rejecting 205
Calling, refer to Phone numbers, dialing 206
Calling, refer to Telephone owner's manual
Calls
– with multiple parties 206
Can holders, refer to Cupholders 126
Capacities 284
Capacity of the trunk 283
Car battery, refer to Vehicle
battery 270
00320051004F004C00510048000300280047004C0057004C005200510003