2013 BMW 335I XDRIVE COUPE instrument panel
[x] Cancel search: instrument panelPage 105 of 308

104
ControlsTechnology for driving comfort and safety
Malfunction
The warning lamp lights up. A mes-
sage appears on the Control Display.
Servotronic is malfunctioning or has
failed. Steering response will be different. You
can continue your journey, but moderate your
speed and exercise due caution. Have the sys-
tem checked as soon as possible.
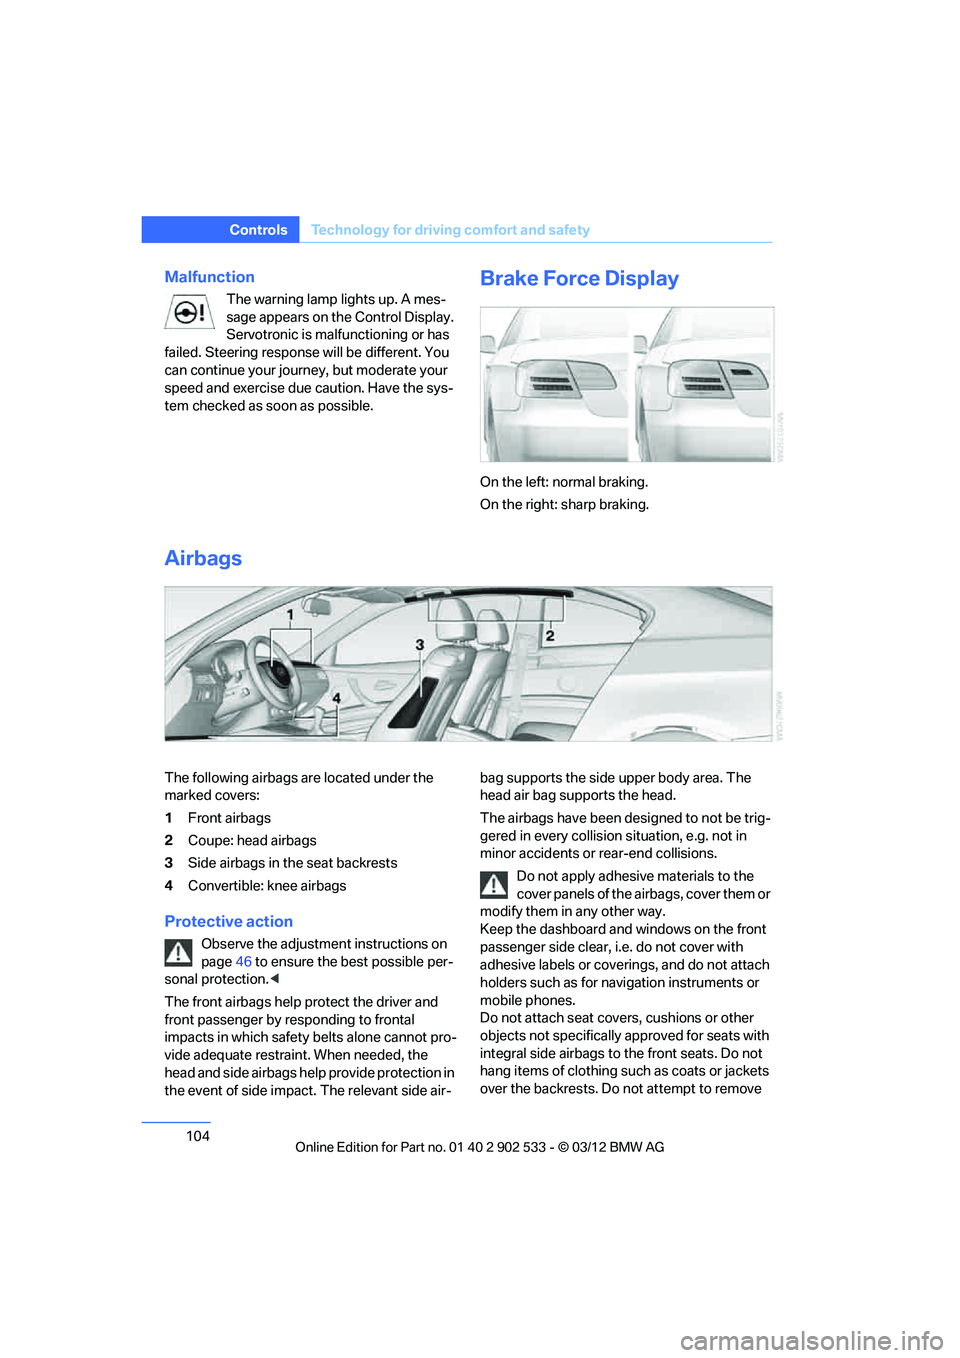
Brake Force Display
On the left: normal braking.
On the right: sharp braking.
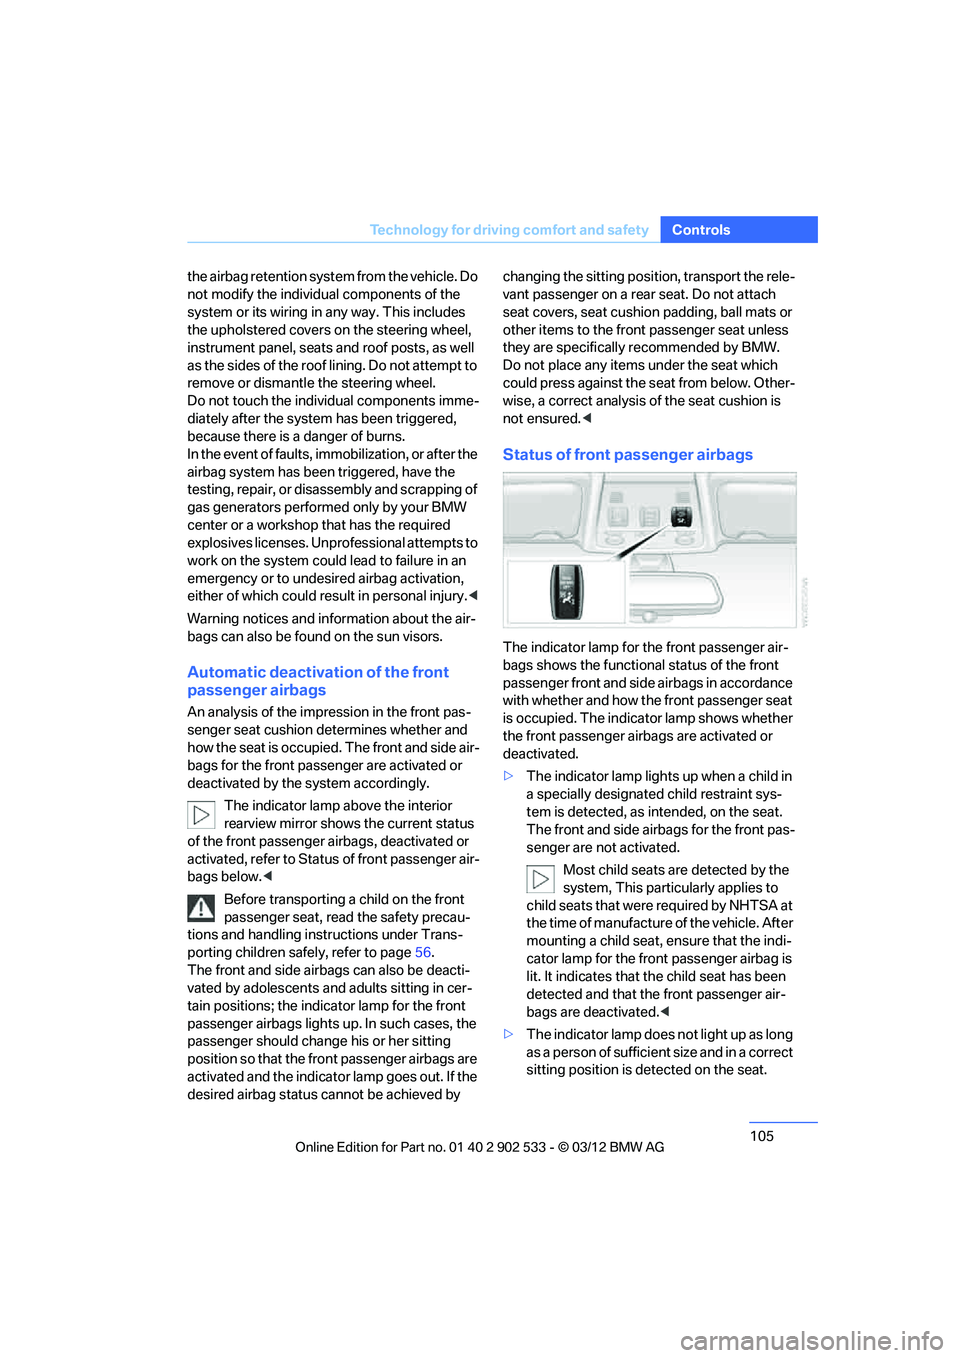
Airbags
The following airbags are located under the
marked covers:
1 Front airbags
2 Coupe: head airbags
3 Side airbags in the seat backrests
4 Convertible: knee airbags
Protective action
Observe the adjustment instructions on
page 46 to ensure the best possible per-
sonal protection. <
The front airbags help protect the driver and
front passenger by responding to frontal
impacts in which safety belts alone cannot pro-
vide adequate restraint. When needed, the
head and side airbags help provide protection in
the event of side impact. The relevant side air- bag supports the side upper body area. The
head air bag supports the head.
The airbags have been designed to not be trig-
gered in every collision situation, e.g. not in
minor accidents or rear-end collisions.
Do not apply adhesive materials to the
cover panels of the airbags, cover them or
modify them in any other way.
Keep the dashboard and windows on the front
passenger side clear, i.e. do not cover with
adhesive labels or coverings, and do not attach
holders such as for navigation instruments or
mobile phones.
Do not attach seat covers, cushions or other
objects not specifically approved for seats with
integral side airbags to the front seats. Do not
hang items of clothing such as coats or jackets
over the backrests. Do not attempt to remove
00320051004F004C00510048000300280047004C0057004C005200510003
Page 106 of 308

105
Technology for driving comfort and safety
Controls
the airbag retention system from the vehicle. Do
not modify the individual components of the
system or its wiring in any way. This includes
the upholstered covers on the steering wheel,
instrument panel, seats and roof posts, as well
as the sides of the roof lining. Do not attempt to
remove or dismantle the steering wheel.
Do not touch the individual components imme-
diately after the system has been triggered,
because there is a danger of burns.
In the event of faults, immobilization, or after the
airbag system has been triggered, have the
testing, repair, or disassembly and scrapping of
gas generators performed only by your BMW
center or a workshop that has the required
explosives licenses. Unprofessional attempts to
work on the system could lead to failure in an
emergency or to undesired airbag activation,
either of which could result in personal injury.
<
Warning notices and information about the air-
bags can also be found on the sun visors.
Automatic deactivation of the front
passenger airbags
An analysis of the impression in the front pas-
senger seat cushion determines whether and
how the seat is occupied. The front and side air-
bags for the front passenger are activated or
deactivated by the system accordingly. The indicator lamp above the interior
rearview mirror shows the current status
of the front passenger airbags, deactivated or
activated, refer to Status of front passenger air-
bags below. <
Before transporting a child on the front
passenger seat, read the safety precau-
tions and handling instructions under Trans-
porting children safely, refer to page 56.
The front and side airbags can also be deacti-
vated by adolescents and adults sitting in cer-
tain positions; the indicator lamp for the front
passenger airbags lights up. In such cases, the
passenger should change his or her sitting
position so that the front passenger airbags are
activated and the indicator lamp goes out. If the
desired airbag status cannot be achieved by changing the sitting posi
tion, transport the rele-
vant passenger on a rear seat. Do not attach
seat covers, seat cushion padding, ball mats or
other items to the front passenger seat unless
they are specifically recommended by BMW.
Do not place any items under the seat which
could press against the seat from below. Other-
wise, a correct analysis of the seat cushion is
not ensured. <
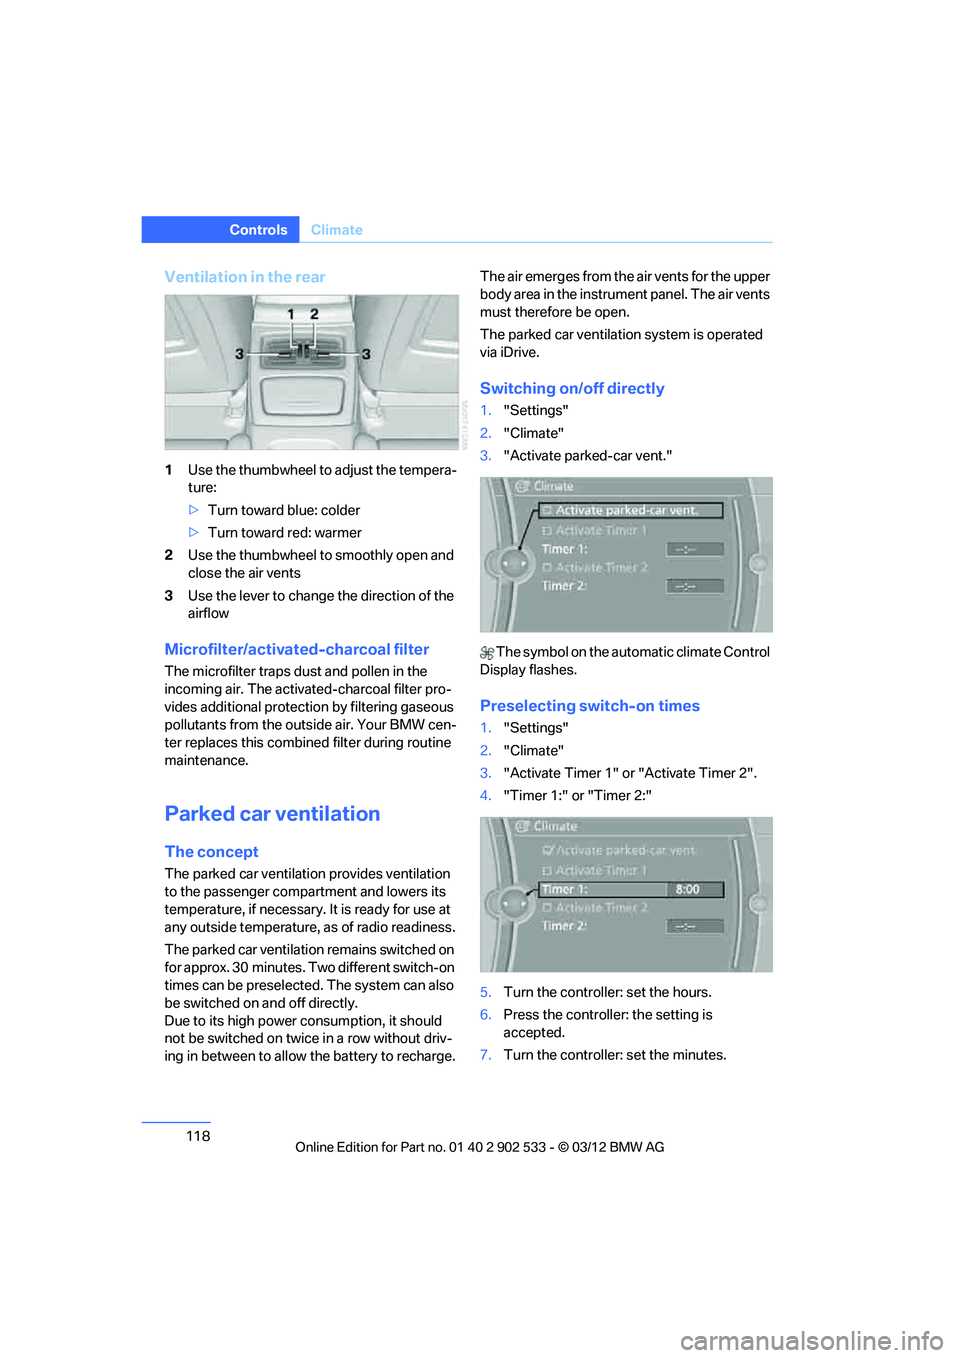
Status of front passenger airbags
The indicator lamp for the front passenger air-
bags shows the functional status of the front
passenger front and side airbags in accordance
with whether and how the front passenger seat
is occupied. The indicator lamp shows whether
the front passenger airbags are activated or
deactivated.
>The indicator lamp lights up when a child in
a specially designated child restraint sys-
tem is detected, as intended, on the seat.
The front and side airbags for the front pas-
senger are not activated.
Most child seats are detected by the
system, This particularly applies to
child seats that were required by NHTSA at
the time of manufacture of the vehicle. After
mounting a child seat, ensure that the indi-
cator lamp for the front passenger airbag is
lit. It indicates that the child seat has been
detected and that the front passenger air-
bags are deactivated. <
> The indicator lamp does not light up as long
as a person of sufficient size and in a correct
sitting position is detected on the seat.
00320051004F004C00510048000300280047004C0057004C005200510003
Page 119 of 308

118
ControlsClimate
Ventilation in the rear
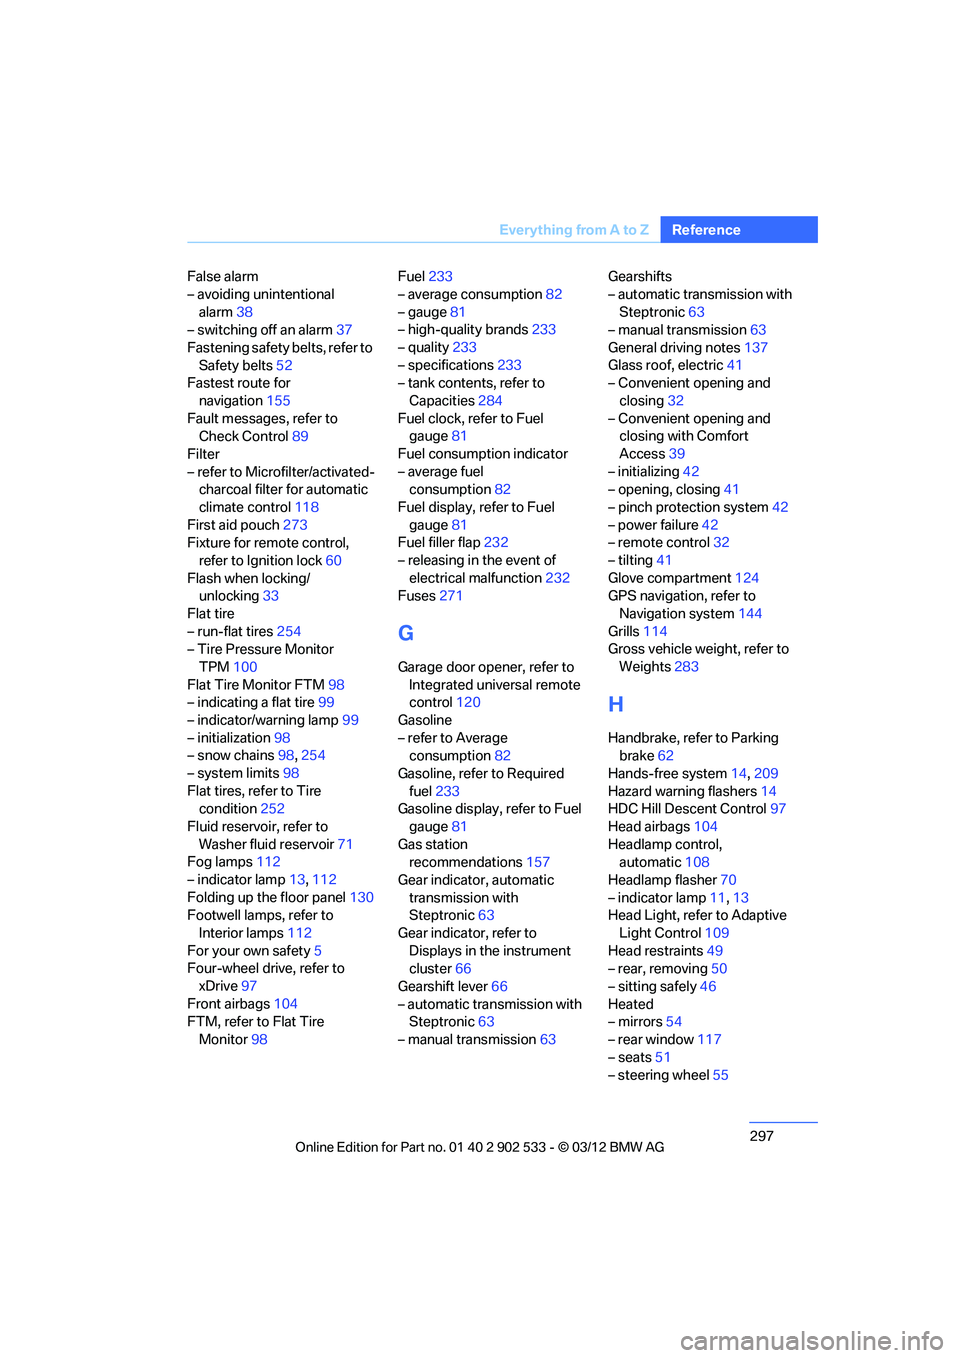
1Use the thumbwheel to adjust the tempera-
ture:
>Turn toward blue: colder
> Turn toward red: warmer
2 Use the thumbwheel to smoothly open and
close the air vents
3 Use the lever to change the direction of the
airflow
Microfilter/activated-charcoal filter
The microfilter traps dust and pollen in the
incoming air. The activated-charcoal filter pro-
vides additional protecti on by filtering gaseous
pollutants from the outside air. Your BMW cen-
ter replaces this combined filter during routine
maintenance.
Parked car ventilation
The concept
The parked car ventilation provides ventilation
to the passenger compartment and lowers its
temperature, if necessary. It is ready for use at
any outside temperature, as of radio readiness.
The parked car ventilation remains switched on
for approx. 30 minutes. Two different switch-on
times can be preselected. The system can also
be switched on and off directly.
Due to its high power co nsumption, it should
not be switched on twice in a row without driv-
ing in between to allow the battery to recharge. The air emerges from the air vents for the upper
body area in the instrument panel. The air vents
must therefore be open.
The parked car ventilation system is operated
via iDrive.
Switching on/off directly
1.
"Settings"
2. "Climate"
3. "Activate parked-car vent."
The symbol on the automatic climate Control
Display flashes.
Preselecting switch-on times
1. "Settings"
2. "Climate"
3. "Activate Timer 1" or "Activate Timer 2".
4. "Timer 1:" or "Timer 2:"
5. Turn the controller: set the hours.
6. Press the controller: the setting is
accepted.
7. Turn the controller: set the minutes.
00320051004F004C00510048000300280047004C0057004C005200510003
Page 298 of 308

297
Everything from A to Z
Reference
False alarm
– avoiding unintentional
alarm 38
– switching off an alarm 37
Fastening safety belts, refer to Safety belts 52
Fastest route for
navigation 155
Fault messages, refer to Check Control 89
Filter
– refer to Microfilter/activated- charcoal filter for automatic
climate control 118
First aid pouch 273
Fixture for remote control,
refer to Ignition lock 60
Flash when locking/ unlocking 33
Flat tire
– run-flat tires 254
– Tire Pressure Monitor
TPM 100
Flat Tire Monitor FTM 98
– indicating a flat tire 99
– indicator/warning lamp 99
– initialization 98
– snow chains 98,254
– system limits 98
Flat tires, refer to Tire condition 252
Fluid reservoir, refer to Washer fluid reservoir 71
Fog lamps 112
– indicator lamp 13,112
Folding up the floor panel 130
Footwell lamps, refer to
Interior lamps 112
For your own safety 5
Four-wheel drive, refer to
xDrive 97
Front airbags 104
FTM, refer to Flat Tire
Monitor 98 Fuel
233
– average consumption 82
– gauge 81
– high-quality brands 233
– quality 233
– specifications 233
– tank contents, refer to
Capacities 284
Fuel clock, refer to Fuel gauge 81
Fuel consumption indicator
– average fuel consumption 82
Fuel display, refer to Fuel gauge 81
Fuel filler flap 232
– releasing in the event of electrical malfunction 232
Fus es 27
1
G
Garage door opener, refer to
Integrated universal remote
control 120
Gasoline
– refer to Average consumption 82
Gasoline, refer to Required fuel 233
Gasoline display, refer to Fuel
gauge 81
Gas station recommendations 157
Gear indicator, automatic transmission with
Steptronic 63
Gear indicator, refer to Displays in the instrument
cluster 66
Gearshift lever 66
– automatic transmission with Steptronic 63
– manual transmission 63Gearshifts
– automatic transmission with
Steptronic 63
– manual transmission 63
General driving notes 137
Glass roof, electric 41
– Convenient opening and
closing 32
– Convenient opening and closing with Comfort
Access 39
– initializing 42
– opening, closing 41
– pinch protection system 42
– power failure 42
– remote control 32
– tilting 41
Glove compartment 124
GPS navigation, refer to
Navigation system 144
Grills 114
Gross vehicle weight, refer to
Weights 283
H
Handbrake, refer to Parking
brake 62
Hands-free system 14,209
Hazard warning flashers 14
HDC Hill Descent Control 97
Head airbags 104
Headlamp control, automatic 108
Headlamp flasher 70
– indicator lamp 11,13
Head Light, refer to Adaptive
Light Control 109
Head restraints 49
– rear, removing 50
– sitting safely 46
Heated
– mirrors 54
– rear window 117
– seats 51
– steering wheel 55
00320051004F004C00510048000300280047004C0057004C005200510003