2013 BMW 335I XDRIVE COUPE mirror
[x] Cancel search: mirrorPage 106 of 308
105
Technology for driving comfort and safety
Controls
the airbag retention system from the vehicle. Do
not modify the individual components of the
system or its wiring in any way. This includes
the upholstered covers on the steering wheel,
instrument panel, seats and roof posts, as well
as the sides of the roof lining. Do not attempt to
remove or dismantle the steering wheel.
Do not touch the individual components imme-
diately after the system has been triggered,
because there is a danger of burns.
In the event of faults, immobilization, or after the
airbag system has been triggered, have the
testing, repair, or disassembly and scrapping of
gas generators performed only by your BMW
center or a workshop that has the required
explosives licenses. Unprofessional attempts to
work on the system could lead to failure in an
emergency or to undesired airbag activation,
either of which could result in personal injury.
<
Warning notices and information about the air-
bags can also be found on the sun visors.
Automatic deactivation of the front
passenger airbags
An analysis of the impression in the front pas-
senger seat cushion determines whether and
how the seat is occupied. The front and side air-
bags for the front passenger are activated or
deactivated by the system accordingly. The indicator lamp above the interior
rearview mirror shows the current status
of the front passenger airbags, deactivated or
activated, refer to Status of front passenger air-
bags below. <
Before transporting a child on the front
passenger seat, read the safety precau-
tions and handling instructions under Trans-
porting children safely, refer to page 56.
The front and side airbags can also be deacti-
vated by adolescents and adults sitting in cer-
tain positions; the indicator lamp for the front
passenger airbags lights up. In such cases, the
passenger should change his or her sitting
position so that the front passenger airbags are
activated and the indicator lamp goes out. If the
desired airbag status cannot be achieved by changing the sitting posi
tion, transport the rele-
vant passenger on a rear seat. Do not attach
seat covers, seat cushion padding, ball mats or
other items to the front passenger seat unless
they are specifically recommended by BMW.
Do not place any items under the seat which
could press against the seat from below. Other-
wise, a correct analysis of the seat cushion is
not ensured. <
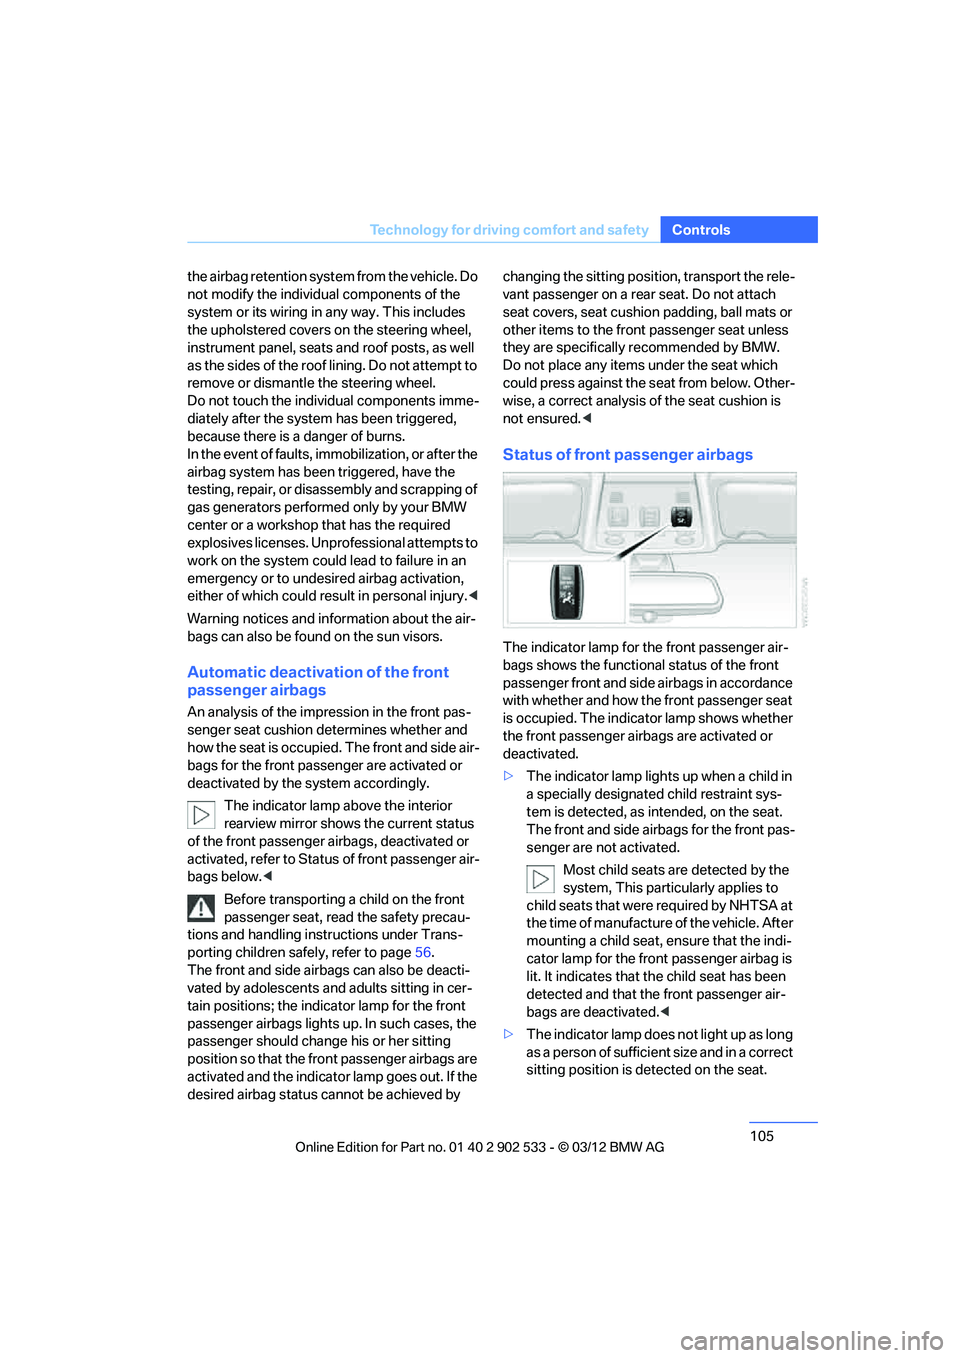
Status of front passenger airbags
The indicator lamp for the front passenger air-
bags shows the functional status of the front
passenger front and side airbags in accordance
with whether and how the front passenger seat
is occupied. The indicator lamp shows whether
the front passenger airbags are activated or
deactivated.
>The indicator lamp lights up when a child in
a specially designated child restraint sys-
tem is detected, as intended, on the seat.
The front and side airbags for the front pas-
senger are not activated.
Most child seats are detected by the
system, This particularly applies to
child seats that were required by NHTSA at
the time of manufacture of the vehicle. After
mounting a child seat, ensure that the indi-
cator lamp for the front passenger airbag is
lit. It indicates that the child seat has been
detected and that the front passenger air-
bags are deactivated. <
> The indicator lamp does not light up as long
as a person of sufficient size and in a correct
sitting position is detected on the seat.
00320051004F004C00510048000300280047004C0057004C005200510003
Page 111 of 308

110
ControlsLamps
angle and other parameters, the light from the
headlamp follows the course of the road.
In tight curves at speeds up to 40 mph/70 km/h,
e.g. on mountainous roads or when turning, an
additional, corner-illuminating lamp is switched
on that lights up the inside area of the curve.
Activating Adaptive Light Control
With the ignition switched on, turn the light
switch to position 3, refer to page 108.
The corner-illuminating lamp is switched on
automatically, depending on the steering wheel
angle or turn signal indicator.
Standstill function: to avoid blinding oncoming
traffic, the Adaptive Light Control does not
direct light toward the driver's side when the
vehicle is at a standstill.
When you are reversing, only the corner-illumi-
nating lamps are switched on and active on
both sides.
Malfunction
The warning lamp lights up. A mes-
sage appears on the Control Dis-
play.The Adaptive Light Control is
malfunctioning or failed. Have the system
checked as soon as possible.
High beams/roadside parking
lamps
1 High beams
2 Headlamp flasher
3 Roadside parking lamps
Roadside parking lamps, left or right
There is an additional option of switching on the
lamps on the side of the car facing the road
when parked.
Switching on
After parking the vehicle, press the lever up or
down beyond the pressure point for a longer
period, arrow 3 .
The roadside parking lamps drain the bat-
tery. Therefore, do not leave them on for
unduly long periods of time; otherwise, the bat-
tery might not have enough power to start the
engine. <
Switching off
Press the lever in the opposite direction to the
pressure point, arrow 3.
High-beam Assistant
The concept
This system automatically switches the high
beams on and off. The procedure is controlled
by a sensor on the front of the interior rearview
mirror. The assistant ensures that the high
beams are switched on whenever the traffic sit-
uation allows. It handles this task for you and
gives you the benefit of the best possible view.
You can intervene at any time and switch the
high beams on and off as usual.
Activating the system
1. Turn the light switch to position 3, refer to
page 108.
2. With the low beams switched on, briefly
push the turn signal/high beam lever in the
direction of the high beam.
The indicator lamp in the instrument
cluster lights up when the high beams
are activated. The system automati-
cally switches from high beams to low beams
and vice versa in response to oncoming traffic,
00320051004F004C00510048000300280047004C0057004C005200510003
Page 112 of 308

111
Lamps
Controls
traffic ahead of you, and adequate ambient
lighting, e.g. on city streets.
Switching the high beams on and off
manually
Whenever you wish, or when the situation
requires, you can intervene:
>
If the High-beam Assistant switches on the
high beams, but you would like to drive with
the low beams, simply switch off the high
beams using the turn signal/high beam
lever. This deactivates the High-beam
Assistant.
To reactivate the system, briefly push the
turn signal/high beam lever toward the high
beams again.
> If the High-beam Assistant switches on the
low beams, but you would like to drive with
the high beams, switch on the high beams
as usual. This deactivates the system and
the high beams need to be switched off
manually, if necessary.
To reactivate the system, briefly push the
turn signal/high beam lever toward the high
beams again.
> Use the headlamp flasher as usual with the
low beams switched on.
System limitations
The High-beam Assistant cannot serve
as a substitute for the driver's personal
judgment of when to use the high beams.
Therefore, manually switch off the high beams
in situations where this is required to avoid a
safety risk.<
The system is not fully functional in situations
such as the following, and driver intervention
may be necessary:
> In very unfavorable weather conditions,
such as fog or heavy precipitation
> In detecting poorly-lit road users, such as
pedestrians, cyclists, horseback riders and
wagons; when driving close to train or ship
traffic; and at animal crossings >
In tight curves, on hilltops or in depressions,
in cross traffic or half-obscured oncoming
traffic on highways
> In poorly lit towns and cities and in the pres-
ence of highly reflective signs
> At low speeds
> When the windshield in front of the interior
rearview mirror is fogged over, dirty or cov-
ered with stickers, etc.
> If the sensor is dirty. Clean the sensor on
the front of the interior rearview mirror using
a cloth moistened with a small amount of
glass cleaner.
Activating via iDrive
1."Settings"
2. "Lighting"
3. "High beam assistant"
The setting is stored for the remote control cur-
rently in use.
00320051004F004C00510048000300280047004C0057004C005200510003
Page 121 of 308
120
ControlsPractical interior accessories
Practical interior accessories
Vehicle equipment
In this chapter, all production, country, and
optional equipment that is offered in the model
range is described. For this reason, descrip-
tions will be given of some equipment that may
not be available in a vehicle, for example due to
the special options or national-market version
selected. This also applies to safety related
functions and systems.
Integrated universal remote
control
The concept
The Integrated universal remote control can be
used to operate up to 3 functions of remote-
controlled devices such as garage door open-
ers or lighting systems. The Integrated univer-
sal remote control thus replaces as many as
three different hand-held transmitters. To oper-
ate them, the buttons on the interior rearview
mirror must be programmed with the desired
functions. Programming requires the hand-held
transmitter for the respective device.
To prevent possible damage or injury,
before programming or using the inte-
grated universal remote control to operate a
device, always inspect the immediate area to
make certain that no people, animals or objects
are within the pivoting or travel range of the
device being operated.
Also follow the safety instructions supplied with
the hand-held transmitter. <
For security reasons, make sure to delete the
stored functions before selling the vehicle, refer
to page 122.
Compatibility
If this symbol appears on the package
or in the instructions supplied with the
device to be operated, you can gener-
ally assume that the device is compatible with
the Integrated universal remote control.
For additional questions, please consult:
> your BMW center.
> www.homelink.com on the Internet.
HomeLink is a registered trademark of Johnson
Controls, Inc.
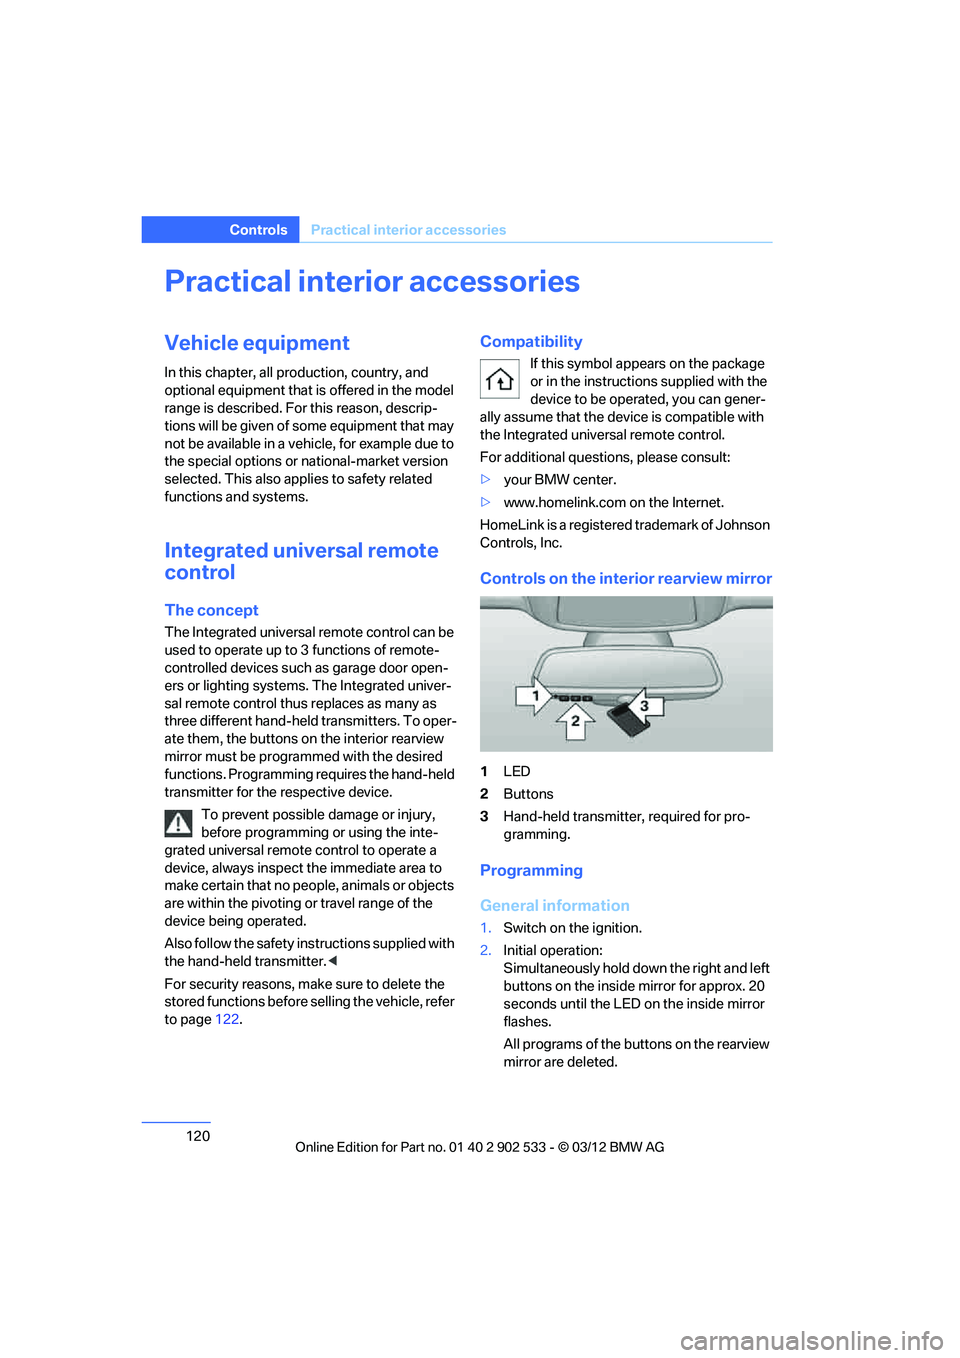
Controls on the interior rearview mirror
1 LED
2 Buttons
3 Hand-held transmitter, required for pro-
gramming.
Programming
General information
1.Switch on the ignition.
2. Initial operation:
Simultaneously hold down the right and left
buttons on the inside mirror for approx. 20
seconds until the LED on the inside mirror
flashes.
All programs of the buttons on the rearview
mirror are deleted.
00320051004F004C00510048000300280047004C0057004C005200510003
Page 122 of 308
121
Practical interior accessories
Controls
3.
Hold the hand-held transmitter of the
device to be controlled approx. 1 in/2.5 cm
to 3 in/8 cm away from the buttons on the
inside mirror.
The required distance depends on the
hand-held transmitter.
4. Simultaneously press and hold the button
of the desired function on the hand-held
transmitter and the button to be pro-
grammed on the inside mirror.
The LED on the inside mirror will flash
slowly at first.
5. As soon as the LED flashes rapidly, release
both buttons. The rapid flashing indicates
that the button on the inside mirror has
been programmed.
If the LED does not flash rapidly within
60 seconds, change the distance between
the inside mirror and the hand-held trans-
mitter and repeat this step. This may
require several attempts. Allow at least
15 seconds between attempts.
6. To program additional functions on the
other buttons of the inside mirror, repeat
steps 3 through 5.
The buttons on the inside mirro r can be used to
operate the devices if the ignition is switched
on.
Special procedure with alternating-
code systems
If the device fails to function even after repeated
programming, check whether the device to be
controlled uses an alternating-code system.
To do so, either read the instructions for the
device or hold down the programmed button on
the inside mirror. If the LED on the inside mirror
flashes quickly at first and then remains lit for
2 seconds, the device uses an alternating-code
system. The LED flashes and lights up repeat-
edly for approx. 20 seconds.
In devices with an alternating-code system, the
Integrated universal remote control and the
device must also be synchronized. For information about synchronizing can also
be found in the operating instructions for the
device to be set.
Programming will be easier with the aid of a
second person.
Synchronizing:
1.
Park your vehicle within the range of the
remote-controlled device.
2. Program the Integrated universal remote
control as described above.
3. Locate and press the synchronization but-
ton on the device to be set. You have
approx. 30 seconds to perform the next
step.
4. Hold down the programmed button on the
inside mirror for approx. 3 seconds and then
release it. Repeat this operation, up to three
times if necessary, to complete the syn-
chronization. If the synchronization has
succeeded, the programmed function is
performed.
Reprogramming individual buttons
1.Switch on the ignition.
2. Hold the hand-held transmitter of the
device to be controlled approx. 1 in/2.5 cm
to 3 in/8 cm away from the buttons on the
inside mirror.
The required distance depends on the
hand-held transmitter.
3. Press the desired button on the inside mir-
ror.
4. If the LED on the inside mirror flashes
slowly after approx. 20 seconds, press the
transmit key of the hand-held transmitter.
5. As soon as the LED flashes rapidly, release
both buttons.
If the LED does not flash rapidly after
approx. 60 seconds, alter the distance and
repeat the step.
Canada: if the LED does not flash rapidly
after approx. 60 seconds, alter the distance
and repeat this step or, if the programming
00320051004F004C00510048000300280047004C0057004C005200510003
Page 123 of 308
122
ControlsPractical interior accessories
by means of the hand-held transmitter was
interrupted, hold down the button on the
inside mirror and then press and release the
button on the hand-held transmitter several
times, holding it down for 2 seconds each
time.
Operation
To prevent possible damage or injury,
before programming or using the inte-
grated universal remote control to operate a
device, always inspect the immediate area to
make certain that no people, animals or objects
are within the pivoting or travel range of the
device being operated.
Also follow the safety instructions supplied with
the hand-held transmitter.
door, if the engine is running or the ignition is
switched on. To do so, within the reception
range of the device, press the button of the
device until the function is triggered. The LED
on the inside mirror remains lit during transmis-
sion of the radio signal.Deleting stored functions
Simultaneously hold down the right and left
buttons on the inside mirror for approx. 20 sec-
onds until the LED on the inside mirror flashes
rapidly. All stored functions are deleted. The
functions cannot be deleted individually.
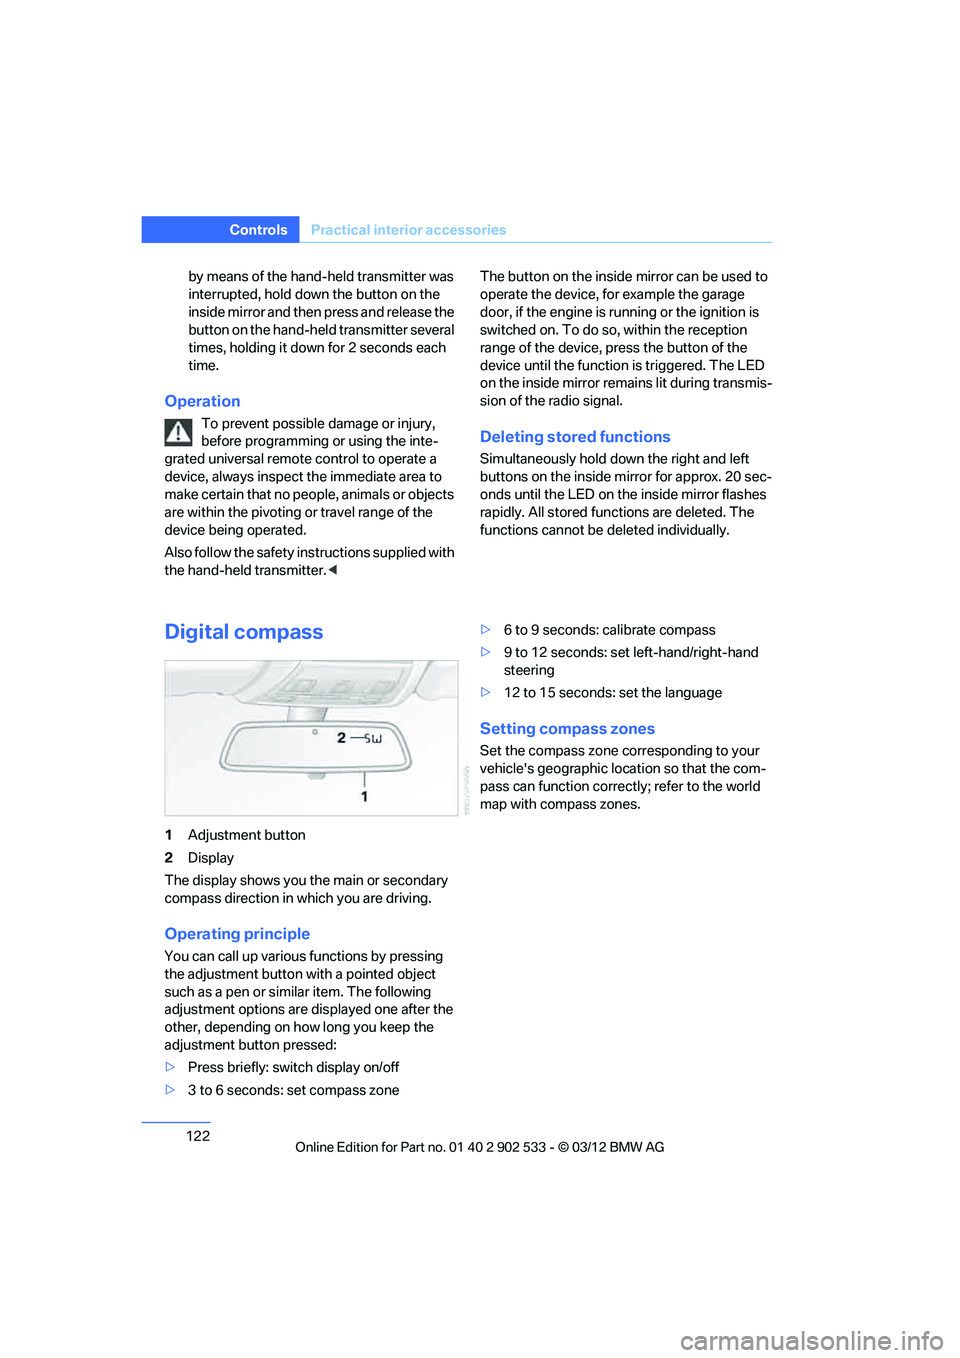
Digital compass
1
Adjustment button
2 Display
The display shows you the main or secondary
compass direction in which you are driving.
Operating principle
You can call up various functions by pressing
the adjustment button with a pointed object
such as a pen or similar item. The following
adjustment options are displayed one after the
other, depending on how long you keep the
adjustment button pressed:
> Press briefly: switch display on/off
> 3 to 6 seconds: set compass zone >
6 to 9 seconds: calibrate compass
> 9 to 12 seconds: set left-hand/right-hand
steering
> 12 to 15 seconds: set the language
Setting compass zones
Set the compass zone corresponding to your
vehicle's geographic location so that the com-
pass can function correctly; refer to the world
map with compass zones.
00320051004F004C00510048000300280047004C0057004C005200510003
Page 137 of 308
136
Driving tipsThings to remember when driving
Things to rememb er when driving
Vehicle equipment
In this chapter, all production, country, and
optional equipment that is offered in the model
range is described. For this reason, descrip-
tions will be given of some equipment that may
not be available in a vehicle, for example due to
the special options or national-market version
selected. This also applies to safety related
functions and systems.
Break-in period
Moving parts need breaking -in time to adjust to
each other. Please follow the instructions below
in order to achieve the optimal service life and
economy of operation for your vehicle.
Engine and differential
Always obey all official speed limits.
Up to 1,200 miles/2,000 km
Drive at varying engine and road speeds, but do
not exceed an engine speed of 4,500 rpm or a
road speed of 100 mph/160 km/h.
Avoid full-throttle operation and use of the
transmission's kickdown mode.
After driving 1,200 miles/2,000 km
Engine and vehicle speeds can be gradually
increased.
Tires
Due to technical factors associated with their
manufacture, tires do not achieve their full trac-
tion potential until after an initial break-in
period. Therefore, drive cautiously during the
first 200 miles/300 km.
Brake system
Brakes require an initial break-in period of
approx. 300 miles/500 km to achieve optimized
contact and wear patterns between brake pads
and rotors. Drive cautiously during this break-in
period.
Clutch
The function of the clutch reaches its optimal
level only after a distance driven of approx.
300 miles/500 km. During this break-in period,
engage the clutch gently.
Following part replacement
The same break-in procedures should be
observed if any of the components mentioned
above have to be renewed in the course of the
vehicle's operating life.
Saving fuel
The fuel consumption of your vehicle depends
on several factors. You can lower fuel consump-
tion and the environmental impact by taking
certain measures, adjusting your driving style
and having the vehicle serviced regularly.
Remove any unneeded cargo
Additional weight increases fuel consumption.
Remove any mounted parts after you
have finished using them
Remove unneeded additional mirrors, the roof
rack and the rear luggage rack after use.
Mounted parts affect the vehicle's aerodynam-
ics and increase fuel consumption.
Close the windows and glass roof
An open glass roof or window causes higher air
resistance and thus increases fuel consump-
tion.
00320051004F004C00510048000300280047004C0057004C005200510003
Page 212 of 308
211
Te l e p h o n e
Communications
Adjusting volume
Turn knob during announcement.
>
The volume remains the same, even if the
volume of other audio sources is changed.
> The volume is stored for the remote control
currently in use.
Notes
Notes on Emergency Requests
Do not use the voice operation system to ini-
tiate an emergency call. In stressful situations,
the voice and vocal pitch can change. This can
unnecessarily delay the establishment of a tele-
phone connection.
Instead, use the SOS button, refer to page 272,
in the vicinity of the interior rearview mirror.
Ambient conditions
> Say the commands, numbers and letters
smoothly and with normal volume, empha-
sis and speed.
> Always say the commands in the language
of the system. The language of the voice
operation of the mobile phone is preset and
cannot be changed via the Control Display.
> Keep the doors, windows, glass roof, and
convertible top closed to prevent interfer-
ence from outside noise.
> Avoid ambient noise in the vehicle while
speaking.
Snap-in adapter
General information
Detailed information on snap-in adapters that
compatibly support mobile phone functions can
be found at your BMW center.
Notes
At high temperatures, the charging function of
the mobile phone may be limited and some
functions may no longer be carried out.
When using the mobile phone via the vehicle,
follow the operating instructions of the mobile
phone.
Installation location
In the center armrest.
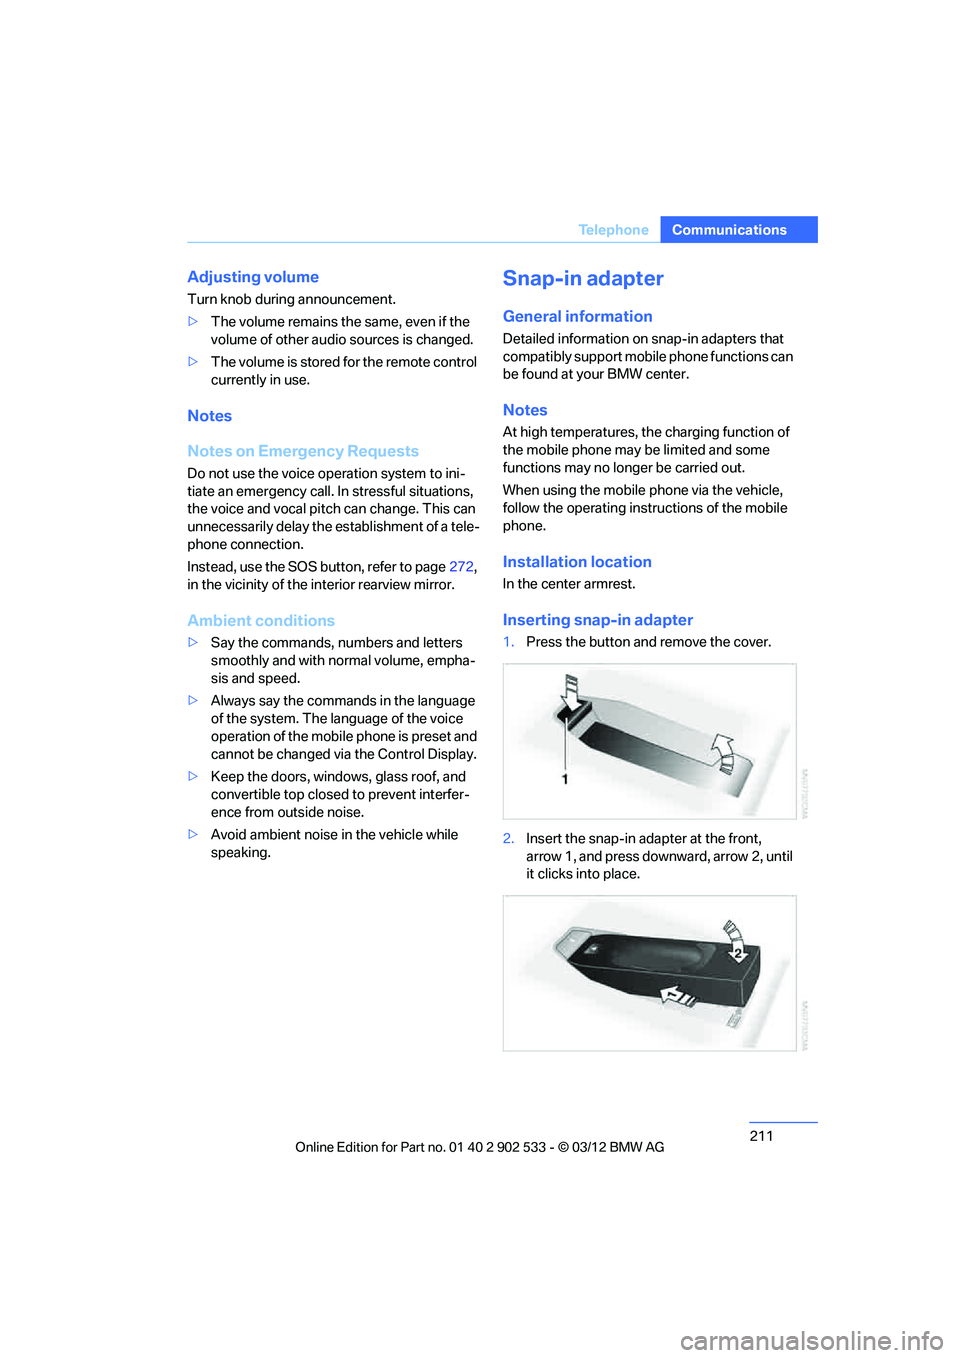
Inserting snap-in adapter
1.Press the button and remove the cover.
2. Insert the snap-in adapter at the front,
arrow 1, and press downward, arrow 2, until
it clicks into place.
00320051004F004C00510048000300280047004C0057004C005200510003