2013 BMW 335I XDRIVE COUPE interior lights
[x] Cancel search: interior lightsPage 114 of 308

113
Lamps
Controls
To switch off the interior lamps, footwell lamps,
entry lamps, and courtesy lamps permanently,
press the button for the front interior lamps for
about 3 seconds.
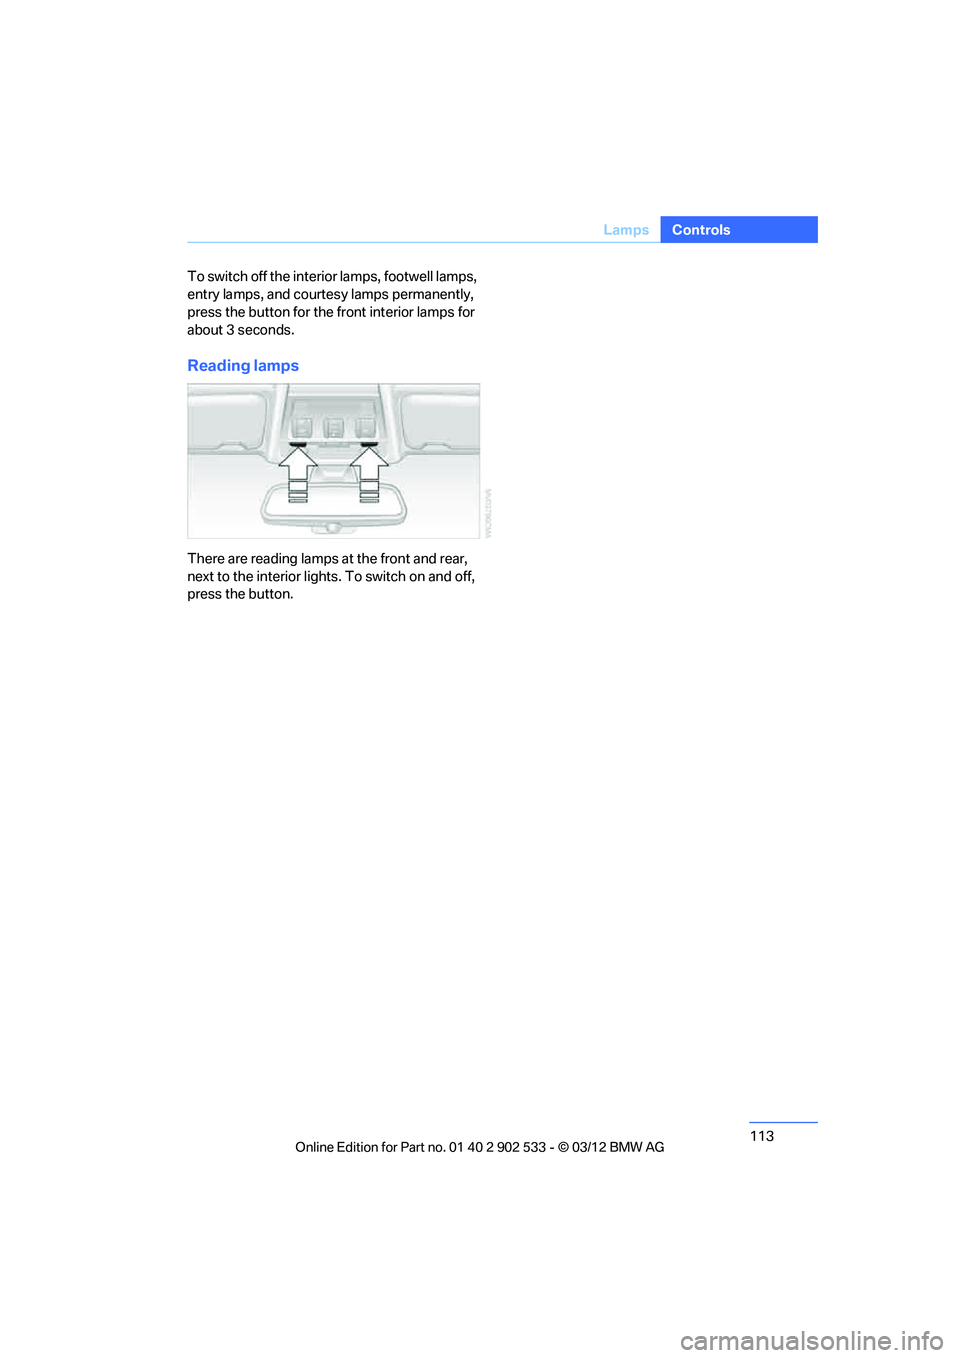
Reading lamps
There are reading lamps at the front and rear,
next to the interior lights. To switch on and off,
press the button.
00320051004F004C00510048000300280047004C0057004C005200510003
Page 122 of 308

121
Practical interior accessories
Controls
3.
Hold the hand-held transmitter of the
device to be controlled approx. 1 in/2.5 cm
to 3 in/8 cm away from the buttons on the
inside mirror.
The required distance depends on the
hand-held transmitter.
4. Simultaneously press and hold the button
of the desired function on the hand-held
transmitter and the button to be pro-
grammed on the inside mirror.
The LED on the inside mirror will flash
slowly at first.
5. As soon as the LED flashes rapidly, release
both buttons. The rapid flashing indicates
that the button on the inside mirror has
been programmed.
If the LED does not flash rapidly within
60 seconds, change the distance between
the inside mirror and the hand-held trans-
mitter and repeat this step. This may
require several attempts. Allow at least
15 seconds between attempts.
6. To program additional functions on the
other buttons of the inside mirror, repeat
steps 3 through 5.
The buttons on the inside mirro r can be used to
operate the devices if the ignition is switched
on.
Special procedure with alternating-
code systems
If the device fails to function even after repeated
programming, check whether the device to be
controlled uses an alternating-code system.
To do so, either read the instructions for the
device or hold down the programmed button on
the inside mirror. If the LED on the inside mirror
flashes quickly at first and then remains lit for
2 seconds, the device uses an alternating-code
system. The LED flashes and lights up repeat-
edly for approx. 20 seconds.
In devices with an alternating-code system, the
Integrated universal remote control and the
device must also be synchronized. For information about synchronizing can also
be found in the operating instructions for the
device to be set.
Programming will be easier with the aid of a
second person.
Synchronizing:
1.
Park your vehicle within the range of the
remote-controlled device.
2. Program the Integrated universal remote
control as described above.
3. Locate and press the synchronization but-
ton on the device to be set. You have
approx. 30 seconds to perform the next
step.
4. Hold down the programmed button on the
inside mirror for approx. 3 seconds and then
release it. Repeat this operation, up to three
times if necessary, to complete the syn-
chronization. If the synchronization has
succeeded, the programmed function is
performed.
Reprogramming individual buttons
1.Switch on the ignition.
2. Hold the hand-held transmitter of the
device to be controlled approx. 1 in/2.5 cm
to 3 in/8 cm away from the buttons on the
inside mirror.
The required distance depends on the
hand-held transmitter.
3. Press the desired button on the inside mir-
ror.
4. If the LED on the inside mirror flashes
slowly after approx. 20 seconds, press the
transmit key of the hand-held transmitter.
5. As soon as the LED flashes rapidly, release
both buttons.
If the LED does not flash rapidly after
approx. 60 seconds, alter the distance and
repeat the step.
Canada: if the LED does not flash rapidly
after approx. 60 seconds, alter the distance
and repeat this step or, if the programming
00320051004F004C00510048000300280047004C0057004C005200510003
Page 268 of 308

267
Replacin g components
Mobility
When working on electrical systems,
always begin by switching off the con-
sumer in question; otherwise, short-circuits
could result. To avoid possible injury or equip-
ment damage when replacing bulbs, observe
any instructions provided by the bulb manufac-
turer. <
For care of the headlamps, please follow the
instructions in the chapter entitled 'Care'. To replace lamps not described here,
please contact your BMW center. <
Light-emitting diodes LED
Light-emitting diodes installed behind translu-
cent lenses serve as the light source for many of
the controls, displays, and equipment in your
vehicle. These light-emitting diodes, which
operate using a concept similar to that applied
in conventional lasers, are officially designated
as Class 1 light-emitting diodes.
Do not remove the covers or expose the
eyes directly to the unfiltered light source
for several hours; otherwise, this could cause
irritation of the retina. <
Headlight lenses
In cool or humid weather, condensation may
form on the interior of outside lamps. The con-
densation will disappear after a short time when
driving with the headlamps switched on. The
headlamp glasses do not need to be changed.
If the headlamps do not defrost despite driving
with the headlamps switched on, and additional
moisture builds up, for example water droplets
in the lamps, have them checked by your BMW
center.
Xenon lamps
These bulbs have a very long service life and are
highly unlikely to fail. If a xenon lamp fails never-
theless, switch on the fog lamps and continue
the journey with great care, provided that local
legislation does not prohibit this. Have all work on the xenon lamp system,
including bulb replacements, performed
only by your BMW center. Due to high voltage,
there is a risk of fatal injury if work on the xenon
lamps is carried out improperly. <
Access to the lamps
1.Switch off the lamps and take the remote
control out of the ignition lock.
2. Remove the upper cover from the head-
lamp. To do so, use a screwdriver to press
the catches towards the rear, see arrows,
and pull the cover forward and out.
Follow the same steps in reverse order to reat-
tach the cover. Be careful when installing the cover; oth-
erwise, leaks could occur and cause dam-
age to the headlamp system. <
Parking lamps and roadside parking
lamps, daytime running lights
These lamps use LED technology for operation.
If they malfunction, please contact your BMW
center.
Corner-illuminating lamps
H3 bulb, 55 watts
1.Switch off the lamps and take the remote
control out of the ignition lock.
2. Remove the cover, refer to Access to the
lamps.
00320051004F004C00510048000300280047004C0057004C005200510003
Page 296 of 308

295
Everything from A to Z
Reference
Control Center, refer to
iDrive 18
Control Display 19
– switching off 19
Control Display, refer to iDrive 18
– adjusting brightness 92
Controller, refer to iDrive 18
Controls and displays 10
Control unit, refer to iDrive 18
Convenient loading in Convertible 33
Convenient opening and
closing
– glass roof 32
– glass roof with Comfort
Access 39
– retractable hardtop 32
– windows 32
– windows with Comfort Access 39
– with Comfort Access 39
Convertible
– bag holder 129
– convenient loading 33
– enlarging trunk 128
– folding down rear backrest 128
– retractable hardtop 42
– rollover protection system 106
– securing cargo 140
– stowing cargo 140
Coolant 259
– checking level 259
Coolant temperature 259
Cooling, maximum 115
Cooling fluid, refer to Coolant 259
Cooling system, refer to
Coolant 259
Copyright 2
Corner-illuminating lamps
– replacing bulbs 267
Cornering light, refer to Adaptive Light Control 109
Correct tires 253 Courtesy lamps, refer to
Interior lamps 112
Criteria for route 155
Cross-hairs in navigation 151
Cruise control 72
– active 74
– malfunction 74
Cruise control, refer to Active Cruise Control 74
Cruising range 82
Cupholders 126
Curb weight, refer to Weights 283
Custom er
Relations 227
D
Dashboard, refer to
Cockpit 10
Dashboard, refer to Instrument cluster 12
Dashboard lighting, refer to
Instrument lighting 112
Data, technical
– capacities 284
– dimensions 281
– weights 283
Data memory 261
Data transfer 228
Date
– date format 89
– setting 89
Daytime running lights 109
– replacing bulbs 267
DBC Dynamic Brake Control 95
Deactivating front passenger
airbags 105
Deadlocking, refer to Locking 32
Defect
– door lock 34
– fuel filler flap 232
Defining a home address 215
Destination, entering by town/ city name 147 Destination address
– entering
146,152
Destination entry via BMW Assist 151
Destination for navigation
– entering by voice 152
– entering via map 151
– entry 146
– home address 149
– manual entry 146
Destination guidance 155
– bypassing a route section 156
– changing specified route 155
– continuing 155
– starting 155
– voice instructions 157
– volume of voice
instructions 157
Digital clock 80
Digital compass 122
Dimensions 281
Directional indicators, refer to Turn signals 70
Direction instructions, refer to Voice instructions 157
Directory for navigation, refer
to Address book 148
Display, refer to iDrive controls 18
Displaying contact pictures 21
5
Dis p
lay lighting, refer to
Instrument lighting 112
Displays
– on the Control Display 18
Displays, refer to Instrument cluster 12
Displays and controls 10
Disposal
– coolant 259
– remote control battery 40
– vehicle battery 271
Distance remaining to service, refer to Service
requirements 85
00320051004F004C00510048000300280047004C0057004C005200510003