2013 BMW 335I XDRIVE COUPE door lock
[x] Cancel search: door lockPage 39 of 308

38
ControlsOpening and closing
objects such as leaves, refer to Avoiding unin-
tentional alarms.
Avoiding unintentional alarms
The tilt sensor and interior motion sensor can
be deactivated together, for example in the fol-
lowing situations:
>In car washes
> In stacking garages
> During transport on car-carrying trains,
boats/ships or on a trailer
> When leaving animals in the vehicle
Switching off tilt alarm sensor and
interior motion sensor
Once the vehicle is locked, press the
button on the remote control again within
approx. 10 seconds.
The indicator lamp lights up briefly and then
flashes continuously. The tilt alarm sensor and
the interior motion sensor are switched off until
the next time the vehicle is unlocked and subse-
quently locked again.
Comfort Access
The concept
It is possible to access the vehicle without actu-
ating the remote control. It is sufficient to have
the remote control with you, for example in your
jacket pocket. The vehicle automatically
detects the remote control in the vicinity or in
the passenger compartment.
Comfort Access supports the following func-
tions:
>Unlocking/locking the vehicle
> Convenient closing
> Unlocking the trunk lid separately
> Engine starting
Functional requirement
>There are no external sources of interfer-
ence in the vicinity.
> The remote control must be outside the
vehicle to lock it.
> The next unlocking and locking cycle is not
possible until after approx. 2 seconds.
> It is only possible to start the engine if the
remote control is inside the vehicle.
Comparison to the standard remote
control
The above functions can be controlled by
pressing the remote control buttons or by using
Comfort Access.
If you notice a brief delay while opening or
closing windows, the glass roof or retract-
able hardtop, the system is checking whether a
remote control is inside the vehicle. Please
repeat the opening or closing procedure, if nec-
essary. <
Unlocking
Grasp the handle on the driver's or front pas-
senger door completely, arrow 1.
This corresponds to pressing the button.
Locking
Touch the surface on the door handle, arrow 2,
with your finger for approx. 1 second.
This corresponds to pressing the but-
ton.
To preserve the battery, please make
sure that the ignition and all electrical
00320051004F004C00510048000300280047004C0057004C005200510003
Page 42 of 308
41
Opening and closing
Controls
All windows open automatically. Press the
switch again to stop the opening move-
ment.
> Pull the switch:
All windows close as long as you pull the
switch.
After switching off the ignition
When the remote control is removed or the igni-
tion is switched off, you can still operate the
windows for approx. 1 minute as long as no
door is opened.
Convenient opening and closing
For information on Convenient opening and
closing via the remote control or the door lock,
refer to page 32 or 34. For information on Con-
venient closing with Comfort Access, refer to
Locking on page 32.
Pinch protection system
If the closing force exceeds a specific value as a
window closes, the closing action is interrupted
and the window reopens slightly.
Despite the pinch protection system
check and clear the window's travel path
prior to closing it; otherwise, the safety system
might fail to detect certain kinds of obstruc-
tions, such as thin objects, and the window
would continue closing.
Do not install any accessories that might inter-
fere with window movement. Otherwise, the
pinch protection system could be impaired.
Convertible: the rear windows are not equipped
with pinch protection. Therefore, watch them
closely when closing to avoid personal injury. <
Closing without pinch protection
If there is an external danger, or if ice on the win-
dows, etc., prevents you from closing the win-
dows normally, proceed as follows:
1.Pull the switch past the resistance point and
hold it there. Pinch protection is limited and
the window reopens slightly if the closing
force exceeds a certain value. 2.
Pull the switch again past the resistance
point within approx. 4 seconds and hold it
there. The window closes without pinch
protection.
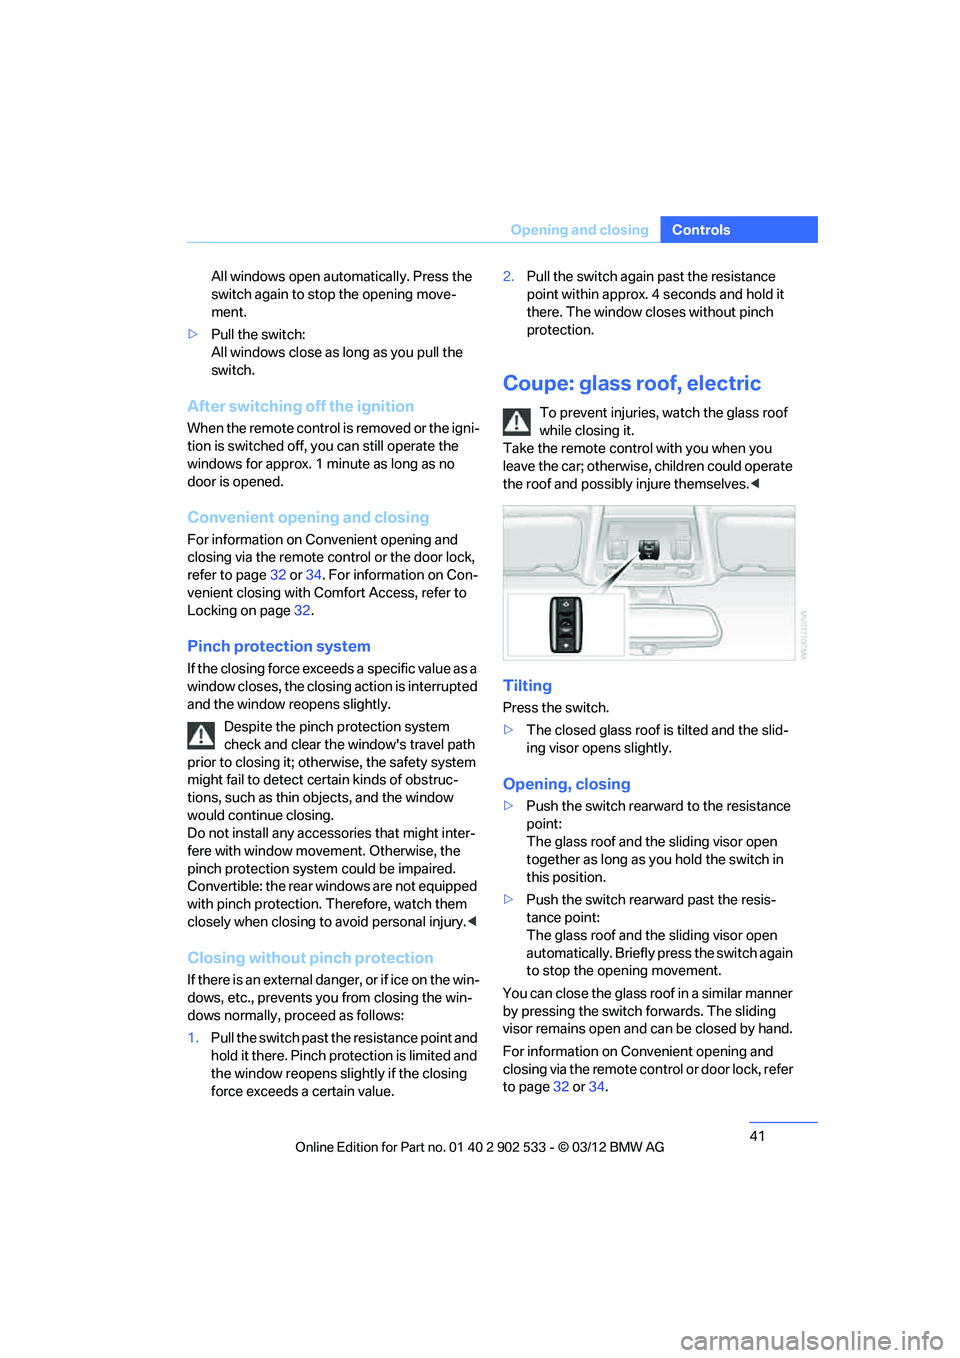
Coupe: glass roof, electric
To prevent injuries, watch the glass roof
while closing it.
Take the remote control with you when you
leave the car; otherwise, children could operate
the roof and possibly injure themselves. <
Tilting
Press the switch.
>The closed glass roof is tilted and the slid-
ing visor opens slightly.
Opening, closing
>Push the switch rearward to the resistance
point:
The glass roof and the sliding visor open
together as long as you hold the switch in
this position.
> Push the switch rearward past the resis-
tance point:
The glass roof and the sliding visor open
automatically. Briefly press the switch again
to stop the opening movement.
You can close the glass roof in a similar manner
by pressing the switch forwards. The sliding
visor remains open and can be closed by hand.
For information on Convenient opening and
closing via the remote control or door lock, refer
to page 32 or 34.
00320051004F004C00510048000300280047004C0057004C005200510003
Page 43 of 308
42
ControlsOpening and closing
After switching off the ignition
When the remote control is removed or the igni-
tion is switched off, you can still operate the roof
for approx. 1 minute as long as no door has
been opened.
Pinch protection system
If the glass roof encounters an obstruction dur-
ing closing from approximately the middle of
the opening in the roof, or during closing from
the tilted position, the closing movement is
interrupted and the glass roof is opened again
slightly.
Despite the pinch protection system
check and clear the roof's travel path prior
to closing it; otherwise, the safety system might
fail to detect certain kinds of obstructions, such
as very thin objects, and the roof would con-
tinue closing.<
Closing without pinch protection
If there is an external danger, press the switch
forward past the resistance point. The roof
closes without pinch protection.
Following interruptions in electrical
power supply
After a power failure, there is a possibility that
the glass roof can only be tilted. The system
must be initialized. BMW recommends having
this work performed by your BMW center.
Convertible: retractable
hardtop
The retractable hardtop combines reliable
weather protection with simple and convenient
operation.
The following tips will enhance your driving
pleasure in your Convertible:
> It is advisable that you close the retractable
hardtop when you park the vehicle. Not only
does the closed hardtop protect the vehicle
interior against unanticipated weather dam- age, it also offers theft protection. However,
even when the hardtop is closed, valuables
should only be stored in the locked trunk.
> Do not attach roof rack systems to the
retractable hardtop, and in particular do not
attach magnetic racks.
> Do not attach rack systems to the trunk lid,
and in particular do not attach magnetic
racks.
> When the retractable hardtop is operated,
the trunk lid swings back and up. Before
operating the retractable hardtop, ensure
that there is enough clearance, e.g. when
parked in front of a wall.
> If you open the hardtop while it is wet, e.g.
after driving in the rain, water may drip into
the trunk. If necessary, remove items from
the trunk beforehand to avoid water stains
or soiling.
Do not place any objects on the retract-
able hardtop or on the trunk lid; other-
wise, they could fall during movements of the
retractable hardtop and cause damage or injury.
Never move the retractable hardtop when the
rollover protection system is in the activated
position.
Driving when the hardtop is not fully opened or
closed may result in damage or injury.
Do not reach into the mechanism during the
opening or closing procedure. Keep children
away from the swiveling area of the retractable
hardtop. <
The retractable hardtop cannot be moved
at temperatures below + 14 7/–10 6. A
message appears on the Control Display. <
The retractable hardtop can only be
opened and closed when the vehicle is
stationary. To avoid causing damage, do not
drive off until the hardtop has stopped mov-
ing. <
00320051004F004C00510048000300280047004C0057004C005200510003
Page 45 of 308
44
ControlsOpening and closing
If the hardtop is not fully opened or
closed, the trunk lid cannot be opened
and the windows cannot be moved. <
Convenient opening and closing with
remote control or via door lock
Refer to pages32 and 34.
Wind deflector
The wind deflector keeps air movements in the
passenger compartment to a minimum when
the hardtop is open and provides an even more
comfortable ride, particularly at high speeds.
Installation
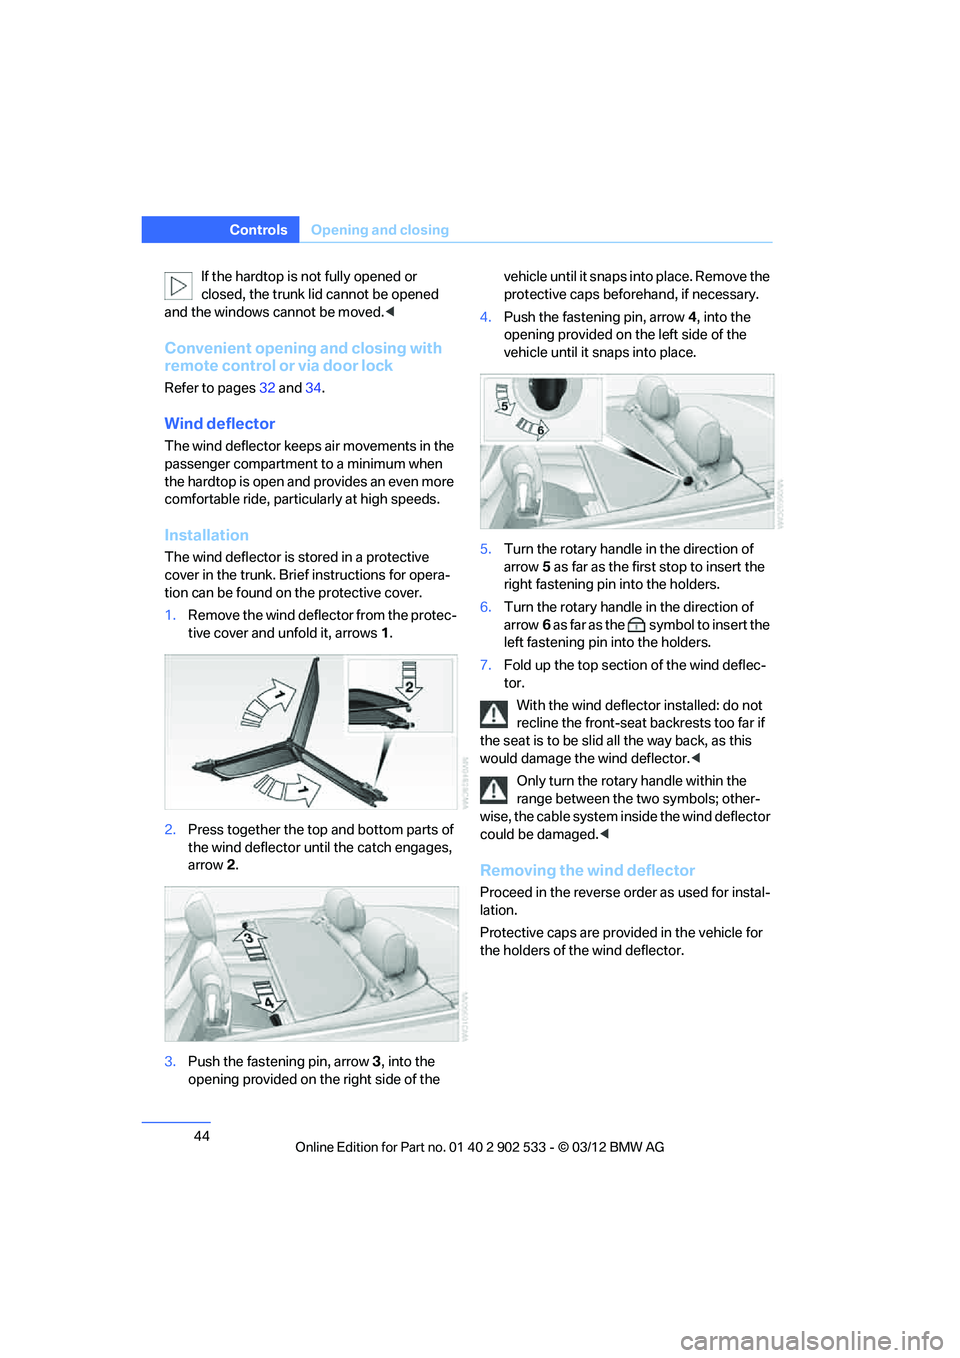
The wind deflector is stored in a protective
cover in the trunk. Brief instructions for opera-
tion can be found on the protective cover.
1. Remove the wind deflector from the protec-
tive cover and unfold it, arrows 1.
2. Press together the top and bottom parts of
the wind deflector until the catch engages,
arrow 2.
3. Push the fastening pin, arrow 3, into the
opening provided on the right side of the vehicle until it snaps into place. Remove the
protective caps beforehand, if necessary.
4. Push the fastening pin, arrow 4, into the
opening provided on the left side of the
vehicle until it snaps into place.
5. Turn the rotary handle in the direction of
arrow 5 as far as the first stop to insert the
right fastening pin into the holders.
6. Turn the rotary handle in the direction of
arrow 6 as far as the symbol to insert the
left fastening pin into the holders.
7. Fold up the top section of the wind deflec-
tor.
With the wind deflector installed: do not
recline the front-seat backrests too far if
the seat is to be slid all the way back, as this
would damage the wind deflector. <
Only turn the rotary handle within the
range between the two symbols; other-
wise, the cable system inside the wind deflector
could be damaged. <
Removing the wind deflector
Proceed in the reverse order as used for instal-
lation.
Protective caps are provided in the vehicle for
the holders of the wind deflector.
00320051004F004C00510048000300280047004C0057004C005200510003
Page 53 of 308
52
ControlsAdjustments
Seat and mirror memory
You can store and call up two different combi-
nations of driver's seat and exterior mirror posi-
tions.
Settings for the backrest width and lumbar sup-
port are not stored in memory.
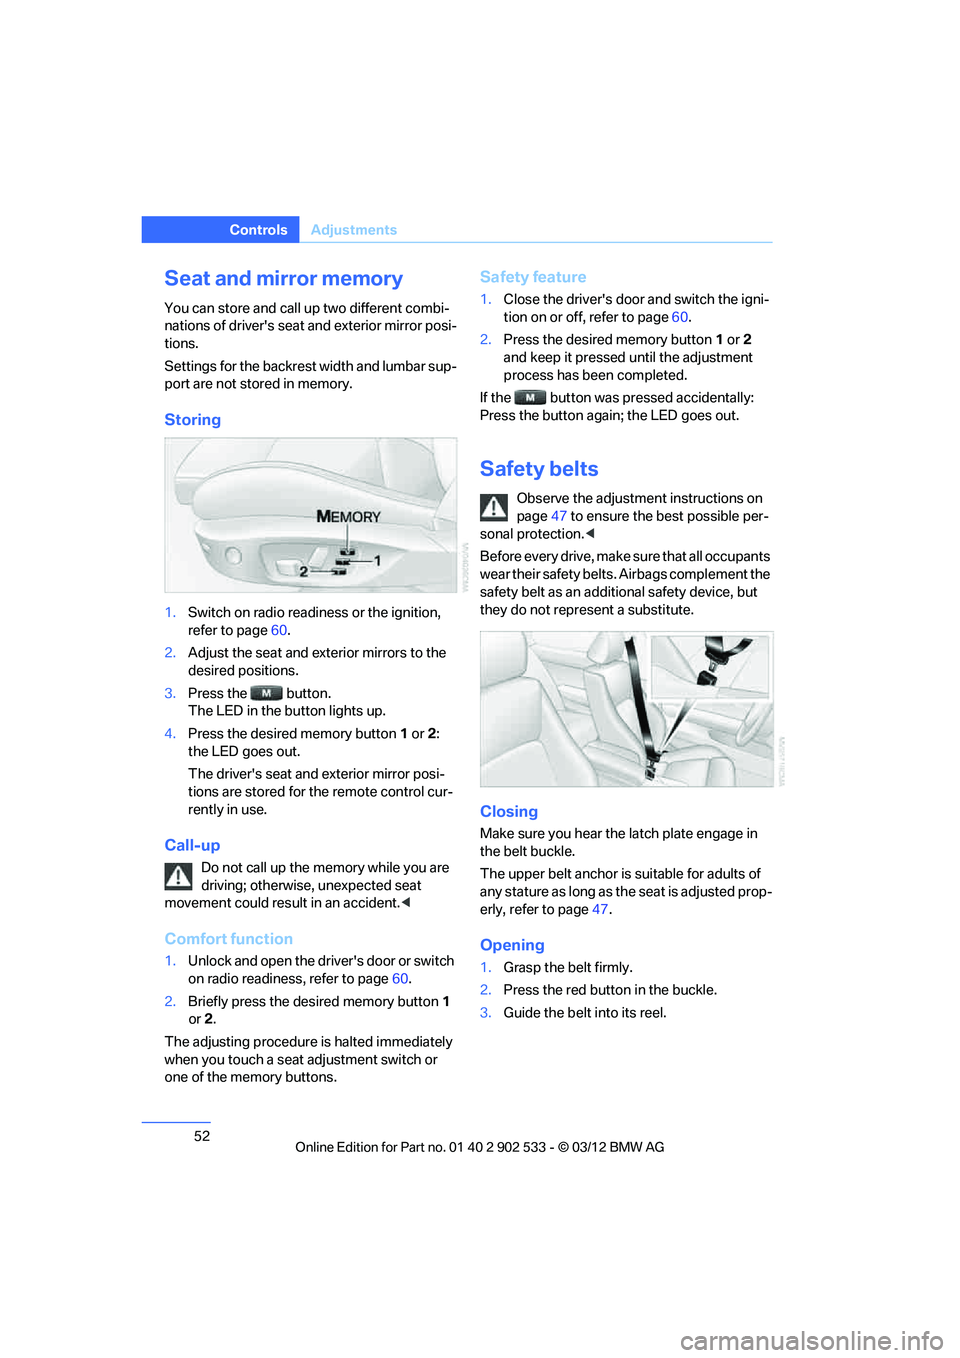
Storing
1.Switch on radio readiness or the ignition,
refer to page 60.
2. Adjust the seat and exterior mirrors to the
desired positions.
3. Press the button.
The LED in the button lights up.
4. Press the desired memory button 1 or 2:
the LED goes out.
The driver's seat and exterior mirror posi-
tions are stored for the remote control cur-
rently in use.
Call-up
Do not call up the memory while you are
driving; otherwise, unexpected seat
movement could result in an accident. <
Comfort function
1.Unlock and open the driver's door or switch
on radio readiness, refer to page 60.
2. Briefly press the desired memory button 1
or 2.
The adjusting procedure is halted immediately
when you touch a seat adjustment switch or
one of the memory buttons.
Safety feature
1. Close the driver's door and switch the igni-
tion on or off, refer to page 60.
2. Press the desired memory button 1 or 2
and keep it pressed until the adjustment
process has been completed.
If the button was pressed accidentally:
Press the button again; the LED goes out.
Safety belts
Observe the adjustment instructions on
page 47 to ensure the best possible per-
sonal protection. <
Before every drive, make sure that all occupants
wear their safety belts. Airbags complement the
safety belt as an additional safety device, but
they do not represent a substitute.
Closing
Make sure you hear the latch plate engage in
the belt buckle.
The upper belt anchor is suitable for adults of
any stature as long as the seat is adjusted prop-
erly, refer to page 47.
Opening
1. Grasp the belt firmly.
2. Press the red button in the buckle.
3. Guide the belt into its reel.
00320051004F004C00510048000300280047004C0057004C005200510003
Page 57 of 308
56
ControlsTransporting children safely
Transporting children safely
Vehicle equipment
In this chapter, all production, country, and
optional equipment that is offered in the model
range is described. As a result, some equip-
ment described may not be available in a partic-
ular vehicle, for example due to the options or
national-market version selected. This also
applies to safety related functions and systems.
The right place for children
Do not leave children unattended in the
vehicle; otherwise, they could endanger
themselves and/or other persons by opening
the doors, for example. <
Children should always sit in the rear
Accident research has shown that the safest
place for children is on the rear seat.
Children under the age of 13 or smaller
than 5 ft/150 cm may be transported only
in the rear in suitable child restraint systems
appropriate for their age, weight and size. Oth-
erwise, there is an increased risk of injury in the
event of an accident. <
Children 13 years of age or older must be buck-
led in with a safety belt as soon as there no
longer is any child restraint system that is
appropriate for their age, size and weight.
Children in the front passenger seat
Should it be necessary to use a child
restraint system on the front passenger
seat, the front and side airbags for the front pas-
senger must be deactivated. Otherwise, a child
traveling on that seat will face a significant risk
of injury if the airbags are triggered off, even
with a child restraint system.
page
105.
Convertible: key switch for
passenger belt
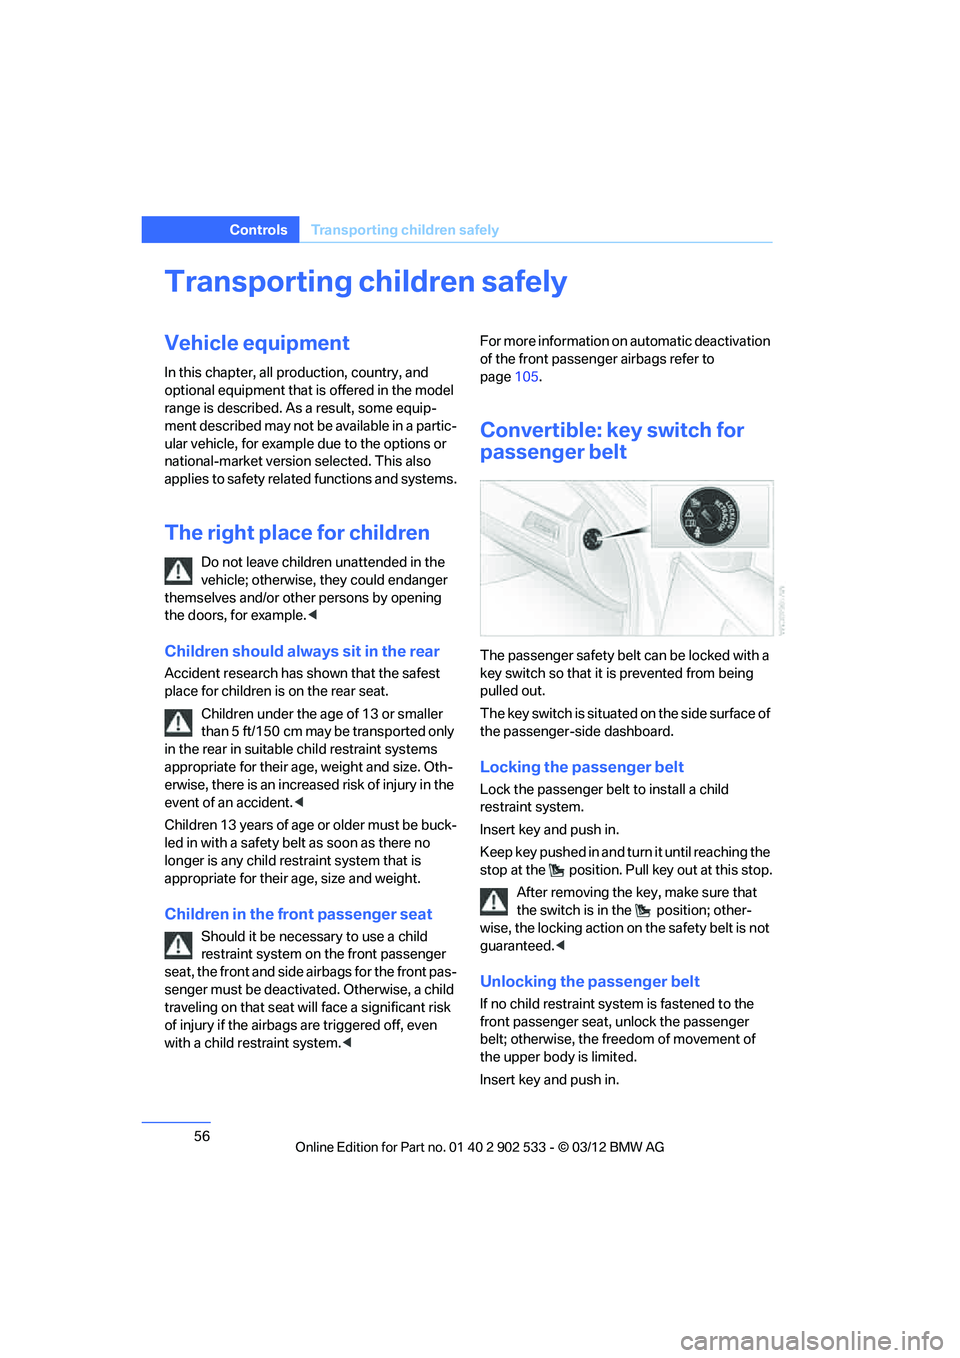
The passenger safety belt can be locked with a
key switch so that it is prevented from being
pulled out.
The key switch is situated on the side surface of
the passenger-side dashboard.
Locking the passenger belt
Lock the passenger belt to install a child
restraint system.
Insert key and push in.
Keep key pushed in and turn it until reaching the
stop at the position. Pu ll key out at this stop.
After removing the key, make sure that
the switch is in the position; other-
wise, the locking action on the safety belt is not
guaranteed. <
Unlocking the passenger belt
If no child restraint system is fastened to the
front passenger seat, unlock the passenger
belt; otherwise, the freedom of movement of
the upper body is limited.
Insert key and push in.
00320051004F004C00510048000300280047004C0057004C005200510003
Page 61 of 308
60
ControlsDriving
Driving
Vehicle equipment
In this chapter, all production, country, and
optional equipment that is offered in the model
range is described. For this reason, descrip-
tions will be given of some equipment that may
not be available in a vehicle, for example due to
the special options or national-market version
selected. This also applies to safety related
functions and systems.
Ignition lock
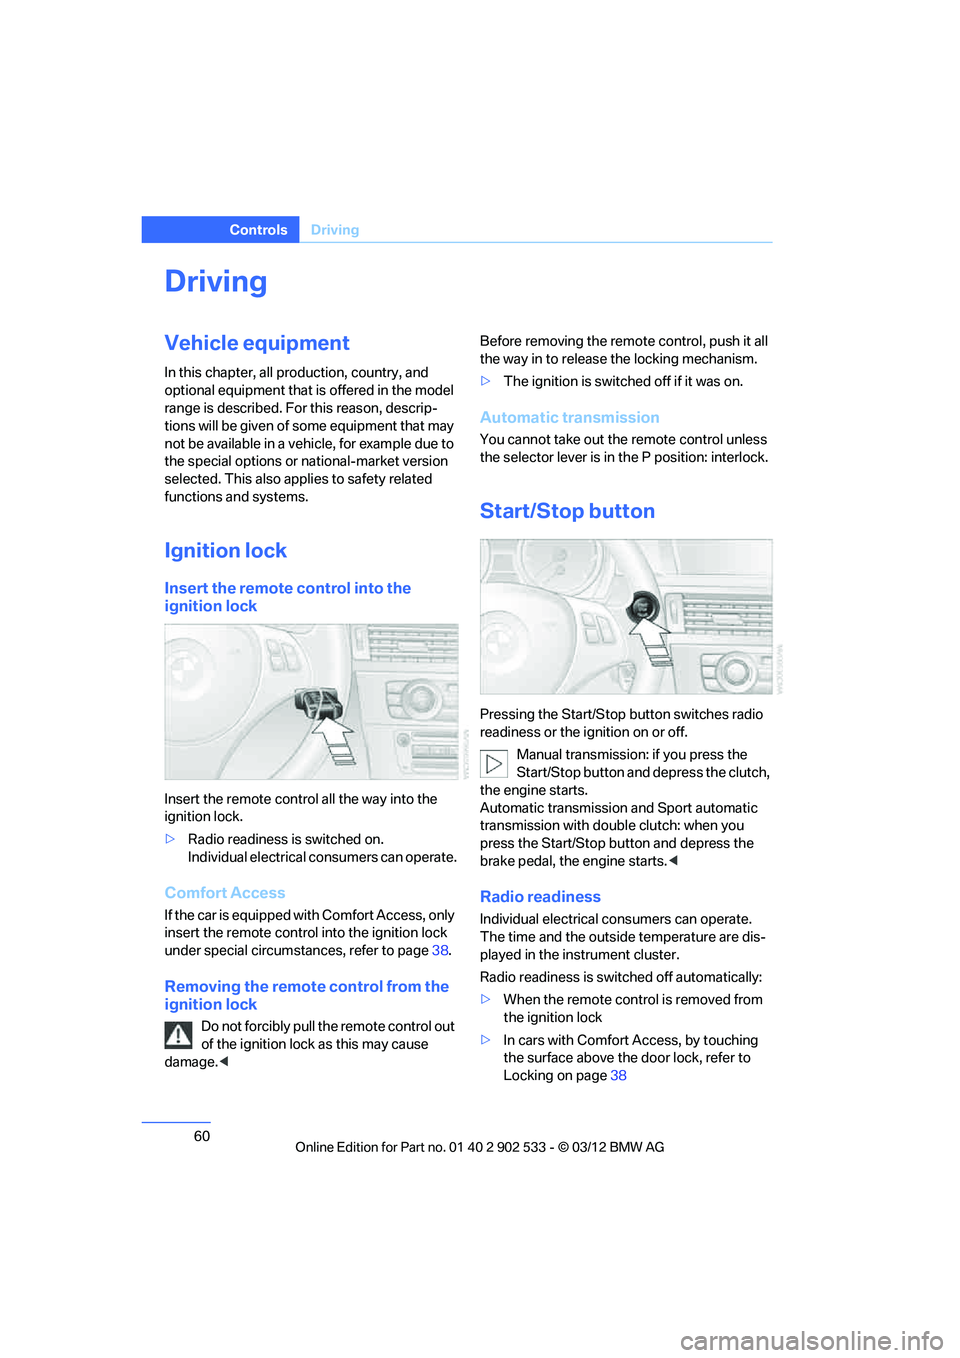
Insert the remote control into the
ignition lock
Insert the remote control all the way into the
ignition lock.
>Radio readiness is switched on.
Individual electrical consumers can operate.
Comfort Access
If the car is equipped with Comfort Access, only
insert the remote control into the ignition lock
under special circumstances, refer to page 38.
Removing the remote control from the
ignition lock
Do not forcibly pull the remote control out
of the ignition lock as this may cause
damage. < Before removing the remote control, push it all
the way in to release the locking mechanism.
>
The ignition is switched off if it was on.
Automatic transmission
You cannot take out the remote control unless
the selector lever is in the P position: interlock.
Start/Stop button
Pressing the Start/Stop button switches radio
readiness or the ignition on or off.
Manual transmission: if you press the
Start/Stop button and depress the clutch,
the engine starts.
Automatic transmission and Sport automatic
transmission with double clutch: when you
press the Start/Stop button and depress the
brake pedal, the engine starts. <
Radio readiness
Individual electrical consumers can operate.
The time and the outside temperature are dis-
played in the instrument cluster.
Radio readiness is switched off automatically:
>When the remote control is removed from
the ignition lock
> In cars with Comfort Access, by touching
the surface above the door lock, refer to
Locking on page 38
00320051004F004C00510048000300280047004C0057004C005200510003
Page 67 of 308
66
ControlsDriving
the clutch slip, as this may cause the transmis-
sion to overheat.
Selector lever positions
P R N D M/S + –
Displays in the instrument cluster
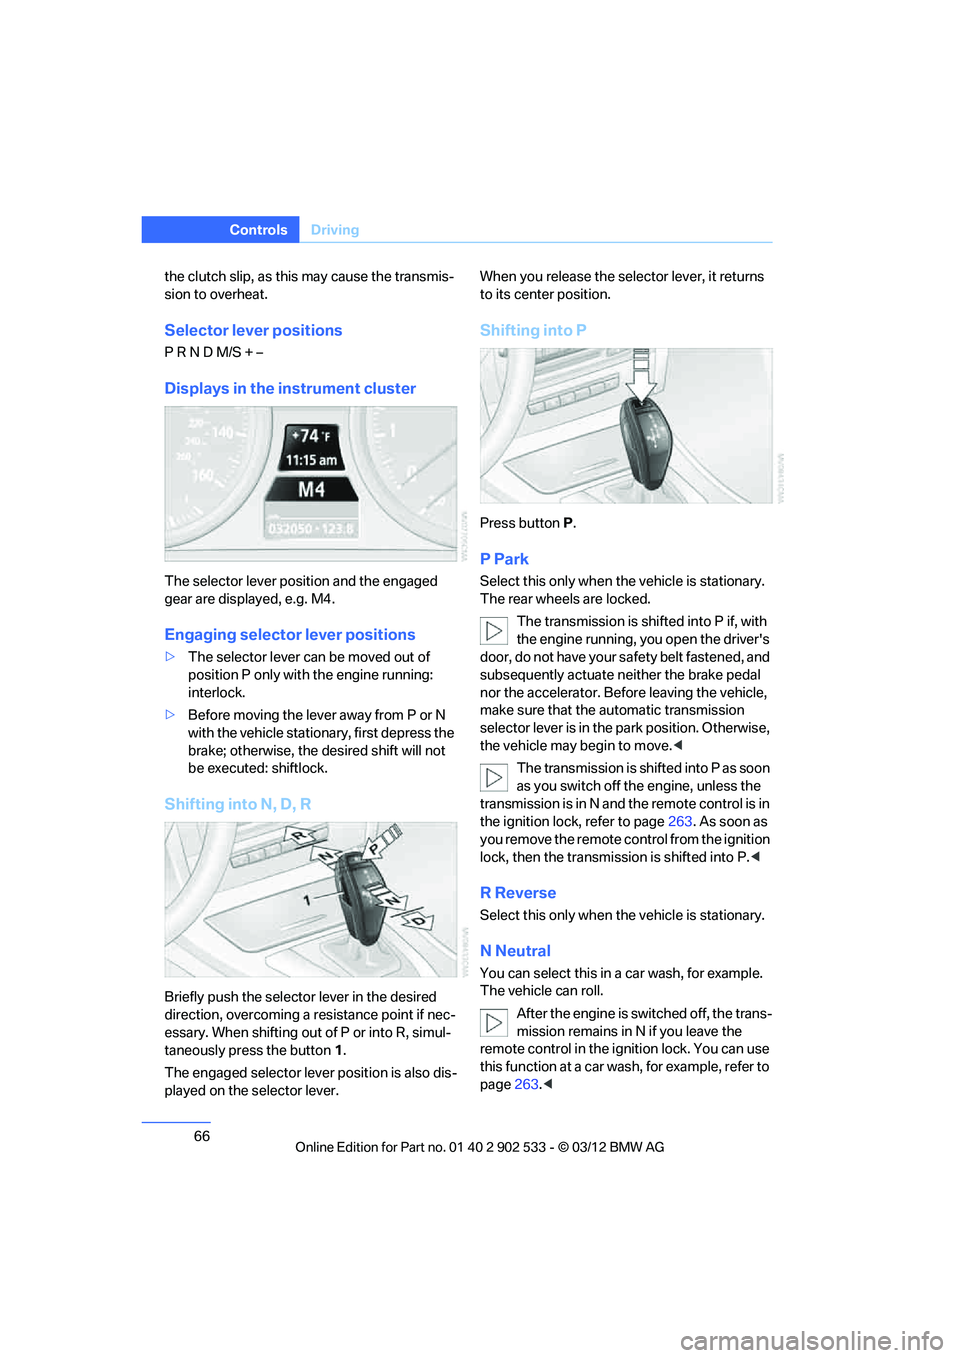
The selector lever position and the engaged
gear are displayed, e.g. M4.
Engaging selector lever positions
>The selector lever can be moved out of
position P only with the engine running:
interlock.
> Before moving the lever away from P or N
with the vehicle stationary, first depress the
brake; otherwise, the desired shift will not
be executed: shiftlock.
Shifting into N, D, R
Briefly push the selector lever in the desired
direction, overcoming a resistance point if nec-
essary. When shifting out of P or into R, simul-
taneously press the button 1.
The engaged selector lever position is also dis-
played on the selector lever. When you release the selector lever, it returns
to its center position.
Shifting into P
Press button
P.
P Park
Select this only when the vehicle is stationary.
The rear wheels are locked.
The transmission is shifted into P if, with
the engine running, you open the driver's
door, do not have your sa fety belt fastened, and
subsequently actuate neither the brake pedal
nor the accelerator. Before leaving the vehicle,
make sure that the automatic transmission
selector lever is in the park position. Otherwise,
the vehicle may begin to move. <
The transmission is shifted into P as soon
as you switch off the engine, unless the
transmission is in N and the remote control is in
the ignition lock, refer to page 263. As soon as
you remove the remote control from the ignition
lock, then the transmission is shifted into P. <
R Reverse
Select this only when the vehicle is stationary.
N Neutral
You can select this in a car wash, for example.
The vehicle can roll.
After the engine is switched off, the trans-
mission remains in N if you leave the
remote control in the ignition lock. You can use
this function at a car wash, for example, refer to
page 263.<
00320051004F004C00510048000300280047004C0057004C005200510003