2013 BMW 335I transmission
[x] Cancel search: transmissionPage 122 of 242
Press the button.▷If active: press twice.▷If interrupted: press once.
The displays go out. The stored desired speed
is deleted.
Interrupting the system When active, press the button.
The system is automatically interrupted if:
▷The brakes are applied.▷The clutch pedal is depressed for a few sec‐
onds or released while a gear is not en‐
gaged.▷The gear engaged is too high for the current
speed.▷The transmission position D is disengaged.▷DTC Dynamic Traction Control is activated
or DSC is deactivated.▷DSC is actively controlling stability.
Maintaining/storing the current speed
Press the button.
Or
Press the rocker switch while the system is in‐
terrupted.
When the system is switched on, the current
speed is maintained and stored as the desired
speed.
It is displayed in the speedometer and briefly
displayed in the instrument cluster, Displays in
the speedometer, refer to page 123.
When cruise control is maintained or stored,
DSC Dynamic Stability Control is switched on, if
necessary.
Changing/maintaining speed
The rocker switch can be pressed while the sys‐
tem is interrupted in order to maintain and store
the current speed.
Adapting the desired speed
Adapt the desired speed to the road con‐
ditions and be ready to brake at all times; other‐
wise, there is the danger of an accident occur‐
ring.◀
Press the rocker switch up or down repeatedly
until the desired speed is set.
If active, the displayed speed is stored and the
vehicle reaches the stored speed if the road is
clear.
▷Each time the rocker switch is pressed to the
point of resistance, the desired speed in‐
creases or decreases by approx.
1 mph/1 km/h.▷Each time the rocker switch is pressed past
the point of resistance, the desired speed
increases or decreases by a maximum of
5 mph/10 km/h.▷Pressing the rocker switch to the resistance
point and holding it there accelerates or de‐
celerates the vehicle without requiring pres‐
sure on the accelerator. After the rocker
switch is released, the vehicle maintains itsSeite 122ControlsDriving comfort122
Online Edition for Part no. 01 40 2 917 801 - II/13
Page 124 of 242
At a glance
Button in the vehicle
PDC Park Distance Control
Switching on/off
Switching on automatically
Select transmission position R with the engine
running.
Automatic deactivation during forward
travel
The system switches off when a certain driving
distance or speed is exceeded.
Switch the system back on if necessary.
Switching on/off manually Press the button.
▷On: the LED lights up.▷Off: the LED goes out.
In addition to the PDC Park Distance Control, the
backup camera, refer to page 125, can be
switched on.
Switching on the backup camera via the
iDrive
With PDC activated:
"Rear view camera"
The backup camera image is displayed. The set‐
ting is stored for the remote control currently in
use.
Display
Signal tones
When approaching an object, an intermittent
tone is sounded that indicates the position of the
object. For example, if an object is detected to
the left rear of the vehicle, a signal tone sounds
from the left rear speaker.
The shorter the distance to the object becomes,
the shorter the intervals.
If the distance to a detected object is less than
approx. 10 in/25 cm, a continuous tone is
sounded.
If objects are located both in front of and behind
the vehicle, an alternating continuous signal is
sounded.
The intermittent tone is interrupted after approx.
3 seconds:▷If the vehicle stops in front of an object that
is detected by only one of the corner sen‐
sors.▷If moving parallel to a wall.
The signal tone is switched off:
▷When the vehicle moves away from an ob‐
ject by more than approx. 4 in/10 cm.▷When transmission position P is engaged.
Volume
The volume of the PDC signal can be adjusted,
refer to user's manual for Navigation, Entertain‐
ment and Communication.
The setting is stored for the remote control cur‐
rently in use.
Visual warning
The approach of the vehicle to an object can be
shown on the Control Display. Objects that are
farther away are displayed on the Control Dis‐
play before a signal tone sounds.
A display appears as soon as Park Distance
Control (PDC) is activated.
Seite 124ControlsDriving comfort124
Online Edition for Part no. 01 40 2 917 801 - II/13
Page 126 of 242
NotesCheck the traffic situation as well
Check the traffic situation around the ve‐
hicle with your own eyes. Otherwise, an accident
could result from road users or objects located
outside the picture area of the backup camera. ◀
At a glance
Button in the vehicle
Backup camera
Camera
The camera lens is located in the handle of the
trunk lid. The image quality may be impaired by
dirt.
Clean the lens, refer to page 222.
Switching on/off
Switching on automatically
Select transmission position R with the engine
running.
The backup camera image is displayed if the
system was switched on via the iDrive.
Automatic deactivation during forward
travel
The system switches off when a certain driving
distance or speed is exceeded.
Switch the system back on if necessary.
Switching on/off manually Press the button.▷On: the LED lights up.▷Off: the LED goes out.
The PDC is shown on the Control Display.
Switch on the backup camera via the iDrive, refer
to page 124.
Switching on the backup camera via the
iDrive
With PDC activated:
"Rear view camera"
The backup camera image is displayed. The set‐
ting is stored for the remote control currently in
use.
Display on the Control Display
Functional requirement
▷The backup camera is switched on.▷The trunk lid is fully closed.
Activating the assistance functions
More than one assistance function can be active
at the same time.
▷Parking aid lines
"Parking aid lines"
Pathway and turning circle lines are dis‐
played.
▷Obstacle marking
"Obstacle marking"
Seite 126ControlsDriving comfort126
Online Edition for Part no. 01 40 2 917 801 - II/13
Page 127 of 242

Spatially-shaped markings are displayed.
Pathway lines
▷Can be shown in the backup camera image
when in transmission position R.▷Help you to estimate the space required
when parking and maneuvering on level
roads.▷Are dependent on the current steering angle
and are continuously adjusted to the steer‐
ing wheel movements.
Turning circle lines
▷Can be shown in the backup camera image.▷Show the course of the smallest possible
turning circle on a level road.▷Only one turning circle line is displayed
when the steering wheel is turned.Obstacle marking▷Spatially-shaped markings can be shown in
the backup camera image.
Their colored steps match the markings of the
PDC. This simplifies estimation of the distance
to the object shown.
Parking using pathway and turning
circle lines
1.Position the vehicle so that the turning circle
lines lead to within the limits of the parking
space.2.Turn the steering wheel to the point where
the pathway line covers the corresponding
turning circle line.Seite 127Driving comfortControls127
Online Edition for Part no. 01 40 2 917 801 - II/13
Page 128 of 242
Display settings
Brightness
With the backup camera switched on:1. Select the symbol.2.Turn the controller until the desired setting
is reached and press the controller.
Contrast
With the backup camera switched on:
1. Select the symbol.2.Turn the controller until the desired setting
is reached and press the controller.
System limits
Detection of objects
High, protruding objects such as ledges may not
be detected by the backup camera.
Top View
The concept
Top View assists you in parking and maneuver‐
ing. The area around the doors and the road area
around the vehicle are shown on the Control
Display for this purpose.
General information
The image is captured by two cameras
integrated in the exterior mirrors and by the
backup camera.
The range is at least 7 ft/2 m to the side and rear.
In this way, obstacles up to the height of the ex‐
terior mirrors are detected early.
Notes
Check the traffic situation as well
Check the traffic situation around the ve‐
hicle with your own eyes. Otherwise, an accident
could result from road users or objects located
outside the picture area of the cameras.◀
At a glance
Button in the vehicle
Top View
Cameras
The lenses of the Top View cameras are located
at the bottom of the exterior mirror housings.
The image quality may be impaired by dirt.
Clean the lens, refer to page 222.
Switching on/off
Switching on automatically
Select transmission position R with the engine
running.
Seite 128ControlsDriving comfort128
Online Edition for Part no. 01 40 2 917 801 - II/13
Page 159 of 242
Hot exhaust systemHot exhaust system
High temperatures are generated in the
exhaust system.
Do not remove the heat shields installed and
never apply undercoating to them. When driv‐
ing, standing at idle and while parking, take care
to avoid possible contact between the hot ex‐
haust system and any highly flammable materi‐
als such as hay, leaves, grass, etc. Such contact
could lead to a fire, and with it the risk of serious
personal injury as well as property damage.
Do not touch hot exhaust pipes; otherwise, there
is the danger of getting burned.◀
Diesel particulate filter
The diesel particulate filter collects soot parti‐
cles and burns them periodically at high tem‐
peratures.
During the cleaning time of several minutes, the
following may occur:▷Temporarily, the engine may run less
smoothly.▷Noises and a slight amount of smoke com‐
ing from the exhaust until shortly after the
engine is shut down.▷A somewhat higher engine speed is neces‐
sary to achieve the accustomed perform‐
ance.
Mobile communication devices in the
vehicle
Mobile communication devices in the ve‐
hicle
It is advised that you do not use mobile commu‐
nication devices, e.g., mobile phones, inside the
vehicle without connecting them directly to the
external antenna. Otherwise, the vehicle elec‐
tronics and mobile communication devices can
interfere with each other. In addition, there is no
assurance that the radiation generated during
transmission will be discharged from the vehicle
interior.◀
Hydroplaning
On wet or slushy roads, a wedge of water can
form between the tires and road surface.
This phenomenon is referred to as hydroplan‐
ing. It is characterized by a partial or complete
loss of contact between the tires and the road
surface, ultimately undermining your ability to
steer and brake the vehicle.
Hydroplaning
When driving on wet or slushy roads, re‐
duce your speed to prevent hydroplaning.◀
Driving through water
Drive though calm water only if it is not deeper
than 9.8 inches/25 cm and at this height, no
faster than walking speed, up to 6 mph/10 km/h.
Adhere to water depth and speed limita‐
tions
Do not exceed this water depth and walking
speed; otherwise, the vehicle's engine, the elec‐
trical systems and the transmission may be
damaged.◀
Braking safely
Your vehicle is equipped with ABS as a standard
feature.
Applying the brakes fully is the most effective
way of braking in situations when this is neces‐
sary.
The vehicle maintains steering responsiveness.
You can still avoid any obstacles with a minimum
of steering effort.
Pulsation of the brake pedal and sounds from
the hydraulic circuits indicate that ABS is in its
active mode.Seite 159Things to remember when drivingDriving tips159
Online Edition for Part no. 01 40 2 917 801 - II/13
Page 167 of 242
Driving style
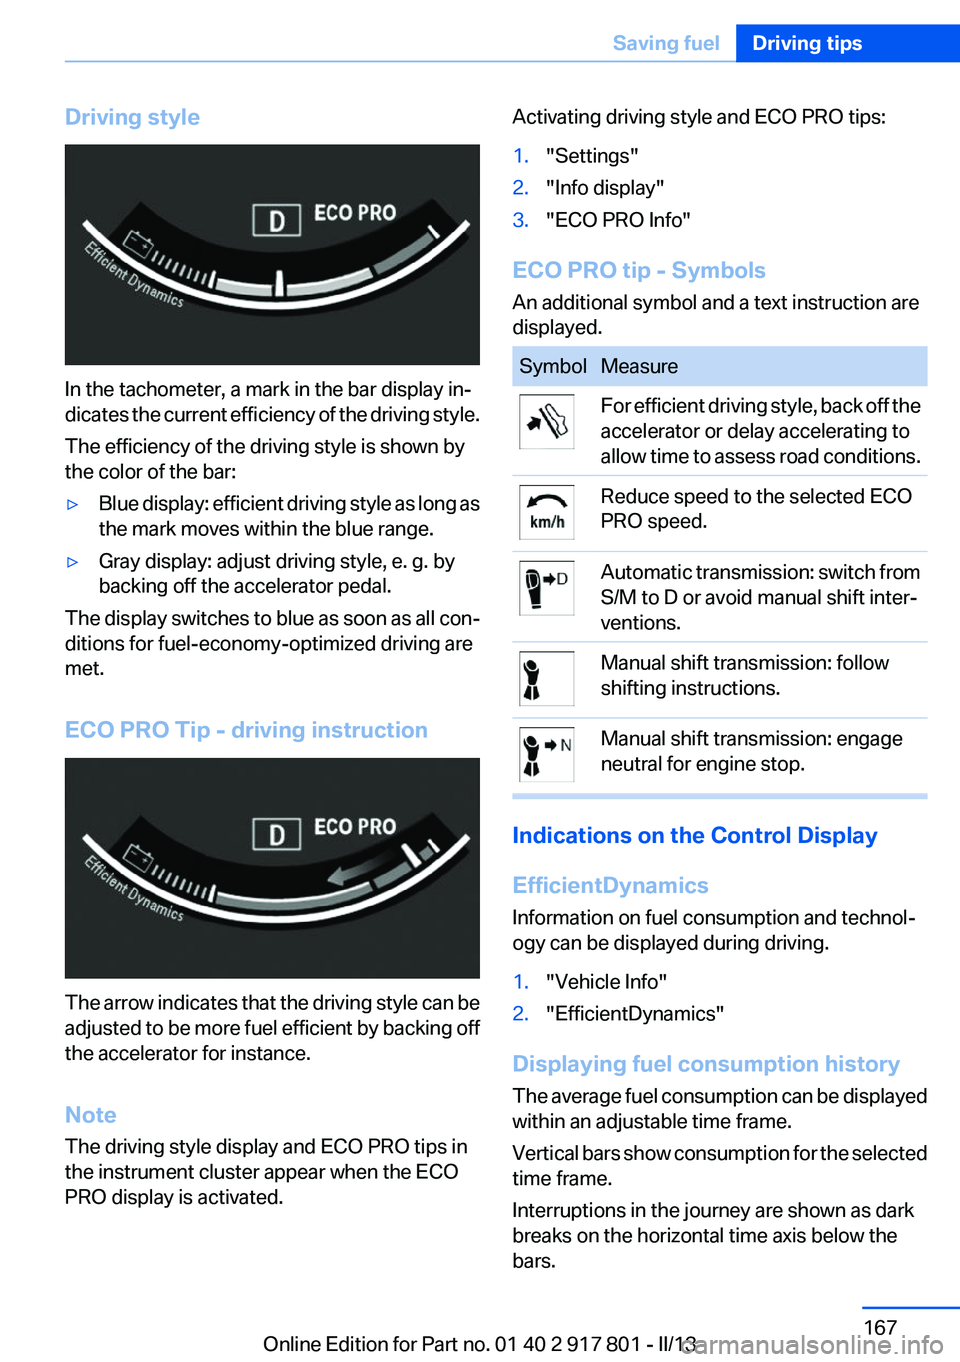
In the tachometer, a mark in the bar display in‐
dicates the current efficiency of the driving style.
The efficiency of the driving style is shown by
the color of the bar:
▷Blue display: efficient driving style as long as
the mark moves within the blue range.▷Gray display: adjust driving style, e. g. by
backing off the accelerator pedal.
The display switches to blue as soon as all con‐
ditions for fuel-economy-optimized driving are
met.
ECO PRO Tip - driving instruction
The arrow indicates that the driving style can be
adjusted to be more fuel efficient by backing off
the accelerator for instance.
Note
The driving style display and ECO PRO tips in
the instrument cluster appear when the ECO
PRO display is activated.
Activating driving style and ECO PRO tips:1."Settings"2."Info display"3."ECO PRO Info"
ECO PRO tip - Symbols
An additional symbol and a text instruction are
displayed.
SymbolMeasureFor efficient driving style, back off the
accelerator or delay accelerating to
allow time to assess road conditions.Reduce speed to the selected ECO
PRO speed.Automatic transmission: switch from
S/M to D or avoid manual shift inter‐
ventions.Manual shift transmission: follow
shifting instructions.Manual shift transmission: engage
neutral for engine stop.
Indications on the Control Display
EfficientDynamics
Information on fuel consumption and technol‐
ogy can be displayed during driving.
1."Vehicle Info"2."EfficientDynamics"
Displaying fuel consumption history
The average fuel consumption can be displayed
within an adjustable time frame.
Vertical bars show consumption for the selected
time frame.
Interruptions in the journey are shown as dark
breaks on the horizontal time axis below the
bars.
Seite 167Saving fuelDriving tips167
Online Edition for Part no. 01 40 2 917 801 - II/13
Page 175 of 242

Use only Ultra-Low Sulfur Diesel.
The fraction of biodiesel in the fuel must
not exceed 5 %, referred to as B5. Do not use
gasoline. If you do fill the tank with the wrong
fuel, e.g., gasoline, do not start the engine as this
may damage the engine.◀
After adding the wrong fuel, contact your service
center or roadside assistance.
If the fuel pump nozzle does not fit in the filler
pipe of your BMW, please check to ensure that
you are refueling at a diesel fuel pump that is
equipped with a diesel fuel pump nozzle.
In the event the Ultra-Low Sulfur Diesel fuel can‐
not be fully inserted into the fuel filler neck,
please contact BMW Roadside Assistance for
instructions on how to add fuel. For more infor‐
mation on BMW Roadside Assistance, refer to
page 214.
Winter diesel
To ensure that the diesel engine remains op‐
erational in the winter, use winter diesel.
It is available at gas stations during winter
months.
The fuel filter heating system, included as a
standard feature, prevents disruption of the fuel
supply while driving.
Do not add any diesel additives
Do not add additives, including gasoline;
otherwise, engine damage may occur.◀For vehicles equipped with
BMW Advanced Diesel
The concept
BMW Advanced Diesel reduces nitrogen oxides
in the diesel emissions from your vehicle by in‐
jecting Diesel exhaust fluid reducing agent into
the exhaust system. A chemical reaction takes
place inside the catalytic converter that mini‐
mizes nitrogen oxides.
In order to be able to start the engine as usual,
there must be sufficient Diesel exhaust fluid
present in the separate container.
Warming up the system
In order to warm the engine up to its operating
temperature after a cold start, the automatic
transmission may subsequently shift up to the
next higher gear.
Displays in the instrument cluster
Reserve display
This display in the instrument cluster provides
information about the distance that can still be
driven with the current reserve level.
The Reserve display appears af‐
ter about 1,000 miles/1,600 km
before the supply is predicted to
run out.
Refill in good time
The Diesel exhaust fluid must be replen‐
ished as soon as the Reserve display appears,
otherwise the engine cannot be restarted.◀
Diesel exhaust fluid on minimum The engine will continue to run
even when the display shows --
mls, as long as it is not switched
off and all other operating condi‐
tions are satisfied, sufficient fuel
for example.Seite 175FuelMobility175
Online Edition for Part no. 01 40 2 917 801 - II/13