2013 BMW 335I CONVERTIBLE ignition
[x] Cancel search: ignitionPage 64 of 308

63
Driving
Controls
The brake lamps do not light up when the park-
ing brake is applied.
<
Manual transmission
When shifting into 5th or 6th gear, press
the gearshift lever to the right. Otherwise,
the engine could be da maged if you inadvert-
ently shift into 3rd or 4th gear. <
Reverse gear
Select this only when the vehicle is stationary.
When the gearshift lever is pressed to the left, a
slight resistance has to be overcome.
Automatic transmission with
Steptronic
In addition to fully automatic operation, you can
also manually shift with the Steptronic, refer to
page64.
Vehicle parking
To prevent the vehicle from rolling,
always select position P and apply the
parking brake before leaving the vehicle with
the engine running. <
Disengaging the remote control
In order to remove the remote control from the
ignition lock, you must first move the selector
lever to position P and switch off the engine:
interlock. Removing the remote control from
the ignition lock, refer to page 60.
Selector lever positions
P R N D M/S + –
Displays in the instrument cluster
The selector lever position is displayed and, in
manual mode, the engaged gear, e.g. M4.
Changing selector lever positions
> With the ignition switched on or the engine
running, the selector lever can be moved
out of position P.
> Before moving the lever away from P or N
with the vehicle stationary, first depress the
brake; otherwise, the selector lever will
refuse to move: shiftlock.
To prevent the vehicle from creeping
after you select a driving position,
depress the brake until you are ready to
start.<
A lock prevents you from inadvertently engag-
ing selector lever positions R and P. To cancel
the lock, press the butto n on the front of the
selector lever, see arrow.
00320051004F004C00510048000300280047004C0057004C005200510003
Page 66 of 308

65
Driving
Controls
>
To downshift, briefly pull the left shift
paddle –.
Upshifts and downshifts are executed only
when they will result in a plausible combination
of engine and vehicle speed; thus, for example,
a downshift that would cause the engine to
overrev will not be executed by the system.
The gear selected is briefly displayed in the
instrument cluster, followed again by the gear
actually in use.
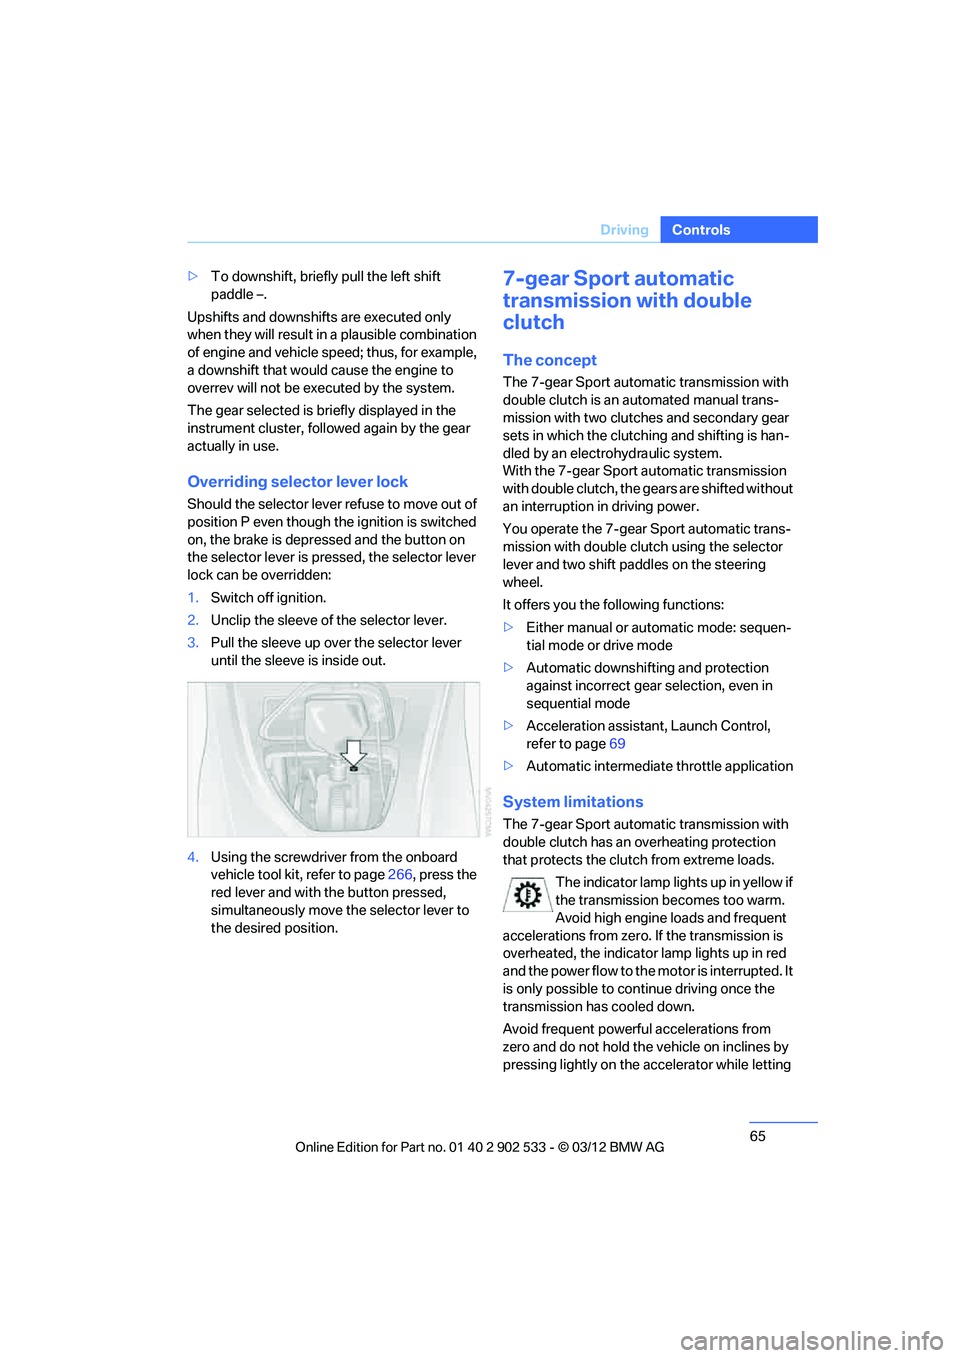
Overriding selector lever lock
Should the selector lever refuse to move out of
position P even though the ignition is switched
on, the brake is depressed and the button on
the selector lever is pressed, the selector lever
lock can be overridden:
1. Switch off ignition.
2. Unclip the sleeve of the selector lever.
3. Pull the sleeve up over the selector lever
until the sleeve is inside out.
4. Using the screwdriver from the onboard
vehicle tool kit, refer to page 266, press the
red lever and with the button pressed,
simultaneously move the selector lever to
the desired position.
7-gear Sport automatic
transmission with double
clutch
The concept
The 7-gear Sport automatic transmission with
double clutch is an automated manual trans-
mission with two clutches and secondary gear
sets in which the clutching and shifting is han-
dled by an electrohydraulic system.
With the 7-gear Sport automatic transmission
with double clutch, the gears are shifted without
an interruption in driving power.
You operate the 7-gear Sport automatic trans-
mission with double clutch using the selector
lever and two shift paddles on the steering
wheel.
It offers you the following functions:
> Either manual or automatic mode: sequen-
tial mode or drive mode
> Automatic downshifting and protection
against incorrect gear selection, even in
sequential mode
> Acceleration assistant, Launch Control,
refer to page 69
> Automatic intermediate throttle application
System limitations
The 7-gear Sport automatic transmission with
double clutch has an overheating protection
that protects the clutch from extreme loads.
The indicator lamp lights up in yellow if
the transmission becomes too warm.
Avoid high engine loads and frequent
accelerations from zero. If the transmission is
overheated, the indicator lamp lights up in red
and the power flow to the motor is interrupted. It
is only possible to continue driving once the
transmission has cooled down.
Avoid frequent powerful accelerations from
zero and do not hold the vehicle on inclines by
pressing lightly on the accelerator while letting
00320051004F004C00510048000300280047004C0057004C005200510003
Page 67 of 308

66
ControlsDriving
the clutch slip, as this may cause the transmis-
sion to overheat.
Selector lever positions
P R N D M/S + –
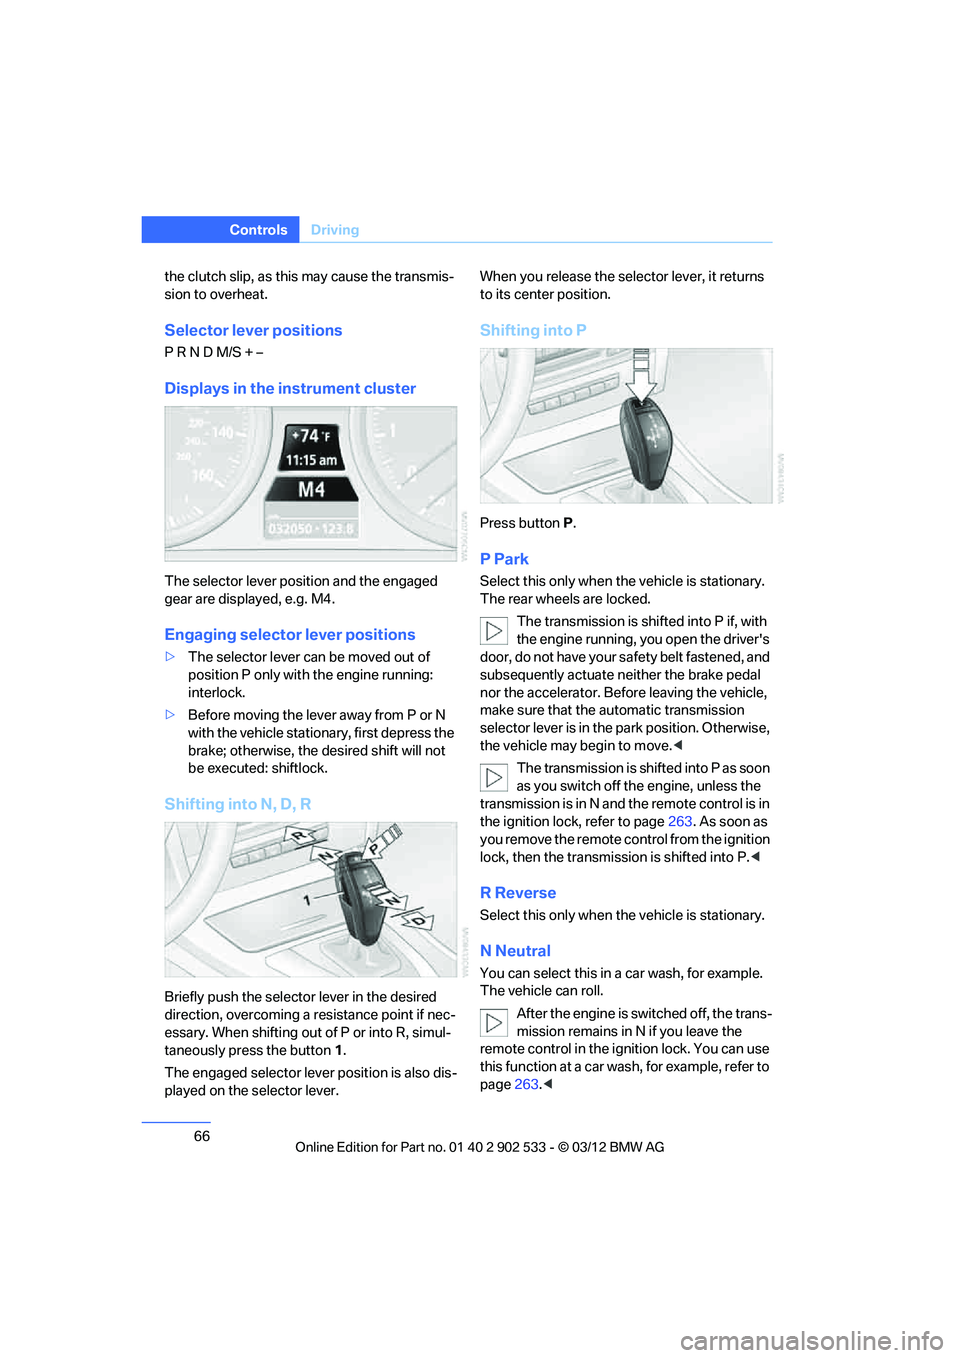
Displays in the instrument cluster
The selector lever position and the engaged
gear are displayed, e.g. M4.
Engaging selector lever positions
>The selector lever can be moved out of
position P only with the engine running:
interlock.
> Before moving the lever away from P or N
with the vehicle stationary, first depress the
brake; otherwise, the desired shift will not
be executed: shiftlock.
Shifting into N, D, R
Briefly push the selector lever in the desired
direction, overcoming a resistance point if nec-
essary. When shifting out of P or into R, simul-
taneously press the button 1.
The engaged selector lever position is also dis-
played on the selector lever. When you release the selector lever, it returns
to its center position.
Shifting into P
Press button
P.
P Park
Select this only when the vehicle is stationary.
The rear wheels are locked.
The transmission is shifted into P if, with
the engine running, you open the driver's
door, do not have your sa fety belt fastened, and
subsequently actuate neither the brake pedal
nor the accelerator. Before leaving the vehicle,
make sure that the automatic transmission
selector lever is in the park position. Otherwise,
the vehicle may begin to move. <
The transmission is shifted into P as soon
as you switch off the engine, unless the
transmission is in N and the remote control is in
the ignition lock, refer to page 263. As soon as
you remove the remote control from the ignition
lock, then the transmission is shifted into P. <
R Reverse
Select this only when the vehicle is stationary.
N Neutral
You can select this in a car wash, for example.
The vehicle can roll.
After the engine is switched off, the trans-
mission remains in N if you leave the
remote control in the ignition lock. You can use
this function at a car wash, for example, refer to
page 263.<
00320051004F004C00510048000300280047004C0057004C005200510003
Page 72 of 308

71
Driving
Controls
Normal wiper speed
Press once.
The system switches to operation in the inter-
mittent mode when the vehicle is stationary.
Fast wiper speed
Press twice or press beyond the resistance
point.
The system switches to normal speed when the
vehicle is stationary.
Intermittent wipe or rain sensor
If the car is not equipped with a rain sensor, the
intermittent-wipe time is a preset.
If the car is equipped with a rain sensor, the time
between wipes is controlled automatically and
depends on the intensity of the rainfall. The rain
sensor is mounted on the windshield, directly in
front of the interior rearview mirror.
Activating intermittent wipe or rain
sensor
Press the button, arrow
3. The LED in the but-
ton lights up.
Setting speed for intermittent wipe or
sensitivity of the rain sensor
Turn thumbwheel 5 up or down.
Deactivating intermittent wipe or rain
sensor
Press the button again, arrow 3.
The LED goes out. Deactivate the rain sensor before enter-
ing an automatic car wash. Failure to do
so could result in damage caused by undesired
wiper activation. <
Cleaning windshield and headlamps
Pull the lever, arrow 4.
Washer fluid is sprayed onto the windshield and
the wipers are operated for a short time.
When the vehicle lighting system is switched
on, the headlamps are cleaned at regular and
appropriate intervals. Do not use the washers if there is any
danger that the fluid will freeze on the
windshield. If you do, your vision could be
obscured. Antifreeze should therefore be
added to the fluid, refer to Washer fluid.
Do not use the washers when the washer fluid
reservoir is empty; otherwise, you will damage
the washer pump. <
Windshield washer nozzles
Both windshield washer nozzles are automati-
cally heated with the engine running or the igni-
tion switched on.
Washer fluid
Washer fluid antifreeze is flammable.
Therefore, keep it away from ignition
sources and only store it in the closed original
container that is kept out of reach of children;
otherwise, there is a risk of personal injury.
Comply with the instructions on the con-
tainer.<
Washer fluid filler neck
Only refill washer fluid when the engine is
cool to avoid contact with hot engine
parts. Otherwise, fluid spills constitute a fire
hazard and a risk to personal safety. <
00320051004F004C00510048000300280047004C0057004C005200510003
Page 74 of 308

73
Driving
Controls
Accelerating using the lever
Accelerating slightly:
Press the lever to the resistance point, arrow 1
,
until the desired speed is reached.
Accelerating significantly:
Press the lever beyond the resistance point,
arrow 1, until the desired speed is reached.
The vehicle accelerates without pressure on
the accelerator pedal. The system stores and
maintains the speed.
Decreasing speed
Repeatedly pull the lever to the resistance point
or beyond, arrow 2, until the desired speed is
displayed.
> Each time the lever is pulled to the resis-
tance point, the desired speed is decreased
by approx. 1 mph or 1 km/h.
> Each time the lever is pulled beyond the
resistance point, the desired speed is
reduced by up to 5 mph or 10 km/h until the
minimum speed of 20 mph or 30 km/h is
achieved.
The system stores and maintains the speed.
Deactivating cruise control
Briefly press the lever upwards or downwards,
arrow 3.
The displays on the speedometer disappear.
In addition, the system is automatically deacti-
vated:
> when the brakes are applied.
> when the manual transmission is shifted
very slowly or shifted into neutral.
> when the automatic transmission selector
lever is moved into the neutral position.
> when the selector lever of the sport auto-
matic transmission with double clutch is
moved into the neutral position.
> when DTC is activated or DSC is deacti-
vated.
> when DSC or ABS is intervening. Cruise control is not deactivated by depressing
the accelerator pedal. Once the accelerator
pedal is released, the stored speed is achieved
again and maintained.
Warning lamp
The warning lamp lights up when
cruise control is deactivated due to
control intervention by the DSC, for
example. A message appears on the Control
Display.
Resuming a previously stored speed
Press the button, arrow 4.
The last stored speed is resumed and main-
tained.
In the following instances, the stored speed is
deleted and can no longer be resumed:
> When driving stability control systems are
intervening.
> In ca rs with manual transmiss ion: when you
shift gears very slowly or shift to neutral.
> In cars with automatic transmission: when
you engage selector lever position N.
> In cars with Sport automatic transmission
with double clutch: when you engage selec-
tor lever position N.
> When the ignition is switched off
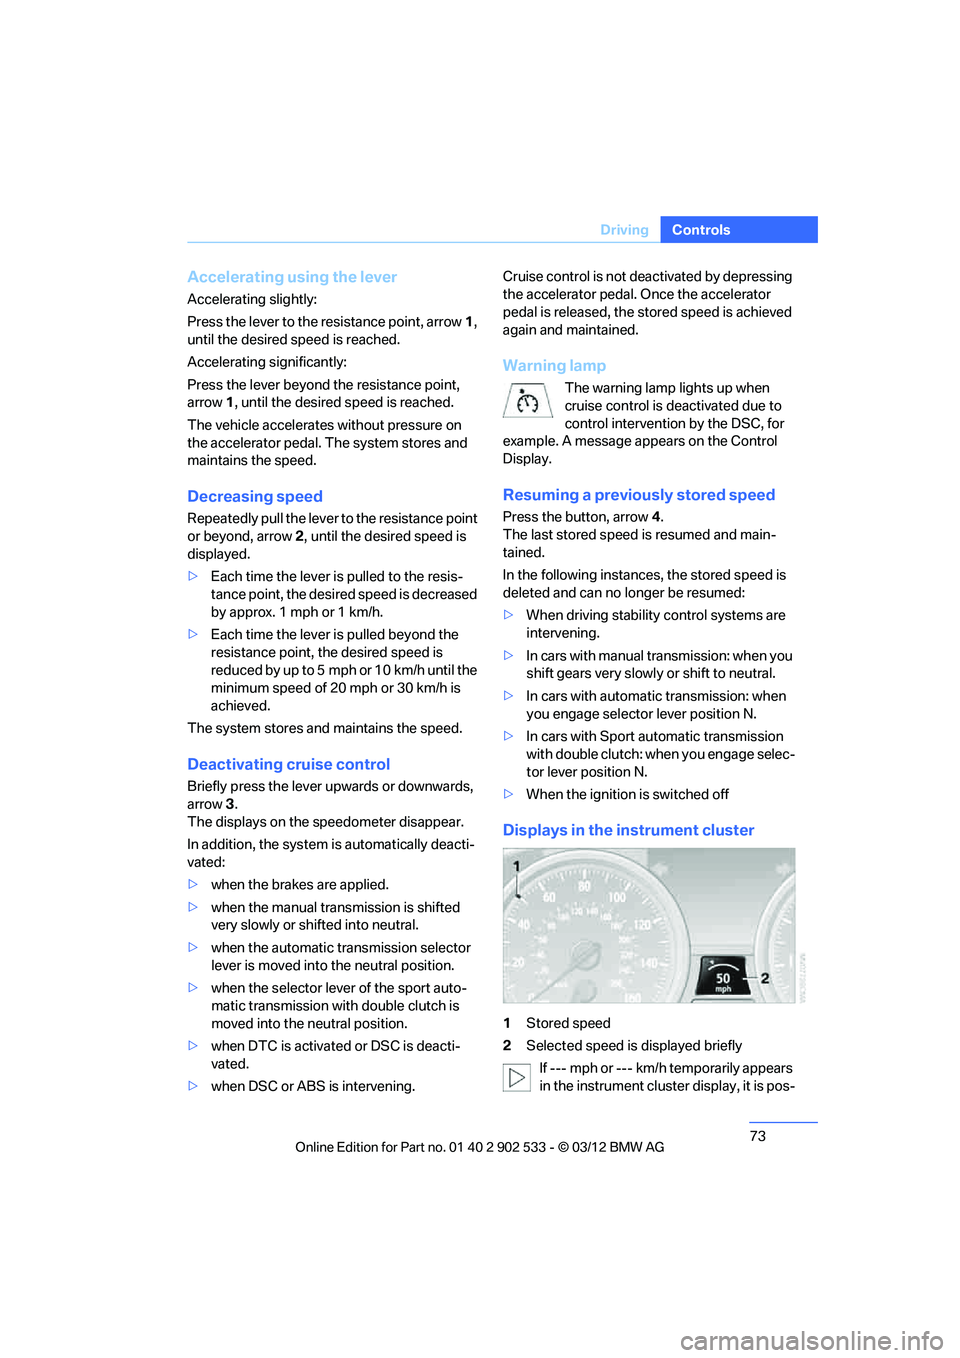
Displays in the instrument cluster
1Stored speed
2 Selected speed is displayed briefly
If --- mph or --- km/h temporarily appears
in the instrument cluster display, it is pos-
00320051004F004C00510048000300280047004C0057004C005200510003
Page 78 of 308

77
Driving
Controls
>
In cars with automatic transmission: when
you engage selector lever position N.
> In cars with Sport automatic transmission
with double clutch: when you engage selec-
tor lever position N.
> When the ignition is switched off.
Displays in the instrument cluster
1Stored desired speed
2 Shows yellow: vehicle detected ahead
Flashes in red: system cannot maintain dis-
tance; driver must brake the vehicle
Flashes in yellow: driving stability control
systems are intervening; cruise control is
deactivated
3 Selected distance to vehicle ahead
The indicator lights up as soon as the sys-
tem is activated.
4 Selected desired speed is temporarily dis-
played
If --- mph or --- km/h temporarily appears
in the instrument cluster display, it is pos-
sible that the system prerequisites for operation
are currently not met. Ca lling up Check Control
messages, refer to page 91.<
Warning lamps
The indicator 2 flashes in red; a
signal sounds.
The system indicates that you
must brake and/or maneuver the
vehicle yourself. Active Cruise
Control cannot automatically restore the dis-
tance to the vehicle ahead. This indicator does not release you from your
responsibility to adapt your desired speed and
driving style to prevailing driving conditions.
The indicator 2 flashes in yellow.
The prerequisites for operating
Active Cruise Control are not met,
e.g. as a result of ABS or DSC
interventions. Active Cruise Con-
trol is deactivated. You can reactivate the sys-
tem, if desired, by briefly pressing or pulling the
lever when road and traffic conditions permit. It
is not possible to resume a stored speed.
Radar sensor
The sensor's ability to detect vehicles ahead
may be restricted as a result of heavy rain, dirt,
snow or ice. If necessary, clean the radar sensor
located in the front bumper, see arrow. Be sure
t o u s e p a rt i c ul a r c a r e w h e n r em o v in g a n y l a y e rs
of snow or ice from the sensor.
The system cannot be activated if the sensor is
incorrectly aligned.
For US owners only
The transmitter and receiver units comply with
part 15 of the FCC/Federal Communications
Commission regulations. Operation is gov-
erned by the following:
FCC ID:
NF3 ACC2SCU 003YK04001 0000
Compliance statement:
This device complies with part 15 of the FCC
Rules. Operation is subject to the following two
conditions:
00320051004F004C00510048000300280047004C0057004C005200510003
Page 81 of 308

80
ControlsControls overview
Controls overview
Vehicle equipment
In this chapter, all production, country, and
optional equipment that is offered in the model
range is described. For this reason, descrip-
tions will be given of some equipment that may
not be available in a vehicle, for example due to
the special options or national-market version
selected. This also applies to safety related
functions and systems.
Odometer, outside
temperature display, clock
1Knob in the instrument cluster
2 Outside temperature display and clock
3 Odometer and trip odometer
Knob in the instrument cluster
>To reset the trip odometer while the ignition
is switched on
> To display the time, outside temperature
and odometer briefly while the ignition is
switched off
Units of measure
To select the respective units of measure, miles
or km for the odometer as well as 7 or 6 for
the outside temperature, refer to page 85.
The setting is stored for the remote control cur-
rently in use.
Time, outside temperature display
Setting the time, refer to page 87.
Outside temperature warning
When the displayed temperature sinks to
approx. +37 7/+3 6, a signal sounds and a
warning lamp lights up. There is an increased
risk of black ice.
Black ice can also form at temperatures
above +37 7/+3 6. You should there-
fore drive carefully on bridges and shaded
roads, for example; otherwise, there is an
increased risk of an accident. <
Odometer and trip odometer
Resetting the trip odometer:
With the ignition switched on, press button 1 in
the instrument cluster.
When the vehicle is parked
If you still want to view the time, outside tem-
perature and odometer reading briefly after the
remote control has been taken out of the igni-
tion lock:
Press button 1 in the instrument cluster.
00320051004F004C00510048000300280047004C0057004C005200510003
Page 86 of 308

85
Controls overview
Controls
Units of measure
You can change the units for fuel consumption,
route/distance, temperature and pressure.
1.
"Settings"
2. "Language/Units"
3. Select the desired menu item.
4. Select the desired unit.
The settings are stored for the remote control
currently in use.
Service requirements
The remaining driving distance and the date of
the next scheduled service are displayed briefly
immediately after you start the engine or switch
on the ignition. The extent of service work required can
be read out from the remote control by
your dealership Service Advisor. <
For certain maintenanc e operations, you can
view the respective distance remaining or due
date individually in the instrument cluster. 1.
Switch on the ignition, refer to page 60.
2. Push button 1 in the turn signal/high beam
lever up or down repeatedly until the appro-
priate symbol appears in the display,
accompanied by the words "SERVICE-
INFO".
3. Press button 2.
4. Use button 1 to scroll through the individual
service items.
00320051004F004C00510048000300280047004C0057004C005200510003