2013 BMW 335I CONVERTIBLE headlamp
[x] Cancel search: headlampPage 113 of 308
112
ControlsLamps
Fog lamps
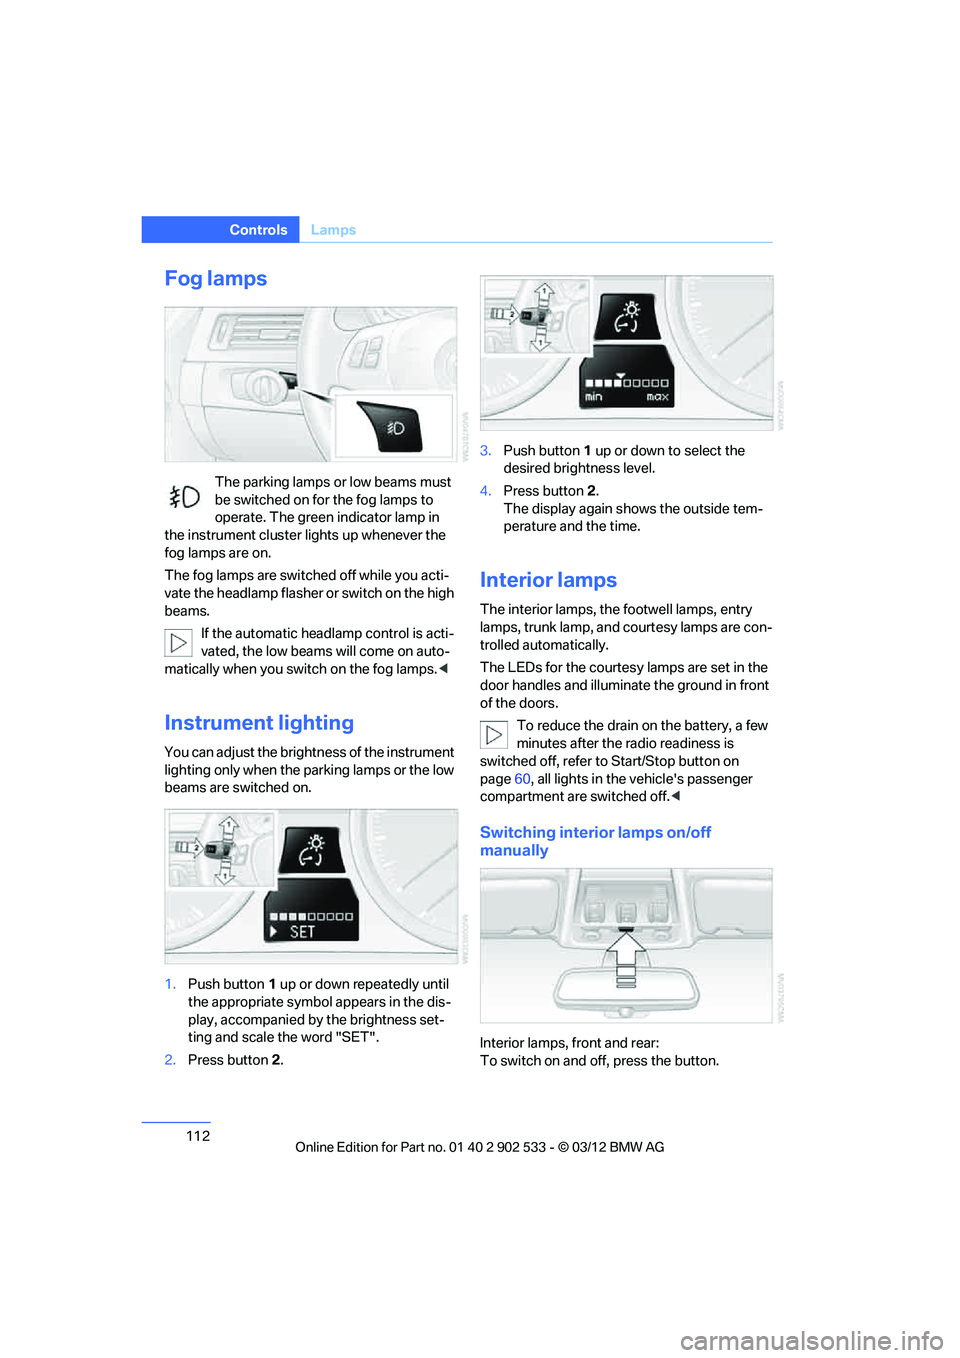
The parking lamps or low beams must
be switched on for the fog lamps to
operate. The green indicator lamp in
the instrument cluster lights up whenever the
fog lamps are on.
The fog lamps are switched off while you acti-
vate the headlamp flasher or switch on the high
beams.
If the automatic headlamp control is acti-
vated, the low beams will come on auto-
matically when you switch on the fog lamps. <
Instrument lighting
You can adjust the brightness of the instrument
lighting only when the parking lamps or the low
beams are switched on.
1.Push button 1 up or down repeatedly until
the appropriate symbol appears in the dis-
play, accompanied by the brightness set-
ting and scale the word "SET".
2. Press button 2. 3.
Push button 1 up or down to select the
desired brightness level.
4. Press button 2.
The display again shows the outside tem-
perature and the time.
Interior lamps
The interior lamps, the footwell lamps, entry
lamps, trunk lamp, and courtesy lamps are con-
trolled automatically.
The LEDs for the courtesy lamps are set in the
door handles and illuminate the ground in front
of the doors.
To reduce the drain on the battery, a few
minutes after the radio readiness is
switched off, refer to Start/Stop button on
page 60, all lights in the vehicle's passenger
compartment are switched off. <
Switching interior lamps on/off
manually
Interior lamps, front and rear:
To switch on and off, press the button.
00320051004F004C00510048000300280047004C0057004C005200510003
Page 256 of 308
255
Engine compartment
Mobility
Engine compartment
Vehicle equipment
In this chapter, all production, country, and
optional equipment that is offered in the model
range is described. For this reason, descrip-
tions will be given of some equipment that may
not be available in a vehicle, for example due to
the special options or national-market version
selected. This also applies to safety related
functions and systems.
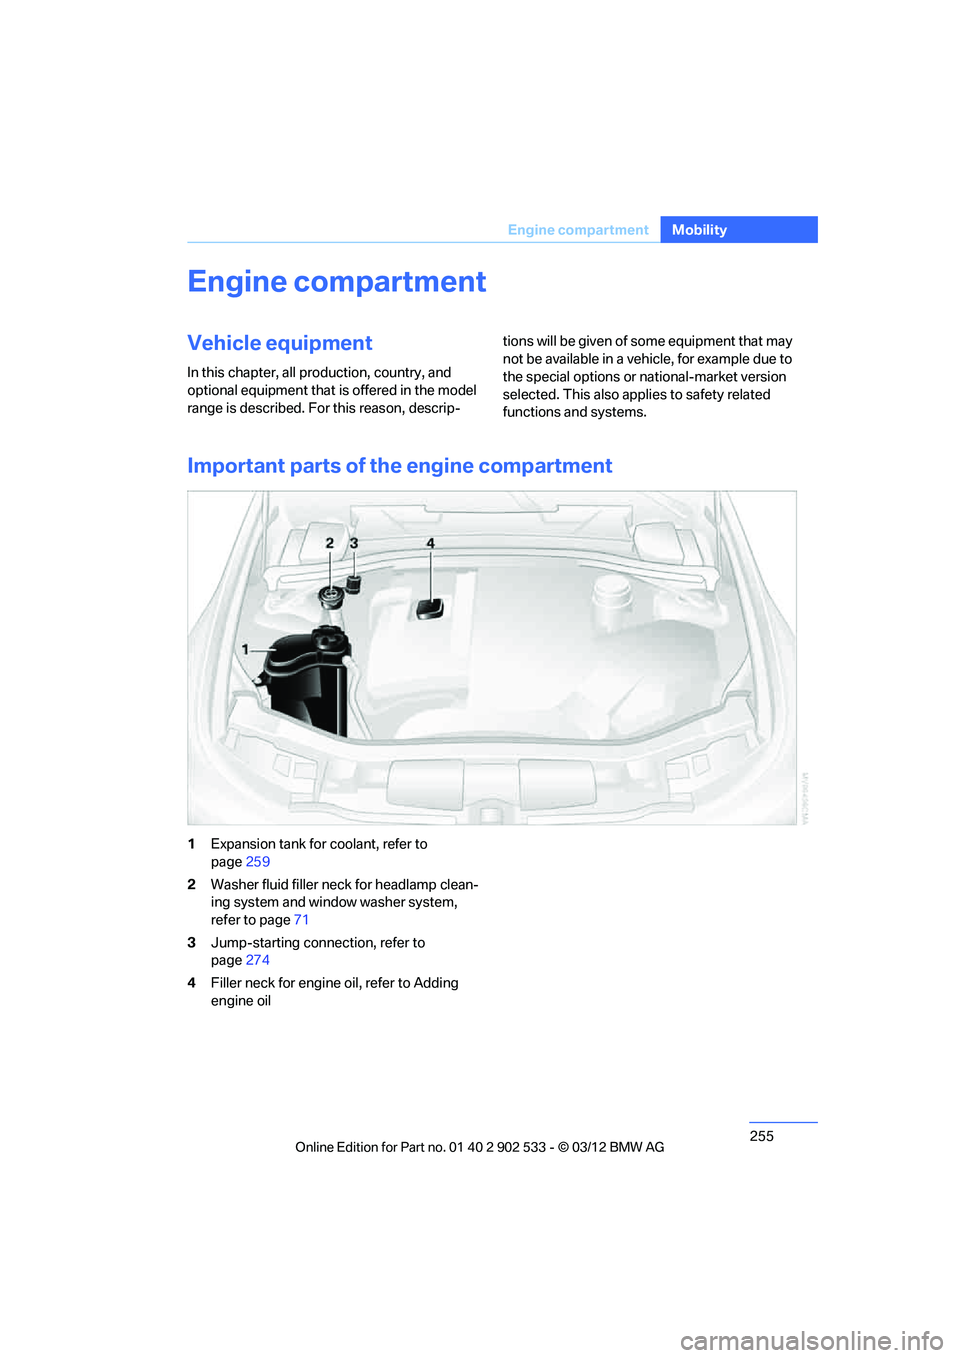
Important parts of the engine compartment
1
Expansion tank for coolant, refer to
page 259
2 Washer fluid filler neck for headlamp clean-
ing system and window washer system,
refer to page 71
3 Jump-starting connection, refer to
page 274
4 Filler neck for engine oil, refer to Adding
engine oil
00320051004F004C00510048000300280047004C0057004C005200510003
Page 264 of 308

263
Care
Mobility
Automatic transmission
Before driving into an automatic car wash, per-
form the following steps to ensure that the vehi-
cle can roll:
1.
Insert the remote control into the ignition
lock, even with Comfort Access.
2. Move the selector lever to position N.
3. Release the parking brake.
4. Switch off the engine.
5. Leave the remote control in the ignition lock
so that the vehicle can roll.
Sport automatic transmission with
double clutch
Before driving into an automatic car wash, per-
form the following steps to ensure that the vehi-
cle can roll:
1.Insert the remote control into the ignition
lock, even with Comfort Access.
2. Engage transmission position N.
3. Release the parking brake.
4. Switch off the engine.
5. Leave the remote control in the ignition lock
so that the vehicle can roll.
The transmission is switched into position P:
> automatically after approx. 30 minutes
> if you remove the infrared remote control
from the ignition lock
Steam jets/high-pressure washers
When using steam jets or high-pressure
washers, make sure to maintain sufficient
distance from the vehicle and do not exceed a
temperature of 140 7/60 6.
Insufficient clearance or excessive pressure or
temperature can lead to component damage or
water penetration. Follow the operating instruc-
tions of the high-pressure washer. <
When using high-pressure washers, do
not spray the sensors, e.g. of the Park
Distance Control, for an extended period and maintain a distance of at least 1 ft/30 cm from
them.
<
Manual car wash
When washing the vehicle by hand, use large
quantities of water and car shampoo if neces-
sary. Clean the vehicle with a sponge or wash-
ing brush, applying light pressure only.
Before cleaning the windshield, deacti-
vate the rain sensor or switch off the igni-
tion to prevent unintentional activation of the
wipers. <
Observe local regulations pertaining to
washing vehicles by hand. <
Headlamps
Do not rub them dry and do not use abrasive or
corrosive cleaning agents.
Loosen dirt, e.g. insects, with shampoo or
insect remover and wash away with copious
quantities of water.
Thaw ice with a windshield deicer and do not
use an ice scraper.
Windows
Clean the inside and outside surfaces of the
windows and the mirrors with window cleaner.
Do not clean the mirrors with cleaners
containing quartz. <
Convertible: retractable hardtop
Proceed as you would in a normal car wash.
When you open a wet hardtop, water
drops may run into the trunk. If necessary,
remove items from the trunk beforehand to
avoid water stains or soiling. <
Paintwork care
Regular care contributes to value retention and
protects the paintwork against the long-term
effects of damaging substances.
Environmental influences in regions with ele-
vated levels of air pollution or natural contami-
00320051004F004C00510048000300280047004C0057004C005200510003
Page 268 of 308
267
Replacin g components
Mobility
When working on electrical systems,
always begin by switching off the con-
sumer in question; otherwise, short-circuits
could result. To avoid possible injury or equip-
ment damage when replacing bulbs, observe
any instructions provided by the bulb manufac-
turer. <
For care of the headlamps, please follow the
instructions in the chapter entitled 'Care'. To replace lamps not described here,
please contact your BMW center. <
Light-emitting diodes LED
Light-emitting diodes installed behind translu-
cent lenses serve as the light source for many of
the controls, displays, and equipment in your
vehicle. These light-emitting diodes, which
operate using a concept similar to that applied
in conventional lasers, are officially designated
as Class 1 light-emitting diodes.
Do not remove the covers or expose the
eyes directly to the unfiltered light source
for several hours; otherwise, this could cause
irritation of the retina. <
Headlight lenses
In cool or humid weather, condensation may
form on the interior of outside lamps. The con-
densation will disappear after a short time when
driving with the headlamps switched on. The
headlamp glasses do not need to be changed.
If the headlamps do not defrost despite driving
with the headlamps switched on, and additional
moisture builds up, for example water droplets
in the lamps, have them checked by your BMW
center.
Xenon lamps
These bulbs have a very long service life and are
highly unlikely to fail. If a xenon lamp fails never-
theless, switch on the fog lamps and continue
the journey with great care, provided that local
legislation does not prohibit this. Have all work on the xenon lamp system,
including bulb replacements, performed
only by your BMW center. Due to high voltage,
there is a risk of fatal injury if work on the xenon
lamps is carried out improperly. <
Access to the lamps
1.Switch off the lamps and take the remote
control out of the ignition lock.
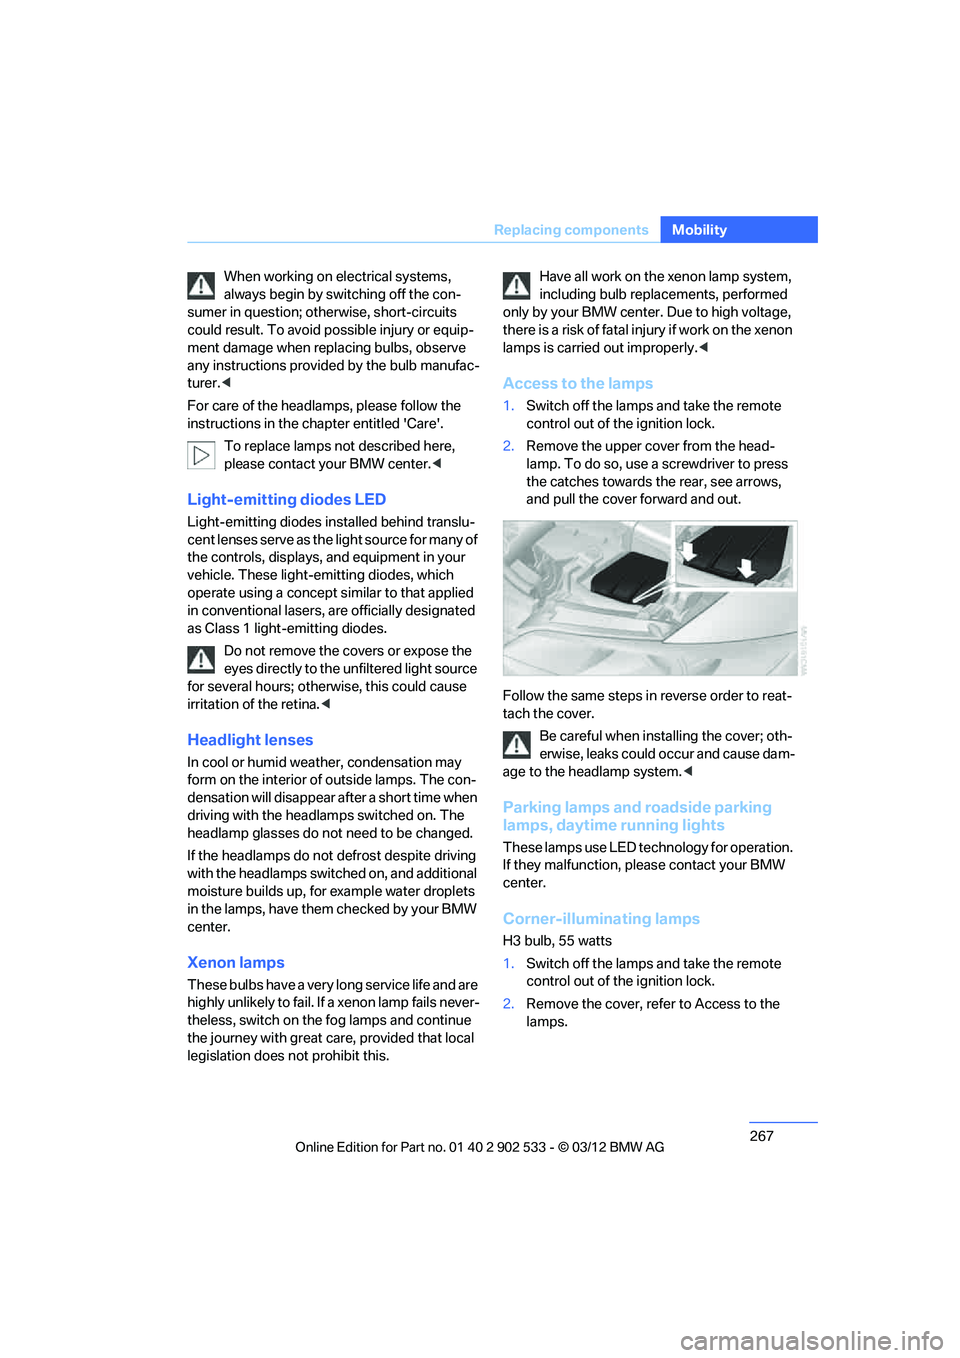
2. Remove the upper cover from the head-
lamp. To do so, use a screwdriver to press
the catches towards the rear, see arrows,
and pull the cover forward and out.
Follow the same steps in reverse order to reat-
tach the cover. Be careful when installing the cover; oth-
erwise, leaks could occur and cause dam-
age to the headlamp system. <
Parking lamps and roadside parking
lamps, daytime running lights
These lamps use LED technology for operation.
If they malfunction, please contact your BMW
center.
Corner-illuminating lamps
H3 bulb, 55 watts
1.Switch off the lamps and take the remote
control out of the ignition lock.
2. Remove the cover, refer to Access to the
lamps.
00320051004F004C00510048000300280047004C0057004C005200510003
Page 276 of 308
275
Giving and receiving assistance
Mobility
5.
Attach the second terminal clamp of the
minus/– jumper cable to the negative termi-
nal of the battery or to the engine or body
ground of the vehicle to be started.
Starting the engine
1.Start the engine of the donor vehicle and
allow it to run for a few minutes at slightly
increased idle speed.
2. Start the engine on the other vehicle in the
usual way.
If the first start attempt is not successful,
wait a few minutes before another attempt
in order to allow the discharged battery to
recharge.
3. Let the engines run for a few minutes.
4. Disconnect the jumper cables by reversing
the above connecting sequence.
If necessary, have the battery checked and
recharged.
Never use spray fluids to start the
engine. <
Tow-starting, towing away
Observe the applicable laws and regula-
tions for tow-starting and towing vehi-
cles. <
Do not transport any passengers other
than the driver in a vehicle that is being
towed. <
Using a tow fitting
The screw-in tow fitting must always be carried
in the car. It can be screwed in at the front or
rear of the BMW.
Coupe: it is stored in the onboard vehicle tool kit
underneath the cover on the right-hand side of
the trunk, refer to page 266.
Convertible: it is stored in the onboard vehicle
tool kit underneath the trunk floor, refer to
page 266. Use only the tow fitting provided with the
vehicle and screw it all the way in. Use the
tow fitting for towing on paved roads only. Avoid
lateral loading of the tow fitting, e.g. do not lift
the vehicle by the tow fitting. Otherwise, the
tow fitting and the vehicle could be damaged. <
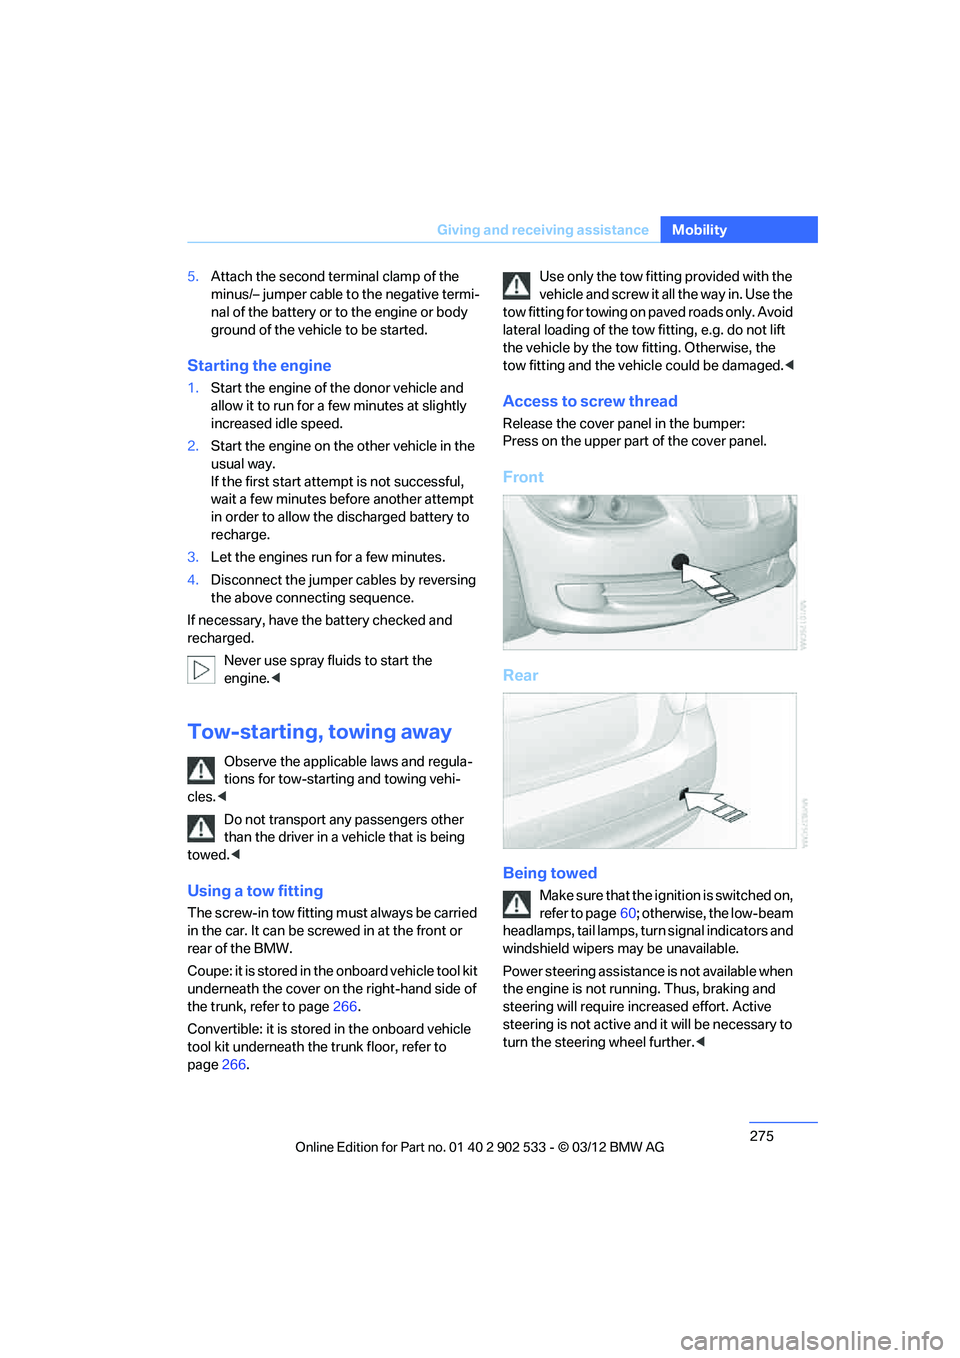
Access to screw thread
Release the cover panel in the bumper:
Press on the upper part of the cover panel.
Front
Rear
Being towed
Make sure that the ignition is switched on,
refer to page60; otherwise, the low-beam
headlamps, tail lamps, turn signal indicators and
windshield wipers may be unavailable.
Power steering assistance is not available when
the engine is not running. Thus, braking and
steering will require increased effort. Active
steering is not active and it will be necessary to
turn the steering wheel further. <
00320051004F004C00510048000300280047004C0057004C005200510003
Page 285 of 308
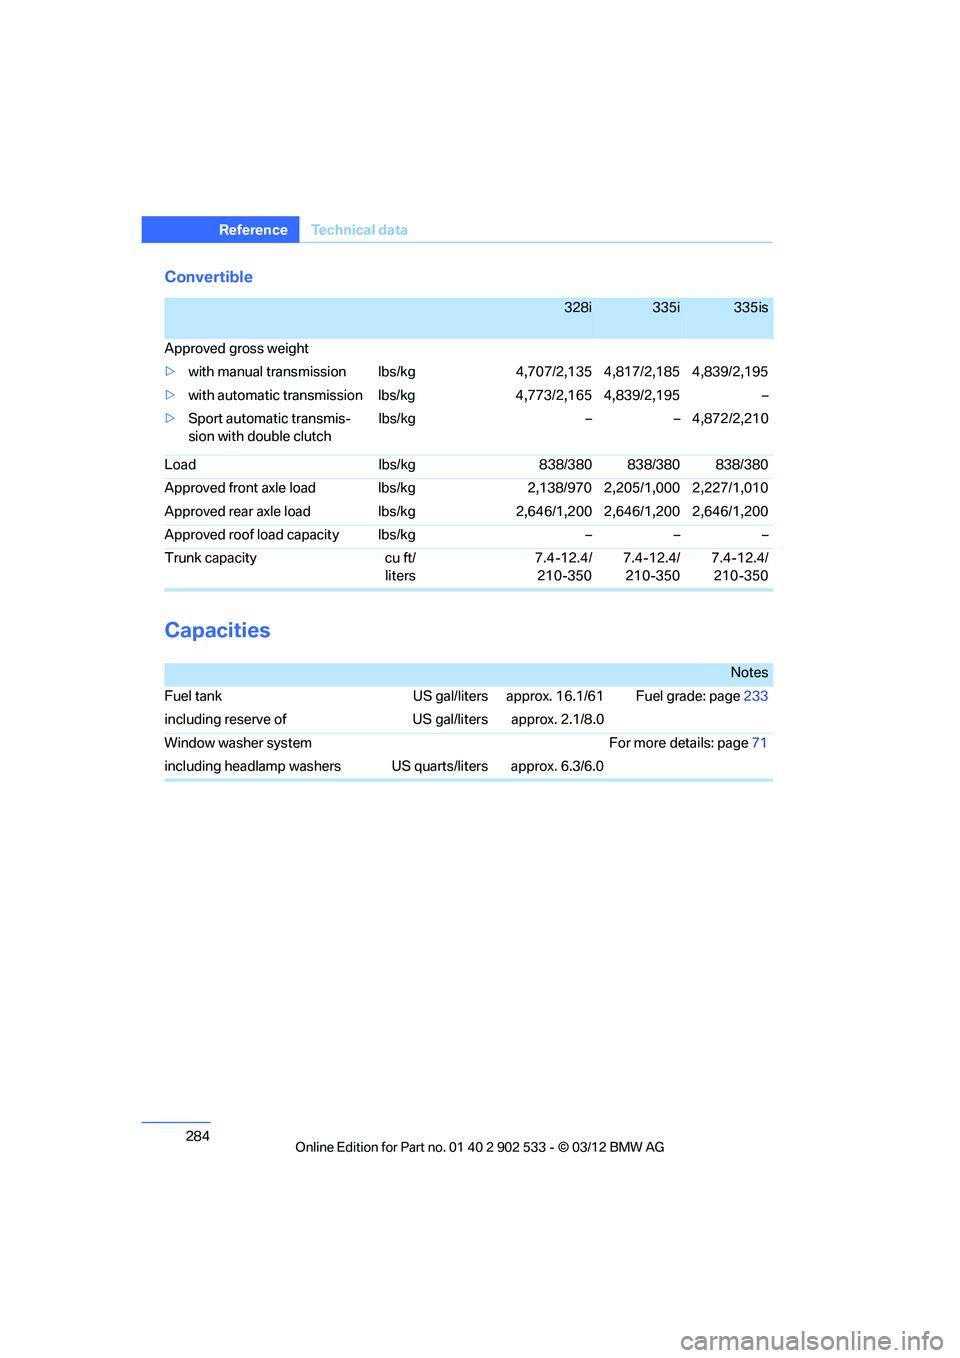
284
Referen ceTechnical data
Convertible
Capacities
328i335i335is
Approved gross weight
> with manual transmission lbs/kg 4,707/2,135 4,817/2,185 4,839/2,195
> with automatic transmission lbs/kg 4,773/2,165 4,839/2,195 –
> Sport automatic transmis-
sion with double clutch lbs/kg
–– 4,872/2,210
Load lbs/kg838/380 838/380 838/380
Approved front axle load lbs/kg 2,138/970 2,205/1,000 2,227/1,010
Approved rear axle load lbs/kg 2,646/1,200 2,646/1,200 2,646/1,200
Approved roof load capacity lbs/kg –––
Trunk capacity cu ft/
liters 7.4-12.4/
210-350 7.4-12.4/
210-350 7.4-12.4/
210-350
Notes
Fuel tank US gal/liters approx. 16.1/61 Fuel grade: page 233
including reserve of US gal/liters approx. 2.1/8.0
Window washer system For more details: page71
including headlamp washers US quarts/liters approx. 6.3/6.0
00320051004F004C00510048000300280047004C0057004C005200510003
Page 293 of 308

292
Referen ceEverything from A to Z
Everything from A to Z
Index
A
ABS Antilock Brake
System 95
ACC, refer to Active Cruise
Control 74
Acceleration assistant, refer to Launch Control 69
Accessories, refer to Vehicle equipment 5
Accident, refer to Sending an
Emergency Request 272
Activated-charcoal filter for automatic climate
control 118
Active Cruise Control 74
– indicator lamp 77
– malfunction 78
– selecting distance 75
– sensor 77
Active steering 103
Adaptive brake lamp
– Brake Force Display 104
Adaptive Light Control 109
Additives
– coolant 259
– engine oil 258
Address, entering 146,152
Address for navigation
– entering 146
Adjusting temperature inside the car, refer to Automatic
climate control 115
Adjusting the thigh support 48
Airbags 104
– indicator/warning lamp 106
– sitting safely 46
Air conditioning mode
– automatic climate
control 115
– ventilation 117 Air distribution
– automatic
115
Airing, refer to Ventilation 117
Air pressure, refer to Tire inflation pressure 235
Air recirculation, refer to Recirculated air mode 116
Air supply
– automatic climate
control 115
– ventilation 117
Air vents 114
Air volume 116
AKI, refer to Fuel grade 233
Alarm system 36
– avoiding unintentional alarms 38
– interior motion sensor 37
– switching off an alarm 37
– tilt alarm sensor 37
ALL program 116
All -se
ason tires, refer to
Winter tires 254
All-wheel drive, refer to xDrive 97
Ambient air, refer to
Recirculated air mode 116
Antifreeze
– coolant 259
– washer fluid 71
Antilock Brake System ABS 95
Anti-theft alarm system, refer to Alarm system 36
Appointments, refer to
Calendar 219
Approved axle loads, refer to Weights 283
Approved engine oils 258
Approved gross vehicle weight, refer to Weights 283Apps
228
Armrest, refer to Center
armrest 124
Arrival time, refer to Computer 82
Ashtray 126
Assist systems, refer to Driving stability control 95
AUC Automatic recirculated air control 116
Audible instructions, refer to
Voice instructions 157
Audio device, external 125
Automatic
– air distribution 115
– air volume 115
– cruise control 72,74
– headlamp control 108
Automatic car washes 262
Automatic climate control 114
Automatic curb monitor 54
Automatic high beams and low beams, refer to High-
beam Assistant 110
Automatic recirculated air control AUC 116
Automatic Service Request 227
Automatic transmission with
Steptronic 63
– interlock 63
– overriding selector lever
lock 65
– shiftlock, refer to Changing selector lever position 63
– sport program 64
– towing 275
– tow-starting 275
AUTO program for automatic climate control 115
00320051004F004C00510048000300280047004C0057004C005200510003
Page 295 of 308

294
Referen ceEverything from A to Z
Car care, refer to Care 262
Care 262
– automatic car washes 262
– care products 262
– carpets 265
– CD/DVD drives 265
– chrome parts 264
– displays 265
– exterior 262
– fine wood parts 265
– headlamps 263
– high-pressure washer 263
– interior 264
– leather 264
– light-alloy wheels 264
– paintwork 263
– plastic parts 265
– retractable hardtop 263
– rubber seals 264
– safety belts 265
– sensors and cameras 265
– upholstery and cloth
trim 264
– washing the car manually 263
– windows 263
Cargo, securing 140
Cargo loading 139
– securing cargo 140
– stowing cargo 140
– vehicle 139
Car jack
– jacking points 270
Car key, refer to Integrated
key/remote control 30
Car phone
– installation location, refer to Center armrest 124
– refer to separate Owner's Manual
Car phone, refer to Telephone 200
Car shampoo 265
Catalytic converter, refer to Hot exhaust system 137
Center armrest 124 Center brake lamp
– replacing bulb
269
Center console, refer to Around the center
console 14
Central locking
– from inside 34
– from outside 31
Central locking system 31
– Comfort Access 38
– hotel function 36
– setting unlocking characteristics 32
Ch an
ges, technical, refer to
For your own safety 5
Changing bulbs, refer to
Lamps and bulbs 266
Changing gears 67
Changing the language on the
Control Display 92
Changing the measurement units on the Control
Display 85
Changing wheels 269
Chassis number, refer to
Engine compartment 255
Check Control 89
Child restraint fixing system
LATCH 57
Child restraint systems 56
Child seats, refer to
Transporting children
safely 56
Chrome parts 265
Chrome polish 265
Cigarette lighter, refer to Lighter 127
Cleaning headlamps 71
– washer fluid 71
Cleaning your BMW, refer to
Care 262
Climate control
– automatic air distribution 115 Clock
80
– 12h/24h mode 88
– setting the time and date 88
– setting time 87
Closing
– from inside 34
– from outside 32
Clothes hooks 125
Cockpit 10
Cold start, refer to Starting the
engine 61
Comfort Access 38
– replacing the battery 39
Comfort access, refer to Comfort Access 38
Comfort area, refer to Around
the center console 14
Compartment for remote control, refer to Ignition
lock 60
Compass 122
Computer 82
– displays on Control Display 82
Computer, refer to iDrive 18
Concierge service 225
Condensation, refer to When the vehicle is parked 139
Condition Based Service CBS 260
Configuring settings, refer to
Personal Profile 30
Confirma tio
n signals for
locking/unlocking the
vehicle 33
ConnectedDrive 224
Connecting vacuum cleaner,
refer to Connecting
electrical appliances 127
Consumption, refer to
Average fuel
consumption 82
Contacts 214
– deleting 216,223
– exporting/importing 223
– new contact 215
00320051004F004C00510048000300280047004C0057004C005200510003